background image

First Things First

5

STEP 5: Tune THE TV

Tune the TV to the VCR viewing channel. The VCR viewing
channel is channel 3 or 4 or the TV’s video line input.

If you connect your VCR using the ANT. IN and RF OUT
jacks with RF coaxial cable, set the CH. 3/4 switch to
channel 3 or channel 4 — the channel you want to use
on your TV.

If the VCR is connected to the TV using the AUDIO/
VIDEO jacks and A/V cables, select the TV’s video line
input with the remote control’s INPUT button to see the
signal. See “How to Find Your TV’s Video Input
Channel” in the 

References 

section of this manual for a

detailed explanation of video line input.

STEP 6: turn on the VCR

Press POWER on the VCR’s front panel or the VCR button
on the remote control to turn on the VCR. The first time
you turn the VCR on, a menu screen appears. This is the
start of an initial set up which helps you set different
options for your VCR.

Step 7: Initial Setup

The first on-screen menu during the initial set up asks
which language you prefer to use for the VCR’s displays.
Use the remote control’s number buttons to select the
corresponding language.


Select a language.
Seleccione un idioma.
Choisissez une langue.

1 English
2 Español
3 Français

1. Press 1 for English, 2 for Español (Spanish), or 3 for

Français (French).

The remaining menus in the setup will appear in the
chosen language. Just follow the step-by-step screens until
setup is complete.

VCR Viewing Channel

When using the ANT IN and RF OUT
jacks to connect your VCR, tune your
TV to channel 3 or 4.

The CH. 3/4 switch on the back of the
VCR determines which TV channel is
used to see the VCR’s output.

When using the AUDIO/VIDEO jacks
to connect the VCR, tune the TV to
the its Video Input Channel using the
TV and INPUT buttons on the VCR’s
remote control.

See “How to Find Your TV’s Video
Input Channel” in the 

References

section of this manual for more
information about video line input.
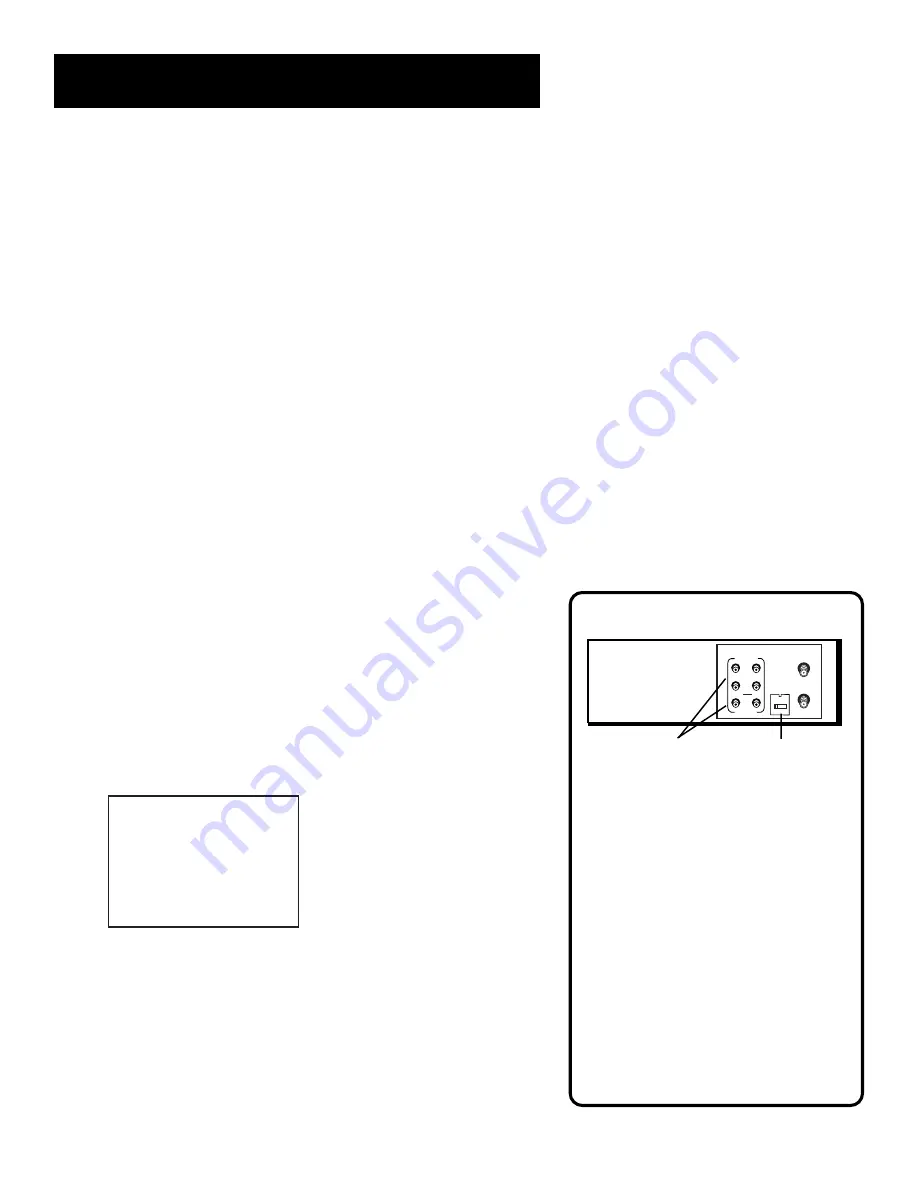
ANT. IN

RF OUT

CH.

VIDEO

AUDIO

OUT

IN

R

L

3    4

AUDIO/VIDEO OUT Jacks

CH. 3/4 Switch

(Continues on next page)

Содержание VCR Plus+ 15530130

Страница 1: ...ervideocassetterecordervideoca ssetterecordervideocassetterecor dervideocassetterecordervideocas setterecordervideocassetterecord ervideocassetterecordervideocass etterecordervideocassetterecorde rvideocassetterecordervideocasse tterecordervideocassetterecorder videocassetterecordervideocasset terecordervideocassetterecorderv ideocassetterecordervideocassett erecordervideocassetterecordervi deocas...

Страница 2: ...entry as practical Care and Cleaning Use a soft cloth or the dusting attachment of your vacuum cleaner to dust your VCR Remove dust from the ventilation holes Plastic surfaces are easily scratched and can be marred by alcohol and various solvents Avoid excessive use of oil based furniture polishes since the materials used in the cabinet will accumulate more dust A nonabrasive antistatic cleaner po...

Страница 3: ... 18 Auto Play 19 Auto TV VCR 19 EnergySaver 19 Front Panel Brightness VCR Display 20 Preferred Tape Speed 20 Set Auto Repeat 20 VCR Basics 23 Remote Buttons 24 Component Buttons 24 VCR Function Buttons 25 TV Function Buttons 26 Playing a Tape 27 Automatic Rewind 27 Tape Eject 27 Recording 28 Check the Safety Tab 28 Recording 29 Recording Features 30 Express Recording XPR 30 Timer Recording 31 VCR ...

Страница 4: ...Counter 53 On Screen Displays 54 Audio Set Up Features 54 Connections 57 Jacks and Cables 58 RF Jacks and Coaxial Cables F type 58 Audio Video A V Jacks and Cables RCA type 58 Choosing a VCR Connection 59 Advantages of A V Cable Connections 59 TV With RF Jack Only 60 TV With A V Jacks 61 TV With A V Jacks and Cable Box 62 TV With RF Jack and Satellite Receiver 63 TV With A V Jacks and Satellite Re...

Страница 5: ...ing with channels and basic video tape operations are essential to get all you can out of the VCR Once you are comfortable with these features feel free to refer to other sections because they cover the more detailed information What Remains The final sections of this manual contain playback and recording information a detailed connections section and a reference section including troubleshooting ...

Страница 6: ...A V cables to connect the two for a better picture See the Connections section in this manual for additional connection options STEP 4 PLUG IN THE VCR The VCR s power cord has a plastic band strung through the blades Remove plastic band before plugging the cord into the power outlet To remove band cut with a pair of scissors and pull it free of the blades Once the plastic is removed match the wide...

Страница 7: ... Initial Setup The first on screen menu during the initial set up asks which language you prefer to use for the VCR s displays Use the remote control s number buttons to select the corresponding language Select a language Seleccione un idioma Choisissez une langue 1 English 2 Español 3 Français 1 Press 1 for English 2 for Español Spanish or 3 for Français French The remaining menus in the setup wi...

Страница 8: ...ttons let you access select and change the VCR s display preferences For example to select a different preferred on screen language than the one selected during the initial set up do the following 1 Press MENU to display the VCR MAIN MENU VCR MAIN MENU 1 VCR Plus 2 Timer Recordings 3 Time 4 Channels 5 Setup 6 Preferences 7 Audio 8 Language 0 Exit 2 Press 8 to display the LANGUAGE menu LANGUAGE Sel...

Страница 9: ...l search Auto clock set Setting time and date manually Setting VCR Plus system channels Remote VCR1 VCR2 feature Auto Play Auto TV VCR Energy Saver Front panel brightness Preferred tape speed Setting Up the VCR 2 FIRST THINGS FIRST 1 RECORDING 3 VCR BASICS 4 OTHER FEATURES 7 6 CONNECTIONS PROGRAM THE REMOTE 5 8 REFERENCE Features not set up during the QuikSet Guide first time setup and must be set...

Страница 10: ... Selection The VCR can be set to display one of three languages in the on screen displays To chose between English Spanish or French 1 On your remote control press the MENU button to display the VCR MAIN MENU VCR MAIN MENU 1 VCR Plus 2 Timer Recordings 3 Time 4 Channels 5 Setup 6 Preferences 7 Audio 8 Language 0 Exit 2 Press 8 to select the LANGUAGE menu LANGUAGE Select a language 1 English 2 Espa...

Страница 11: ... 7 Audio 8 Language 0 Exit 2 Press 4 to display the CHANNELS menu CHANNELS 1 Auto Channel Search 2 Add Remove Channels 3 Signal Type CABLE 4 VCR Plus Setup 5 Cable Box Setup 0 Exit 3 Press 5 to display the CABLE BOX SETUP menu Then select one of the three choices CABLE BOX SETUP Do you use your cable box to receive ALL channels or only SOME channels 1 ALL channels 2 Only SOME channels 3 Cancel set...

Страница 12: ... the factory but you may want to add or delete some channels depending on whether they are active To Auto Channel Search 1 Press MENU to display the VCR MAIN MENU 2 Press 4 to display the CHANNELS menu CHANNELS 1 Auto Channel Search 2 Add Remove Channels 3 Signal Type CABLE 4 VCR Plus Setup 5 Cable Box Setup 0 Exit 3 Press 1 to display the AUTO CHANNEL SEARCH menu AUTO CHANNEL SEARCH What type of ...

Страница 13: ... keys on the remote or number buttons to go to the channels you want to remove or add ADD REMOVE CHANNELS Channel 115 is presently ADDED Press CLEAR to remove Press MENU to exit ADD REMOVE CHANNELS Channel 115 is presently REMOVED Press INFO to add Press MENU to exit 4 When at the channel it will be added if not already on the list or deleted if it was If the channel was added you can press CLEAR ...

Страница 14: ... display TIME menu TIME 1 Set Time and Date 2 Auto Clock Set ON 3 Set Time Zone 4 Set Daylight Savings Time Data was found on channel 20 0 Exit 3 Press 3 to display the SET TIME ZONE screen SET TIME ZONE What is your Time Zone 1 Eastern 2 Central 3 Mountain 4 Pacific 5 Alaska 6 Hawaii 7 Automatic Press MENU to continue 4 Select your time zone then press MENU to continue If you chose Automatic for ...

Страница 15: ...l channel If the Auto Clock Set was unsuccessful set the clock through the TIME menu The Auto Clock Set feature is set to OFF automatically when you set the clock this way 1 Press MENU to display the VCR MAIN MENU 2 Press 3 to display the TIME menu TIME 1 Set Time and Date 2 Auto Clock Set ON 3 Set Time Zone 4 Set Daylight Savings Time Data was not found 0 Exit 3 Press 1 to display the SET TIME AN...

Страница 16: ... updated each time the VCR is turned off and after every power interruption So when your TV stations or cable company update their lineups your ProScan VCR will get the most current channel list automatically freeing you from having to manually change the channel list yourself If your VCR Plus Silver system fails to download the proper information for any reason you can always manually map the cha...

Страница 17: ... button on the remote control to access the VCR s MAIN MENU 2 Press 4 to access the CHANNELS menu CHANNELS 1 Auto Channel Search 2 Add Remove Channels 3 Signal Type CABLE 4 VCR Plus Setup 5 Cable Box Setup 0 Exit 3 Press 4 to access the VCR Plus Setup menu VCR PLUS SETUP 1 Set channel lists 2 Auto VCR Plus ON VCR Plus data was not found 4 Pressing 1 will take you to a screen to manually map VCR Pl...

Страница 18: ... 1 94 Viewer s Choice 2 55 WGN Chicago 43 WTBS Atlanta 60 WWOR New York Mapping VCR Plus Channels Manually Using the VCR Plus SILVER system can make taping timer recordings for cable or off air antenna easier If your VCR Plus SILVER system setup failed during the QuickSet then you will need to map the channels for your local service manually A worksheet and abbreviated codes for typical cable serv...

Страница 19: ...ble News Network 70 Canadian Home Shopping Network 56 Canal Famille 69 Cathay International Television Inc 68 Chinavision Canada Corp 60 Country Music Television 63 Family Channel 62 First Choice 96 First Choice Two 97 First Choice Three 99 First Choice Four 90 House of Commons 91 La Chaine Francaise 51 The Learning Channel 65 MeteoMedia The Weather Network 48 MuchMusic Network 55 MusiquePlus 52 N...

Страница 20: ... this VCR to respond to that button In the PREFERENCES menu press 1 to select Remote Control With the compatible remote control press the VCR2 VCR2 LD or VCR2 DVD button to change which remote controls the VCR PREFERENCES Press VCR2 to Change 2 Auto Play ON 3 Auto TV VCR ON 4 EnergySaver 2 00 5 Front Panel AUTO 6 Tape Speed SLP 7 Set Auto Repeat 8 Commercial Advance 0 Exit PREFERENCES 1 Remote Con...

Страница 21: ... you want the VCR to remain in the TV mode This is useful if you watch your VCR on the TV s video input and you don t want your antenna cable signal interrupted by the VCR EnergySaver By default this VCR automatically turns off after two hours of inactivity To change the time delay or to disable the feature Press 4 in the PREFERENCES menu to switch between ON and OFF OFF means the VCR will remain ...

Страница 22: ...0 to h mm Press CLEAR to turn off Press MENU to exit The CLEAR key will erase all three numbers entered and move the cursor back to the first position hours The Press CLEAR to turn off message will appear only after the first number has been entered into the end time Auto Repeat is set back to by resetting the dialog box by cassette ejecting or insertion by powering off the VCR by power interrupti...

Страница 23: ... duration The VCR will automatically switch to playback during rewind if the counter equals or is less than 0 00 The Auto Repeat may be adjusted by setting the counter to 00 00 This can be done by pressing the CLEAR button while the tape counter is on screen or on the front panel display The counter will not reset while rewinding in an Auto Repeat loop ...

Страница 24: ...22 ...

Страница 25: ...program should do just that This section shows you the basics of using your VCR It discusses things like using the remote control playing a tape and recording programs VCR Basics tells you what you need to know in order to watch a movie or tape your favorite show 5 Setting Up the VCR 2 First things first 1 Recording 3 VCR Basics 4 OTHER FEATURES 7 6 Connections 5 5 8 REFERENCE Program the Remote ...

Страница 26: ...to control the VCR Also turns other compatible components on or off SAT CABLE Turns on a compatible ProScan RCA or GE satellite receiver and sets the remote to control the receiver Can be programmed to control different brands of receivers Used with the ON OFF button to turn on a compatible cable box if programmed and sets the remote to control the cable box TV Turns on a compatible ProScan RCA or...

Страница 27: ...other using the number buttons Press GO BACK to switch between the two channels INFO Shows the status displays on the TV screen INPUT Selects between the line inputs and the VCR s tuner Line input refers to the signal coming from the component connected to the audio video input jacks on the back or front of the VCR MENU Displays and accesses menu system Numbers 0 through 9 Select a channel up to 9...

Страница 28: ...TV s channel memory CLEAR Removes menus or status displays from the screen GO BACK Switches between two channels Select one channel and then select another using the number buttons Press GO BACK to switch between the two channels GUIDE Displays channel guide on some TV s INFO Shows the TV s status displays on the TV screen MUTE Reduces volume to minimum level Numbers 0 through 9 Select a channel u...

Страница 29: ...FWD on VCR FORWARD on remote or REV on VCR REVERSE on remote to position the tape Press PLAY PAUSE if necessary on VCR PLAY on remote to begin tape play Press PLAY PAUSE PAUSE on remote for stop action Press TRACKING up or down to remove any streaks from the picture if necessary Press STOP EJECT on VCR STOP on remote to stop playback Automatic Rewind The VCR automatically rewinds the tape if it re...

Страница 30: ...need to make sure there is a tape in the VCR and that the tape s safety tab is in place You cannot record on a tape with the safety tab removed Safety Tab If the safety tab is removed and you want to record over it simply cover the hole with vinyl tape Tape Speeds SP Standard Play Gives the best quality recording but fewer programs can be recorded on the tape Special effects such as pause slow mot...

Страница 31: ...ds Recording Features on your VCR include Recording explained in the VCR Basics section Express Recording XPR Timer Recording Timer Recording with the VCR Plus Programming System Broadcast Stereo or Second Audio Program SAP Audio Only Recording Copying and Editing Tapes 5 Setting Up the VCR 2 First things first 1 Recording 3 VCR Basics 4 OTHER FEATURES 7 6 Connections 5 5 8 REFERENCE Program the R...

Страница 32: ...he VCR by just entering a PlusCode programming number found in TV guides Express Recording XPR Use express recording when you want to quickly record the remaining portion of the program you are watching 1 Set the tape speed to SP or SLP by pressing TAPE SPEED on the VCR SPEED on the remote 2 Press the RECORD button to begin recording 3 Repeatedly press the RECORD button to set up the recording tim...

Страница 33: ...h the number buttons The data includes the channel number press INPUT to select the line input start time and end time including AM or PM The start date is automatically entered based on the VCR clock The date and or speed can be changed when flashing Timer Recording Information The Clock must be set correctly Insert a tape with the safety tab in place and enough tape to record the program PROGRAM...

Страница 34: ... VCR Plus system code numbers to simplify timer programming if you have cable TV and don t receive all channels through a cable box the VCR can control the cable box or if you receive your TV signal off air Setting Up the Channel List If you did not set up the VCR Plus system channel list you can do it now 1 Display the CHANNELS menu from the VCR MAIN MENU 2 Display the VCR Plus Channel List scree...

Страница 35: ... VCR PLUS Enter PlusCode Number from TV listing 12876 Press CLEAR to correct Press MENU when done 4 Press MENU to enter the programming number How often should this program record 1 One time 2 Daily every day 3 Weekdays M F 4 Weekly once per week 0 Cancel 5 Indicate how often you want the program to be recorded Program 1 One time Channel 03 Cable Start Time 08 00 PM End Time 09 30 PM Start Date 11...

Страница 36: ...ring Programs To review programs that you have already set up 1 Press 2 when the VCR MAIN MENU is displayed to display the TIMER RECORDINGS menu TIMER RECORDINGS 1 Create a New Program 2 Review Existing Progs 3 Use VCR Plus Code 0 Exit 2 Press 2 to display the Review Existing Progs screen Program 1 One Time Channel 104 Cable Start Time 08 00 PM End Time 09 30 PM Start Date 11 16 00 Thu Tape Speed ...

Страница 37: ...ecorded 6 Set the Reception STEREO MONO SAP feature for the type of audio you want to record See the section Other Features for detailed information AUDIO 1 Reception STEREO 2 Tape Playback HI FI 0 Exit 7 Press RECORD to start recording 8 Press STOP when you are finished Recording Audio Only You can record audio only from another audio source connected to the AUDIO IN R and L jacks on the back or ...

Страница 38: ... in the References section of this manual for detailed information about video line input 4 If you are using coaxial cables for the connection tune recording VCR to channel 3 or 4 the one selected on the playback VCR If you are using audio video cables select the line input on the recording VCR 5 Insert the tape you want to copy into the playback VCR Insert a blank tape with its safety tab in plac...

Страница 39: ...Editing Tapes 2 Press VCR1 on remote to control recording VCR Press RECORD REC then PAUSE to put recording VCR in pause mode 3 Press VCR2 on remote to control playback VCR 4 Use FORWARD REVERSE and PLAY to locate the point where you want to begin copying Press PAUSE while VCR is playing to put playback VCR in pause mode 5 Press EDIT on remote to start the VCRs copying 6 Press EDIT again when you w...

Страница 40: ...38 ...

Страница 41: ...tellite receivers and cable boxes DVD players and more The remote is already programmed to operate most PROSCAN RCA and GE televisions and satellite receivers The AUX button can be programmed to control a PROSCAN or RCA auxiliary component 5 Setting Up the VCR 2 First things first 1 Recording 3 VCR Basics 4 OTHER FEATURES 7 6 Connections 5 Program the Remote 5 8 REFERENCE ...

Страница 42: ... Receiver or Cable Box The remote features Code Search a technology that largely automates the programming process Follow these steps to program the remote to control a TV digital satellite receiver or cable box 1 Turn on the component you want to control TV digital satellite receiver or cable box 2 Press and hold the button you want to program TV or SAT CABLE While holding the component button pr...

Страница 43: ...k up the brand and code number s for the component in the code list at the end of this section 3 Press and hold the button on the remote you want to program 4 Enter the code from the list at the end of this section 5 Release the button and then press ON OFF to see if the component responds to the remote commands If it doesn t try pressing the component button and then ON OFF again 6 Repeat these s...

Страница 44: ...tton 4 Enter the 4 digit code from the code list on the next page 5 Release the AUX button and press ON OFF or CHAN up or down to see if the auxiliary component responds to the remote commands Operating the Auxiliary Component After you have programmed your remote see which buttons will operate your component 1 Point the remote at the component and press AUX If it does not turn on press AUX and th...

Страница 45: ...lsar 1151 Pulser 1004 Quasar 1003 1054 1070 1094 Radio Shack Realistic 1000 1004 1006 1012 1038 1049 1095 1162 1171 1172 RCA 1000 1003 1004 1005 1006 1007 1019 1096 1098 1099 1100 1101 1102 1103 1129 1179 1181 1187 1188 1190 Rhapsody 1176 Runco 1151 Sampo 1004 1006 1171 1172 1175 Samsung 1004 1005 1006 1012 1015 1019 1104 1105 1106 1171 1172 Samsux 1171 Sansui 1191 Sanyo 1004 1048 1049 1050 1080 1...

Страница 46: ...44 ...

Страница 47: ...VANCE MOVIE ADVANCE Picture Search Options Tracking Pro Tect Plus Locking Time Counter On Screen Displays Audio Reception Audio Playback Setting Up the VCR 2 First things first 1 Recording 3 VCR Basics 4 OTHER FEATURES 7 6 Connections 5 8 REFERENCE Program the Remote ...

Страница 48: ...background display of blue or see the video as the commercials are skipped Because television signals do not indicate where commercials are located this feature finds and marks them through a set of formulas based on how television is broadcast today Since television stations broadcast differently and insert their own commercials you may experience some variations in this feature s effectiveness S...

Страница 49: ...ress 1 to turn commercial Marking ON or OFF Select ON and the VCR will mark commercials within approximately 30 seconds for the following types of recording Timer Timer with VCR Plus or Express Recording Sets the VCR to automatically mark commercials after the power is tuned off Recording Allows the VCR to prompt you to mark the commercials when you ve stop the recording The VCR is waiting to mark...

Страница 50: ...kipped if the program segment is between commercials and less than one minute or there are frequent dark and quiet scenes If part of the program is skipped rewind the tape to the beginning of the skipped program segment and press PLAY Select MANUAL and the VCR won t advance through the blocks of marked commercials until you press SEARCH If you press SEARCH during playback of material other than co...

Страница 51: ... tape is this 1 Purchased Rented Movie 2 Home Recording 3 Other Press CLEAR to cancel 2 Press 1 if the tape is a purchased or rented movie press 2 if it s a recording made at home or press 3 if it s something else you don t know or you do not want to select MOVIE ADVANCE Pressing 2 or 3 gives the same response and takes you to a different search feature If you accidentally make a wrong selection p...

Страница 52: ... is found the following screen is displayed MOVIE ADVANCE The movie is ready Press PLAY to start Press STOP to cancel This display will time out after a few minutes and the VCR will enter the Stop mode Press 2 to Go To Preview The following screen appears with a video background Searching for preview Press SEARCH to reverse Press STOP to cancel When a preview is detected the VCR cues it and begins...

Страница 53: ...ing play or play pause using slow motion Slow motion works well for tapes recorded at the SP or SLP speed 1 During playback press PAUSE and then FORWARD or REVERSE to begin slow motion playback 2 Press FORWARD to increase or REVERSE to decrease the speed of the search 3 Use TRACKING up or down to remove any streaks from the picture 4 Press PLAY to return to normal playback The VCR switches automat...

Страница 54: ...two number buttons to enter the number of marks you want to search Press CLEAR on the remote to correct an entry 4 Press FORWARD to search forward or REVERSE to search in reverse The VCR will locate your index mark and begin playback If you did not enter a specific index number the VCR will locate the next index mark and begin playback 5 Press STOP to end index searching Some index marks may be mi...

Страница 55: ...eject the tape and re insert it Tracking has no effect during recording only playback Pro Tect Plus Locking To disable the usage of the VCR or to protect your timer recordings you can lock the VCR so that the buttons on the VCR or remote won t work To Lock Press and hold the VCR button on the remote for approximately six seconds SAFE appears To Lock While a Timer Recording is in Progress Press and...

Страница 56: ...ayed in the VCR s display panel 3 Press INFO again to have no displays appear on the TV screen The time counter remains in the VCR s display panel This is useful for dubbing tapes 4 Press INFO again to return to the normal display The current time is displayed in the VCR s display panel Turning off the VCR also resets the displays Audio Set Up Features The audio setup features affect your tape pla...

Страница 57: ...ed to is broadcasting SAP Tape Playback The VCR records the same audio on both the Hi Fi stereo and linear tracks on the tape Hi Fi sound is recorded on separate left and right stereo channels Monaural sound is recorded on the linear track Press 2 to switch between Tape Playback HI FI LINEAR and MIX To enjoy Hi Fi sound connect your VCR to a stereo television or amplifier receiver using the audio ...

Страница 58: ...56 ...

Страница 59: ...coil any twin lead cables and keep them away from the audio video cables as much as possible Make sure all antennas and cables are properly grounded Refer to the Safety Tips sheet packed with your unit Protect Your Components from Overheating Do not block ventilation holes in any of the components Arrange the components so that air can circulate freely Do not stack components Allow adequate ventil...

Страница 60: ...led ANT IN and RF OUT The coaxial cable supplied with your VCR is used to connect the VCR s RF OUT jack and your TV s antenna input Audio Video Jacks and Cables RCA type The AUDIO VIDEO jacks provide very good picture quality and stereo sound and can be used if your TV has audio video input jacks These jacks are used for most audio video connections between components The VCR AUDIO VIDEO jacks are...

Страница 61: ...efer to the instruction manual that came with that particular component Advantages of Audio Video Cable Connections Using a simple coaxial cable connection gives you good picture quality If your television has audio video jacks I highly recommend using them to get even better picture quality and stereo sound when recording and playing back videotapes These connections give you more convenient oper...

Страница 62: ...annels To use this connection you must have 1 coaxial cable for cable or antenna connection 2 for cable box To connect 1 Connect cables as shown 2 Return to First Things First then follow the steps Using This Connection Tune your TV to channel 3 or 4 whichever one you selected with the CH 3 4 switch on the back of the VCR Set the Auto TV VCR feature to ON To play a tape 1 Insert a tape 2 If necess...

Страница 63: ...atching another except when using a cable box for all channels To use this connection you must have 1 coaxial cable for cable antenna connection 2 for cable box 3 audio video cables To connect 1 Connect cables as shown 2 Return to First Things First then follow the steps Using This Connection Tune your TV to its video input channel Use of TV VCR button is not required Set the Auto TV VCR feature t...

Страница 64: ... To use this connection you must have 3 coaxial cables 3 audio video cables 1 splitter To connect 1 Connect cables as shown 2 Return to First Things First then follow the steps Using This Connection Tune your TV to its video input channel Use of TV VCR button is not required Use of TV VCR button is not required Set the Auto TV VCR feature to OFF To play a tape 1 Insert a tape 2 If necessary press ...

Страница 65: ...ever one you selected with the CH 3 4 switch on the back of the receiver Turn off receiver To watch and or record from the digital satellite receiver tune your VCR to its line input L1 appears in display Turn Auto TV VCR feature to ON To play a tape 1 Insert a tape 2 If necessary press the VCR button and then PLAY To record one off air or cable program and watch another 1 Turn off the digital sate...

Страница 66: ... record from the digital satellite receiver tune your VCR to its line input L1 appears in the display Turn Auto TV VCR feature to OFF To play a tape 1 Insert a tape 2 If necessary press the VCR button and then PLAY to start To record one off air or cable program and watch another 1 Begin recording a program using a recording feature 2 Select a different channel on the TV To record a digital satell...

Страница 67: ...ction Troubleshooting Tips and a question and answer section about COMMERCIAL ADVANCE in this Appendix These areas might help resolve some of those simple problems Finally this section of the manual also contains your warranty information 5 Setting Up the VCR 2 First things first 1 recording 3 VCR Basics 4 OTHER FEATURES 7 6 Connections 5 5 8 REFERENCE Program the Remote ...

Страница 68: ... VCR s audio video jacks tune to the VCR s Video Line Input PLAY PAUSE Plays a tape Pauses action for viewing during playback Pauses recording to prevent recording of unwanted scenes POWER Turns the VCR on or off The power button glows at all times even when the VCR is turned off RECORD Starts VCR recording Also used for Express Recording XPR Remote Sensor Receives signals from the remote control ...

Страница 69: ...ect Cassette ejected FF Fast forwarding HI VCR turned on and BYE VCR turned off PLAY In playback flashes during play pause and slow REC Recording and RECP For record pause or pause mode REW Rewinding R0 30 Express recording in progress SAFE Pro Tect Plus feature turned on SCH and SCH Forward or reverse search SP and SLP Tape speed STILL Play pause STOP Tape is stopped Timer Indicator Lights during...

Страница 70: ... or a camcorder when connected to these jacks Use the remote control s INPUT button to select L1 in order to record from these jacks AUDIO and VIDEO OUT Jacks Sends signals from the VCR to another component such as a TV or other VCR when connected with these jacks ANT IN Jack Receives a signal from an antenna satellite or cable system when attached RF OUT Jack Passes antenna signal to the TV when ...

Страница 71: ... make sure the TV s fine tuning is correct for the channel selected Check video cable connections between VCR and TV monitor Check to make sure the TV monitor is set to Video Input see How to Find Your TV s Video Input Channel in theis section of the manual for detailed information Try another tape Some snow streaks are normal during search stop action frame advance and slow motion playback Streak...

Страница 72: ...able box or satellite receiver was turned on when recording was to begin Power interruption Reset the clock Check to see if time and date are correct including AM PM Check to make sure the program did not exceed the tape s length or the tape was not rewound beforehand Check to make sure the VCR was turned off at the time recording was to start Check to make sure there was a tape in the VCR and the...

Страница 73: ...t channels over 69 Cable channels over 69 can only be selected if Signal Type CABLE ANTENNA feature is set to CABLE Cassette with safety tab removed does not start to play automatically Check to make sure the AUTO PLAY ON OFF feature is set to ON Timer indicator flashes The clock is not set Check to make sure there is a cassette in the VCR when a timer recording is set Time counter disappears duri...

Страница 74: ...F in the COMMERCIAL ADVANCE menu Set it to ON A recording is less than 15 minutes or the commercial is longer than one minute A single isolated commercial can not be marked Recording started in the middle of a commercial segment A commercial group within the first or last two minutes of a recording Accuracy and effectiveness can vary depending upon program content and the characteristics of the co...

Страница 75: ...e is set to AUTO the marked commercials should be skipped each time the tape is played in a COMMERCIAL ADVANCE VCR After marking commercials is the tape left at the beginning or end of the recording The tape is left at the end of the recording so it is in position to begin additional programmed recordings Does the marking process interfere with other programmed recordings No If two or more recordi...

Страница 76: ...e 430 mm 9 57 inches deep 243 mm Weight 7 1 pounds 3 2 kg Storage Temperature 22 F to 149 F Range 30 C to 65 C Operating 41 F to 104 F Temperature Range 5 C to 40 C Check your cable company s compatibility requirements Cleaning the VCR Use a soft cloth or dusting attachment of your vacuum cleaner to dust your VCR Remove dust from the ventilation holes on the cabinet Plastic surfaces are easily scr...

Страница 77: ... the step above If those options do not work try the following ideas You might access the Video Input Channel by pressing a button on the remote see table below selecting the channel from the TV s menu system see table below tuning directly to the channel by selecting a specific channel number see table below going through all the channels in the channel list by pressing the channel up or down but...

Страница 78: ...y describes how to install adjust and operate your VCR Any additional information should be obtained from your Dealer Installation and related adjustments Signal reception problems not caused by your VCR Damage from misuse or neglect Cleaning of video audio heads Batteries A VCR that has been modified or incorporated into other products or is used for institutional or other commercial purposes A V...

Страница 79: ...enu 9 10 16 32 Cleaning the VCR 74 CLEAR button 25 34 41 52 53 Clearing programs 34 Code search feature 40 Codes for remote 43 COMMERCIAL ADVANCE 46 questions and answers 73 Component buttons 24 Connecting your VCR 4 Connections 57 A V cable advantages 59 choosing 59 information 58 TV with A V jacks 61 TV with A V jacks cable box 62 TV with A V jacks satellite receiver 64 TV with RF jack only 60 T...

Страница 80: ...ecording 28 audio only 35 basic 28 broadcast stereo TV 35 copying editing tapes 36 Express XPR 30 SAP 35 speeds 20 28 timer 31 VCR Plus 32 XPR 30 Recording speed SLP 20 28 SP 20 28 Remote control auxiliary component 42 buttons 24 cable boxes 40 controlling other components 40 installing batteries 4 programming 39 satellite receivers 40 TV 40 TV codes 43 VCR1 VCR2 option 18 Remote sensor 66 Removin...

Страница 81: ...ter 53 Time counter display 54 Time display on TV 54 TIME menu 12 Time zone 12 TIMER indicator 67 Timer recording 30 stopping 34 VCR Plus 30 Tips troubleshooting 69 Tracking 53 button 26 51 53 Troubleshooting 69 TV video input channel 75 TV button 24 40 75 TV function buttons 26 TV VCR button 35 59 60 67 V VCR channels list 10 cleaning 74 function buttons 25 28 viewing channel 5 VCR button 5 VCR i...

Страница 82: ...80 ...

Страница 83: ...81 ...

Страница 84: ...ice please contact your dealer or the nearest Servicenter from the yellow pages Please do not send any products to the Indianapolis address listed in this manual or on the carton This will only add delays in service for your product As an ENERGY STAR Partner Thomson Consumer Electronics has determined that this product or product model meets the ENERGY STAR guidelines for energy efficiency ...

Отзывы: