background image

29

Recording

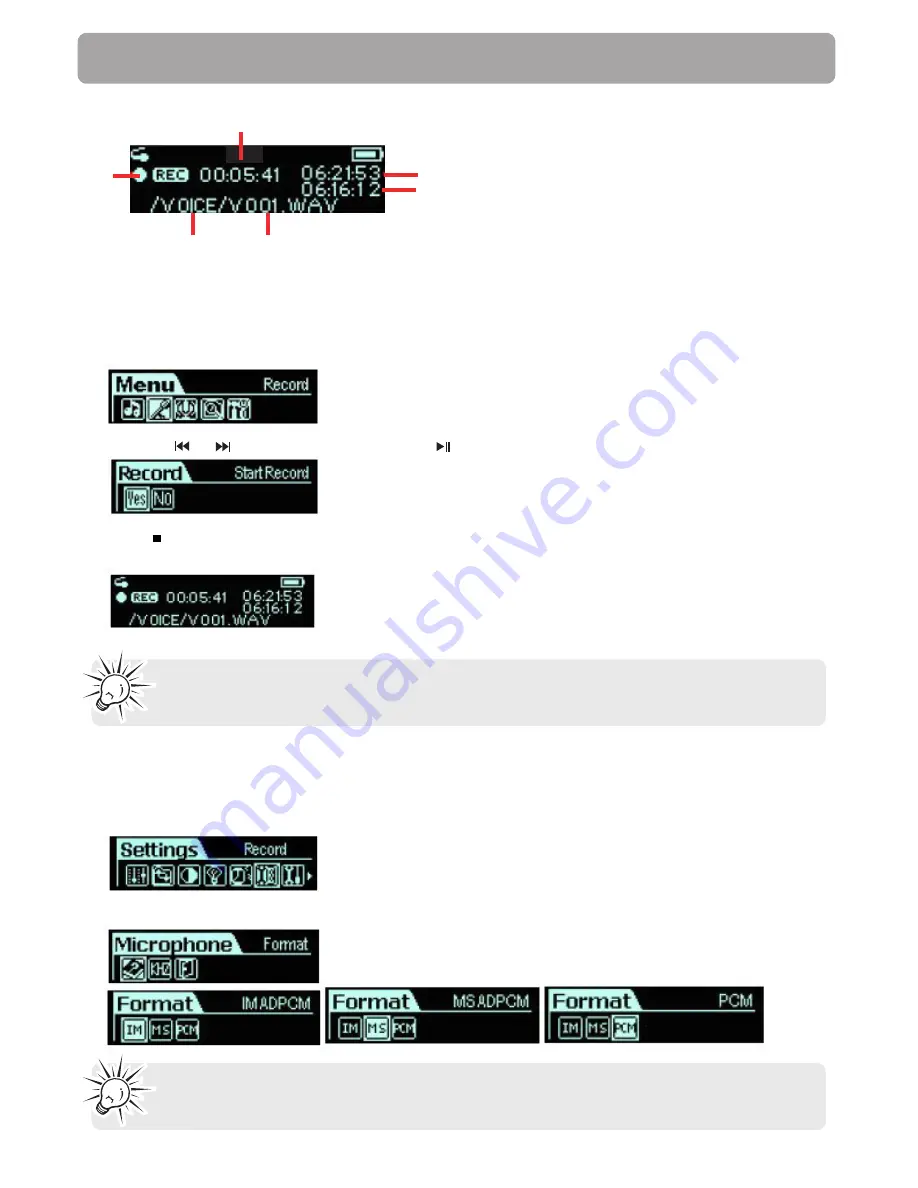
1. Recording status
2. Elapsed time

3. Total time

4. Remaining time
5. Folder name

6. File name

Recording from the Built-in Microphone

The player allows you to record from the built-in microphone. Note the location of the built-in
microphone.
1. Press 

M

 and select 

Record

 from the Menu.

2. Slide to 

or 

 to highlight 

Yes

 and press 

to confirm. The recording starts automatically.

3. Press

 or 

M

 to stop recording and enter the voice mode. Your voice recording will be

automatically renamed as a Vxxx.wav file and stored in the Voice folder.

Note:

 The display will show “MEMORY FULL” when all available memory has been

used.

1

2

3

4

5

6

Adjusting Recording Settings

This option allows you to adjust the settings for the recordings.
1. Select 

Record

 from the settings menu and press 

M

.

2. Select the file format of your recording.

Note: 

The recording formats are only slightly different. It is not recommended

to change this setting.

Содержание TH1401

Страница 1: ...It is important to read this instruction book prior to using your new product for the first time user manual TH1401 ...

Страница 2: ...d User License Agreement 6 Before You Begin 8 Unpacking your player 8 Things to consider before you get started 9 Computer system requirements 9 Warning 9 Caution 9 Caution while driving 9 Back up your data 9 Getting Started 10 Inserting the battery 10 Connecting to a computer 10 Removing the player from your computer 11 Powering on off 12 Controls and Display 13 Controls 13 Display 14 Transferrin...

Страница 3: ...storage device 22 Menu navigation 27 Menu structure 27 Microphone 29 Playback 25 Playlist folders 24 Power on off 12 Power saving 32 Recording playback 30 Recording settings 29 Recording 29 Removing the player from the computer 11 Repeat mode 31 Ripping CD 17 Specifications 37 Transfer audio files to the player 20 Upgrading player 34 Volume control 25 Windows Media Player adding audio files 16 Win...

Страница 4: ...tant Information WARNING TO PREVENT FIRE OR ELECTRICAL SHOCK HAZARD DO NOT EXPOSETHIS PRODUCT TO RAIN OR MOISTURE SEE MARKING ON BOTTOM BACK OF PRODUCT CAUTION RISKOFELECTRICSHOCK DONOTOPEN THE EXCLAMATION POINT WITHIN THE T R I A N G L E I S A WARNING SIGN ALERTING YOU OF I M P O R T A N T I N S T R U C T I O N S A C C O M PA N Y I N G T H E P R O D U C T T H E L I G H T N I N G FLASH AND ARROW H...

Страница 5: ...nce to radio communications However there is no guarantee that interference will not occur in a particular installation If this equipment does cause harmful interference to radio or television reception which can be determined by turning the equipment off and on the user is encouraged to try to correct the interference by one or more of the following measures Reorient or relocate the receiving ant...

Страница 6: ... but not limited to applicable restrictions concerning copyright and other intellectual property rights c The Program may contain pre release code that does not perform at the level of a final code release In such case the Program may not operate properly Updated versions of the Program may be downloaded from www rcaaudiovideo com digitalaudiosupport d THOMSON Entity is not obligated to provide su...

Страница 7: ...he WM DRM Software in your A V Device has been compromised owners of Secure Content Secure Content Owners may request that Microsoft revoke the WM DRM Software s right to acquire new licenses to copy display and or play Secure Content Revocation does not alter the WM DRM Software s ability to play unprotected content A list of revoked WM DRM Software is sent to your A V Device whenever you downloa...

Страница 8: ... Digital Rights Management Windows 2000 or Windows XP SP1 or higher required Unpacking your player Your player came with everything you need to make music portable all of the items shown below should have been packed in the box with your player Explore a world of accessories Jump on the Internet and go to www rcaaudiovideo com to discover the additional accessories that are available for your play...

Страница 9: ...trary to copyright laws Caution Keep player out of direct sunlight Exposure to direct sunlight or extreme heat such as inside a parked car may cause damage or malfunction Do not expose to rain or moisture Caution while driving Use of headphones while operating an automobile or moving vehicle is not recommended and is unlawful in some states and areas Be careful and attentive on the road Stop opera...

Страница 10: ...ttery to the signs on the battery compartment 4 Re install the battery compartment cover Connecting to the Computer Caution BEFORE YOU START Make sure that the player is off and disconnect the earphones Make sure the player is not locked If the player is locked while you power it on the screen displays Locked and the player will automatically power off after a few seconds ...

Страница 11: ...a removable media device Microsoft Windows 2000 and XP 5 Transfer files to or from the player using Windows Explorer To do so drag and drop your files to the player as shown below Note You can also organize your music files into folders before transferring them to your player refer to page 24 Removing the player from your computer 1 Right click on the Safely Remove Hardware icon in the taskbar nex...

Страница 12: ...lack Caution When storing the unit be sure to remove the battery because it may leak and damage the unit Battery may leak electrolyte if inserted incorrectly if disposed of in fire or if an attempt is made to charge a battery not intended to be recharged Discard leaky batteries immediately Leaking batteries may cause skin burns or other personal injury Do not charge batteries which are not intende...

Страница 13: ...layer on In playback mode press to play a track During playback press to pause and again to resume playback In browsing mode slide up down right left to scroll 4 Volume up Slide the button to to increase the volume level 5 Skip backward Fast rewind Slide the button to to go to the previous file menu item slide and hold to fast rewind a file 6 Skip Next Fast Forward Slide the button to to go to the...

Страница 14: ...ower Off Press to stop playback Press and hold to turn the player off 11 Battery compartment 12 Headphone jack 13 Neck strap hole Display 1 Play Pause Stop Rec status 2 File number Total files 3 Repeat mode 4 Equalizer mode 5 Synchronous lyric display 6 Battery indicator 7 Elapsed time Total file time 8 ID3 Tag track name lyrics display 9 Music type 10 Music mode Voice mode 11 Hold icon 12 Volume ...

Страница 15: ...XP Player 9 Series for Windows 2000 3 Follow the instructions to finish the download 4 Once the download is completed double click on the exe file to start the installation Windows Media Player 10 Overview Transferring Music 1 Now Playing Watch listen to currently playing media 2 Library Create playlists and manage your media files 3 Rip Copy CD Audio tracks to WMA format 4 Burn Copy MP3 WMA track...

Страница 16: ...n be played edited burned to CD or copied to your digital audio player 1 On your computer open Windows Media Player 10 and click on the small triangle in the upper right corner Select Tools and then click on Search for Media Files Alternatively press the F3 key on your keyboard 2 In the Look in dialog box browse to the drive and folder where your music files are stored 3 Click on Search 4 Windows ...

Страница 17: ...small triangle in the upper right corner From this menu select Tools and then Options 2 In the Options dialogue box click on the Rip Music tab Under Rip settings set the Format to mp3 Under Audio quality you can set the recording quality by dragging the slider By default it is set to smallest size This quality will be sufficient for your mp3 player You can set the quality to a higher setting but t...

Страница 18: ...o start the process Start Windows Media Player 10 and click on the Rip tab in the top button bar The contents of the CD will be displayed By default all tracks are checked Uncheck any track you do not want to encode into a music file Click on the Rip Music button to begin encoding the selected tracks Note WMP10 is now properly set up to convert audio tracks from CD to mp3 files WMP10 can also retr...

Страница 19: ... an audio CD to WMA tracks is almost identical to Windows Media Player 10 except for the names used The option Rip Music is called Copy from CD The option to start ripping directly after inserting a CD is not available on Windows 2000 If you encounter problems to playback WMA files on the player try the following setting and then transfer the WMA files to the player again 1 Connect the player to y...

Страница 20: ...s Media Player 10 and click on the Sync tab in the top button bar 4 Click on Edit Playlist to add the tracks to be transferred to your player Click on OK once all the desired tracks have been added 5 You should now see the tracks you wish to transfer to your player listed and checked on the left side of the Windows Media Player screen under Sync List If you wish not to transfer any of the listed t...

Страница 21: ... are saved in the same directory and under the same file name If not the player will not recognize the lyric file and only the ID3 tag information such as Artist Album or Track name will be displayed Note Your player only supports lrc files If the lyrics do not synchronize with the music please download another music file from the Internet and try again Deleting files from the player For any files...

Страница 22: ...ct the player to your computer 2 Double click on the My Computer icon on your Windows desktop Windows XP users may need to click on the Start button and select My Computer from the menu 3 Your player has been recognized as a Mass Storage Device and automatically displays as a new device letter in the My Computer window 4 You can now drag and drop your files from your computer to the player You can...

Страница 23: ...r files if you loose them accidentally format your player or perform a firmware upgrade 1 Repeat steps 1 to 3 in the previous section 2 Drag and drop the files stored on your player to the disk or drive where you want to store the duplicate copy 3 After the files have been copied unplug your player from your computer 4 If you accidentally loose or damage the files stored on your player you will th...

Страница 24: ...t these steps to create folders and sub folders 4 After the files have been copied unplug the player 5 You can now use the Navigation folder to browse your music on your player Note You can create up to 50 directories organized in up to 19 sub folders and store up to 300 music files on your player If you create or store more files and folders the extra items will be ignored You can store up to 254...

Страница 25: ...urrent file to skip to previous file Otherwise you will return to the beginning of the current file 5 Press to stop the playback Volume During playback simply slide to or to increase or decrease the volume The volume indicator on the screen changes accordingly Locking your player To ensure no button is pressed accidently while recording or playing you can use the Hold function to lock your player ...

Страница 26: ...files the LRC icon displays and the lyrics display synchronously on the screen while the music is playing Note Make sure the music and lyric files are saved in the same directory and under the same file name If not the player will not recognize the lyric file and only the ID3 tag information such as Artist Album or Track name will be displayed Playback ...

Страница 27: ... files stored in your player 1 Press M and select Navigation from the Menu 2 Slide to or to select a file or folder and press to play the music or enter the folder 3 In navigation mode press to go back to the previous screen When a folder is selected in navigation mode press M A sub menu will show To enter the folder select Enter To play the music stored in the folder select Play To erase the sele...

Страница 28: ...9 sub folders and store up to 300 music files on your player If you create or store more files and folders the extra items will be ignored You can store up to 254 files in one directory If you store more than 254 files in one directory you will only be able to view the first 254 in navigation mode However you will still be able to play the extra files in Music mode ...

Страница 29: ... starts automatically 3 Press or M to stop recording and enter the voice mode Your voice recording will be automatically renamed as a Vxxx wav file and stored in the Voice folder Note The display will show MEMORY FULL when all available memory has been used 1 2 3 4 5 6 Adjusting Recording Settings This option allows you to adjust the settings for the recordings 1 Select Record from the settings me...

Страница 30: ...5 Hz 16000 Hz 22050 Hz 32000 Hz Maximum recording time TH1401 64 hours 46 4 hours 32 hours 23 2 hours 16 hours Playback of Microphone Recordings 1 Select Navigation from the menu and browse for the VOICE folder Press to enter 2 Slide to or to find the Vxxx WAV file you want to listen to 3 Press to play the recording Maximum recording time TH1402 128 hours 92 8 hours 64 hours 46 4 hours 32 hours ...

Страница 31: ...ect 1 To change the equalizer setting select Equalizer from the settings menu To navigate follow the steps described above 2 Slide to or to choose among the six EQ presets available Normal no logo displayed XBass Rock Jazz Classical and Pop 3 Press to apply Repeat Mode Five repeat modes are available Normal Repeat One Repeat All Random Random All 1 Select Repeat from the settings menu To navigate ...

Страница 32: ... steps described on page 31 2 Select Timer from the Backlight menu 3 Slide to or to adjust the delay before backlight is switched off Choose among the options 3 5 10 15 seconds and Always on backlight will always be turned on 4 Press to apply Power Savings You can use the power savings function to automatically turn off the player after a predetermined period of inactivity 1 Select PowerSavings fr...

Страница 33: ... among the options English default Français French Español Spanish Deutsch German Italiano Italian and Nederlands Dutch and press to apply Information About your Player Information is available regarding the firmware version built in memory size and free memory size 1 Select About from the settings menu To navigate follow the steps described on page 31 2 The firmware version and the total memory c...

Страница 34: ...are is an embedded program that displays the interface and responds to instructions Firmware updates may be available to improve performance or add features You can download the firmware from http www rcaaudiovideo com downloads For best performance we recommend that you select the Format Data Area option to format both the firmware and the storage space When not selected only the firmware will be...

Страница 35: ...ck on OK to start formatting the mp3 flash memory Warning Formatting will erase all files on your player Make sure you have a backup before you proceed Make sure NTFS under File System drop down menu is not selected If you select this option the RCA player will display an error message before powering off and you will have to format it again Check out the Troubleshooting section for more details ...

Страница 36: ... in recovery mode The player displays an error message before powering off If you have formatted your player to NTFS format the above message will display and your player will power off automatically You must reformat it to FAT or FAT32 format Why can t I play files in the player WMA files may be DRM protected and you do not have the proper rights license to play the files Check the website and or...

Страница 37: ...p to 15 hours Equalizer Normal XBass Rock Jazz Classical Pop Display 128 x 32 Dot matrix OLED ID3 Tag display album artist title Synchronous lyric display Controls Power On Play Pause Select Stop Power Off Skip Next Fast Forward Skip Previous Fast Rewind Menu button Volume Volume Hold Switch Audio Playback Windows Media Audio WMA MPEG Audio Layer 3 MP3 WAV Voice Recording 8 KHz to 32 KHz sampling ...

Страница 38: ...nal to Noise Ratio 85 dB A weighted Frequency Response 20 Hz 20 kHz Total Harmonic Distortion Output THD 0 1 Check for updates Visit http www rcaaudiovideo com for the latest news and firmware upgrades for our digital media player ...

Страница 39: ...isuse or neglect Products which have been modified or incorporated into other products Products purchased or serviced outside the USA Acts of nature such as but not limited to lightning damage Product Registration Please complete and mail the Product registration Card packed with your unit It will make it easier to contact you should it ever be necessary The return of the card is not required for ...

Страница 40: ...40 Thomson Inc P O Box 1976 Indianapolis IN 46206 1976 2007 Thomson Inc Trademark s Registered Marca s Registrada s Marque s Deposée s www rcaaudiovideo com v2 0 ...

Отзывы: