background image

Connections & Setup

12

Chapter 1

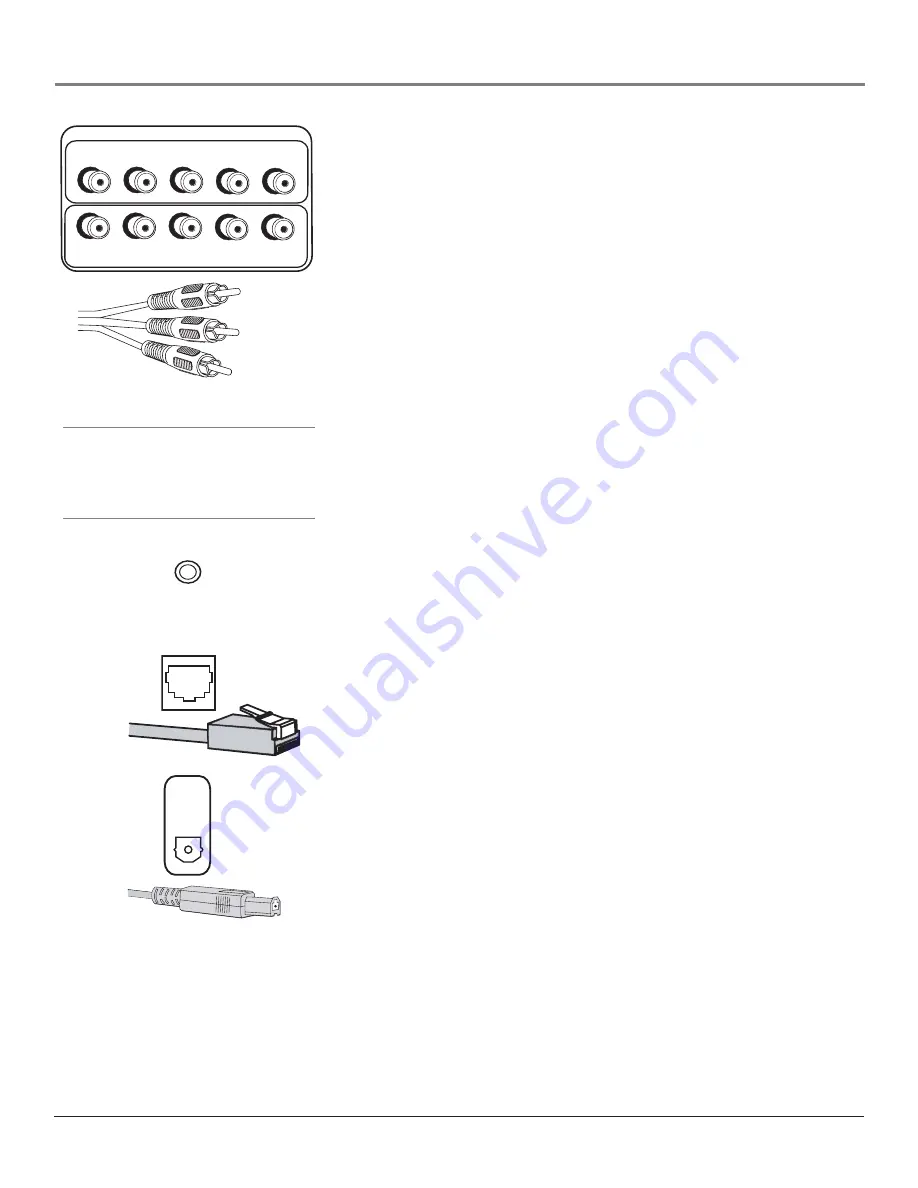
INPUT 2 COMPONENT/COMPOSITE INPUT

Provides connection to a second

NTSC (analog) video component with either composite or component outputs
such as a VCR or DVD player.

R Audio

 provides right audio connection and connector is usually red.

L Audio

 provides left audio connection and connector is usually white.

•   


Y/Video P

B

 P

R

Unlike a single video input, component (Y P

B

 P

R

) video

maintains the video signal as three separate parts through these three jacks.
To ensure maximum picture quality, use three video-grade cables for the
Y P

B

 P

connections. Accepts 480i, 480p, 720p, and 1080i signals. If you’re

connecting to a component with a Video jack instead, you can still use the
Y/Video jack. Go to the 

Connections

 menu, select 

Video Input Source

 and

choose 

Composite video

 as your source. Go to page 57 for more

information.

Notes:

 Also, remember to connect the left and right audio cables

because the Y, Pb, Pr cables carry only the picture signal, not the sound.

PIP can only be displayed from component inputs in 480i format.

INPUT 4 COMPONENT/COMPOSITE INPUT

Provides connection to a

second optional component video source, such as a DVD player or satellite
receiver. The jacks are the same as described above for INPUT 2.

INPUT 2

COMPONENT/COMPOSITE INPUTS

Use menu for composite video.

L

R

P

R

P

B

Y/VIDEO

INPUT 4

L

R

P

R

P

B

Y/VIDEO

ETHERNET

Component Cables

WIRED

IR

DIGITAL

AUDIO

OUTPUT

WIRED IR

 This jack is for connecting a wired remote control system, which

is primarily for professional installers. If you’re using the remote that was
included with your TV, don’t plug anything into this jack or the TV won’t
respond to the remote.

ETHERNET

Connect a router, cable modem, or Digital Subscriber Line (DSL)

modem to the TV using an Ethernet cable (CAT 5) for a possible software
upgrade. Go to page 57 for more information on software upgrades. Do not
connect a telephone cable because of risk of fire or shock. A green light on the
jack means that an active network has been detected. An orange light on the
jack means the data is either being sent or received.

DIGITAL AUDIO OUTPUT

Use a digital optical cable (or SPDIF cable) to

connect your TV to a compatible Dolby Digital or PCM receiver or decoder.
Dolby Digital offers theatre-quality sound (six audio channels). If you own a
receiver that uses an optical cable input, you can use an optical cable to
connect the TV to that receiver for the best sound quality. Go to the 

Digital

Audio Out

 screen in the 

Audio 

menu to select 

Auto Select 

or 

PCM

 as the output

for this jack.

Note:

 This TV’s optical digital output jack fully complies with the

international standard governing this type of jack (IEC958), and is
designed for connection to a Dolby Digital (AC-3

®

 or PCM) receiver or

decoder. Older equipment, some of which is not fully compliant with
IEC958, may not be compatible with the Dolby Digital bitstream. Such a
connection using anything other than a Dolby Digital (AC-3 or PCM)
receiver or decoder could create a high noise level, causing damage to
headphones or speakers.

Y (green)

P

R

 (red)

P

B

 (blue)

Tip

Inputs 2/4 can be used as either a component
video (Y P

B

 P

) input or a composite video

(Y/Video) input. Go to the Connections menu,
choose Video Input Setup and select which
video input source you are using.

Содержание Scenium HD50LPW162

Страница 1: ...HDTV with DLP technology High Definition Television User s Guide ...

Страница 2: ...___________________________________________________________________ Important Information Refer to the identification rating label located on the back panel of your product for its proper operating voltage FCC Regulations state that unauthorized changes or modifications to this equipment may void the user s authority to operate it Cable TV Installer This reminder is provided to call your attention...

Страница 3: ...CRTs which means you don t have to worry about screen burn fixed video images burning onto the screen permanently or convergence realigning the CRTs The diagram on the left illustrates the complex system Thin and Light The efficiency of DLP technology enabled our design team to create a high performance HDTV that is about 16 inches thin and weighs less than 100 pounds Lamp Replacement DLP technolo...

Страница 4: ...mply the width and height of the picture Regular TVs use a 4 3 aspect ratio which means the picture is a little wider than it is tall a screen that is 20 inches wide is about 15 inches tall When the standards were being developed for television broadcasting in 1941 by the NTSC the National Television Standards Committee it made sense to adopt the 4 3 aspect ratio the film industry was using at tha...

Страница 5: ...l cable signals because it includes QAM Quadrature Amplitude Modulation Note A digital cable card may be necessary to view scrambled encrypted channels Contact your cable provider for more information Go to page 18 for more information TruScan Digital Reality The intelligent signal processing of TruScan Digital Reality recognizes incoming video signals and progressively converts them to achieve op...

Страница 6: ... the volume from the TV or the amplifier in the Fixed Variable Output option in the Audio Connections menu If you own an amplifier with digital audio connect to the DIGITAL AUDIO OUTPUT jack instead Audio Video Output Jacks Because the VCRs in most households are analog and can t receive or record digital TV signals recording digital TV broadcasts wasn t possible without purchasing additional equi...

Страница 7: ...o Complete the Assisted Setup 21 Complete the Assisted Setup 21 Set the Menu Language 22 Complete Channel Search 22 Changing Channels 22 Next Steps 22 Chapter 2 Using the Remote Control The Buttons on the Remote Control 24 Programming the Remote to Operate Other Components 26 Find Out If You Need to Program the Remote 26 Programming the Remote 26 How to Use the Remote After You ve Programmed It 27...

Страница 8: ... 53 Equalizer Presets 53 Audio Processor 53 Sound Logic 54 Audio Mode 54 SAP Second Audio Program 54 Balance 54 Audio Connections 55 Connections Menu 56 Signal Strength 56 Channel Search 56 Software Upgrade 57 Signal Source 57 Video Input Setup 57 Auto Tuning 57 Special Features 58 Ethernet Setup 58 Preferences Menu 59 Closed Captioning 59 Screen Format 61 Time Menu 61 Color Scheme 62 Translucency...

Страница 9: ...up Chapter Overview Things to Consider Before You Connect Choose Your Connection Explanation of Jacks and Cables The Front of Your TV How To Connect Plug in the TV Put Batteries in the Remote Turn on the TV Use the Remote Control to Complete the Assisted Setup Complete the Assisted Setup Next Steps ...

Страница 10: ...around other components Position Cables Properly to Avoid Audio Interference Insert each cable firmly into the designated jack Use Indirect Light Don t place the TV where sunlight or room lighting will be directed toward the screen Use soft or indirect lighting Using a Stand If a stand base or cabinet is used insure that it is of adequate size and strength to prevent the TV from being accidentally...

Страница 11: ...t this service call 1 888 206 3359 For additional assistance while using your RCA Scenium product please visit www rcascenium com customersupport VCR Components Cables Needed Connection Title Go to Coaxial Audio Component Composite TV VCR DVD Player page 15 TV Satellite Receiver VCR page 16 Satellite Receiver VCR Coaxial Audio Composite S Video M E N U C H C H V O L V O L P O W E R Component with ...

Страница 12: ...TS CENTER Provides center surround sound to an A V receiver or audio amplifier R and L REAR Provides right and left rear surround sound Note To turn the TV s internal speakers on and off press MENU on the remote control and choose Audio Then choose Fixed Variable Out from the menu and choose an option SUBWOOFER Provides lower bass frequencies out from the TV to a powered subwoofer or audio receive...

Страница 13: ...ften color coded yellow for video red for right audio and white for left audio R Audio provides right audio connection and connector is usually red L Audio provides left audio connection and connector is usually white V Video provides composite video connection and connector is usually yellow S VIDEO lets you connect an S Video cable for better picture quality to a component with S Video capabilit...

Страница 14: ... using the remote that was included with your TV don t plug anything into this jack or the TV won t respond to the remote ETHERNET Connect a router cable modem or Digital Subscriber Line DSL modem to the TV using an Ethernet cable CAT 5 for a possible software upgrade Go to page 57 for more information on software upgrades Do not connect a telephone cable because of risk of fire or shock A green l...

Страница 15: ...Digital Visual Interface DVI the jack on the back of your TV is also compatible with DVI components Note If you connect a component with a DVI jack to the HDMI DVI input you ll need an HDMI to DVI adapter Also connect the left and right audio cables to an input that is not in use An example is shown on page 17 Then go to the Audio Connections menu and select DVI Audio Input to choose the input you...

Страница 16: ... TV on and off The indicator lights when TV is on Your HDTV s lamp has a cool down period when the TV is turned off and a warm up period when the TV is turned on If you try to turn the TV on during a cool down you will hear audio and then the picture will be displayed after a few moments This could take up to one minute For different light status of the indicator see above Notes The front panel il...

Страница 17: ...mposite audio video cables B Connect the VCR s audio video inputs to the AUDIO VIDEO OUTPUT jacks on the TV This enables recording of digital and analog programs except copy protected or component video formats Viewing the Components 1 Turn on the TV and the component s you want to view 2 Press the TV button on the remote control 3 Press the INPUT button on the remote control to scroll through the...

Страница 18: ...st also connect audio cables The S Video cable and component video cables only transfer video information Viewing the Components 1 Turn on the TV and the component s you want to view 2 Press the TV button on the remote control 3 Press the INPUT button on the remote control to scroll through the Video Input Channels View the VCR on the INPUT 1 channel View the satellite receiver on the INPUT 3 chan...

Страница 19: ...g 2 To connect your TV to a component with an HDMI jack use an HDMI cable Connect the HDMI cable to the HDMI DVI INPUT jack on the back of the TV and to the HDMI Out jack on the back of the component Viewing the Component 1 Turn on the TV and the component you want to view 2 Press the TV button on the remote control 3 Press the INPUT button on the remote control to select the HDMI DVI Video Input ...

Страница 20: ... approximately 30 seconds for the status screen to appear Write down the information you see and call your cable company to provide them with the information on screen Notes If your information screen disappears before you have a chance to write down the information press MENU on the remote to access the menu system Then press 9 9 9 and the information screen appears Go to page 58 for more informa...

Страница 21: ...ions menu and select Yes for connecting to an external subwoofer 4 Use speaker wire to connect the audio video receiver to your external front and rear speakers Refer to your audio receiver manual to complete speaker hookup to the receiver OR How to Connect TV Receiver with Dolby Digital Speakers If you own a receiver with Dolby Digital or PCM Pulse Code Modulation that uses an optical cable type ...

Страница 22: ... 120V 60Hz FIXED VARIABLE AUDIO OUTPUTS EXTERNAL AMP MAX POWER RATING 60 WATTS into 8 OHMS CENTER SPEAKER INPUT SUBWOOFER CENTER R REAR L REAR MATRIX SURROUND OUTPUTS R L WIRED IR INPUT 3 L R S VIDEO V INPUT 4 L R PR PB Y VIDEO IN OUT A V AMPLIFIER VCR IN TV IN OUT TAPE IN CD L R LEFT RIGHT DIGITAL AUDIO INPUT FRONT SPEAKERS CENTER LEFT RIGHT SURROUND SPEAKERS REAR Back of Left Front Speaker Back ...

Страница 23: ...ress TV on the remote or press the Power button on the TV s front panel Note Pressing the TV button turns on the TV and puts the remote into TV mode TV mode means that the buttons on the remote control operate the TV s functions Use the Remote Control to Complete the Assisted Setup The technical term is Navigation how you move through the on screen menus The method is the same throughout the menu ...

Страница 24: ...mplete Channel Search Even though this initial channel search can take several minutes it is important to complete in order for your TV to display channels and programming Make sure you have connected cable and or off air antenna to the corresponding inputs before you start channel search 1 To do a complete channel search check each box that pertains to your TV For example if you re only receiving...

Страница 25: ...on only 23 Using the Remote Control Chapter Overview The Buttons on the Remote Control Programming the Remote to Operate Other Components How To Use the Remote After You ve Programmed It The Learning Feature Volume Punchthrough Feature Using the INPUT Button Remote Code List ...

Страница 26: ...nnel up or down press and hold to continue changing channels CH CTRL Channel control Toggles the channel control between the main TV picture and the PIP window Use channel up channel down INPUT component buttons or number buttons to change channels in PIP CH CTRL is marked by a triangle in the banner CLEAR Removes on screen menus and displays Cancels the commercial skip timer DVD Places the remote...

Страница 27: ...While the screen is blue you can still turn the TV back on If the screen is black when you try to turn it on the TV s lamp is in its cool down cycle The TV s audio comes on then the picture is displayed after a few moments In other modes VCR DVD SAT CAB AUX AUDIO and if programmed turns the component on and off PIP Makes the PIP window appear and disappear See Chapter 3 for more information about ...

Страница 28: ...following 1 Turn on the component in this example a VCR 2 Point the remote at the component 3 Press the corresponding component button in this example VCR 4 Press ON OFF to see if the VCR responds If the VCR doesn t respond you need to program the remote to operate it Programming the Remote There are two ways to program the remote control to operate other components Automatic Code Search and Direc...

Страница 29: ...er entered an invalid code or the button isn t programmable 5 Release the component button point the remote at the component and then press ON OFF to see if the component responds to the command If it doesn t try pressing the component button and then ON OFF again If you get no response repeat these steps using the next code listed for your brand until the component responds to the remote commands...

Страница 30: ...ned function to the following buttons on the TV s remote control component buttons TV VCR DVD SAT CAB AUX and AUDIO the CLEAR button and the LIGHT button Before adding a Learned Function you must program this TV s remote control to operate that component because programming the remote control erases all learned commands for that component mode Do the learning process in low light areas because too...

Страница 31: ... your TV remote is out of memory the component button s light flashes 4 times and turns off exiting you from the Learning mode Clearing a Learned Function To delete a learned button function use the procedure below 1 Press and hold the component button the component button lights Then press and hold the CLEAR button for 3 seconds Continue pressing both buttons the component mode button flashes tur...

Страница 32: ...r audio receiver or amplifier Go to page 26 for instructions If you can t program this remote to operate your audio receiver Volume Punchthrough won t work 2 While setting up Volume Punchthrough it s best to point the remote away from components 3 Decide which mode the remote will be in when the volume from the audio receiver punches through The mode will be one of the component buttons TV DVD SAT...

Страница 33: ...el Remote Code List Audio Codes Programmable for the AUDIO and AUX buttons AUX Dimensia Lyra Wireless RCA 4004 Audio Cassette GE 4006 RCA 4006 CD Players ADC 4055 4056 4066 Aiwa 4039 4057 Akai 4058 Denon 4060 Emerson 4040 Fisher 4041 4063 4064 GE 4007 4065 Hitachi 4042 JVC 4043 Kenwood 4044 4067 4068 Luxman 4069 Marantz 4046 MCS 4070 Mitsubishi 4071 4072 NEC 4045 Onkyo 4047 Panasonic 4048 Pioneer ...

Страница 34: ... 2005 Craig 2009 2010 2019 2036 Curtis Mathes 2005 2009 2012 2014 2017 2018 2020 2060 2072 Daewoo 2011 2013 2015 2021 2022 2023 2056 Daytron 2056 Dimensia 2072 Electrohome 2010 2024 Emerson 2002 2008 2010 2011 2017 2020 2021 2022 2024 2025 2026 2027 2028 2039 2059 2061 2067 2069 2076 Fisher 2007 2019 2029 2030 Fuji 2003 2017 2062 Funai 2022 Garrard 2022 GE 2000 2001 2009 2017 2018 2060 2063 2072 G...

Страница 35: ...ntation only 33 Chapter 3 Using the TV s Features Chapter Overview About the Channel Banner Digital or Analog TV Channels Parental Controls How V Chip Works for the USA and Canada Auto Tuning Feature PIP Picture In Picture Operation Emergency Alert System EAS ...

Страница 36: ... re viewing Listening to Displays when SAP is playing for an analog channel For a digital channel displays the currently playing audio mode Also displays the audio processor in use SAP or Audio Mode changes with SOUND button 16 9 Normal 1080i HD Aspect ratio 4 3 or 16 9 original resolution of the broadcast not the resolution of the TV HD or SD For more information about aspect ratio and broadcast ...

Страница 37: ... and you want to enter subchannel numbers press the right arrow button to advance to the subchannel entry box 4 Enter the number of the subchannel This number appears in the subchannel entry box 5 Press OK to tune to the channel or wait a few seconds and the TV tunes to the channel Notes You can always use the channel up and down buttons on the remote control to change channels within the TV mode ...

Страница 38: ...ng limits the Locked List and blocking features The Unlocked List will be used instead of the Locked List Do you want to unlock the TV Point to Yes and press OK to unlock the TV Point to No and press OK to cancel No Yes Front Button Block 8 V Chip Unrated 7 Canada V Chip 6 USA V Chip 5 Antenna Ch List 4 Cable Channel List 3 Video Input List 2 Lock TV 1 Go Back 0 Main Menu Parental Controls Locking...

Страница 39: ...ns and the TV is locked and you tune to a program whose rating exceeds the rating limit you set you will receive a message telling you that the program is not approved for viewing Broadcasters are not required to provide content themes so programs received with no content themes will only be blocked if you block their age based rating and the TV is locked With the V Chip Unrated menu you can also ...

Страница 40: ... sexual situations S or moderate violence V General Audience Most parents would find this program suitable for all ages It contains little or no sexual dialogue D or situations S no strong language L and little or no violence V Directed to Children 7 years and older Designed for children ages 7 and above It may be more appropriate for children who have acquired the developmental skills needed to d...

Страница 41: ... G 3 Press the OK button to toggle between Viewable and Blocked The status for the rating listed to the right and all higher ratings automatically change to Blocked and B 4 Select Lock TV from the Parental Controls menu Enter a password and re enter password a second time to confirm the password Blocking Specific Content Themes You can block programs based on their content When you block a content...

Страница 42: ...rating How to block and view movie ratings is explained in the next two sections To access the V Chip Movie Rating menu 1 Press MENU on the remote control the Main Menu appears 2 Select Parental Controls 3 Select USA V Chip 4 Select V Chip Movie Rating Blocking Movie Ratings If you only want your child to watch movies that have a PG rating and lower in other words movies rated PG and G then you co...

Страница 43: ...fanity or mildly suggestive language Could also contain brief scenes of nudity General Audience Programming considered acceptable for all ages groups While not designed specifically for children it is understood younger viewers may be part of the audience Violence guidelines will contain very little violence either physical or verbal or emotional Will be sensitive to themes which could frighten a ...

Страница 44: ...out ratings the Movie rating N A the USA TV rating None and the Canadian rating of Exempt E The TV must be locked for the V Chip Unrated feature to be enforced View Unrated and Exempt Programs Block Unrated and Exempt Programs Adults Programming is for adults only This program contains sustained violence or extremely violent scenes Viewers 16 and over Programming is not suitable for those under ag...

Страница 45: ...n follow Not Connected Choose this if you don t have this particular component connected to the TV or if you don t want the TV to automatically tune to the correct channel when you press one of the component buttons on the remote Channel 2 3 or 4 Cable Input Component is connected to the CABLE INPUT jack on the back of the TV and you want the TV to tune to channel 2 3 or 4 when you press the corre...

Страница 46: ...n picture with analog channels and inputs PIP doesn t support digital signals The main and PIP channels must be from different tuners or inputs for example main is from INPUT 1 and PIP is from ANTENNA INPUT If you are only using tuners for PIP and main you must have the main picture from CABLE INPUT and the PIP picture from ANTENNA INPUT or vice versa PIP Buttons There are certain remote buttons t...

Страница 47: ...The PIP window will reappear If you press PIP and the PIP window is gray you may have activated the Parental Control feature and the program exceeds the rating limits you set For information on removing limits see the section Parental Controls You cannot view closed captioning in the PIP window PIP channel skips all digital ATSC TV channels and tunes to analog channels PIP can only be displayed in...

Страница 48: ...This page intentionally left blank ...

Страница 49: ...ed within this publication are for representation only 47 Chapter 4 Using the TV s Menu System Chapter Overview Menus On Screen Help and Control Panels Picture Quality Menu Audio Menu Connections Menu Preferences Menu ...

Страница 50: ...t the picture Picture Presets Choose preset levels of Picture Settings Auto Color Correct the color from channel to channel Color Warmth Adjust the color to Cool Warm or Normal Noise Reduction Reduce picture static or interference Green Stretch Intensify and enhance shades of green Edge Enhancement Make the picture s edges sharper Contrast Expand Intensify and enhance shades of black Advanced Sett...

Страница 51: ...r time values such as the Wake Up Timer highlight the or field and press OK to change the time or simply use the number buttons To enter passwords you must use the number buttons On screen Menu Items The on screen menu items are used to access the information and or change the settings of the specific item highlighted Highlight the item with the up and down arrow buttons Then press OK or right arr...

Страница 52: ...d select a different picture preset For example if you normally use Personal but want to watch a show in Vibrant Day lighting choose Vibrant Day watch the show and then afterwards return to your customized settings by choosing Personal The PRESETS button on the remote works with Picture Presets Go to the Remote chapter for more information Assisted Setup 6 5 Preferences Connections 4 3 Parental Co...

Страница 53: ...Picture Settings 1 Go Back 0 Main Menu Picture Quality Press 5 or 6 to point to an option then press OK to select it Press 3to return to the menu Noise Reduction reduces the appearance of video noise on composite video sources giving a smoother picture For other sources of video the Noise Reduction is not active The Frame Comb setting provides a constant level of improvement In the Adaptive settin...

Страница 54: ...4 and HD61LPW164 Allows you to adjust the lines of the picture so they appear smooth Press the left right arrow buttons to move the lines in the test pattern until they re smooth Reset Controls Menu button resets all Picture Quality controls to their original factory settings except Personal Picture Preset Horizontal and Vertical Position and Smoothing Adjust for the currently tuned input see on s...

Страница 55: ...even band Equalizer Presets or create your own personal preset The seven band graphic equalizer lets you adjust the audio frequency settings The equalizer can only be changed if the Fixed Variable Audio Output is set to Variable Output Speakers On If the Fixed Variable Audio Output is set to Fixed Output you cannot make changes to the equalizer and the bands are set to 0dB However the graphic equa...

Страница 56: ...ss 5 or 6 to point to an option then press OK to select it Press 3to return to the menu Turning Sound Logic on will monitor a program s audio track and limit volume excursions to a minimum and maximum volume range from the current volume setting Acting like a dynamic range limiter it compresses the dynamic range to limit sudden volume increases for example the sudden increase in volume you sometim...

Страница 57: ... are disabled This output is ideal when connecting to an audio receiver or amplifier that has its own remote control for controlling the volume Is an external subwoofer connected to the Subwoofer Output This option only appears when Variable Output Speakers On is selected Select Yes if you want the low bass frequencies to be directed from the SUBWOOFER Out jack to the connected external subwoofer ...

Страница 58: ...empts to tune to that channel You can then adjust your off air antenna for maximum signal strength largest number for the selected channel The signal strength for a digital channel will be shown as until the signal is strong enough for use then numbers will appear Analog channels will always have the display N A since analog signal strength is not measured Only primary channels appear in the list ...

Страница 59: ...n be changed to accept composite video instead When using composite video connect the yellow RCA cable to the Y VIDEO connector on the TV Select the Input 2 video source Composite Video Component Video Y PB PR Composite Video Component Video Y PB PR Special Features 7 Ethernet Setup 8 Auto Tuning 6 Video Input Source 5 Signal Source Signal Source 4 Software Upgrade 3 Channel Search 2 Signal Streng...

Страница 60: ... shows and simply press the OK button on the remote to read more text If more than one link appears use the arrow buttons to highlight the one you want To exit the screen press CLEAR on the remote Initial Volume 2 Maximum Volume 3 CableCARD Tools 4 Remote Setup 5 Text here Initial Channel 1 Go Back 0 Main Menu Connections Special Features Press 5 or 6 to point to an option then press OK to select ...

Страница 61: ...vailable on a channel or input Off No captioning information is displayed On When Muted Captioning information is only shown when available and the TV s sound is muted To mute the sound press the MUTE button on the remote control and captioning information will appear on the screen if available Notes Use the CC button on the remote to toggle CC on and off Go to the remote section for more informat...

Страница 62: ...rity 4 Digital Captions Digital Captions 3 Analog Captions 2 Caption Display 1 Go Back 0 Main Menu Preferences Closed Captioning Press 5 or 6 to point to an option then press OK to select it Press 3to return to the menu You can select a mode or source of closed captions for digital TV programs If the Caption Priority feature is set to Use the digital captions then the digital caption mode you sele...

Страница 63: ...ord the video closest to its original format Turn on Automatic Format Switching so that as you change channels the TV will change formats for you Notes There is no ability provided to change the screen format for a 16 9 video signal since it fills up the entire area of the TV s screen The format of some video cannot be changed even though it appears to be a 4 3 aspect ratio picture The FORMAT butt...

Страница 64: ...nge the color of the menu system and banner Menu Language 6 Lamp Power 7 Translucency 5 Record Output Color Scheme 4 Time Menu 3 Screen Format 2 Closed Captioning 1 Go Back 0 Main Menu Preferences Press 5 or 6 to point to an option then press OK to select it Press 3to return to the menu You can select from one of four colors for the menu system and the channel banner Plum Raspberry Emerald Sky Blu...

Страница 65: ...his publication are for representation only 63 Reference Chapter Overview Troubleshooting Lamp Replacement Instructions HDTV Specifications Accessory Information Limited Warranty Care and Cleaning FCC Information Index Chapter 5 ...

Страница 66: ...ial Features then Remote Setup Choose TV default Power indicator is blinking or flashing If the light blinks 5 times pauses and blinks again 5 times the lamp is trying to turn on If the TV doesn t turn on after 5 minutes and then the light blinks steadily for one minute one of the following options is possible Lamp door is open Locate the door on the side of the TV and close it Turn off the TV and...

Страница 67: ...qualizer SRS and Sound Logic settings Check if SAP is turned on Check that the Audio Mode is set to your language Humming or buzzing noise The TV is in its lamp cool down cycle To prolong the life of the TV s lamp system the TV must warm up and cool down properly You may notice additional noise during these cycles Maybe the speakers are turned off Check the FIXED VARIABLE OUT control panel in the ...

Страница 68: ... and the remote sensor on the component Make sure there is a clear path Maybe the remote isn t aimed directly at the component TV or VCR that you re trying to operate Maybe remote is not in TV Mode Press the TV button so the remote controls the TV Maybe batteries in remote are weak dead or installed incorrectly If batteries are weak you will not be able to activate backlighting on the remote inste...

Страница 69: ...e will apply IMPORTANT PRECAUTIONS Before you begin make sure you read and understand all of the instructions If you need any clarification call 1 866 723 6486 for help You must follow all the instructions step by step TTE Technology Inc cannot be held responsible for failure to adhere to the safety measures described herein the safety measures on the back panel of the TV and any other reasonable ...

Страница 70: ...odel Number Sticker with Lamp Type 7 Loosen the screw on the door don t remove the screw just loosen it Note Don t use a coin to loosen the screw because the coin could fall into the TV 8 Press the catch tabs near the screw you just loosened one tab is above the screw and one is below and remove the entire lamp access door Place the door to the side don t put it on the floor or anywhere someone mi...

Страница 71: ...rn on unless this door is in place and properly attached a Insert the catch tabs also called latches into the slots on the left side of the lamp access compartment first Then put the rest of the door in place by rotating the door until it is fully closed and the latches are engaged b Tighten the screw 16 Plug the power cord into the back of the TV first and then back into the wall outlet strip 17 ...

Страница 72: ... Low High Horizontal Resolution Picture Width 1280 Horizontal Viewing Angle Alpha H 80 Hybrid Lens System Yes Picture Presets Vibrant Day Natural Cinematic Night Videogame Professional Personal Light Engine Type DLP Light Engine Picture Screen Pitch Screen 155mm Scan Rate Converter Yes Vertical Viewing Angle Alpha V 20 Wide Band Video Amplifier Yes Sound Audio Power Watts Front Speakers 20 Watts C...

Страница 73: ... Timers Yes Front Panel Stereo Headphone Jack 3 5mm Stereo Mini jack Front A V Input Composite with S Video Back Panel Inputs Outputs Composite A V Inputs with Autodetect S Videos 2 sets Component with composite audio video inputs 2 Y Pr Pb RCA Jacks SYNCROSCAN Antenna Cable Inputs 2 RF HDMI DVI Input with Audio Input menu selection 1 Ethernet RJ45 Input 1 Audio Video Record Output 1 Digital Audio...

Страница 74: ...V or go to the Lamp Power menu for the lamp type To order call 1 800 338 0376 Push on Cable attaches to the round antenna connectors called 75 ohm F type on the back of your VCR or TV The ends push on for a quick connection VH89 6 ft 5 95 Screw on Cable attaches to the round antenna connectors called 75 ohm F type on the back of your VCR or TV The ends screw onto the connectors for a secure connec...

Страница 75: ...ust take your unit to the Service Center location at your own expense or pay for the cost the Service Center may charge to transport your unit to and from your home Proof of purchase in the form of a bill of sale or receipted invoice which is evidence that the product is within the warranty period must be presented to obtain warranty service For rental firms proof of first rental is also required ...

Страница 76: ...onnect the equipment into an outlet on a circuit different from that to which the receiver is connected Consult the dealer or an experienced radio TV technician for help This Class B digital apparatus complies with Canadian ICES 003 Limitation of Warranty THE WARRANTY STATED ABOVE IS THE ONLY WARRANTY APPLICABLE TO THIS PRODUCT ALL OTHER WARRANTIES EXPRESS OR IMPLIED INCLUDING ALL IMPLIED WARRANTI...

Страница 77: ...olume up down 25 C Cable Box remote codes 31 Cable Channel List 36 CABLE INPUT jack 13 CableCARD 3 Connection 18 slot 13 Tools menu 58 CableCARD Tools 58 Cables to connect 8 Canada English ratings 42 French ratings 42 V Chip unrated program 42 Canada V Chip 41 Caption display 59 priority 60 style 60 Captions Analog 59 Background color 60 Background Opacity 60 Color 60 Digital 60 Font 60 Opacity 60...

Страница 78: ...s 48 Action buttons 49 Choice fields 49 Choice lists 49 Numeric entries 49 Sliders 49 Menu Language 62 Menu language 22 MENU OK Button 14 Menus 48 Audio 53 Moving through 48 Picture Quality 50 Preferences 59 Mode Audio 54 Modes remote control 27 Mono 53 Mute Closed captioning 59 MUTE button 25 N Natural picture setting 50 Noise reduction 51 Normal screen format 61 Number buttons 24 Numeric entries...

Страница 79: ...25 T Things to Consider Before You Connect 8 Time display 34 Time of Day 61 Timer Sleep 61 Wake up 61 Tint 50 Translucency 62 Troubleshooting 64 TruScan 3 Turn on TV 21 TV button 25 TV CableCARD connection 18 TV HDMI or DVI component connection 17 TV problems 64 TV remote codes 32 TV Satellite Receiver VCR connection 16 TV VCR DVD Player Connection 15 U Universal remote programming to control othe...

Страница 80: ...ks are trademarks of THOMSON S A used under license to TCL Thomson Electronics TTE Printed in USA TOCOM 1633646A Please do not send any products to the Indianapolis address listed in this manual or on the carton This will only add delays in service for your product Visit the RCA Scenium website at www rcascenium com ...

Отзывы: