


Operating Your Receiver
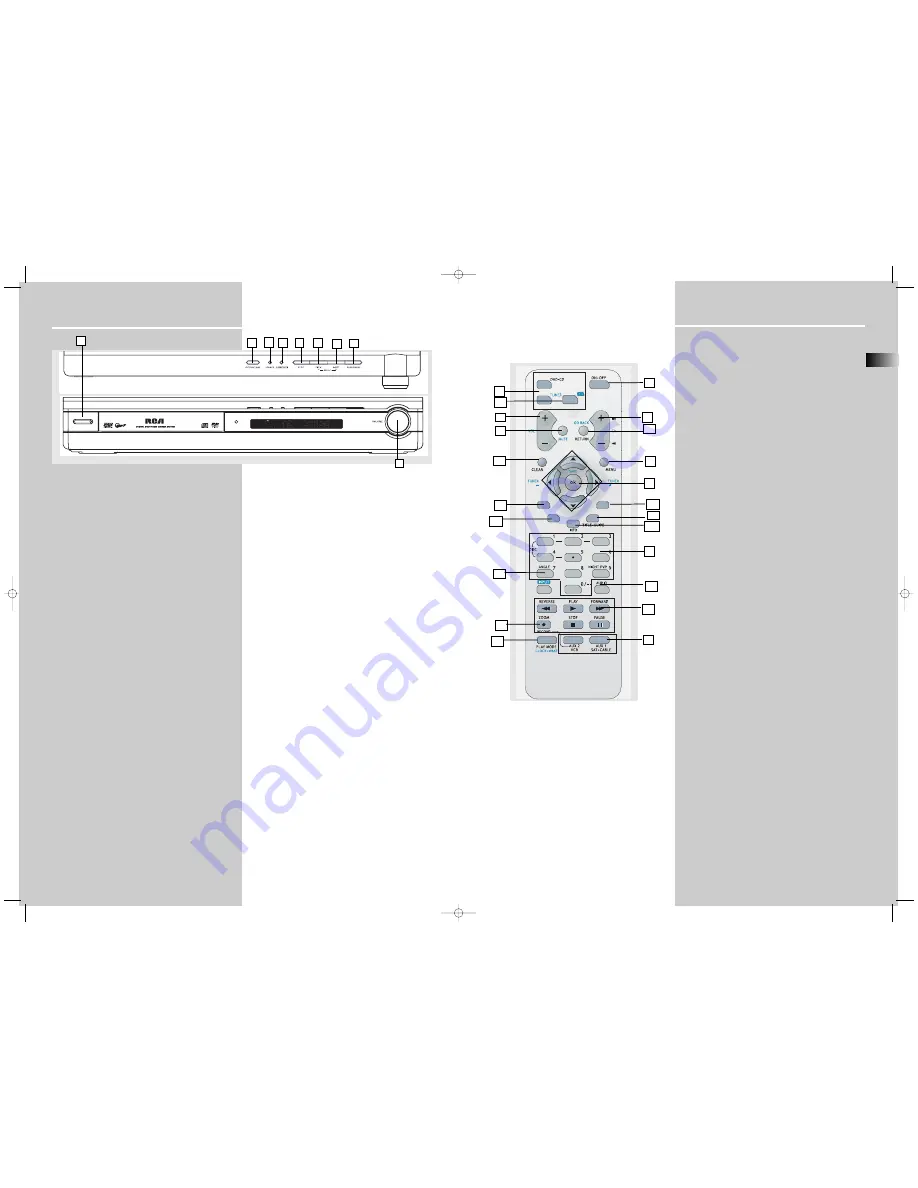
Receiver Controls
1. STANDBY / ON
• To turn on or off the receiver.
2. OPEN / CLOSE
• Press to open / close the CD compartment door.
3. SOURCE
• To select input source. For example, DVD/CD, VCR, etc.
4. SUBWOOFER
• Press to toggle among different subwoofer mode.
5. STOP
To stop DVD/CD playback.
6. PRESET - / PREV
• To move back to the beginning/previous preset memory
location in tuner mode.
• To skip to the beginning/previous track in CD mode and the
beginning/previous chapter in DVD mode (only during
playback).
7. / NEXT
• To go to the next preset memory location in tuner mode.
• To skip to the next track in CD mode and the next chapter in
DVD mode (only during playback).
8. PLAY/PAUSE
To start and pause DVD/CD playback.
9. VOLUME
Turn the knob to adjust volume level.
1
6
2
4
9
7
5
10
3
Operating Your Receiver
EN
Remote Control
Please be sure you have inserted the batteries into the remote
control. You can test it by pressing any button.
1. ON
•
OFF
• To turn on or off the receiver.
2. Source Buttons
• To turn on and select various audio/video sources. (The button functions will
be re-arranged when in AUX 1 and AUX 2 mode, the function may vary depend-
ing on the compnents used)
3. CH+, CH-
• To select programmed stations in TUNER mode.
• To skip to the next or previous chapter, track or image in DVD, CD, mp3
and JPEG mode.
4. VOL+, VOL- (Volume Buttons)
• To adjust the volume.
5. MUTE
• To mute / unmute all audio outputs.
6. SUBWOOFER
• Selects among subwoofer output level (SOFT SUBWOOFER, BALANCED
SUBWOOFER, STRONG SUBWOOFER, POWERFUL SUBWOOFER).
7. Adjustment Buttons
• In TUNER mode, press the arrow buttons to tune up or down the radio fre-
quencies.
- press
OK
will enter function setting mode.
- press
OK
again for dimmer and sleep function, then press
LEFT
and
RIGHT
to make changes.
- When the display shows the setup you want to change (dimmer, sleep, etc),
press
UP
and
DOWN
to make changes.
• In DVD/CD/JPEG mode, press the arrow buttons to navigate OSD menu,
and press
OK
to validate selection.
8. Number Buttons
• In Tuner mode, to select a preset station.
• In DVD/CD mode, enable pull down menu by
INFO
, then press the arrow
buttons to select field to be adjusted. Press the
Number
buttons to direct
input the settings (e.g. CD track)
9. MENU
• In Tuner mode:
- Press to store desired frequency in memory. The flashing icon “PRESET” will
appear in display. Input your desired channel number while the word is still
flashing and the frequency will be stored.
• In DVD mode, press for menu setup for DVD title.
10. Operation Buttons
• Press
DVD/CD
on the remote to enter DVD/CD mode. In DVD/CD mode,
you can press the operation buttons to perform actions such as play, stop,
pause, etc.
11. CLEAR
• When in OSD menu, press to return to the root menu.
12. AUDIO
• In Tuner mode, press this button to switch from ST to MONO mode and
vice-versa.
• In DVD mode, press to select different audio channel (if available).
13. ANGLE (DVD only)
• Press to select different screen display angles.
14. ZOOM (DVD / JPEG only)
• Press to select the zoom ratio.
15. INFO
• Press to display playback information.
16.TITLE
•
GUIDE
• Press to go to the title menu at DVD mode.
17. SURROUND
• Press to change the surround sound settings.
18. PLAYMODE
• Press to toggle between different playmodes. (Repeat chapter, etc.)
19. EQ. LEVEL
• Press to toggle between equalizer setting, BASS/TRE setting and channel
setting.
- In equalizer setting mode, use
LEFT/RIGHT
to change the setting.
- In BASS/TRE setting mode, use
UP/DOWN
to adjust level setting.
- In channel setting mode, use
LEFT/RIGHT
to select channel, and use
UP/DOWN
to adjust level setting.
20. TV
• Press to select the television.
Functions in TV mode
(available when using a RCA TV)
3. CH+, CH-
• Press to change channel.
7. LEFT / RIGHT
• Press to use the zoom function (with a 16:9 television only)
9. MENU
• Press to exit a menu.
15. INFO
• Press to obtained information about the channel.
16. TITLE.GUIDE
• Press to display the programmed guide.
21. GO BACK / RETURN
• Press to return to the channel watched before last.
EQ. LEVEL
SURROUND
SUBWOOFER
1
4
2
3
10
14
13
12
7
8
9
11
11
17
5
6
16
15
18
8
2
19
STANDBY/ON
20
21
RTD160-EN receiver 6/10/04 2:37 PM Page 14


