RCA RTD160 Скачать руководство пользователя страница 3

Getting Started

Inserting Batteries into Remote Control 

Insert two “AAA” batteries according to the + and - signs
on the battery compartment. To use the remote control,
point it directly at your receiver.

Set up and Maintenance of the Receiver

IMPORTANT NOTE

• Provide spaces for sufficient ventilation as indicated
below.  If the space is insufficient, the unit may overheat
resulting in malfunction and shorter life time.

• Do not connect to the AC power cords until  all connec-
tions are completed. 
• Do not use your set immediately after transferring it from
a cold place to a warm place:  there is risk of condensation.
• Do not expose your set to water and excessively high
temperatures.
•  After having disconnected your set, clean the case with a
soft cloth, or with a slightly damp leather chamois. Never
use strong solvents.

Disc handling precaution:

• Do not touch the recorded surface.

• Do not use record cleaning sprays, solvent or anti-static
liquid.
• If the disc is dirty, clean it with a damp cloth and wipe
from the center out. Wipe in straight line and not in circu-
lar motion.
• Do not attach stickers, label on the disc.
• Store the disc in its case after playing.

Regional coding

Your DVD player has been designed to process regional
management information that is stored on DVD. DVD that
have different regional codes to that of your player cannot
be played. The regional code for your player is 1. All means
all regions. When you buy a disc, check that it bears the
correct logo.

Protect your Components from
Overheating

• Do not block ventilation holes in any component.
Arrange the components so that air can circulate freely.

• Do not stack components directly on top of each other.

•  Allow adequate ventilation when placing your compo-
nents in a stand.

•  Place the receiver near the top shelf of the stand so
heated air rising from it will not affect other components.

Disc you can play

While advances have been made to ensure that your player
is compatible with the largest number of discs possible, it
cannot be guaranteed that you will be able to play discs
which might not be compatible with audio CD, VCD and
SVCD standards. In the case of writable and rewritable
discs, compatibility with this player depends on the DVD
writer, the write sofeware and the disc used.

DVD video - 

Digital video discs - 12 cm and 8 cm, single or dou-

bled sided, single or dual layer. DVDs are high-density optical discs

on which high quality picture and audio are recorded by means of

digital signals.

DVD-R, DVD-RW, DVD+R, DVD+RW - 

Most DVD-R and DVD+R

(one recording only), DVD-RW and DVD+RW discs (rewritable).

Depending on the DVD writer and discs used. Recordings using

DVD-R and DVD+RW discs must be made in Video DVD mode.

Recordings using DVD+RW discs must be made in accordance with

the specifications for DVD+RW discs with a 4.7 GB capacity.

VCD, Video Compact Disc - 

CD on which you can record up to 74

minutes of VHS-quality video associated with still images, audio

tracks and interactive menu.

SVCD, Super Video Compact Disc - 

Most SVCDs comply with the

IEC62107 standards. SVCDs can be used to record up to 70 min-

utes of digital sound and images in accordance with MPEG-2 stan-

dards for video and MPEG-1 standards for audio.

Audio CDs - 

Audio CDs (8 and 12cm)

CD-R, CD-RW - 

Most CD-R (one recording only) and CD-RW

discs (rewritable). This player can play most CD-R discs. CD-Rs

written during a multisession recording can also be played, provid-

ed that the session had ended before the disc is played (depend-

ing on the write software). However, depending on the condition of

the CD writer, computer and the disc used, you may find that not

all discs will play successfully. When playing a CD-R disc, it is com-

pletely normal for the unit to take up to 30 seconds to recognize

the disc before starting to play. If the disc is not recognized

after a period of 30 seconds, remove the disc and then insert it

again.

•  

Irrespective of the actual recording capacity of the CD-R, do

not use its full capacity.

•  

CD-Rs should be preferably used instead of CD-RWs (rewritable

CDs) as, in certain cases, CD-RW playback may be faulty.

•  

Use reliable, good-quality CD write software.

•  

Close all other applications on the computer to ensure reliable

CD-R disc recording.

Disc you cannot play

DVD-ROM, DVD RAM, CDV, SACD, DVD Audio (High resolution tracks).  Data

part of CD Extra, disc with non standard shape (e.g. heart), disc with region

code different from the one specified on the back of the unit.

EN

3

Getting Started

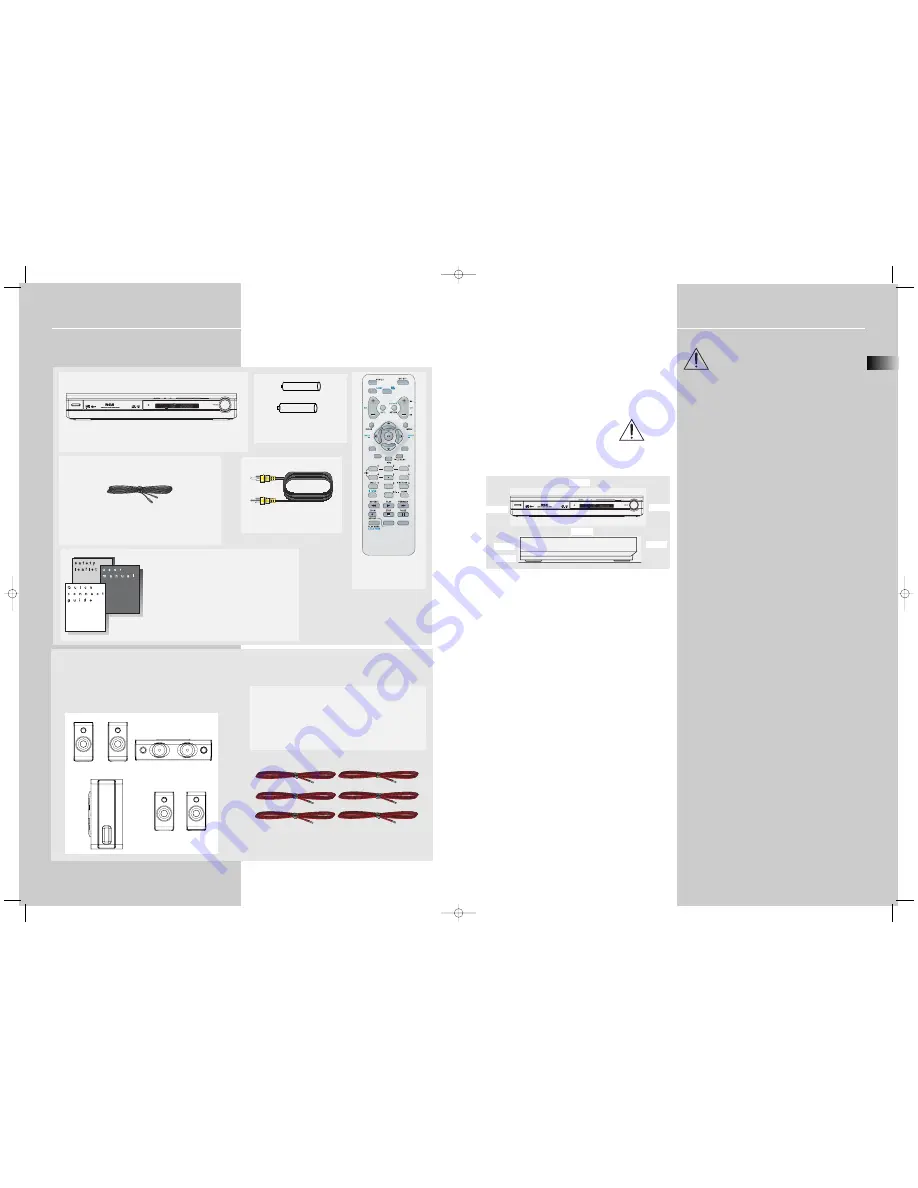
Unpacking the DVD Receiver

You should receive the following items:

2

STANDBY/ON

STANDBY/ON

+         -

+         -

One DVD receiver unit

One pair of “AAA” 

batteries

One Pig-Tail 

antenna wire

one video cable (single wire)
with yellow connectors

  EQ. LEVEL

SURROUND

SUBWOOFER

AUX 2
  VCR

      AUX 1
  SAT.CABLE

•  one instruction book;
•  one safety leaflet;
•  one Quick Connection Guide

One Remote Control

(RCR311AC1)

Unpacking The Speakers 

• one set of speakers including 1 set of left and right front
speakers, 1 centre speaker, 1 subwoofer and 1 set of left
and right rear speakers.

FRONT SPEAKERS

CENTER  SPEAKER

SUBWOOFER

REAR SPEAKERS

(SURROUND SOUND)

10cm/4”

5cm/2”

10cm/4”

10cm/4”

10cm/4”

1 X green/grey stripped wire for center speaker

1 X red/grey stripped wire for front right speaker

1 X white/grey stripped wire for front left speaker

1 X purple/grey stripped wire for subwoofer

1 X blue/grey stripped wire for rear left speaker

1 X grey/grey stripped wire for rear right speaker

Front

Rear

RTD160-EN  receiver  6/10/04  2:36 PM  Page 6

Содержание RTD160

Страница 1: ... IMPORTADOR Comercializadora Thomson de México S A de C V Álvaro Obregón No 151 Piso 13 Col Roma Delegación Cuauhtémoc C P 06700 México D F Telefono 52 55 11 020360 RFC CTM 980723 KS5 It is important to read this instruction book prior to using your new product for the first time Es importante leer este manual antes de usar por vez primera su euipo u s e r m a n u a l RTD160 EN receiver 6 10 04 2 ...

Страница 2: ...orient the receiving antenna that is the antenna for the radio or television that is receiving the interference Move the unit away from the equipment that is receiving interference Plug the unit into a different wall outlet so that the unit and the equipment receiving interference are on different branch circuits If these measures do not eliminate the interference please consult your dealer or an ...

Страница 3: ...rdings using DVD R and DVD RW discs must be made in Video DVD mode Recordings using DVD RW discs must be made in accordance with the specifications for DVD RW discs with a 4 7 GB capacity VCD Video Compact Disc CD on which you can record up to 74 minutes of VHS quality video associated with still images audio tracks and interactive menu SVCD Super Video Compact Disc Most SVCDs comply with the IEC6...

Страница 4: ...your TV set check whether your TV has another Video socket Composite S video that you can use to connect your player 1 It is recommended that you should only use one kind of connection method listed below Progressive scan You can enable the progressive scan function through the main menu only if the following requirments are fulfilled 1 Your TV supports progressive scan function 2 Component video ...

Страница 5: ...er s perspective Height The mid and high frequency drivers of the three front speakers should be as close as possible to the same height This often requires placing the center speaker directly atop A or beneath B the TV set EN 7 Getting Started Connecting the Speakers Speakers There are 6 speakers equipped with the unit 2 front 1 cen ter 2 rear 1 subwoofer In order to enjoy good surround effects a...

Страница 6: ...e details Level adjustment surround channel level expectation Even though you adjust the surround channel to be as loud as the others on the test signal you ll find that on actual program material the surround channel is usually much lower than the front Don t be tempted to re adjust the surround level program producers use surround mostly for subtle atmosphereics and ambience and only rarely for ...

Страница 7: ...ress OK to validate selection 8 Number Buttons In Tuner mode to select a preset station In DVD CD mode enable pull down menu by INFO then press the arrow buttons to select field to be adjusted Press the Number buttons to direct input the settings e g CD track 9 MENU In Tuner mode Press to store desired frequency in memory The flashing icon PRESET will appear in display Input your desired channel n...

Страница 8: ... OFF on the remote or STANDBY ON on the receiver to return to the standby mode When you turn up the unit for the first time 1 A startup menu will show on the screen when you turn on the unit for the first time 2 Use UP DOWN to highlight the language you want then press OK 3 The chosen language will be your default menu lan guage Selection of Audio source When one of the audio source is selected th...

Страница 9: ...tal for mat Dolby Digital provides better sound quality and a more powerful presence than conventional Dolby Surround This unit is equipped with Dolby Digital 5 1 channel so that you can enjoy enhanced full digital surround sound Different from Dolby Pro Logic in that only four channels Front Left Front Right Centre and Rear are used the new system provides stereo separation of the rear speakers R...

Страница 10: ...ective and suit the acoustic conditions in your listening room you may need to delay the signal coming from some of the speak ers Channel delay compensates for center or surround speakers that are closer to the listening position than the front speakers You may setup the speakers channel by channel while in stop mode enter the setup menu then choose SOUND for speaker setup To change the speaker di...

Страница 11: ...ch speaker you have enabled See Fine Setting of the Speakers and the letters inside the speaker icons show which channel is present in the source information For example the diagram shown means you have all five speakers and subwoofer enabled and the digital sources you played have five channels plus subwoofer complement ed Dolby Digital 5 1 Channels S stands for subwoofer The indication S appears...

Страница 12: ...previous chapter or NEXT to move to the next chapter Press STOP once to stop playback and go into resume mode Quick search 1 While playing a disc press REVERSE on the remote con trol to scan backward through the disc Press FORWARD on the remote to scan forward Press repeatedly to change the searching speed 2 Press PLAY at any time to resume normal playback Time search 1 Press INFO on the remote du...

Страница 13: ...ed when your TV supports progressive scan through com ponent video connection On screen banner display You can access the on screen banner display during play back to select many playback features Each feature is illus trated with an icon However each feature shown in the banner is available only if the disc was created with that particular feature An invalid icon appears on the screen when you se...

Страница 14: ...ly Or you can manually remove bookmark by the following steps 1 Open the bookmark menu 2 Use the arrows on the remote to move the cursor to the bookmark location you want to delete 3 Use the arrow button on the remote to move the cursor to the trash icon 4 Press OK to delete the bookmarked scene Play mode 1 Refer to page 20 General use to open the playmode menu or press PLAYMODE directly 2 Press U...

Страница 15: ... played on screen The menu shows the current settings 2 Use the arrow buttons to highlight an option and press OK to open the selected menu 3 Press the LEFT arrow to go back to the previous menu or press CLEAR to exit the setup menu completely Audio language This step will define the default audio language Choosing an audio language from the on screen banner display will only overwrite this settin...

Страница 16: ...oftware Keep in mind that not all movies and discs are rated The player includes a total of 8 rating steps corresponding to the existing disc rating steps These additional steps allow for a better control the of program playback for all audiences Level 8 All DVDs can be played Factory preset Level 7 to 2 DVDs for general audiences children can be played Level 1 DVDs for children can be played DVDs...

Страница 17: ...look distorted with some DVD disc For a 4 3 movie you will get If you have a conventional 4 3 TV if you select 4 3 letterbox for a 16 9 movie you will get if you select 4 3 Pan Scan for a 16 9 movie you will get the left and right edges are hidden for a 4 3 movie for both selections you will get Dimmer level You can adjust the brightness level of the front display 1 Open the Front Display menu 2 U...

Страница 18: ...ing audio files into mp3 for saving onto CD R W or CD ROM e g Rocky08 mp3 Do not use any other extension e g doc pdf Do not use the mp3 extension for other text or non audio data files as this may result in serious malfunction and harmful noise interference Most commonly available CD creation software can make files compatible for the system but do not forget to finalize your disc after creation T...

Страница 19: ...he time display menu 2 Press the arrow keys to move the cursor to the time dis play box then you can press UP to switch among Track Elapsed Track Remain time during playback The select ed mode is displayed on the banner SUBWOOFER SURROUND SUBWOOFER SURROUND On screen banner display for CD playback General use 1 Press INFO on the remote control to hide and show the on screen banner Only audio CD ba...

Страница 20: ... In the file window use the arrow buttons on the remote to select the file you wish to begin playing 3 Press OK to select a file to play 4 Press PLAY PAUSE on the main unit or PLAY on the remote control to start playback 5 You may use the arrow buttons to selected the next file to be played Playback will stop when all the files have been played Playmode selection for mp3 1 You can select your desi...

Страница 21: ...al tracks to the pro gram 4 Press PLAY to start program playback 5 Move to highlight Done to return to normal playback with program saved Cancel program Program will be cancelled when 1 the disc tray is opened 2 power is turned off SUBWOOFER SURROUND SUBWOOFER SURROUND All Track 1 1 3 5 7 9 2 4 6 8 10 Done Track 2 Track 3 Track 4 Track 5 11 12 Note You can select a maximum of 24 items RTD160 EN CD...

Страница 22: ...own on screen for a while and fade play back will stop until all the files are played 2 You can pause viewing by pressing PAUSE or press PLAY to resume 3 Press STOP to go back to navigation mode Playmode In JPEG mode you can select NORMAL FAST SLOW in the playmode selection field to change the playback speed Playing mp3 and JPEG files simultaneously When you insert a disc containing both mp3 and J...

Страница 23: ...receiver can store all available radio stations automatically in an ascending order SUBWOOFER SURROUND D I G I TA L PRO LOGIC INTRORANDOM DVD VCD CD MP3 Manual preset 1 Tune to a radio station see Manual tuning on page 38 above for details 2 Press MENU on the remote control PRESET will appear on the display 3 While the word PROG is still flashing input your desired preset number 1 40 using the UP ...

Страница 24: ... 30 min utes while in DVD CD mode it automatically switches to standby Auto Power Off Press the STANDBY ON button to switch the player on again The keys do not activate the functions they control unit and or remote control Set the STANDBY ON key to OFF red light on and back to ON again Alternatively turn off the power disconnect the power plug and then re connect it The player may not be operating...

Страница 25: ...a guarantee In order to provide the highest quality product possible we reserve the right to make any improvement or modification without prior notice The English version serves as the final reference on all products and operational details should any discrepancies arise in other languages Video Disc T homson Digita l What your warranty covers Defects in materials or workmanship For how long after...

Страница 26: ...Batteries A unit that has been modified or incorporated into other products or is used for institutional or other commercial purposes A unit purchased or serviced outside Canada Acts of nature such as but not limited to lightning dam age Product Registration Please complete and mail the Product Registration Card packed with your product It will make it easier to contact you should it ever be neces...

Отзывы: