RCA RS2047 Скачать руководство пользователя страница 8

10

EN

11

EN

CD to USB Recording

CD & USB Playback

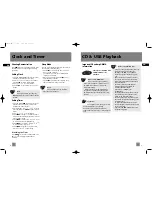
mp3/WMA Playback Sequence

•  Check that the mp3/WMA disc is created with a single folder structure. Refer to the diagram below

for playback sequence details on multi-level folder structure. 

• For example, folders and songs from level 2 are played before moving on to play folders and songs

from level 3.

Folder 1

Folder 3

Song 1.1.1
Song 1.1.2
Song 1.1.3

Song 2.2
Song 2.3
Song 2.4

Song 1.2.1.1
Song 1.2.1.2
Song 1.2.1.3

Folder 1.2.1

Song 2.1.1
Song 2.1.2

Folder 2.1

Song 3.1
Song 3.2

Folder 1.1

Folder 1.2

Folder 2

A

B

C

D

E

F

G

3
4

6
7

8

9

10

11

12

13

LEVEL 1                            LEVEL 2                          LEVEL 3                             LEVEL 4 

Song 4
Song 5

1
2

14

15

Note:

• Folder playback sequence is indicated by the letters A to G.

• Song playback sequence is indicated by the numbers (1 to 15) in front of the song name.

You can record CD tracks / files to your USB
device.

Recording CD to USB Device

1. Connect a USB device to the USB connector at

the front of the unit.

2. In CD mode, press 

CD REC

to enter record

mode. If CD playback is stopped, press 

CD REC

,

playback and recording will start automatically.
If CD is already playing, recording starts at
once. “REC” icon shows on the display in
record mode. 

3. Press 

CD REC

or       to stop recording.

Recording Selected Tracks on a CD
to USB Device

1. Create a CD program by following instructions

under “Setting Up Programs”.

2. In CD stop or navigation mode, press 

CD REC

to enter record mode. 

3. From stop mode, press PROG to enter program

playback mode. Playback and recording starts
automatically. The “PROG” and “REC” icons
show on the display.

4. Press CD REC or      to stop recording.

Deleting a File from USB Device

1. Select the unwanted file using the navigation

keys (refer to “Tracks and Files Navigation” for
details)

2. Press 

DEL

on the remote control (or 

DELETE

on the main unit).

3. Select “YES” on the display by using

(navigation keys) (or rotate 

-

on the

main unit).

4. Press      on the remote control (or 

SELECT

on

the main unit) to confirm.

Deleting All Files on USB Device

In navigation mode, press and hold 

DEL

on the

remote control (or 

DELETE

on the main unit) to

delete all files on the USB device.

Renaming Files on USB Device

1. Select a desired file using the navigation keys

(refer to “Tracks and Files Navigation” for
details).

2. Press 

PROG

on the remote control.

3. Press          (navigation keys) (or rotate 

-

on the main unit) to select

alphabets, press          (or 

BACK

or 

SELECT

on

the main unit) to move to the next alphabet.
The alphabet being edited is flashing on the
display. 

4. Press 

PROG

when finished.

Note: 

Recording stops automatically when CD

stops (Example: end of disc is reached).

Note:

Only empty folders can be deleted.

Note:

After deleting the last file in a folder,

the display shows ‘EMPTY’ and then goes back

up one level in the folder tree and shows the

current empty folder.

RS2047EN  3/1/06  1:53 PM  Page 16

Содержание RS2047

Страница 1: ...In China Impreso en China IMPORTADOR Comercializadora Thomson de México S A de C V Álvaro Obregón No 151 Piso 13 Col Roma Delegación Cuauhtémoc C P 06700 México D F Telefono 52 55 11 020360 RFC CTM 980723 KS5 It is important to read this instruction book prior to using your new product for the first time Es importante leer este manual antes de usar por vez primera su euipo RS2047EN 3 1 06 1 53 PM ...

Страница 2: ... try to insert it the other way If it still won t fit contact a qualified electrician to change the outlet or use a different one Do not attempt to bypass this safety feature Main plug is used as the disconnect device it shall remain operable and should not be obstructed during intended used To be completely disconnected the apparatus from supply mains the main plug of the apparatus shall be disco...

Страница 3: ...t use damaged warped or cracked discs Do not touch the pick up lens which is located inside the disc compartment To keep dust from collecting on the pick up lens do not leave the compartment door open for an extended period of time If the lens becomes dirty clean it with a soft brush or use an air blower brush designed for camera lenses The apparatus shall not be exposed to dripping or splashing a...

Страница 4: ...our and minute digit in clock setting skip forward goes to the next track or file CD and USB modes selects the next program location tunes up radio frequency selects the next radio preset station and increases hour and minute digit in clock setting play pause plays and pauses playback stop stops playback or recording returns to the first track on a mp3 WMA disc selects tune or preset mode when lis...

Страница 5: ... the respective mp3 and WMA icon lights on the display 5 Press in stop mode to begin playback Press during playback to pause and again to resume playback 6 Press or to skip to the previous or next track or file Press and hold to search through a CD while it is playing 7 During playback press to stop playback Playing and Loading Discs Simultaneously 1 Press OPEN CLOSE to open the disc tray while a ...

Страница 6: ...t Showing Demonstration Press DEMO to turn on off demonstration mode The demonstration scrolls through all display operations Setting Clock 1 Press and hold CLOCK on the remote control until the hour flashes on the display 2 Press or to set the hour and then press CLOCK to shift to minute digits 3 Press or to set the minute 4 Press CLOCK to save settings or to quit setting Setting Timer 1 Press an...

Страница 7: ...ng time D For mp3 WMA and USB playback title artist and elapsed time show on the display alternatively In stop mode for mp3 WMA discs press to view the total number of files on the disc Press again to show the total number of folders Sampling Tracks Press INTRO on the remote control to play the first 10 seconds of each track file on the current disc or USB device Press again to turn intro mode off...

Страница 8: ...g instructions under Setting Up Programs 2 In CD stop or navigation mode press CD REC to enter record mode 3 From stop mode press PROG to enter program playback mode Playback and recording starts automatically The PROG and REC icons show on the display 4 Press CD REC or to stop recording Deleting a File from USB Device 1 Select the unwanted file using the navigation keys refer to Tracks and Files ...

Страница 9: ...system s front panel Move closer to the system Remove any obstacles between the remote and the system Troubleshooting Tips Radio Basic Listening Refer to Quick Start for basic listening operations Auto Preset Programming FM only Press and hold BAND for 2 seconds to scan stations in FM band The stations will then be stored as preset channels A maximum of 32 stations can be stored Beware of your pre...

Страница 10: ... a bill of sale or receipted invoice which is evidence that the product is within the warranty period must be presented to obtain warranty service For rental firms proof of first rental is also required What your warranty does not cover Customer instruction Your Owner s Manual describes how to install adjust and operate your unit Any additional information should be obtained from your dealer Insta...

Страница 11: ...ads Batteries A unit that has been modified or incorporated into other products or is used for institutional or other commercial purposes A unit purchased or serviced outside Canada Acts of nature such as but not limited to lightning damage Product Registration Please complete and mail the Product Registration Card packed with your product It will make it easier to contact you should it ever be ne...

Отзывы: