background image

Table of Contents 

Important Safety Instructions - - - - - - - - - - - - - - - - - - - - - - - - - - - -


P1 

Additional Warnings and Precautions - - - - - - - - - - - - - - - - - - - - - -  P2 
FCC Warning - - - - - - - - - - - - - - - - - - - - - - - - - - - - - - - - - - - - - - - - -  P3 
In The Box - - - - - - - - - - - - - - - - - - - - - - - - - - - - - - - - - - - - - - - - -  P3 
Table of Contents    - - - - - - - - - - - - - - - - - - - - - - - - - - - - - - - - - - - -


P4 

Remove & Close the Lens Cover    - - - - - - - - - - - - - - - - - - - - - - - - -  P5 
Placing Your Projector    - - - - - - - - - - - - - - - - - - - - - - - - - - - - - - - -  P5 
To Reduce Image Distortion    - - - - - - - - - - - - - - - - - - - - - - - - - - - -  P6 
Distance Between The Projector And Screen - - - - - - - - - - - - - - - -  P6 
Placing Your Projector On Ceiling    - - - - - - - - - - - - - - - - - - - - - - - -


P6 

Adjust the Vertical Location    - - - - - - - - - - - - - - - - - - - - - - - - - - - -


P7 

Adjust the Focus and Keystone      - - - - - - - - - - - - - - - - - - - - - - -


P7 

Controls of Remote    - - - - - - - - - - - - - - - - - - - - - - - - - - - - - - - - - - -  P8 
Install / Remove Battery Of Remote    - - - - - - - - - - - - - - - - - - - - - - -  P8 
Controls of Projector    - - - - - - - - - - - - - - - - - - - - - - - - - - - - - - - - -  P9 
Install Power Adapter    - - - - - - - - - - - - - - - - - - - - - - - - - - - - - - - - -  P10
Connect HDMI show the Image On Projector Screen    - - - - - - - - -  P11 
Connect AV Show The Image On Projector Screen - - - - - - - - - - - -  P11 
Connect VGA Show The Image On Projector Screen - - - - - - - - - - -  P12
Connect Audio Output (Aux Out / Line Out / Earphones) - - - - - - - -  P13
Install USB Device And Micro SD Card 

 - - - - - - - - - - - - - - - - -  P13

Using Micro SD  Card and USB Playback - - - - - - - - - - - - - - - - - - -  P14

4

 - - - 

Using Projector Menu 1.0 - - - - - - - - - - - - - - - - - - - - - - - - - - - - - - -  P15
Using Projector Menu 2.0 - - - - - - - - - - - - - - - - - - - - - - - - - - - - - - -  P16
Using Projector Menu 3.0 - - - - - - - - - - - - - - - - - - - - - - - - - - - - - - -  P17
Using Projector Menu 4.0 - - - - - - - - - - - - - - - - - - - - - - - - - - - - - - -  P18
Specifications - - - - - - - - - - - - - - - - - - - - - - - - - - - - - - - - - - - - - - - -  P19

Trouble shooting - - - - - 

- - - - - - - - - - - - - - - - - - - - - - - - - - - - - - - - -  P20

- - - - - - - - - - - - - - - - - - - - - - - - - - - - - - - - -  P21

Warranty card  - - - - - - - - - - - - - - - - - - - - - - - - - - - - - - - - - - - - - -  P22

Projector screen Setup

Содержание RPJ300 COMBO-BLK

Страница 1: ...尺寸 105 148MM 80克书纸 黑白印刷 ...

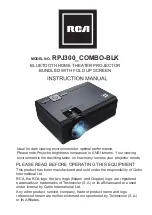
Страница 2: ...egistered trademarks or trademarks of Technicolor S A or its affiliates and are used under license by Curtis International Ltd Any other product service company trade or product name and logo referenced herein are neither endorsed nor sponsored by Technicolor S A or its Affiliates Ideal for dark viewing environments for optimal performance Please note Projector brightness is measure in ANSI lumens...

Страница 3: ... point where they exit from the apparatus 10 Only use a achments accessories specified by the manufacturer 11 Unplug this apparatus during lightning storms or when unused for long periods of me 12 Refer all servicing to qualified service personnel Servicing is required when the apparatus has been damaged in any way such as power supply cord or plug is damaged liquid has been spilled or objects have ...

Страница 4: ...5 WARNING Changes or modified to this unit not expressly approved by the party responsible for compliance could void the user s authority to operate the equipment 6 WARNING Use of this unit near fluorescent lighting may cause interference regarding use of the remote If the unit is displaying erratic behavior move away from any fluorescent lighting as it may be the cause 7 WARNING Shock hazard Do N...

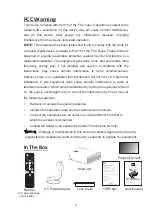
Страница 5: ...nications However there is no guarantee that interference will not occur in a particular installation If this equipment does cause harmful interference to radio or television reception which can be determined by turning the equipment off and on the user is encouraged to try to correct the interference by one or more of the following measures Reorient or relocate the receiving antenna Increase the ...

Страница 6: ... Remote P8 Install Remove Battery Of Remote P8 Controls of Projector P9 Install Power Adapter P10 Connect HDMI show the Image On Projector Screen P11 Connect AV Show The Image On Projector Screen P11 Connect VGA Show The Image On Projector Screen P12 Connect Audio Output Aux Out Line Out Earphones P13 Install USB Device And Micro SD Card P13 Using Micro SD Card and USB Playback P14 4 Using Project...

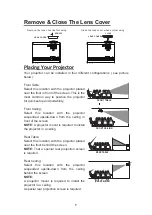
Страница 7: ...f the screen NOTE A projector mount is required to install the projector in a ceiling Rear Table Select this location with the projector placed near the floor behind the screen NOTE That a special rear projection screen is required Rear Ceiling Select this location with the projector suspended upside down from the ceiling behind the screen NOTE A projector mount is required to install the projecto...

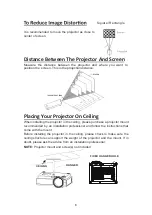
Страница 8: ...he ceiling please purchase a projector mount recommended by an installation professional and follow the instructions that come with the mount Before installing the projector in the ceiling please check to make sure the ceiling structure can support the weight of the projector and the mount If in doubt please ask the advice from an installation professorial NOTE Projector mount and screw s not incl...

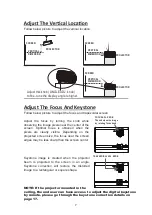
Страница 9: ...ter Keystone image is created when the projector beam is projected to the screen in an angle Keystone correction will restore the distorted image to a rectangular or square shape 7 SCREEN PROJECTOR VERTICAL DIMENSION VERTICAL DIMENSION SCREEN PROJECTOR VERTICAL DIMENSION SCREEN PROJECTOR Adjust this knob ANGLE ADJ knob to fine tune the display angle to higher FOCUS ADJ KNOB Then sharpen the image b...

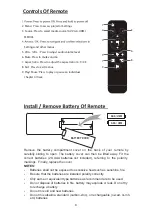
Страница 10: ...t type batteries as recommend are to be used Do not dispose of batteries in fire battery may explode or leak Do not try to recharge a battery 8 AAA UM4 AAA UM4 BATTERY DOOR Do not mix alkaline standard carbon zinc or rechargeable ni cad ni mh etc batteries Controls Of Remote 2 Menu Press to access projector Settings 3 Source Press to select media source AV VGA HDMI MEDIA Settings and other menus 5...

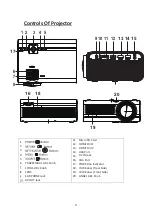
Страница 11: ... 14 15 16 1 3 4 5 6 7 8 910 12 11 VGA 2 IR 17 18 19 20 LENS FOCUS ADJ Knob TRAPEZOIDAL ADJ Knob POWER on Indicator DC IN jack OK IR Window Rear Side IR Window Front Side ANGEL ADJ Knob EAR PHONE Jack AV OUT Jack Micro SD Card HDMI Port 1 USB Port VGA Port HDMI Port 2 ...

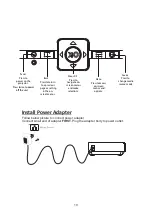
Страница 12: ...r body to power outlet 10 Source Press to change media source mode Menu Presstoaccess on screen menus and options Arrows OK Press to navigate on screenmenus and make selections Back Presstoreturn to a previous page or setting in the on screenmenus Power Press to power on the projector Press twice to power off the unit ...

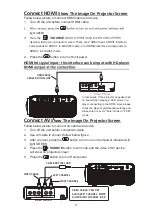
Страница 13: ... on unit and power indicator will light GREEN 4 Press the SOURCE button to AV mode and the video of AV device will show on projector screen 5 Press the button to turn off unit power 11 HDMI CABLE CABLE NOT INCLUDE LEFT CHANNEL RIGHT CHANNEL VIDEO CABLE VIDEO PLAYER VIDEO CABLE YELLOW AUDIO LEFT CHANNEL WHITE AUDIO RIGHT CHANNEL RED CABLE NOT INCLUDE In rare cases if the projector s speaker has no ...

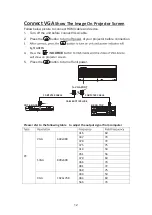
Страница 14: ... light GREEN 4 Press the SOURCE will show on projector screen 5 Press the button to turn off unit power Please refer to the following table to adjust the output signal from computer PC VGA 640x480 31 5 60 34 7 70 37 9 72 37 5 75 SVGA 800x600 31 4 50 35 1 56 37 9 60 46 6 70 48 1 72 46 9 75 XGA 1024x768 40 3 50 48 4 60 56 5 70 12 To VGA PORT NOTE BOOK DECK TOP OR C OMPUTER CABLE C OMPUTER CABLE CABL...

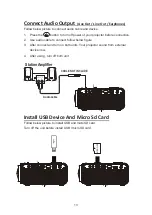
Страница 15: ...ction 2 Use audio cable to connect follow below figure 3 After connect and turn on both units Your projector sound from external device now 4 After using turn off both unit Install USB Device And Micro Sd Card Follow below picture to install USB and microSD card Turn off the unit before install USB microSD card 13 MICRO SD CABLE NOT INCLUDE Station Amplifier Audio cable ...

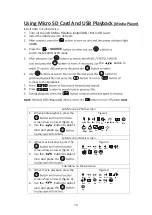
Страница 16: ...creen show on lower figure 1 2 Use the button to select icon and press Figure 1 Sub Menu on Music screen 3 When music playback press the screen show on lower figure 2 4 Use the button to select icon and press Figure 2 Sub Menu on Movie screen 5 When movie playback press the screen show on lower figure 3 6 Use the button to select icon and press Figure 3 14 OK OK OK Micro SD Pause FB FF Next Prev Stop...

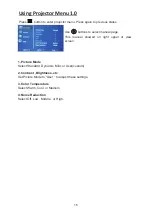
Страница 17: ...ns to select manual page This manual showed on right upper of view screen OK 1 Picture Mode Select Standard Dynamic Mild or User custom 2 Contrast Brightness etc Set Picture Mode to User to adjust these settings 3 Color Temperature Select Warm Cool or Medium 4 Noise Reduction Select Off Low Middle or High ...

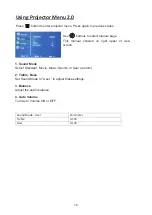
Страница 18: ...ual page This manual showed on right upper of view screen Sound Mode User Parameter 0 0 1 0 e l b e r T 0 0 1 0 s s a B OK 1 Sound Mode Select Standard Movie Music Sports or User custom 2 Treble Bass Set Sound Mode to User to adjust these settings 3 Balance Adjust the audio balance 4 Auto Volume Turn Auto Volume ON or OFF ...

Страница 19: ...nds Chinese Franais Deutech Slovenina Slovak Espanol Italiano Norsk Portugues Magyar Srpski Esky Polski Svenska Dansk Romnete Suomi OK INFO RCA SW Ver V7 0 1 OSD Language Select different language follow below figure 2 Aspect Ratio Select 16 9 4 3 3 Bluetooth Turn Bluetooth ON or OFF 4 Projection mode Select Front Rear F Ceiling R Ceiling 5 Reset Select Y or N 6 Info Display the unit information a...

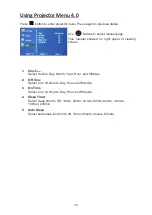
Страница 20: ...upper of viewing screen OK 1 Clock Select clock to Day Month Year Hour and Minutes 2 Off Time Select turn off timer to Day Hour and Minutes 3 On Time Select turn on timer to Day Hour and Minutes 4 Sleep Timer Select sleep timer to Off 10min 20min 30 min 60min 90min 120min 180min 240min 5 Auto Sleep Select auto sleep function to off 1hour 2hours 4hours 8hours ...

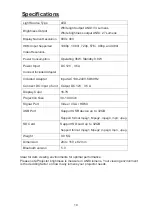
Страница 21: ...nput of unit Input AC100 240V 50 60Hz Output DC12V 3 5 A Display Color 16 7K Projection Size 30 100 inch Signal Port Video VGA HDMI USB Port Support USB device up to 32GB Support format mpeg1 Mpeg2 mpeg4 mp3 Jpeg SD Card Support SD card up to 32GB Support format mpeg1 Mpeg2 mpeg4 mp3 Jpeg Weight 0 9 KG Dimension 203 x 150 x 82 mm 19 Ideal for dark viewing environments for optimal performance Pleas...

Страница 22: ...ull the screen fabric flat and lay it on the wall where it will be installed Mark every position of the grommets correctly on the wall 3 Second stick each hook on an adhesive tape 4 Then stick the hooks with the tapes on every position marded on the wall 5 Finally put the screen flat by hanging the grommets on the relevant hooks ...

Страница 23: ...ntilation vents 3 Check the air filter is clean and clean if necessary 4 Turn on the projector If the issue persists please contact your support provider for further assistance The Image is wider at the top bottom of the screen This is called keystone and is due to the projection angle not being perpendicular to the screen To correct use the projectors inbuilt keystone function to adjust the image...

Страница 24: ...22 ...
Отзывы: