background image

Utilisation De Lecteur CD

F

4


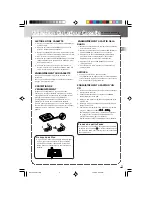
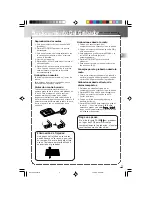
CHARGEMENT D’UN CD

1. Mettez le commutateur de Fonctions (FUNCTION) en

position CD;  si aucun CD n’est chargé,

“      “ et “     “ apparaissent en alternance à l’écran.

2. Appuyez sur la touche PUSH OPEN (Ouverture) pour

ouvrir le compartiment à CD.

3. Placez un CD dans le compartiment, la face imprimée

vers le haut.

4. Refermez le compartiment. “– ” clignote à l’écran,

suivi du nombre total de plages.

5. Pour retirer le CD, appuyez sur la touche PUSH OPEN,

puis retirez le CD en le tenant soigneusement par le

bord extérieur.


LECTURE D’UN CD

1. Pour écouter toutes les plages dans l’ordre en

commençant par la première, appuyez sur la touche

 (PLAY/PAUSE). La plage en lecture est affichée

à l’écran.

Remarque: Appuyez sur  la touche 

 (PLAY/

PAUSE) pour arrêter momentanément le CD. Le
numéro de plage en lecture clignote à l’écran.
Appuyez à nouveau sur la touche 

 (PLAY/

PAUSE) pour continuer la lecture.

2. Réglez le VOLUME à un niveau confortable.

3. Pour arrêter la lecture avant la fin du CD appuyez sur

la touche STOP 

 . Attendez quelques secondes

l’arrêt complet du CD, appuyez sur la touche PUSH
OPEN pour ouvrir le compartiment à CD, puis retirez
le CD.


RECHERCHE AUTOMATIQUE D’UNE

   PLAGE

Cette fonction vous permet de localiser rapidement le

commencement d’une plage quelconque du CD, y
compris celle en lecture.

Lorsque le CD est en lecture:

Appuyez sur la touche SKIP BACKWARD 
(Omission Arrière) pour revenir au commencement de
la plage précédente.

Appuyez sur la touche SKIP FORWARD 
(Omission Avant) pour avancer au commencement de
la plage suivante.

Lorsque le CD est à l’arrêt, appuyez à plusieurs reprises

sur la touche SKIP FORWARD 

 ou 

 SKIP

BACKWARD (Omission Arrière ou Omission Avant)
jusqu’à ce que le numéro de la plage désirée soit affiché
à l’écran, puis appuyez sur la touche 

 (PLAY/

PAUSE). La lecture de la plage sélectionnée commence
alors.


RECHERCHE DANS UNE PLAGE

En mode PLAY ou PAUSE, appuyez longuement sur la
touche SKIP FORWARD 

 afin d’avancer

rapidement à travers une plage.

En mode PLAY ou PAUSE, appuyez longuement sur la
touche SKIP BACKWARD 

 afin de revenir

rapidement en arrière à travers une plage.

CD-R Compatible

Cet appareil peut lire des disques CD-R.

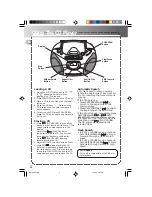
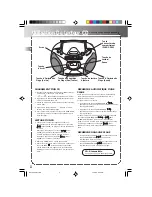
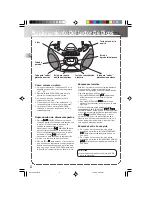
Touche
d’Arrêt

Touche d’Omission de
Plage (Avant)

Touche de Lecture
Aléatoire

Touche d’Omission de
Plage (Arrière)

Ecran

Touch
d’ouverture du
compartiment
(PUSH OPEN)

Touche de Répétition
de Plage (Une/Toutes)

Touche de
Lecture/
Pause

RP7994 FrenchIB

7/12/00, 5:23 PM

5

Содержание RP7994

Страница 1: ...mode is not on Check that CD function is selected Clean the disc Check disc for warping scratches or other damage Check if something is causing the system to vibrate If so move the system Problem CD button will not respond or does not change discs when you press DISC SKIP Distorted or noisy tape recordings Remote control does not work Solution Switch to another function TAPE TUNER and then back to...

Страница 2: ... N meridian St Indianapolis IN 46290 2000 Thomson Consumer Electronics Inc Trademark s Registered Marca s Registrada s Marque s Deposée s 55020360 Rev 1 EN F E www rca com PORTABLE CD PLAYER 2 B REPE STOP RP7994 Cover 7 12 00 5 22 PM 2 ...

Страница 3: ...u s e r m a n u a l RP7994 RP7994GR RP7994BL RP7994SL PORTABLE CD PLAYER 2 BAND RADIO STEREO CASSETTE RECORDER PLAY PAUSE MIX REPEAT STOP RP 7994 RP7994 Cover 7 12 00 5 22 PM 3 ...

Страница 4: ...dditional suggestions Headset Safety Do not play your headset at a high volume Hearing experts advise against continuous extended play If you experience a ringing in your ears reduce volume or discontinue use You should use extreme caution or temporarily discontinue use in potentially hazardous situations Even if your headset is an open air type designed to let you hear outside sounds don t turn u...

Страница 5: ...ne way If the plug won t go into the outlet completely turn the plug over and try to insert it the other way If it still won t fit contact a qualified electrician to change the outlet or use a different one Do not attempt to bypass this safety feature Important Battery Information IMPORTANT Be sure to remove batteries when storing the set for more than 30 days Leaky batteries can badly damage the ...

Страница 6: ...ATOR Reception is in stereo when the indicator lights TUNING WHEEL KNOB Tune in desired radio station Tuning In Radio Stations Move the FUNCTION switch to RADIO to turn the radio on Set BAND to AM or FM Tune in desired station by turning the tuning wheel knob To turn off the radio move FUNCTION switch to TAPE The Stereo Indicator will glow when it receive a FM stereo broadcasting RECORD Press to r...

Страница 7: ...scratches on the tape or worse yet the tape could break If you notice some slack in the tape use a pencil to tighten it up before you insert it A Recording from the Radio 1 Insert a cassette tape into the tape deck and close door 2 Move the FUNCTION switch to RADIO and select a radio station 3 Press RECORD to begin recording RECORD and PLAY lock down 4 Press STOP EJECT to end recording 5 To turn o...

Страница 8: ...Adjust VOLUME to a comfortable level 3 Press STOP to stop playing the CD before all tracks have played Wait a few seconds for the CD to stop turning then press PUSH OPEN to open the CD compartment door and remove the CD Automatic Search Automatic search lets you quickly locate the beginning of any track on the CD including the track currently playing If the CD is playing Press SKIP BACKWARD to ret...

Страница 9: ...ntly with a soft cloth from the inner edge toward the outer perimeter If a disc becomes dirty wet a soft cloth in water wring it out well wipe the dirt away gently and then remove any water drops with a dry cloth Do not use record cleaning sprays or antistatic agents on discs Also never clean discs with benzene thinner or other volatile solvents which may cause damage to the disc surface Tape Care...

Страница 10: ...ted Make sure CD function is selected CD sound skips Clean the CD as explained in Care and Maintenance Check CD for warping scratches or other damage Check for vibration or shock that may affect the unit move system if necessary Distorted or noisy recordings Inspect the recording head and clean it if necessary Demagnetize recording head as explained in Care and Maintenance NOTES ON CD R RW DISC CD...

Страница 11: ...warranty Insure your shipment in case of loss of damage Thomson accepts no liability in case of damage or loss A new or refurbished unit will be shipped to you prepaid freight What your warranty does not cover Customer instruction Your Owner s Manual provides information regarding operating instructions and user controls For additional information ask your dealer Installation and set up service ad...

Страница 12: ...ds Blvd Mississauga Ontario L5T 2V7 The provisions of this written warranty are in addition to and not a modification of or subtraction from the statutory warranties and other rights and remedies contained in any applicable legislation and to the extent that any such provisions purport to disclaim exclude or limit any such statutory warranties and other rights and remedies such provisions shall be...

Страница 13: ...u modification interne doit être confiée à un technicien compétent Ne jamais toucher l appareil avec les mains mouillées En cas d infiltration de liquide à l intérieur du boîtier faites inspecter l appareil par un technicien compétent Ce lecteur de disque compacte est muni d un laser Ce laser remplace la cartouche et le saphir sur un tourne disque classique Bien que ce produit soit équipé d une le...

Страница 14: ...z de nouveau Si elle ne rentre toujours pas contactez un électricien compétent afin de faire changer la prise Sinon utilisez une autre prise Ne jamais essayer de contourner ce dispositif de sécurité INFORMATIONS IMPORTANTES CONCERNANT LES PILES Si vous ne vous servez pas de votre radiocassette pendant plusieurs semaines vérifiez à retirer les piles car celles ci peuvent fuir et provoquer des dégât...

Страница 15: ...tion d arrêt appuyez sur cette touche afin de rembobiner la bande vers son commencement F FWD AVANCE RAPIDE A partir de la position d arrêt appuyez sur cette touche afin d avancer rapidement la bande vers sa fin STOP EJECT ARRET EJECTION Appuyez sur cette touche afin d arrêter toute activité en cours du lecteur cassette ou pour ouvrir la porte du compartiment à cassette lorsqu aucune touche n est ...

Страница 16: ...i vous constatez du mou dans la bande resserrez la à l aide d un crayon avant de l insérer dans le compartiment à cassette A ENREGISTREMENT A PARTIR DE LA RADIO 1 Insérez une cassette dans le compartiment à cassette puis refermez la porte 2 Mettez le commutateur de Fonctions FUNCTION en position RADIO puis sélectionnez une station 3 Appuyez sur la touche RECORD Enregistrement pour commencer l enre...

Страница 17: ...timent à CD puis retirez le CD RECHERCHE AUTOMATIQUE D UNE PLAGE Cette fonction vous permet de localiser rapidement le commencement d une plage quelconque du CD y compris celle en lecture Lorsque le CD est en lecture Appuyez sur la touche SKIP BACKWARD Omission Arrière pour revenir au commencement de la plage précédente Appuyez sur la touche SKIP FORWARD Omission Avant pour avancer au commencement...

Страница 18: ...r l excès d eau passez le chiffon soigneusement sur le disque pour enlever la saleté puis enlevez toute trace d humidité à l aide d un chiffon sec N utilisez aucun produit nettoyant ou agent antistatique sur les disques De même ne nettoyez jamais les disques à l aide de benzène diluants ou autres solvants volatiles qui pourraient endommager la surface du disque ENTRETIEN DES CASSETTES Gardez les c...

Страница 19: ... position CD Le son du CD sautille Nettoyez le CD voir la rubrique Entretien Vérifiez le CD pour tout signe de déformation rayage ou autre dommages Vérifiez que l appareil ne subisse aucun choc ou vibration qui pourrait le perturber Déplacez l appareil si nécessaire L enregistrement est déformé ou parasité Inspectez la tête d enregistrement et la nettoyer si nécessaire Démagnétisez la tête d enreg...

Страница 20: ...reuve d achat et assuré à Thomson Consumer Electronics Canada Inc Centre de Distribution 6200 Edwards Blvd Mississauga Ontario L5T 2V7 Les dispositions de la présente garantie s ajoutent aux garanties statutaires et autres droits et recours prévus par les lois applicables sans les modifier ou les supprimer et dans la mesure où ces dispositions prétendent exclure ou restreindre de telles garanties ...

Страница 21: ...S AURICULARES Advertencias No utilice los auriculares con alto volumen Los expertos en audición aconsejan no escuchar durante largo tiempo y continuamente mediante auriculares Si nota que los oídos le zumban reduzca el volumen de los auriculares o deje de utilizarlos Debería extremar la precaución o no utilizar temporalmente los auriculares en condiciones potencialmente peligrosas Aún si sus auric...

Страница 22: ...ediatamente las pilas que tengan pérdidas para evitar posibles quemaduras de la piel u otras lesiones personales Alimentación con corriente alterna Enchufe el cable de alimentación en el jack AC situado en la parte posterior del aparato y en una toma de corriente alterna que sea para clavijas polarizadas una clavija más ancha que la otra Para su seguridad La clavija para tomacorriente de CA es pol...

Страница 23: ...la banda AM o FM INDICADOR DE FM EN ESTÉREO El indicador se ilumina cuando el aparato recibe emisiones en estéreo RUEDITA DE SINTONÍA Para sintonizar la emisora deseada Sintonía de las estaciones de radio Para encender la radio coloque el selector de funciones en la posición RADIO Coloque la tecla BAND en la banda AM o FM Sintonice la estación deseada con la ruedita de sintonía Funcionamiento Del ...

Страница 24: ...r que se rayen o peor aún se rompan Si nota la cinta algo floja use un lápiz para apretarla antes de colocarla en el grabador Grabaciones desde la radio 1 Coloque un casete virgen en el compartimiento de casetes y cierre la puerta 2 Coloque el selector de funciones en RADIO y elija una emisora 3 Para empezar a grabar oprima RECORD y la tecla PLAY se activará bajará automáticamente 4 Oprima STOP EJ...

Страница 25: ...STOP para detener el lector antes de que se hayan reproducido todas las pistas Espere unos segundos para que el disco deje de girar luego oprima PUSH OPEN para abrir la puerta del compartimiento y sacar el disco Búsqueda automática Esta función le permite encontrar rápidamente el comienzo de cualquier pista del disco inclusive de la pista que se está reproduciendo Si se está reproduciendo un disco...

Страница 26: ...n un paño desde el borde interior hasta el perímetro externo Si un disco se ensucia mucho límpielo cuidadosamente con un paño suave y humedecido con agua luego retire cualquier excedente de agua con un paño seco No utilice aerosoles limpiadores o agentes antiestáticos en los discos Nunca limpie los discos con bencina diluyente o cualquier otro tipo de solvente volátil ya que pueden dañar su superf...

Страница 27: ... CD El disco compacto salta Limpie el disco siguiendo las instrucciones que aparecen en Cuidados y mantenimiento Verifique que el disco no esté arqueado rayado o tenga algún otro daño Fíjese que no haya vibraciones o impactos que puedan afectar el aparato mueva de lugar el sistema si es necesario Grabaciones distorsionadas o con ruidos Verifique el estado del cabezal de grabación y límpielo si es ...

Страница 28: ...pta ninguna responsabildiad en ninguno de estos dos casos Pague todos los cargos que le cobre el Centro de Canjes por los servicios no cubiertos por la garantía Se le enviará un aparato nuevo o reacondicionado con porte pagado Aspectos no cubiertos por la garantía Instrucción a los clientes Su Manual de Instrucciones le brinda información sobre el aparato Para más detalles póngase en contacto con ...

Отзывы: