RCA RDR6350 Скачать руководство пользователя страница 9

9

Copyright © 2020 RCA Communications Systems   

www.RCACommunicationsSystems.com

Communications Systems

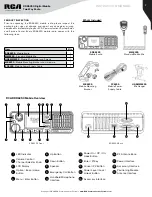
RDR6350 Digital Mobile

Two-Way Radio

INSTRUCTION MANUAL

4.  Press        or         button to find the required subscriber alias or ID 

and press         button to select. 

5.  Press         or         button to find Control Services and press         

button to select.

6.  Press          or          button to find Radio Disable and press          button 

to select.

7.  The display shows 

Radio Disable

 and then 

Success

, the target 

radio has been Disabled and unable to use.

P1

P1

P1

Contacts Setting

Contacts provide an address book capabilities to your radio. Each 

entry corresponds to an alias or ID that you use to initiate a call. The 

entries are sorted in the order they are entered in the Contacts List. 

Each entry is associated with a different call type: Group Call, Private 

Call or All Call.

Note:

 You can add, delete, or edit contacts from the Digital Contacts 

list.

Making a Group Call from Contacts

1.  Press         button to access the menu.
2.  Press         or           button to navigate to Contacts and press              

button to select.

3.  Press        or        button to find the Group Contacts and press         

button to select.

4.  Press        or         button to the required Group alias or ID and 

press          

button to select. 

5.  Press 

[PTT]

 button to make the call. The LED lights up solid red. 

The display shows Group Call  and the group alias or ID

6.  Release the 

[PTT]

 button to listen, when any user in the group 

responds, the LED lights up solid green. You will see Group Call, 

the group ID, and that user’s ID on your display. 

7.  If there is no voice activity for a programmed period of time, the 

call ends. 

Note:

 If Talk Permit function is enabled, wait for the Talk Permit 

Tone to finish and then speak clearly into the microphone.

P1

P1

P1

P1

Making an Individual Call from Contacts

1.  Press          button to access the menu.
2.  Press         or           button to navigate to Contacts and press              

button to select.

3.  Press        or        button to select Individual Contacts and press         

button to select.

4.  Press        or         button to navigate to desired subscriber alias or 

ID and press         button to select. 

5.  Press the 

[PTT]

 button to make the call. The LED lights up solid red. 

The display shows Individual Call  and the subscriber alias or ID

6.  Release the 

[PTT]

 button to listen, when the target radio responds, 

the LED lights up solid green and the display shows the transmitting 

user’s ID. 

7.  If there is no voice activity for a programmed period of time, the 

call ends. 

Note:

 If Talk Permit function is enabled, wait for the Talk Permit 

Tone to finish and then speak clearly into the microphone.

P1

P1

P1

P1

Call Log Feature

Your radio keeps track of all recent outgoing, answered, and missed 

Individual Calls. Use the call log feature to view and manage recent 

calls. You can Store an ID from the Call Log to Contacts or Delete it. 

The Call Log lists are  Outgoing, Incoming, and Missed. 

Note:

 When you select a Call List and it contains no entries, the display 

shows List Empty.

Accessing the Call Log

1.  Using the programmed Call Log button.
2.  Using the radio menu

2.1.  Press          button to access the menu.

2.2.  Press       or       button to Call Logs and press        button to 
select.

2.3.  Press      or        button to navigate to the desired list and 
press  

button to select. The most recent entry is displayed 

first.

2.4.  Use the        or         buttons to scroll through the list.

2.5.  Press the 

[PTT]

 to initiate a call

P1

P1

P1

Storing an Alias or ID from the Missed Call List

1.  While viewing an entry from the Call Log list, press          to select. 
2.  Press        or         button to navigate to [Save], then press          .
3.  Use the keypad to input a name. 
4.  Press          to enter.
5.  The display shows Save Successfully.

P1

P1

P1

Text Message Features

Your radio is able to receive data such as a text message from another 

radio.

Navigate to Messages

1.  Press          button to access the menu, press          or           button 

to select Messages.

2.  Press   or    button navigate to the New Message. 

Note:

 Press             button to enter and              button at any time to 

return to previous screen.

Deleting a Call from a Call List

1.  While viewing an entry from the Call Log list, press         to select. 
2.  Press        or         button to navigate to [Delete], then press          .
3.  Press         to enter.
4.  The display shows Delete Successfully.

P2

P1

P1

P1

P1

P1

Содержание RDR6350

Страница 1: ...sponding to an Individual Call 6 Receiving and Responding to an All Call 6 Making Call with Channel Selector Knob Making a Group Call 6 Making an Individual Call 7 Making an All Call 7 Making a Group or Individual Call w One Touch Access Button 7 Emergency Operations 7 Advanced Features Sending a Call Alert 7 Receiving and Responding to a Call Alert 8 Sending a Radio Check 8 Remote Monitor 8 Initi...

Страница 2: ...ile Mounting Bracket and Hardware 1 PC6350 Mobile Power Supply Cable 1 RDR6350 Mobile Radio MB6350 Mobile Mounting Bracket PC6350 Mobile Power Supply Cable HGRMM6350 Mic Hanger MM6350 Standard Mobile Mic RCA RDR6350Mobile Overview 1 LED Indicator 6 Up Button 11 Power On Off On Hook Button 16 RF Antenna Base 2 Volume Control Channel Selector Knob 7 Down Button 12 Enter P1 Key 17 Power Interface 3 L...

Страница 3: ... Power Line 7 U Shaped Bracket 14 Fuse Basic Operations Turning on off radio Short press Power On Off On hook button to tum on the radio LCD displays power up LOGO and then enter the standby screen and then long press Power On Off On hook button to shutdown Note If a fault occurs and the radio does not turn off you can press and hold the Power On Off On hook button for more than 1O seconds with th...

Страница 4: ...duration of a button press Short Press Press and release quickly Long Press Press and hold for the programmed duration between 1 seconds and 3 75 seconds The Programmable Functions are None Monitor On Off Outgoing Call Log Nuisance Temp Delete Channel Display One Touch Access 1 15 Channel Down Power Low High Channel Up Alerts Tones Profiles Direct Channel Entry Public Address On Off Disconnect Rad...

Страница 5: ...w and High for the radio Alerts Tones Profiles Quick access to the Alerts and Tones settings menu Public Address On Off Toggles between Public Address On and Off for the radio Radio Mode Toggle Switch Switches between the different radio modes available for the radio Conventional Analog and DMR Digital DMR Digital Trunking Record Playback Plays the selected recorded voice call Scan On Off Toggles ...

Страница 6: ...ual radio There are two types of Individual Calls The first type is when a radio presence check is performed prior to setting up the call while the other sets up the call immediately When you receive an Individual Call 1 The LED indicator appear solid green 2 The first line of the display shows Individual Call The second line displays the subscriber alias or ID 3 Press the PTT button to respond to...

Страница 7: ...unction is available only in digital mode Your radio supports 7 Emergency Alarms Emergency Alarm Emergency Alarm with Emergency Call Emergency Alarm with Voice to Follow Emergency Call Pre Status Message Pre Status Message with Emergency Call Pre Status Message with Voice to Follow Each alarm has the following default setting Disabled Radio cannot transmit alarm signal but can receive alarm from o...

Страница 8: ...io Available If the target radio is not active in the system the radio beeps twice and the display briefly shows Target Radio Unavailable P1 P1 P1 P1 P1 P1 Remote Monitor Allows the radio to send Remote Monitor command to another radio This command activates the receiving radio s microphone and transmitter for the duration specified for the receiving radio in the Remote Monitor Hot Mic Time under ...

Страница 9: ...avigate to desired subscriber alias or ID and press button to select 5 Press the PTT button to make the call The LED lights up solid red The display shows Individual Call and the subscriber alias or ID 6 Release the PTT button to listen when the target radio responds the LED lights up solid green and the display shows the transmitting user s ID 7 If there is no voice activity for a programmed peri...

Страница 10: ...ss or button to select Status Messages press button to enter the Status Messages menu 4 Press or button to select the preset Status Message and press button to enter 5 Press or button to select the target radio you wish to send the Status Message to 6 If the message is sent the radio beeps twice and the display shows Sent If the message is not sent the radio beeps once and display shows Failed P1 ...

Страница 11: ...s Sent If the message is not sent the radio beeps once and the display shows Failed P1 P1 P1 P1 P1 P1 P1 P1 P1 P1 P1 P1 P1 Deleting a Text Message from the Inbox 1 Press button to access the menu 2 Press or button navigate to the Message and press to select 3 Press or button to navigate to Inbox and press to select 4 Press or button to select the message and press to access the sub menu and select...

Страница 12: ...d and Keypad Unlocked You can lock your radio s keypad to avoid an inadvertent key press You have two options to lock your keypad Shortcut key press the programmed keypad lock button to lock or unlock the keypad Use keypad to activate the setting 1 Press to access the menu 2 Press or to navigate to Settings and press to select 3 Press or to navigate to Keypad Lock and press to select 4 Press or to...

Страница 13: ...evel for this channel This feature can be toggled between the levels using the radio menu or the programmable shortcut keys 1 Press to access the menu 2 Press or to navigate to Settings and press to select 3 Press or to navigate to Power Level and press to select 4 Press or to select Low Power or High Power Speech Enhancement This feature controls the your radio s microphone gain automatically whi...

Страница 14: ... 3 Press or to navigate to GPS and press to select 4 Press or to turn On or Off the GPS Voice Recording This feature allows you to record each communication with other radios A microSDHC card UHS Speed Class U1 is required to store the voice recording files and is not included with the radio If the feature is not activated in the radio contact your RCA Communications Systems Dealer 1 Press to acce...

Отзывы: