background image

43

Features and Controls

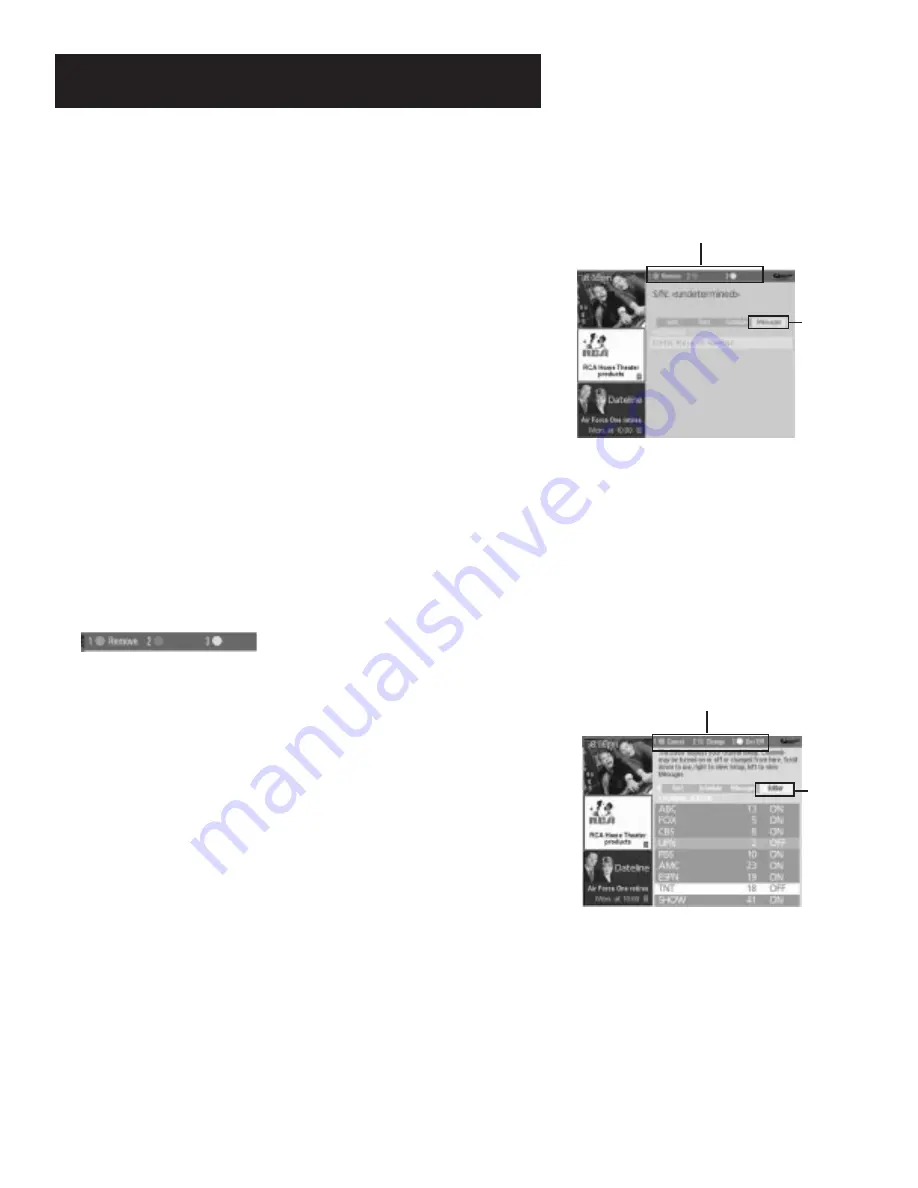
Messages

Occasionally you will receive messages regarding your GUIDE Plus+
system, as well as special programming information.  You can access
these messages from the Message Menu on the Menu bar.

To read messages:

1.

Press MENU on the remote to select the Menu bar.

2.

Use the arrows to highlight the Messages menu selection.

3.

Highlight the message you wish to read by using the up and down
arrows.

4.

Press INFO to display the full text of the message. If the text
continues beyond the screen, press INFO to view the next page of
text. Once you have reached the end of the message, pressing INFO
closes the expanded information and returns you to the Messages
screen.

5.

Then use the Messages Menu Action Button as described in the next
section.

Messages Menu Action Button

When viewing the Messages menu the following Action button will
appear on the bar:

Remove

Highlight the message you wish to delete and press 1 on

the remote.

Editor

You may customize the channel listing by enabling or disabling the
display of certain channels. For instance, you may disable channels that
you never watch. You can restore disabled channels at a later point in
time.

1.

Press GUIDE to bring up the GUIDE Plus+ system.

2.

Press MENU to highlight the Menu bar.

3.

Use the right and left arrows to highlight the Editor menu selection.

4.

Use the up and down arrows to select a channel.

Then use the Editor Menu Action Buttons as described in the next
section.

Editor
Menu
Selection

Editor Menu
Action Buttons

Messages
Menu
Selection

Messages
Action Buttons

Содержание F31665

Страница 1: ...visioncolortelevisioncolortel evisioncolortelevisioncolortelev isioncolortelevisioncolortelevisi oncolortelevisioncolortelevision colortelevisioncolortelevisionco lortelevisioncolortelevisioncolo rtelevisioncolortelevisioncolort elevisioncolortelevisioncolortel evisioncolortelevisioncolortelev isioncolortelevisioncolortelevisi oncolortelevisioncolortelevision colortelevisioncolortelevisionco lorte...

Страница 2: ... rating label located on the back panel of your product for its proper operating voltage FCC Regulations state that unauthorized changes or modifications to this equipment may void the user s authority to operate it If fixed non moving images are left on the screen for long periods they may be permanently imprinted on the screen Such images include network logos phone numbers and video games This ...

Страница 3: ...Using Point and Select 12 Entering Setup 12 Selecting a Language 13 Auto Channel Search 13 The GUIDE Plus System 14 Setting Up the GUIDE Plus System 14 Setting the Time 16 Setting the VCR1 Channel auto tuning 17 Setting the VCR2 Channel auto tuning 17 Setting the DVD Channel auto tuning 18 Setting the SAT CABLE Channel auto tuning 19 Labeling the Channels 20 Using the Remote 21 Remote Buttons 22 U...

Страница 4: ...Out of the GUIDE Plus System 39 Downloading Data 39 The Different GUIDE Plus System Menus 39 Grid Guide 40 Sort 41 Schedule 42 Messages 43 Editor 43 PIP Picture in Picture Operation 44 Channel Marker 46 Parental Controls and V Chip 47 V Chip TV Rating Limit 48 V Chip Movie Rating Limit 52 V Chip Unrated Program Block 53 Channel Block 53 Front Panel Block 53 Lock Unlock Parental Controls 53 Referen...

Страница 5: ...e Reference section in the back of the book contains troubleshooting tips care and cleaning instructions accessory ordering information and your warranty Well if your TV s out of the box let s get started Check out the notes that have been added throughout the manual in these Tip Boxes There are some important tips that will help you get the most from your TV Setup and connections Interactive Setu...

Страница 6: ...O R L CABLE ANTENNA VCR CONTROL IN OUT Once you have completed this connection you may skip to Step 3 Important Stand Information CAUTION Choose the location for your TV carefully Take precautions that the stand or other furniture on which the TV is placed is properly located see Important Safeguards sheet and of adequate size and strength to prevent the TV from accidentally being tipped over push...

Страница 7: ...DEO OUT IN FROM ANT OUT TO TV CH3 CH4 CABLE CABLE BOX OR ANTENNA CABLE CABLE BOX OR ANTENNA VIDEO R L MONO S VIDEO AUDIO R L CABLE ANTENNA VCR CONTROL IN OUT Once you have completed this connection you may skip to Step 3 Connect the IR Controller How to View the VCR To watch the VCR in this connection tune TV to Channel 3 or 4 Later in the Interactive Setup section you will program the TV to autom...

Страница 8: ...er to see and hear audio and video from the component You will program this later in the Interactive Setup VIDEO R L MONO S VIDEO AUDIO R L CABLE ANTENNA VCR CONTROL IN OUT Cable Antenna Takes the signal input from a cable cable box or an off air antenna Can also be used for basic component connections VCR Control Connect the GUIDE Plus system IR controller for one button recording and channel tun...

Страница 9: ... back panel instead of straight down the middle Try not to coil any twin lead cables and keep them away from the audio video cables Protect your components from Overheating Do not block ventilation holes in any of the components Arrange the components so that air can circulate freely Do not stack components Allow adequate ventilation when placing your components in a stand Place an amplifier on th...

Страница 10: ...ch the VCR in this connection enter 03 to tune to the VCR channel In the Interactive Setup you can program the TV to automatically tune to the correct input channel when you turn on your component TV VCR and Satellite Receiver SATELLITE RECEIVER VCR 1 TV S VIDEO L R VIDEO OUT IN FROM ANT OUT TO TV SATELLITE IN CH3 CH4 IN FROM ANT OUT TO TV CH3 CH4 VIDEO R L MONO S VIDEO AUDIO R L CABLE ANTENNA VCR...

Страница 11: ...infrared remote sensor and others do not If your component is labeled affix the IR controller directly over the sensor If the IR location is not labeled on your component you need to use to use the component s remote control to locate the sensor 1 Hold the component s remote control not the remote that came with your TV so that it is touching the front of the component 2 Slowly move the remote ove...

Страница 12: ... TV button on the remote to turn on the TV after you have set up the GUIDE Plus system For more information on setting up the GUIDE Plus system see the next section Interactive Setup To get out of the GUIDE Plus System Press OK to exit the GUIDE Plus system and tune to the highlighted channel Press GUIDE to exit the GUIDE Plus system and tune to the channel displayed in the View window Press CLEAR...

Страница 13: ...IDE Plus menu system Select a menu language Search for available channels Set up the GUIDE Plus system Set the time Set the VCR1 channel Set the VCR2 channel Set the DVD channel Set the SAT CABLE channel Make the channel list and labels Setup and connections Interactive Setup 1 2 Using the Menu System Using the remote 3 4 Features and Controls Reference 6 5 ...

Страница 14: ...n first used or after a power outage your television needs to be set up Would you like to begin now Press MENU to begin setup or Press CLEAR to exit You can also access the Interactive Setup through the Main menu 1 Press MENU to bring up the Main menu TV MAIN MENU 1 Audio 2 Picture Quality 3 Screen 4 Channel 5 Time 6 Parental Control 7 GUIDE Plus Menu 8 Setup 0 Exit 2 Point to Setup and press MENU...

Страница 15: ...o select that language Auto Channel Search The next part of the setup routine asks you if you want the TV to search for all channels viewable through your antenna or cable TV system This is sometimes called auto programming SETUP Would you like the TV to search for all available channels 1 Search for channels 2 Skip this step 1 Press MENU or OK to tell the TV to begin searching for channels The di...

Страница 16: ...kip this step Setting Up the GUIDE PIUS System To complete GUIDE Plus setup the GUIDE Plus IR controllers must be connected to your cable box and VCR if you have them Refer to the Setup and Connections section for additional information Select your Country and enter your ZIP or Postal code The next series of screens asks you about your cable TV setup If you have a cable box you need to set the GUI...

Страница 17: ...ter the channel you use to view channels through your cable box usually 3 or 4 Consult your cable box s instruction book or your cable company if you are not sure Choose 0 to use VIDEO INPUT When the GUIDE Plus system correctly identifies the correct code for your VCR the VCR s tuner changes to channel 9 Select YES if the VCR automatically changed to channel 9 or NO if it did not If you select NO ...

Страница 18: ...first download it sets the time for you automatically SETUP Would you like to set the time on the TV 1 Set time 2 Skip this step 1 Press MENU or OK to bring up the Set Time control panel SET TIME AM Enter01to12forthehour Press MENU to exit 2 Use the left and right arrows to point to the hour and minutes spaces Use the digits to enter the numbers and the up and down arrows to change from AM to PM 3...

Страница 19: ...our TV 1 Use TV with a VCR 2 Skip this step 1 Press MENU or OK to bring up the VCR1 choice list 1 Not connected 2 Channel 3 3 Channel 4 4 Video Input SET VCR1 CHANNEL 2 Point to the choice that matches the way you have your VCR connected to the TV 3 Press MENU or OK to continue Setting the VCR2 Channel auto tuning The next step lets you set the VCR2 channel When you set the VCR2 channel you re tel...

Страница 20: ...ing the DVD Channel auto tuning The next step lets you set the DVD channel When you set the DVD channel you re telling the TV what channel to tune to when you press the DVD button on the remote Indicate which input you used to connect a DVD player If you don t have a DVD player connected to the TV skip this step or select Not Connected from the DVD Channel choice list For more see Auto Tuning in t...

Страница 21: ...sed to connect a satellite receiver or a cable box If you don t have a satellite receiver or cable box connected to the TV skip this step or select Not Connected from the SAT CABLE Channel choice list For more see Auto Tuning in the Using the Menus section SETUP Would you like to use a cable box or satellite unit with your TV 1 Use with cable or satellite 2 Skip this step 1 Press MENU or OK to bri...

Страница 22: ... labeling the channels 4 Repeat this process for each of your channels Then press MENU or OK to continue The TV can store up to 27 labels in memory What Now Now that you ve finished the interactive setup you can sit back relax and enjoy the TV Or Programming the Remote Since you ve gone this far you can take a few minutes to program the remote to control your VCR DVD player satellite receiver or o...

Страница 23: ...r PROSCAN component you probably don t need to program it at all Setup and connections Interactive Setup 1 2 Using the Menu System Using the remote 3 4 Features and Controls 5 Reference 6 Modes of Operation Because this universal remote can control several different components DVD player VCR Cable Box etc it uses operational modes triggered by the component buttons For example if you want the remo...

Страница 24: ...e TV s volume to its minimum level Press again to restore the volume SKIP Press once before changing channels and the TV will wait 30 seconds before returning you to the original channel Press repeatedly to add more time CH or CH v Scans up or down through the current channel list Press once to change the channel up or down press and hold to continue changing channels VOL or VOL Decreases or incre...

Страница 25: ...Caption Display Alternate with PIP has been selected will display captioning in the PIP window SWAP Swaps the main picture with the PIP window CH CTRL Selects the picture window that is the main or PIP window to be changed by the CH channel up CH v channel down or WHO INPUT buttons RESET Resets picture quality controls to the Bright Lighting Picture Control Preset Point and select to choose a diff...

Страница 26: ...am VCR1 VCR2 etc While holding the device button press and hold ON OFF until the red light on the remote turns on then release both buttons 3 Press and release PLAY then wait 5 seconds or until the LED stops flashing At this point the remote is searching for the correct code to program If after 5 seconds the device you want to control does not turn off press PLAY again to tell the remote to search...

Страница 27: ...nent buttons For example if you want the remote to control the TV you would press the TV button to put the remote into TV mode before you could control the TV Front Panel If you cannot locate your remote you can use the front panel of your TV to operate many of the TV s features MENU Brings up the Main menu When in the menu system it selects highlighted items Also returns you to the previous menu ...

Страница 28: ...2115 2120 2125 Radioshack Realistic 2002 2011 2013 2014 2021 2022 2023 2026 2029 2049 2050 2096 2131 Radix 2014 Randex 2014 Ricoh 2128 Runco 2104 Samsung 2005 2013 2015 2033 2053 2112 Sanky 2131 2104 Sansui 2010 2092 2111 2123 Sanyo 2011 2013 2023 Scott 2012 2015 2025 2032 2035 2038 2065 2093 2116 Sears 2011 2014 2021 2023 2048 2049 2050 2051 2055 2056 2107 2118 Sharp 2002 2017 2029 2094 2095 2096...

Страница 29: ...eginning with some information on using menus and control panels Each menu is then outlined and special features are detailed to help you get the most from your TV Setup and connections Interactive Setup 1 2 Using the Menu System Using the remote 3 4 Features and Controls 5 Reference 6 ...

Страница 30: ...2 Picture Quality 3 Screen 4 Channel 5 Time 6 Parental Controls 7 GUIDE Plus Menu 8 Setup 0 Exit Menus take you to another menu or a control panel There are two ways to select a choice in a menu Point with the arrows and then select with MENU or OK Press a number button on the remote For example in the Main menu press 3 to go straight to the Screen menu Exiting a menu There are three ways to exit ...

Страница 31: ...xit Numeric Entry A numeric entry control panel is used to enter numbers or letters A pointer appears underneath the column you are changing SET TIME AM Enter01to12forthehour Press MENU to exit 1 Use the digits to enter a number in the column above the pointer 2 Press the right arrow to move to the next column then use the digits to enter a number 3 When you have finished entering information pres...

Страница 32: ...again to restore the volume Tone Controls Displays the slider controls for adjusting the TV s treble bass and balance Audio Processor Displays a choice list of available audio modes which control the way the sound comes through your speakers Mono Plays the sound in mono only Use this setting when receiving broadcasts with weak stereo signals Stereo Splits the incoming stereo audio signal into left...

Страница 33: ...e TV s speakers off and allows variable output from the TV s audio output jacks Fixed Output Speakers Off This setting turns the TV s speakers off and allows fixed output from the TV s audio output jacks to an external device such as a surround sound amplifier With Fixed Output On the TV s volume control tone controls and mute are disabled Using the Remote to Select an Audio Processor You can chan...

Страница 34: ...rmal Lighting Soft Lighting or Personal Picture Preset Choose the setting that is best for your viewing environment Auto Color Displays a choice list that lets you turn on the feature that automatically corrects the color of the picture This is especially useful for tracking realistic flesh tone colors as you switch from channel to channel Choose On or Off depending on your preference Color Warmth...

Страница 35: ...you choose the way closed captioning information is shown in the PIP window Off No captioning information is displayed On Captioning information is shown always when available Alternate with PIP button Captioning information is shown when available when the PIP button is pressed and the PIP window is displayed PIP Closed Caption Mode Displays a choice list that lets you choose which captioning mod...

Страница 36: ...es you may prefer to leave the closed captioned mode set to CC1 which displays complete text of the program in the primary language in your area Closed Captioning Modes The TV offers eight closed captioned modes including four text modes To set the Closed Captioning Mode 1 Select Screen from the Main menu 2 Point to Closed Caption Mode and press OK A choice list displays CLOSED CAPTION MODE 1 CC1 ...

Страница 37: ...els included in the Normal list are available when you scan up and down using the CH v buttons Use the up and down arrows to indicate whether the channel number indicated is included Yes or is not included No in the Normal channel list Chan Label Use the up and down arrows to enter a six character label for each channel Hold the button down to scroll quickly through the characters Press RESET to c...

Страница 38: ...V MAIN MENU 1 Audio 2 Picture Quality 3 Screen 4 Channel 5 Time 6 Parental Controls 7 GUIDE Plus Menu 8 Setup 0 Exit CHANNEL 1 Signal Type 2 Auto Channel Search 3 List and Labels 4 Auto Tuning 0 Exit Time Menu Sleep Timer Displays a control panel that lets you select the amount of time you want to give the TV before it shuts itself off Schedule Displays a control panel that lets you set up a sched...

Страница 39: ...3 4 Features and Controls 5 Reference 6 How to use the Features and Controls This section introduces you to the features and controls with which your TV is equipped In this section you will learn how to use The GUIDE Plus Menu system PIP Picture In Picture control Parental controls including V Chip rating limits ...

Страница 40: ...UIDE Plus display options On Automatically displays the GUIDE Plus system when you use the TV button on the remote to turn on the TV Off Disables the GUIDE Plus system from being displayed when you use the TV button on the remote to turn on the TV Continuous Demo Runs the GUIDE Plus demonstration until it is turned off To end the Continuous Demo press MENU The following sections tell you more abou...

Страница 41: ...p information is still correct The GUIDE Plus program will complete a download at the next available time Channel Mapping If more than one cable company services your area you may be prompted with a Channel Mapping screen after the first GUIDE Plus download You will need to identify your cable company by selecting the correct channel numbers for the stations in question Use the left and right arro...

Страница 42: ...ecord the program highlighted in the Channel listing If you have a cable box changing channels on the TV will not cause the cable box channel to change while recording The Program information window will display a confirmation when you have successfully created a timer to watch or record If you have selected two programs to watch or record which begin at the same time or overlap you will receive a...

Страница 43: ...on the bar Watch Press 1 on the remote to place a timer in the Schedule and then follow the online help for further options Placing a timer in the Schedule will cause the TV to turn on and tune to the program highlighted in the Channel listing at the predetermined time When the TV turns on the GUIDE Plus system will automatically appear with the scheduled program highlighted and tuned in the View ...

Страница 44: ... message The GUIDE Plus system will not schedule a conflicting timer therefore you must choose between the two programs To remove or change the frequency daily once or weekly of a scheduled event access the Schedule Menu from the Menu bar 1 Press GUIDE to bring up the GUIDE Plus system 2 Press MENU to highlight the Menu bar 3 Use the arrows to highlight the Schedule menu selection 4 Use the up and...

Страница 45: ...ages screen 5 Then use the Messages Menu Action Button as described in the next section Messages Menu Action Button When viewing the Messages menu the following Action button will appear on the bar Remove Highlight the message you wish to delete and press 1 on the remote Editor You may customize the channel listing by enabling or disabling the display of certain channels For instance you may disab...

Страница 46: ...Next for that channel Pressing INFO while highlighting an ad panel will fill the screen with any additional and or promotional information regarding that particular program Pressing the INFO button again exits the expanded information screen Troubleshooting Troubles sometimes are caused by simple faults that you can correct without a service technician Here are a few basic remedies Program informa...

Страница 47: ...nel number is the one you are controlling Using the PIP Feature While you may use PIP in different ways this basic PIP scenario should get you started While watching the TV follow these steps to use your VCR to supply the picture for PIP 1 Press the PIP button on the remote The PIP window appears on the screen 2 Turn on the VCR 3 Press the TV button then press WHO INPUT until you see the VCR signa...

Страница 48: ...es until you put the remote in TV mode Just press the TV button No signal or bad reception Most VCRs and satellite receivers have an antenna or TV button If your cable or off air antenna goes into your VCR or satellite receiver then into your TV try pressing the antenna or TV button on the front of the component Tip If programmed to control your VCR the ANTENNA button on the remote acts as a TV VC...

Страница 49: ...by adults and may be unsuitable for children under 17 It contains one or more of the following content themes graphic violence V explicit sexual activity S or crude indecent language L Parents Strongly Cautioned Contains some material that many parents would find unsuitable for children under 14 Parents are strongly urged to exercise greater care in monitoring this program and are cautioned agains...

Страница 50: ...ock 6 Lock Parental Controls 0 Exit C o n t e n t V CHIP TV RATING LIMIT R a t i n g S t a t u s T V M A V I E W D L S V F V V V V R A T I N G S T A T U S T V M A V i e w T V 1 4 V i e w T V P G V i e w T V G V i e w T V Y 7 V i e w T V Y V i e w D L S V F V V V V V V V V V V V V V P r e s s v t o s e l e c t r a t i n g P r e s s M E N U t o e x i t Content V CHIP TV RATING LIMIT Rating Status TV...

Страница 51: ...oggle between View and Block The status for the rating listed to the left and all higher ratings automatically changes to Block and B Content V CHIP TV RATING LIMIT Rat i n g S t a t u s TV P G B l o c k D L S V F V B B B B RAT I N G S T A T U S TV M A B l o c k TV 1 4 B l o c k TV P G B l o c k TV G V i e w TV Y 7 V i e w TV Y V i e w D L S V F V B B B B B B B B B B B V Pres s v t o v i e w p r o...

Страница 52: ...e the lowest level of content you do not want the child to watch 2 Use the left and right arrows to highlight the Rating Field 3 Use the up and down arrows on the remote to scroll through the age based ratings until the rating that corresponds with the lowest content you do not want the child to watch appears In the example above you would scroll through the ratings until the TV PG rating appeared...

Страница 53: ...uch as the B under language L corresponding with TV 14 5 Press the up or down arrows to change its status back to V Your child would then be able to watch programs with TV 14 adult language content but not programs with TV PG or TV MA language content C o n t e n t V CHIP TV RATING LIMIT R a t i n g S t a t u s T V 1 4 V i e w D L S V F V V V V V R A T I N G S T A T U S T V M A V i e w T V 1 4 V i...

Страница 54: ...ng Movie Ratings After you block movie ratings you have the option of changing some of the rating status buttons back to View 1 Highlight the rating field and press the up and down arrows to find the rating you want to view 2 Use the right arrow to highlight the rating status field Press the up and down arrows to change the button from Block to View For example if movies with a rating of PG 13 and...

Страница 55: ...ble of controlling the front panel while you have the Front Panel blocked Don t forget to lock parental controls after you change the status of Channel Block If you do not the channel block will not take effect Lock Unlock Parental Controls Selecting this option lets you lock and unlock parental controls settings using a password If you do not lock parental controls none of the settings for V Chip...

Страница 56: ...r installed incorrectly Try replacing batteries Note if you remove the batteries you may have to reprogram the remote to control other components Remove batteries and hold number 1 for at least 60 seconds to drain the microprocessor inside the remote Release number 1 replace the batteries and if necessary reprogram the remote Remove all batteries for approximately 12 hours Then replace batteries a...

Страница 57: ...nsors Your remote may be interfering with the IR controller Place a piece of dark tape over the IR controller GUIDE Plus system control of cable box is slower than direct control of the box itself Keep this in mind when changing channels Care and Cleaning CAUTION Turn OFF your TV before cleaning You can clean the TV as required using a soft lint free cloth Be sure to occasionally dust the ventilat...

Страница 58: ...26 Request home service from any Authorized RCA Television Service Center provided that your television is located within the geographic territory covered by an Authorized RCA Television Service Center If not you must take your television to the Service Center location at your own expense or pay for the cost the Service Center may charge to transport your television to and from your home To identi...

Страница 59: ...ase complete and mail the Product Registration Card packed with your TV It will make it easier to contact you should it ever be necessary The return of the card is not required for warranty coverage How state law relates to this warranty This warranty gives you specific legal rights and you also may have other rights that vary from state to state If you purchased your product outside the United St...

Страница 60: ...o cables that have RCA type phono connectors Color Coded Jacks The jacks on the TV s monitor panel are color coded for ease of use The video jacks are yellow the right audio jacks are red and the left audio jacks are white When connecting components to each other be sure that you always connect left outputs to left inputs and right outputs to right inputs If a component has only one output mono co...

Страница 61: ...ey order or check must be in U S currency only No COD or CASH 5 00 Please complete other side also All accessories are subject to availability Where applicable we will ship a superseding model Screw on antenna cable 3 ft VH81 4 95 Screw on antenna cable 6 ft VH82 6 95 Push on antenna cable 6 ft VH89 5 95 Monaural VCR Dubbing Cable 6 ft VH83 5 95 Stereo VCR Dubbing Cable 6 ft VH84 9 95 S Video Cabl...

Страница 62: ...rder on your VISA MasterCard or Discover Card by filling in below USE YOUR CREDIT CARD IMPORTANT Copy complete account number from your VISA card IMPORTANT Copy complete account number from your MasterCard My card expires My card expires Copy Number above your name on MasterCard AUTHORIZED SIGNATURE Credit card order will not be processed without signature Prices are subject to change without noti...

Страница 63: ...mponents 9 Locating IR sensors on your components 9 L Labels 20 35 Language 13 33 Selecting 13 List Labels 20 Locating IR sensors 9 M Main menu 12 Memory 35 MENU button 12 Menu language 13 33 Menus 28 Messages 43 Mono 30 Mute 30 N Normal list 35 P Parental controls Blocking movies 52 Blocking TV shows 48 Channel block 53 Front panel block53 Locking unlocking 53 Menu 47 Picture presets 32 Picture q...

Страница 64: ...evision manufacturing facilities around the world Thomson collects and returns over 1 5 million pounds of glass and furnace dust to the glass making process annually Thomson has launched worldwide energy savings programs which contribute to efforts to reduce air emissions from electrical generating facilities Below are a few examples of Thomson s achievements in our efforts to preserve our natural...

Отзывы: