background image

Using the TV’s Features

22

Chapter 2

About the GUIDE Plus

+

 System

The GUIDE Plus+ system is an interactive on-screen program guide that lists TV
schedules for your area and allows your TV direct control of a cable box and
VCR. You must first set up the GUIDE Plus+ Menu system in order to view this
on-screen program guide (see Chapter 1 for details). Press GUIDE to bring up
the GUIDE Plus+ system.

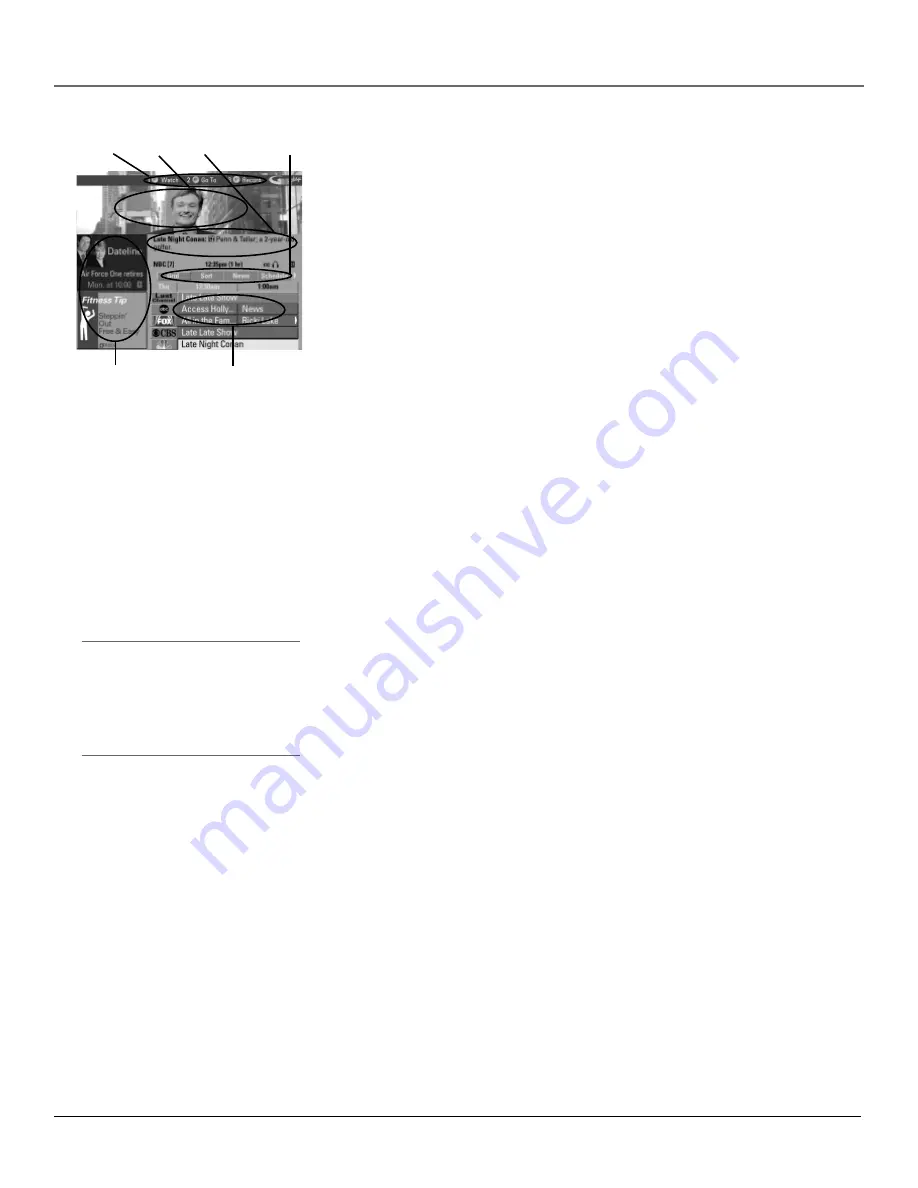
There are six sections of the GUIDE Plus+ system:

A row of Action buttons at the top of the screen 

(1

and 

3)

Video window

Program information

A row of menu options

 (Grid, Sort, News, Schedule, Messages,

Channels, Setup)

Channel listings

Promotional information

Note:

The GUIDE Plus+ system screens illustrated in this book are

representations of what you are likely to see. Not all channels, programs,
and GUIDE Plus+ information depicted will be available in your area.

New features and options can be downloaded to the GUIDE Plus+
system, so these too are subject to change.

Downloading Data

The GUIDE Plus+ system is not available until it completes its first download of
program information. When the power is turned off, the TV locates a “host
channel” that carries GUIDE Plus+ system data containing program schedule
and channel lineup information. A channel lineup is the list of stations and their
respective channels.

To ensure that your first download of data is complete, you should leave your
TV off overnight. Downloads occur several times a day. The TV must be turned
off for GUIDE Plus+ system data to download.

If the TV loses power or is unplugged, GUIDE Plus+ system program listings
may be lost. When power is restored, make sure the setup information is still
correct. The GUIDE Plus+ system will receive updated program information
during the next scheduled download.

Channel Lineup

If more than one cable company services your area, you may be prompted with

STEP 5: Choosing Your Channel Lineup

  after the first GUIDE Plus+ system

download. You will need to identify your cable company by selecting the
correct channel numbers for the stations in question.

Use the up and down arrow buttons


to change the channel group and

press OK when the correct channel group is highlighted.

Menu
options

Action
buttons

Program
information

Channel
listings

Promotional
information

Tip

Since the program information provided
by the GUIDE Plus+ system is based on
your locale, you will need to run Setup
again if you move to a different zip or
postal code.

Video
window

Содержание F19432

Страница 1: ...Television User s Guide Changing Entertainment Again ...

Страница 2: ...r its proper operating voltage FCC Regulations state that unauthorized changes or modifications to this equipment may void the user s authority to operate it If fixed non moving images are left on the screen for long periods they may be permanently imprinted on the picture tube Such images include network logos phone numbers and video games This damage is not covered by your warranty Extended view...

Страница 3: ...he Demo Pin from the G LINK jack Complete the on screen interactive setup You ll find detailed instructions in Chapter 1 One Touch VCR Recording You must connect the G LINK cable to the TV and place one of the wands in front of the remote sensor on the VCR If you have a cable box connect the G LINK cable to the TV and place one of the wands in front of the remote sensor on the cable box V Chip Par...

Страница 4: ...Introduction 2 This page intentionally left blank ...

Страница 5: ... Connect This G LINK Cable 13 How to Find the Remote Sensor 13 Placing the G LINK Wands 13 Complete the Interactive Setup 15 Set the Menu Language 15 Complete Auto Channel Search 15 The GUIDE Plus System Setup 15 What to Expect 19 The Buttons on the Remote Control 20 Chapter 2 Using the TV s Features About the GUIDE Plus System 22 Downloading Data 22 Getting In Out of the GUIDE Plus System 23 The ...

Страница 6: ...ock Parental Controls 38 Chapter 3 Using the TV s Menu System How to Use the Different Types of Menus and Control Panels 40 Menus 40 Control Panels 40 Audio Menu 42 Picture Quality Menu 42 Screen Menu 43 Using Closed Captioning 43 Channel Menu 44 Time Menu 44 Chapter 4 Other Information Troubleshooting 46 Care and Cleaning 49 RCA TV Limited Warranty 49 Index 53 ...

Страница 7: ...Connections The Front of Your TV Why You Should Connect This G LINK Cable Plug in the TV Put Batteries in the Remote How to Use the Remote Control to Complete the Interactive Setup Turn on the TV Complete the Interactive Setup Buttons on the Remote Control 5 Chapter 1 Changing Entertainment Again ...

Страница 8: ...te all cables down the side of the back of the TV instead of straight down the middle of the back of the TV If your antenna uses 300 ohm twin lead cables do not coil the cables Also keep the twin lead cables away from audio video cables Important Stand and Base Safety Information Choose the location for your TV carefully Place the TV on a stand or base that is of adequate size and strength to prev...

Страница 9: ...connect your TV Please use the following chart to determine which connection is best for you Proceed to the appropriate page and connect your TV Cables Needed to Connect Components to Your TV The pictures below show the cables needed for the connections represented in this book Note Please locate the G LINK cable provided when you re getting ready to set up your TV You need to connect this cable t...

Страница 10: ...k on your VCR sometimes labeled OUT TO TV 2 Connect cable or antenna to your VCR Connect the coaxial cable from your cable outlet cable box or antenna to the Input Jack on your VCR sometimes labeled IN FROM ANTENNA or IN FROM ANT 3 Connect the G LINK cable to the TV A If you haven t already done so remove the Demo Pin from the G LINK jack B Connect the G LINK cable to the G LINK jack on the TV Nex...

Страница 11: ... from your cable or antenna to the CABLE ANTENNA jack on the back of your TV Go to page 14 2 If you re connecting a cable box connect the G LINK cable A If you haven t already done so remove the Demo Pin from the G LINK jack B Connect the G LINK cable to the G LINK jack on the TV Next step place the wands of the G LINK cable to the cable box instructions are on p 13 Go to page 13 ...

Страница 12: ...ATELLITE RECEIVER S VIDEO L R VIDEO OUT IN FROM ANT OUT TO TV SATELLITE IN IN FROM ANT OUT TO TV CH3 CH4 VCR VIDEO OUT L R AUDIO IN L R TV back panel CABLE ANTENNA G LINK From Cable or Antenna Satellite Signal TV VCR Satellite 3B 2B 2A 1B 1A ...

Страница 13: ...E IN 2 Connect the Satellite Receiver to the VCR and to the TV A Connect a coaxial cable to the Output Jack sometimes labeled OUT TO TV on the satellite receiver and to the Input Jack on the VCR sometimes labeled IN FROM ANT B Connect a coaxial cable to the Output Jack on the VCR sometimes labeled OUT TO TV and to the CABLE ANTENNA jack on the TV 3 Connect G LINK cable A If you haven t done so rem...

Страница 14: ...ystem CH Scans down through the current channel list When you re using the TV s menu system it acts like the arrow down button on the remote control CH Scans up through the channel list When you re using the TV s menu system it acts like the arrow up button on the remote control VOL Decreases the volume When you re using the TV s menu system it acts like the left arrow button on the remote control...

Страница 15: ...perly How to Find the Remote Sensor You have to place the G LINK wands in front of the remote sensor on the VCR and or cable box Some cable boxes and VCRs have the remote sensor labeled on the unit If the remote sensor isn t labeled on your VCR and or cable box you need to use the remote control that came with the VCR and or cable box to locate the sensor 1 Turn off the VCR and or cable box 2 Hold...

Страница 16: ...how you move through the on screen menus The theory is the same throughout the menu screens highlight your choice and select it To highlight a menu item press the arrow buttons on the remote to highlight one of the items listed on the screen Use the up or down arrow button to move up or down Use the right or left arrow button to move right or left To select the item that you ve highlighted press O...

Страница 17: ...that language Complete Auto Channel Search The next part of the SETUP asks you if you want the TV to search for all channels viewable through your antenna or cable TV system This is sometimes called auto programming 1 Press OK to tell the TV to begin searching for channels A progress report appears on the screen 2 When the screen on the TV tells you the search is complete press OK the first GUIDE ...

Страница 18: ...to go to the next space The left arrow button moves you to the left Step 2 Configuring for Cable The next series of screens asks you about your cable setup To supply your TV with the correct TV program listings the GUIDE Plus system needs to know if your TV is connected to cable 1 If your TV is connected to cable highlight Yes and press OK If your TV isn t connected to cable highlight No and press...

Страница 19: ... these products 6 Look at your cable box If it is still on and changed to channel 09 the test was successful Highlight Yes and press OK STEP 3 Configuring for a VCR appears If your cable box didn t change to channel 09 or turned itself off you have two choices No and Test this code again Test this code again If you think the TV the cable box or any of the remote controls might have been touched or...

Страница 20: ...n progress don t touch your TV VCR or any of the remote controls for these products 4 Look at the front display of your VCR If your VCR turned on automatically and changed to channel 09 the test was successful Highlight Yes and press OK If your VCR didn t change to channel 09 you can either choose No or Test this code again If you think your TV or remotes might have been touched during the test tu...

Страница 21: ...plete additional screens appear If any settings are incomplete or incorrect highlight No repeat setup process and press OK Follow the instructions on the screen 2 You can choose to view a demo of the GUIDE Plus features which may take a few minutes to load If you don t want to see the demo right now press OK to watch TV What to Expect The next time you turn on your TV the GUIDE Plus system will ap...

Страница 22: ...revious channel GUIDE Press GUIDE to make the GUIDE Plus system appear on the screen Press GUIDE again to remove it from the screen INFO Displays channel information MENU Displays the TV s Main menu You can also press and hold for 2 seconds to display the GUIDE Plus system MUTE Lowers the volume to its minimum level Press again to restore volume OK When a menu is on the screen press OK to select t...

Страница 23: ...Using the TV s Features Chapter Overview All About the GUIDE Plus System The Channel Banner Parental Controls and V Chip 21 21 Chapter 2 Changing Entertainment Again ...

Страница 24: ... a host channel that carries GUIDE Plus system data containing program schedule and channel lineup information A channel lineup is the list of stations and their respective channels To ensure that your first download of data is complete you should leave your TV off overnight Downloads occur several times a day The TV must be turned off for GUIDE Plus system data to download If the TV loses power o...

Страница 25: ...o access the GUIDE Plus system 2 Press MENU or use the up and down arrow buttons to select the Menu bar the Grid Guide appears by default 3 Use the left and right arrow buttons to access other menus 4 Press OK or MENU or use the down arrow button to see the menu options Grid Guide The Grid Guide appears each time you enter the GUIDE Plus system It displays the current programming for each channel ...

Страница 26: ... If you have a cable box changing channels on the TV will not cause the cable box channel to change while recording Record will only appear if you have set up GUIDE Plus system and specified your VCR type The program information window will display a confirmation when you have successfully scheduled a program to watch or record Note If you have selected two programs to watch or record which begin ...

Страница 27: ... return to the menu bar or press GUIDE or CLEAR to exit the GUIDE Plus system Then use the Sort Menu Action Buttons as described next Sort Menu Action Buttons When viewing the results of a Sort the following Action buttons appear Watch Press 1 on the remote to place a timer in the Schedule and then follow the on line help for further options Placing a timer in the Schedule will cause the TV to tur...

Страница 28: ... system Schedule The Schedule menu allows you to alter timers for either viewing or recording programs The GUIDE Plus system allows one touch VCR recording if you have connected the G LINK cable to your VCR See Chapter 1 for more details on connecting the G LINK cable To schedule a program to watch or record 1 If the GUIDE Plus system isn t on your screen press GUIDE on your remote control 2 Press...

Страница 29: ... only on that day WEEKLY records the program each week at the same time Messages Occasionally you will receive messages regarding your GUIDE Plus system as well as special programming information You can access these messages from the Messages menu on the Menu bar To read messages 1 If your GUIDE Plus system isn t on your screen press GUIDE on your remote control 2 Press MENU on the remote to sele...

Страница 30: ... number for the highlighted channel line On Off Press 3 on the remote to toggle the state of the channel between On and Off Setup The Setup menu allows you to access the GUIDE Plus system setup information To access the Setup option 1 If the Guide Plus system isn t on your screen press GUIDE on your remote control 2 Press MENU to select the Menu Bar 3 Use the right arrow to highlight the Setup men...

Страница 31: ...lays the GUIDE Plus system setup screen Change system settings Confirms the settings you completed in the GUIDE Plus system setup are correct Review options Displays GUIDE Plus system auto display options View demo Runs the GUIDE Plus system demonstration GUIDE Plus Label Displays the GUIDE Plus label menu On Displays the station name when you change channels Off The station name isn t displayed w...

Страница 32: ...00 00 Displayed to count down time left on the commercial skip SKIP timer Parental Controls and V Chip The Parental Controls menu allows you to program your TV so that children cannot see certain programs channels or use the front panel controls The first three choices in the Parental Controls menu involve software inside your TV referred to as V Chip which allows you to block TV programs and movi...

Страница 33: ... are strongly urged to exercise greater care in monitoring this program and are cautioned against letting children under the age of 14 watch unattended This program contains one or more of the following content themes intensely suggestive dialogue D strong coarse language L intense sexual situations S or intense violence V Parental Guidance Suggested Contains material that parents may find unsuita...

Страница 34: ... Parental Controls 0 Exit Content V CHIP TV RATING LIMIT Rating Status TV MA VIEW D L S V FV V V V RATING STATUS TV MA View TV 14 View TV PG View TV G View TV Y7 View TV Y View D L S V FV V V V V V V V V V V V V Press v to select rating Press MENU to exit The V Chip Rating Limit Screen The following is an example of where items are located within the Rating Limit screen Content V CHIP TV RATING LI...

Страница 35: ...w highlight to the Status field 5 Press the up or down arrow button to toggle between View and Block The status for the rating listed to the left and all higher ratings automatically changes to Block and B 6 Press OK on the remote to return to the menu or exit the screen when you are finished 7 Select Lock Parental Controls from the Parental Controls menu Enter a password and if you have not alrea...

Страница 36: ...ramming TV PG and above containing adult language To block program content 1 Determine the lowest level of content you don t want the child to watch 2 Use the up and down arrow buttons on the remote to scroll through the age based ratings until the rating that corresponds with the lowest content you do not want the child to watch appears In the example above you would scroll through the ratings un...

Страница 37: ...e able to watch programs with TV 14 adult language content but not programs with TV PG or TV MA language content Note Only the content theme status corresponding to TV 14 L language changes to V View Higher rated content themes such as that for TV MA language do not change V Chip Movie Rating Limit You set movie rating limits by blocking movies rated above a specified level How to block movie rati...

Страница 38: ...cking movie ratings you must set NR to View separately to view NR movies Viewing Movie Ratings After you block movie ratings you have the option of changing some of the rating status buttons back to View 1 Highlight the Rating field and press the up and down arrow buttons to find the rating you want to view 2 Press the right arrow button to highlight the rating Status field Press the up and down a...

Страница 39: ...ble from your scan list Front Panel Block Selecting this option lets you block disable or unblock enable the TV s front panel The remote still tunes to any channel Front Panel Block can Keep children from watching TV when the parent is not present Keep young children from playing with the buttons When using this as a Parental Control method you should remove access to any remote that is capable of...

Страница 40: ... this option lets you lock and unlock parental controls settings using a password If you do not lock parental controls none of the settings for V Chip Channel Block or Front Panel Block will take effect If you forget your password simultaneously press and hold MENU on the television and volume down on the remote for 3 seconds Nothing appears on the screen Parental Controls simply unlock and you ca...

Страница 41: ...the TV s Menu System Chapter Overview How to Use the Different Types of Menus and Control Panels Audio Menu Picture Quality Menu Screen Menu Channel Menu Time Menu 39 39 Chapter 3 Changing Entertainment Again ...

Страница 42: ...us The first menu is called the Main menu Press MENU on the remote or on the front panel to bring up the Main menu Note that holding MENU for 2 seconds displays the GUIDE Plus system Menus take you to another menu or a control panel There are two ways to select a choice in a menu Use your arrow buttons on your remote control to highlight your choice and press OK Press a number button on the remote...

Страница 43: ...S Contrast Color Tint Black Level Sharpness Press MENU to exit SET TIME AM Enter01to12forthehour Press MENU to exit Tip If the control panel is not set to the current time use the arrows to go back over the columns and the digits to make changes You can also enter numbers by using the up and down arrows on the remote CLOSED CAPTION MODE 1 CC1 2 CC2 3 CC3 4 CC4 5 T ext 1 6 T ext 2 7 T ext 3 8 T ext...

Страница 44: ...n the red and green levels Black Level Adjusts the brightness of the picture Sharpness Adjusts the crispness of the edges in the picture When exiting this menu the Save Personal Picture Preset choice list will appear You can choose either Yes or No If you save the settings as a Personal Picture Preset the TV will store the settings so you can re select them quickly if someone changes the settings ...

Страница 45: ... Off Always and press OK The closed captioning is turned off and you go back to the Screen menu Tip If you don t know which Closed Caption mode to use select CC1 CC1 is probably the mode that is used in your area CC2 CC3 and CC4 are reserved for foreign languages but are rarely used at this time TV MAIN MENU 1 Audio 2 Picture Quality 3 Screen 4 Channel 5 Time 6 Parental Control 7 GUIDE Plus Menu 8...

Страница 46: ...l up and down Use the up and down arrow buttons to indicate whether the channel number indicated is included Yes or is not included No in the Normal channel list Channel Label Use the up and down arrow buttons to enter a six character label for each channel Hold the button down to scroll quickly through the characters The TV can store up to 27 labels in memory Time Menu Sleep Timer Displays a cont...

Страница 47: ...Other Information Chapter Overview Troubleshooting Care and Cleaning Limited Warranty Accessory Order Form Index 45 45 Chapter 4 Changing Entertainment Again ...

Страница 48: ...nplug the TV for two minutes and then plug it back in Turn the TV on and try again TV turns off while playing Scheduled Off function may have been activated Go to p 44 for instructions Electronic protection circuit may have been activated because of a power surge Wait 30 seconds and then turn the TV on again If this happens frequently the voltage in your house may be abnormally high or low TV turn...

Страница 49: ...e TV You can turn off this feature by pressing GUIDE on your remote control and then select the Menu bar Press the right arrow button to select Setup Choose Review options and select OFF GUIDE Plus System Problems GUIDE Plus setup won t switch to channel 9 for VCR and or channel 02 cable box Make sure you have removed the Demo Pin from the G LINK jack Check to see if the G LINK wands are positione...

Страница 50: ...ere is a clear path Maybe the remote isn t aimed directly at the component TV or VCR that you re trying to operate Maybe batteries in remote are weak dead or installed incorrectly Put new batteries in the remote You might need to drain the remote s microprocessor remove batteries and press the number 1 button for at least 60 seconds Release the 1 button replace the batteries and if necessary progr...

Страница 51: ...ow long after your purchase 90 days for labor charges One year for parts Two years for the picture tubes The warranty period for rental units begins with the first rental or 45 days from date of shipment to the rental firm whichever comes first What we will do Pay any Authorized RCA Television Service Center the labor charges to repair your television Pay any Authorized RCA Television Service Cent...

Страница 52: ...chased or serviced outside the U S A Acts of God such as but not limited to lightning damage Product registration Please complete and mail the Product Registration Card packed with your TV It will make it easier to contact you should it ever be necessary The return of the card is not required for warranty coverage How state law relates to this warranty This warranty gives you specific legal rights...

Страница 53: ...ust be in U S currency only No COD or CASH 5 00 Please complete other side also All accessories are subject to availability Where applicable we will ship a superseding model Accessory Order Form Detach Here VH81 3 ft VH82 6 ft VH89 6 ft Gold Tipped cable VH83 6 ft Gold Tipped cable VH84 6 ft Screw on Cable attaches to the round antenna connectors called 75 ohm F type on the back of your VCR or TV ...

Страница 54: ...Copy Number above your name on MasterCard AUTHORIZED SIGNATURE Credit card order will not be processed without signature Name Street Apt City State Zip Print or type your name and address clearly Please make sure that both sides of this form have been filled out completely Allow 4 weeks for delivery All accessories are subject to availability Prices are subject to change A complete and correct ord...

Страница 55: ...nformation 22 Guide Plus system setup 15 I INFO button 20 Interactive setup 15 L Labels 44 Language 43 Languages selecting 15 Locating remote sensor 13 Lock Parental Controls 38 M Memory 44 Menu Audio 42 Channel 44 Channels 28 Grid Guide 23 Language 43 Messages 27 News 26 Picture Quality 42 Schedule 26 Screen 43 Setup 28 Sort 25 Time 44 MENU button 20 Menus GUIDE Plus system setup 15 Messages menu...

Страница 56: ... This page intentionally left blank ...

Страница 57: ... This page intentionally left blank ...

Страница 58: ... This page intentionally left blank ...

Страница 59: ... This page intentionally left blank ...

Страница 60: ... This page intentionally left blank ...

Страница 61: ... This page intentionally left blank ...

Страница 62: ... This page intentionally left blank ...

Страница 63: ... This page intentionally left blank ...

Страница 64: ...ion Please do not send any products to the Indianapolis address listed in this manual or on the carton This will only add delays in service for your product 60 RECYCLED PAPER MINIMUM 20 POST CONSUMER 2000 Thomson Consumer Electronics Inc Trademark s Registered Marca s Registrada s Printed in USA TOCOM 15557580 ...

Отзывы: