background image

Menu features

30

Turn on Parental Control

The Parental Control feature allows you to program your TV so that
children cannot see certain programs or channels.

The parental control feature comes turned “Off,” so if you choose not to
implement it, you can just ignore it.

When turned “on,” the software reads a code that most broadcasters
send with programs. That code tells the software the program’s age-
based rating (TV-MA, TV-14, etc.) and content themes (Violence (V),
Adult Language (L), etc.). If you have blocked the rating and/or content
themes that the program contains, you will receive the message, “This
rating is blocked.” when you turn to that particular channel.
Broadcasters are not required to provide content themes, so programs
received with no content themes will only be blocked if you block their
age-based rating.

You can also block out programs that have been given a rating of “Not
Rated,” and programs that are considered “unrated” because no code
has been sent by the broadcaster.
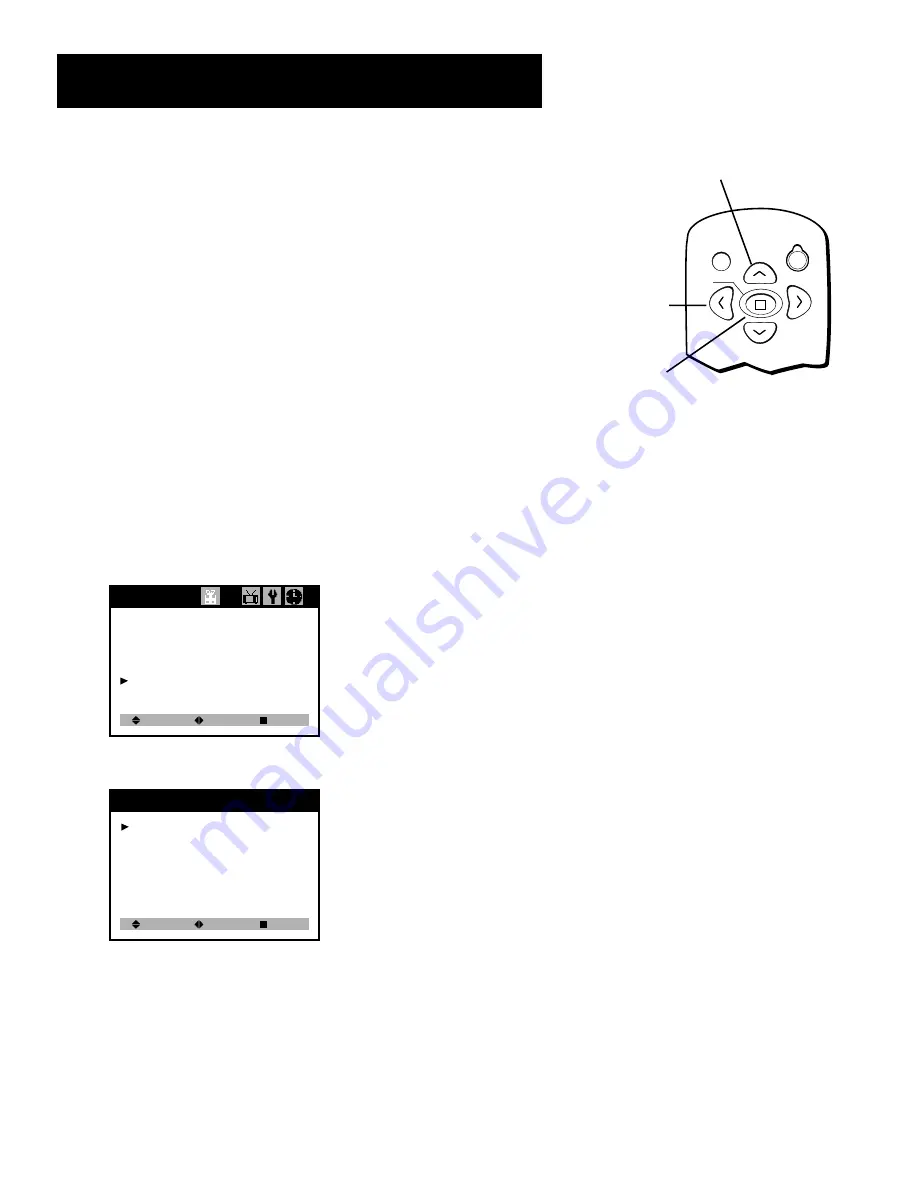
1.

Repeatedly press MENU on the remote to display the Special menu.
Press CH v to highlight Parental Control.

Closed Caption:   Off
CC on Mute:   

Off

Power Restore:    On
Audio:   

Mono

Parental Control

Special

Select

Adjust

Exit

2.

Press VOL > or VOL <  to display the Parental Control menu.

Parental Lock: Off
TV Guidelines
Movie Ratings
No Rating: Unblock
Ext. Source: Unblock
Change Password

Parental Control

Select

Adjust

Prev.

2.

Press VOL > or VOL <  to turn the Parental Lock feature On. The
Enter a new Password screen will appear. Use the number buttons
(0-9) to enter your password.

MUTE

MENU

VOL

VOL

POWER

CH

CH

VOL  < or >

CH ^ or CH v

MENU

Содержание F19420

Страница 1: ...oncolortelevisioncolortel evisioncolortelevisioncolortelev isioncolortelevisioncolortelevisi oncolortelevisioncolortelevision colortelevisioncolortelevisionco lortelevisioncolortelevisioncolo rtelevisioncolortelevisioncolort elevisioncolortelevisioncolortel evisioncolortelevisioncolortelev isioncolortelevisioncolortelevisi oncolortelevisioncolortelevision colortelevisioncolortelevisionco lortelevi...

Страница 2: ...on the picture tube Such images include network logos phone numbers and video games This damage is not covered by your warranty Extended viewing of channels displaying these images should be avoided Cable TV Installer This reminder is provided to call your attention to Article 820 40 of the National Electrical Code Section 54 of the Canadian Electrical Code Part 1 which provides guidelines for pro...

Страница 3: ...et Up Menu 9 Using Point and Select 10 Set Up Menu 10 Select a Language for the Menus 11 Set Reception and Memorize Channels 12 Add or Delete Channels 13 Change the Input 14 Remote Buttons and Front Panel 15 Remote Buttons 16 Front Panel Controls and Jacks 17 Menu Features 19 Menus and Control Panels 20 Video Menu 20 Adjust a Video Setting 21 Return Video Settings to Factory Preset 22 Time Menu 22...

Страница 4: ...rol 30 Change the Password 31 Setting TV Guidelines and Movie Ratings 32 Setting the TV Guidelines Ratings Limits 33 Setting the Movie Ratings Limits 34 Setting the No Rating Feature 35 Block the External Source Signal 35 Reference 37 Troubleshooting 38 Care and Cleaning 39 RCA TV Limited Warranty 40 Accessory Information 42 Index 45 ...

Страница 5: ... Features and Controls 5 Menu Features Remote Front Panel 3 4 Reference 5 Getting started This manual is designed to get you started quickly The first four sections of the manual show you how to get your TV set up and connected and use all of the menus features and controls of your TV The reference section in the back of the book contains troubleshooting tips care and cleaning instructions accesso...

Страница 6: ...ortant Stand Information CAUTION Choose the location for your TV carefully Take precautions that the stand or other furniture on which the TV is placed is properly located see Important Safeguards sheet and of adequate size and strength to prevent the TV from accidentally being tipped over pushed off or pulled off This could cause damage to the TV and or personal injury Before You Connect Protect ...

Страница 7: ...ke your connection How to View the VCR To watch the VCR in this connection tune TV to Channel 3 or 4 Coaxial Cables In this connection two Coaxial Cables are used one connects from an antenna cable or cable box to the VCR and one connects from the VCR to the TV These cables carry both audio and video signals Once you have completed this connection you may skip to Step 3 VCR 1 L MONO R VIDEO OUT IN...

Страница 8: ...n Model F19430 be sure to connect Right Audio to Right Audio and Left Audio to Left Audio between stereo components Advanced Connections Advanced connections give you better sound and video by separating the audio and video signals and enabling you to connect multiple components This section describes the types of inputs available on the back of your TV and suggests ways you can use them for optim...

Страница 9: ...acks will be turned off Most Audio Video cables are combined into one cable with three heads on each end We show individual cables in these sample connections Either may be used but you must be sure to connect Video to Video Right to Right and Left to Left Video yellow Right Audio red Left Audio white Coaxial Cables Carries the signal from the antenna or cable directly to the television or through...

Страница 10: ...n the remote or TV Step 6 Set Up the TV Proceed to the next section to set up your TV for your personal preferences POWER How to View Your Components To watch the satellite receiver in this connection press INPUT to select the video input channel To watch the VCR in this connection enter 03 to tune to the VCR channel VCR 1 L MONO R VIDEO OUT IN FROM ANT OUT TO TV CH3 CH4 VIDEO IN ANT IN Back of TV...

Страница 11: ...Set Up menu is used to configure the TV and set up the features for your personal preference Select a menu language Search for available channels Setup and connections Set Up Menu 1 2 Menu Features Remote Front Panel 3 4 Reference 5 ...

Страница 12: ... You can display the Set Up menu by repeatedly pressing MENU Language English Reception Air Memorize Channels Add Delete Channels Input TV Set Up Select Adjust Next Language Lets you change the menu language to Spanish French or English Reception Set to tell your TV if you are connecting an antenna or cable TV system Memorize Set to have your TV create a Channel List from the available channels Ad...

Страница 13: ...or French Idioma Espanol Recepcion Aire Memorizar Canales Anadir Borrar Canales Entrada TV Config Escoger Ajustar Otro Langue Francais Reception Air Memoriser Chaines Ajouter Supprimer Chaines Entree Tele I n s t a l l e r Choix Regler Suivant ˆ ˆ 3 Repeatedly press MENU to remove the menu and return to normal TV viewing Repeatedly press MENU at any time to remove all displays from the screen and ...

Страница 14: ...Select Adjust Next 2 Use VOL or VOL to select Air or Cable Select Air if you have connected an antenna Select Cable if you have connected a cable TV system 3 Use CH v to select Memorize Channels Language English Reception Air Memorize Channels Add Delete Channels Input TV Set Up Select Adjust Next 4 Press VOL or VOL to have the TV begin searching for available channels The display gives you a prog...

Страница 15: ... of the menus below will appear depending on whether the selected channel is in the channel list This channel is not in memory Press VOL to add Press CH for other channels Add Delete Channels Press MENU to return to Set Up menu Air 11 This channel is in memory Press VOL to delete Press CH for other channels Add Delete Channels Press MENU to return to Set Up menu Air 11 4 Use the VOL or VOL to add ...

Страница 16: ...V if you want to see the signal from the antenna or cable TV Select Line if you want to see the signal from a component connected to the AUDIO VIDEO jacks on the TV 3 When the Input feature is set to Line you will see the signal from a component connected to the front AUDIO VIDEO jacks Language English Reception Air Memorize Channels Add Delete Channels Input Line Set Up Select Adjust Next Note if...

Страница 17: ...section defines the functions of the remote buttons Front Panel Controls and Jacks This section defines the functions of the controls and jacks on the front panel Remote and Front Panel 3 Setup and connections Set Up Menu 1 2 Menu Features Remote Front Panel 3 4 Reference 5 ...

Страница 18: ... GO BACK Returns you to the previous channel MENU Used to toggle through the menus MUTE Reduces the TV s volume to its minimum level Press again to restore the volume POWER Turns the TV on and off SLEEP Used to program the TV to turn off after a certain time VIDEO Used to display the video features Contrast Brightness Sharpness Color and Tint on the TV screen Use VOL and VOL to adjust the feature ...

Страница 19: ...ough the current channel list Press once to change the channel up or down press and hold to continue changing channels Used to point to different items in the menu system Model F19420 Only Headphone Jack Attach a headphone to this jack for private listening MENU Button Used to toggle through the menus POWER Button and Standby Indicator Turns the TV on and off The standby indicator lights when the ...

Страница 20: ...This page intentionally left blank ...

Страница 21: ...n how to use Video menu for adjusting Contrast Sharpness Brightness Color and Tint Time menu for setting the Time Wake Up Time and Sleep Timer Special menu for selecting Closed Captions activating Parental Controls including V Chip rating limits and selecting Audio 3 Setup and connections Set Up Menu 1 2 Menu Features Reference 5 4 Remote Front Panel 3 ...

Страница 22: ...d the menus are automatically cleared from the screen Settings Custom Contrast Brightness Sharpness Color Tint Video Select Adjust Next Language English Reception Air Memorize Channels Add Delete Channels Input TV Set Up Select Adjust Next Video Menu You can access the Video menu features directly by pressing VIDEO on the remote or display the Video menu by pressing MENU on the remote Settings Pre...

Страница 23: ...VOL or VOL to select Contrast and display the Contrast adjustment slider Contrast Video Press VOL to increase the Contrast Press VOL to decrease the Contrast 3 Press CH or CH v to display another Video adjustment slider and use VOL or VOL to adjust it 4 Press MENU to return to the Video menu or wait ten seconds for the slider to disappear from the TV screen The TV will remember your settings You c...

Страница 24: ...ghtness Sharpness Color Tint Video Select Adjust Next 3 To return to your custom settings press VOL or VOL again Time Menu You can display the Time menu by repeatedly pressing MENU on the remote You must set the current time including AM or PM to use the Wake Up time or Off time feature Set Clock Wake Up time Off time Sleep Timer 0 min Time Select Adjust Next Set Clock Lets you enter the current t...

Страница 25: ...te to display the Time menu Set Clock Wake Up time Off time Sleep Timer 0 min Time Select Adjust Next 2 Press VOL or VOL to enter the current time including AM or PM Set Clock 12 00 AM Wake Up time Off time Sleep Timer 0 min Time Select Adjust Next 3 Press and hold VOL or VOL to quickly enter the current time including AM or PM 4 Use CH or CH v to select another time function or repeatedly press M...

Страница 26: ... Sleep Timer 0 min Time Select Adjust Next 3 Press and hold VOL or VOL to quickly enter the Wake Up time including AM or PM 4 Use CH or CH v to select another time function or repeatedly press MENU to remove the Time menu from the TV screen To Cancel Wake Up Time 1 Display the Time menu select Wake up Time and press and hold VOL or VOL until appears Set an Off Time You must set the current time in...

Страница 27: ...me menu select Off Time and press and hold VOL or VOL until appears Set the Sleep Timer You can also set the Sleep Timer using the SLEEP button on the remote Repeatedly press SLEEP to display the amount of time 15 30 45 60 90 or 120 minutes that you want the TV to play before it turns itself on 1 Repeatedly press MENU on the remote to display the Time menu Press CH v to highlight Sleep Timer Set C...

Страница 28: ...osed Caption C1 CC on Mute Off Power Restore On Audio Mono Parental Control Special Select Adjust Exit Closed Caption Lets you turn closed captioning on and select the type of closed caption you want to view CC on Mute Lets you turn closed captioning on and select the type of closed caption you want to view when you mute the TV Power Restore Allows you to plug your TV into an outlet that is contro...

Страница 29: ...n Audio Mono Parental Control Special Select Adjust Exit 2 Use VOL or VOL to select the type of Closed Caption you want to display on the TV screen or turn Closed Caption off Closed Caption C1 CC on Mute Off Power Restore On Audio Mono Parental Control Special Select Adjust Exit Select C1 to view Captions if available providing words following the dialog narration and side effects of the action on...

Страница 30: ...al Select Adjust Exit Select C1 to view Captions if available providing words following the dialog narration and side effects of the on screen action Select C2 to view a different type of Caption if available Select Off to turn off any Closed Caption 3 Use CH or CH v to select another Special feature or press MENU to remove the Special menu from the TV screen Power Restore This feature allows you ...

Страница 31: ... TV Select Mono to hear mono sound only Use this setting when receiving broadcasts with weak stereo signals MONO is displayed on the TV screen when you tune to a program that is broadcast in mono Select Stereo to split the incoming stereo audio signal into left and right channels STEREO is displayed on the TV screen when you tune to a program that is broadcast in stereo Select Second Audio Program...

Страница 32: ... content themes so programs received with no content themes will only be blocked if you block their age based rating You can also block out programs that have been given a rating of Not Rated and programs that are considered unrated because no code has been sent by the broadcaster 1 Repeatedly press MENU on the remote to display the Special menu Press CH v to highlight Parental Control Closed Capt...

Страница 33: ... change the password 1 Repeatedly press MENU on the remote to display the Special menu Press CH v to highlight Parental Control and press CH v to highlight Change Password Parental Lock On TV Guidelines Movie Ratings No Rating Unblock Ext Source Unblock Change Password Parental Control Select Adjust Prev 2 The Enter a New Password screen appears Enter and repeat your new password 3 Press CH or CH ...

Страница 34: ...lts and may be unsuitable for children under 17 It contains one or more of the following content themes crude indecent language L explicit sexual activity S or graphic violence V Parents Strongly Cautioned Contains some material that many parents would find unsuitable for children under 14 Parents are strongly urged to exercise greater care in monitoring this program and are cautioned against lett...

Страница 35: ... associated content The Blocked settings are checked and the Unblock settings are not checked TV MA TV 14 TV PG TV G TV Y7 TV Y Block Rating All FV D L S V Select Adjust Prev Rating Field Lets you select from a list of age based ratings you can block or view Content Themes Lists the content themes you can block or view Content Status Fields Lets you select which content themes to view for the sele...

Страница 36: ... Guidelines Movie Ratings No Rating Unblock Ext Source Unblock Change Password Parental Control Select Adjust Prev 3 Press VOL or VOL to display the Movie Rating screen X NC 17 R PG 13 PG G Block NR Select Adjust Prev 3 Press CH or CH v to highlight the lowest Rating you want to block Press VOL or VOL to block the rating and all of the ratings above the one you block A check appears next to the ra...

Страница 37: ...s VOL or VOL to toggle between Unblock and Block Select Unblocked so all unrated programs are available Select Blocked so no unrated programs are available 3 Press CH or CH v to select a different Parental Control feature or press MENU to return to the Special menu Press again to remove the Special menu from the screen Block the External Source Signal This option lets you decide if you want to blo...

Страница 38: ... external source is available Select Blocked so the signal from an external source is blocked 3 Press CH or CH v to select a different Parental Control feature or press MENU to return to the Special menu Press again to remove the Special menu from the screen MUTE MENU VOL VOL POWER CH CH VOL or CH or CH v MENU ...

Страница 39: ...ce References This section includes Troubleshooting Guide Care and Cleaning RCA Limited Warranty Accessory Information Index Setup and connections Set up Menu 1 2 remote Front Panel 3 Menu Features 4 5 Reference ...

Страница 40: ...s Remove batteries and hold number 1 for at least 60 seconds to drain the microprocessor inside the remote Release number 1 and replace the batteries Turns off while playing Off Time Feature or Sleep Timer in Time Menu may have been set If TV turns on with Wake Up feature in Time menu you must press a CH or VOL button within 15 minutes or the TV will automatically turn off Electronic protection ci...

Страница 41: ...e Check the CC feature in the Special menu Care and Cleaning CAUTION Turn OFF your TV before cleaning You can clean the TV as required using a soft lint free cloth Be sure to occasionally dust the ventilation slots in the cabinet to help assure adequate ventilation The TV s screen may be cleaned with a soft lint free cloth as well Take care not to scratch or mar the screen If necessary you may use...

Страница 42: ...n sizes larger than 26 Request home service from any Authorized RCA Television Service Center provided that your television is located within the geographic territory covered by an Authorized RCA Television Service Center If not you must take your television to the Service Center location at your own expense or pay for the cost the Service Center may charge to transport your television to and from...

Страница 43: ...th your TV It will make it easier to contact you should it ever be necessary The return of the card is not required for warranty coverage How state law relates to this warranty This warranty gives you specific legal rights and you also may have other rights that vary from state to state If you purchased your television outside the United States This warranty does not apply Contact your dealer for ...

Страница 44: ...elded so they are less susceptible to hum or interference from adjacent cables Most audio video connections between components can be made with shielded audio and video cables that have RCA type phono connectors Screw on Coaxial Connector Standard Audio Video cable with RCA type phono plugs such as No VH83 Round 75 ohm coaxial cable Push on Connector Flat 300 ohm twin lead cable VH81 3 ft VH89 6 f...

Страница 45: ...Card preferably Money order or check must be in U S currency only No COD or CASH 5 00 All accessories are subject to availability Prices are subject to change without notice Where applicable we will ship a superseding model Screw on antenna cable 3 ft VH81 3 95 Screw on antenna cable 6 ft VH82 5 95 Push on antenna cable 6 ft VH89 5 95 Monaural VCR Dubbing Cable 6 ft VH83 5 95 Stereo VCR Dubbing Ca...

Страница 46: ...terCard or Discover Card by filling in below USE YOUR CREDIT CARD IMPORTANT Copy complete account number from your VISA card IMPORTANT Copy complete account number from your MasterCard My card expires My card expires Copy Number above your name on MasterCard AUTHORIZED SIGNATURE Credit card order will not be processed without signature Name Street Apt City State Zip Print or type your name and add...

Страница 47: ... Mono audio 29 Movie Ratings 32 Movie ratings limits 34 MUTE button 16 Mute closed caption 28 N No rating feature 35 Number buttons 16 O Off time set 24 Optional accessories 42 Order form accessory 43 P Parental control 30 Parental lock feature 30 Password 31 Password change 31 Point and Select 10 POWER button 16 17 Power restore feature 28 Problem solving 38 Product Registration Inside front cove...

Страница 48: ...homson Consumer Electronics Inc Trademark s Registered Marca s Registrada s Printed in USA TOCOM 15600640 Please do not send any products to the Indianapolis address listed in this manual or on the carton This will only add delays in service for your product ...

Отзывы: