background image

14

Cleaning the Disc

A defective or soiled disc inserted into the unit can 
cause sound to drop out during playback.
Handle  the  disc  by  holding  its  inner  and  outer 
edges.
•  Do  NOT  touch  the  surface  of 

the unlabeled side of the disc.

•  Do NOT stick paper or tape on 

the surface.

•  Do  NOT  expose  the  disc  to 

direct  sunlight  or  excessive 
heat.

•   Clean  the  disc  before  playback.  Wipe  the  disc 

from the center outward with a cleaning cloth.

•  NEVER use solvents such as benzine or alcohol to 

clean the disc.

•  Do  NOT  use  irregular  shaped  discs  (example: 

heart  shaped,  octagonal,  etc.).  They  may  cause 
malfunctions.

Cleaning the Unit

•  Be  sure  to  turn  the  unit  off  and  disconnect  the 

power source before maintaining the unit.

•  Wipe the unit with a dry soft cloth. If the surfaces 

are  extremely  dirty,  wipe  clean  with  a  cloth 
that has been dipped in a weak soap-and-water 
solution  and  wrung  out  thoroughly.  Then  wipe 
with a dry cloth.

•  Never use alcohol, benzine, thinner, cleaning fluid 

or other chemicals. Do NOT use compressed air to 
remove dust.

Important Note

•  Before  transporting  the  unit,  remove  any  disc 

from the disc compartment.

Maintenance

View Mode
16:9 Fill, 16:9 Pillarbox, 4:3 Fill, 4:3 Pan Scan, and 4:3 Letterbox are available for your choice. 
Note: Depending on the disc, you may not be able to view the mode as selected.

HDMI Resolution
To select the HDMI resolution  to match the capabilities of your TV.
Note: HDMI resolution can be only selected if the HDMI cable is connected to a TV.
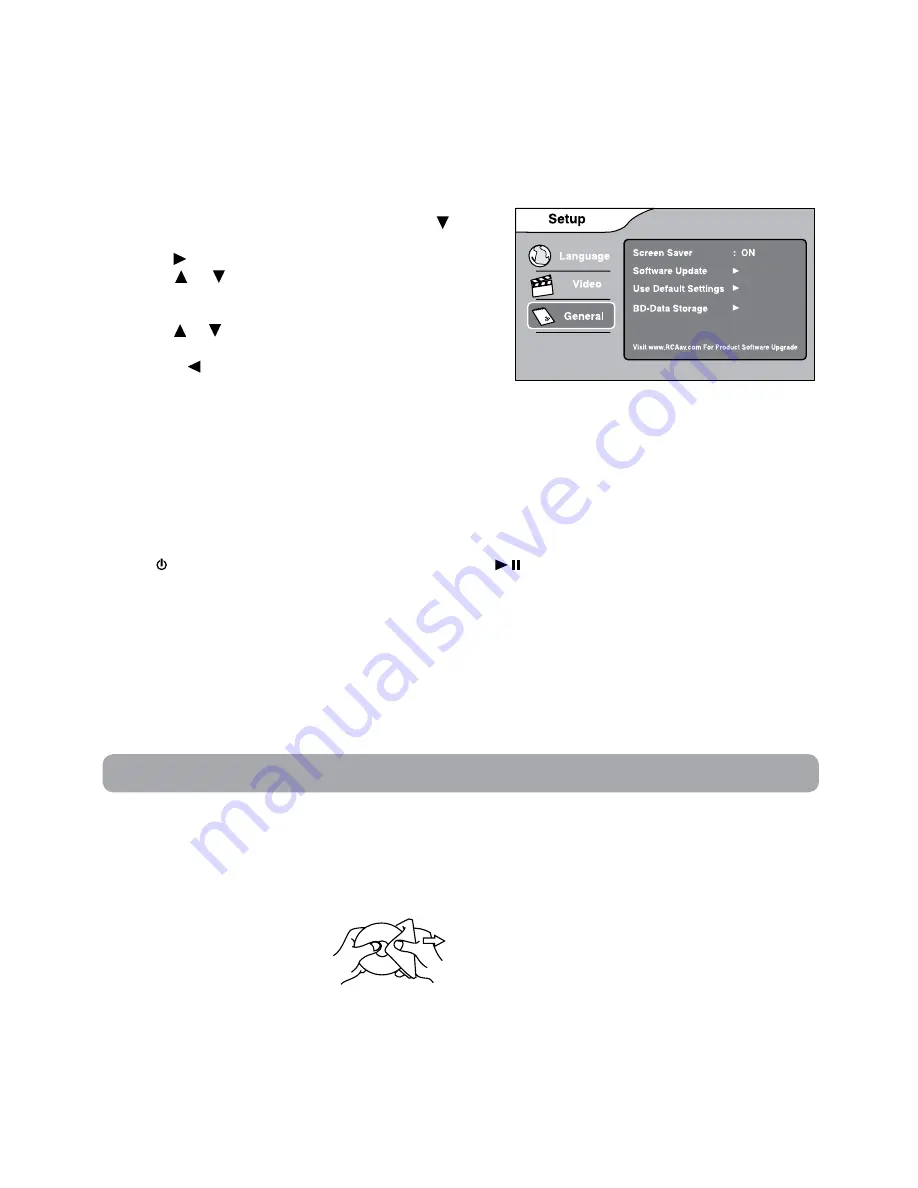
General Setup

1. In STOP mode, press the SETUP button. Press the   button 

to select General.

2. Use the   button to move the highlight bar to the right,  

use the   or   button to select Screen Saver, Software 
Update, Use Default Settings and BD-Data Storage, press 
the OK button to select.

3. Use the   or   button to select your settings, then press 

the OK button to confirm.

4. Press  the    button  to  go  back  to  the  previous  menu. 

Repeat steps 2 and 3 to adjust other options.

5. To exit the SETUP MENU and return to the normal screen, press the EXIT or SETUP button.

Screen Saver
To turn on or off the screen saver (screen protection to prevent image burn).
Note: 
•  When  you  leave  the  unit  in  stop  mode  for  approximately  5  minutes,  the  screen  saver  of  the  unit 

automatically appears if you set the Screen Saver to On mode. To turn off the screen saver, press the PLAY 
button.

•  When screen saver appears approximately 15 minutes, the unit will automatically turn to STANDBY mode. 

Press   STANDBY/ON button (on the remote control) or     Play/Pause button to turn the product from 
STANDBY mode to ON.

Software Update
For future Product Software Upgrades - please visit 

www.RCAav.com

 for information on updates.

Use Default Settings
Restores your player to the original factory settings. The unit will exit the default setting menu automatically 
and re-load the disc in the disc tray.
Note:  It will take 3-5 seconds to reset the player to the factory default.
BD-Data Storage
The available storage space is displayed next to BD-Data Storage.

Содержание BRC3073

Страница 1: ...s constantly changing and improving To ensure you re getting the best performance from your product please visit our website to download the latest operating software for it Simply go to www RCAav com click on your product s link and you ll get the latest operating software Just follow the online instructions and you ll have your product upgraded in minutes ...

Страница 2: ...hted candles should be placed on the AC power adapter and the unit Leave a minimum of 10cm around the apparatus for ventilation Attention should be drawn to the environmental aspects of battery disposal Use of apparatus in moderate climates On Condensation When left in a heated room where it is warm and damp water droplets or condensation may form inside the unit When there is condensation inside ...

Страница 3: ...ing to qualified service personnel Servicing is required when the apparatus has been damaged in any way such as the power supply cord or plug is damaged liquid has spilled or objects have fallen into the apparatus the apparatus has been exposed to rain or moisture does not operate normally or has been dropped THE APPARATUS SHALL NOT BE EXPOSED TO DRIPPING OR SPLASHING AND THAT NO OBJECTS FILLED WI...

Страница 4: ... 10 Subtitle Selection 10 Angle Selection 10 Using the PiP Picture in picture mode 10 Using a Disc Pop Up Menu 11 Displaying Blu ray Disc Information 11 Using the Picture Menu 11 Playing Picture Files 11 Repeat Playback 11 Locating a Desired Section 12 Locating a specific chapter 12 Locating a specific title 12 Locating a specific time 12 Customizing the Function Settings 13 Language Setup 13 Vide...

Страница 5: ...ny of the following marks Titles Chapters and Tracks Blu ray Discs and DVDs are divided into titles and chapters If the disc has more than one movie on it each movie would be a separate title Chapters are sections of titles Audio CDs are divided into tracks A track is usually one song on an Audio CD Note Numbers identify each title chapter and track on a disc Most discs have these numbers recorded...

Страница 6: ...place the batteries Note If the remote control is not going to be used for a long time remove the batteries to avoid damage caused by battery leakage corrosion When discarding batteries environmental problems must be considered and local rules or laws governing the disposal of these batteries must be strictly followed Do not mix old and new batteries Do not mix ALKALINE standard CARBON ZINC or rec...

Страница 7: ...a Blu ray Disc Press to repeat chapter or title of a DVD Press to repeat single track of whole CD 15 A B Button Press to perform point to point repeat playback on a Blu ray Disc DVD or CD 16 PICTURE Button Press to adjust brightness contrast backlight Screen 17 GOTO Button Press to skip directly to a specific location on a Blu ray Disc or DVD 18 Skip Button Press to move forward through titles cha...

Страница 8: ...D Buttons Performs fast reverse forward playback OK Button When disc door is closed press to confirm selections on a menu screen When disc door is opened press to enter or exit SETUP menu MENU Button Press to open or close the disc s menu Cursor or Buttons Press to highlight selections on a menu screen and adjust certain settings 8 Indicator When charging with the AC power adapter switch the CHARG...

Страница 9: ...th Check your local traffic laws for rules governing the use of video devices in vehicles IMPORTANT This car adapter is for use with 12 volt batteries only WARNING Disconnect this car power adapter when not in use Not for use in 24V vehicles B Using the AC power Adapter Using the provided AC power adaptor only and should be connected to a mains supply within these parameters Cautions Turn off the ...

Страница 10: ... battery properly environmental problems must be considered and local rules or laws governing the disposal must be strictly followed WARNINGS CAUTIONS The built in battery can only be recharged when the unit is in CHARGE mode while using the AC adapter The built in battery cannot be recharged when the unit is in power ON mode Do NOT recharge the battery in the vehicle by using the car power adapte...

Страница 11: ...gnal or weak signal TV Black AV Cable not included TV HDMI Cable not included When a HDMI cable is connected the unit s speaker will be muted and the audio will instead output to the connected device Configure the Video Setup options found in the SETUP menu to best match the capabilities of your TV Set the HDMI resolution to match the capabilities of your TV This setting is also in the Video Setup...

Страница 12: ...AV amplifier that supports it Manufactured under license from Dolby Laboratories Dolby and the double D symbol are trademarks of Dolby Laboratories Sound System Unit Operation Turning on the Unit 1 Slide the CHARGE OFF ON switch on the player to the ON position 2 The start up picture will appear on the screen 3 After use slide the CHARGE OFF ON switch on the player to OFF Note If the CHARGE OFF ON...

Страница 13: ...s Press the SKIP button to advance titles chapters tracks For an audio CD use the number buttons on the remote control to go directly to the desired track number Zooming into an image While a DVD picture file disc is playing press the ZOOM button to enlarge the image in serveral levels While an image is zoomed you can use the or CURSOR button to shift the view and display the part you want To retu...

Страница 14: ... press the MENU button and choose the appropriate subtitle on the disc menu Angle Selection Some discs contain scenes that have been shot from a number of different angles For these discs the same scene can be viewed from each of these different angles 1 While you are playing a disc with different angles recorded press the ANGLE button to view the number of current angles available 2 Press the ANG...

Страница 15: ...he screen 3 While viewing a JPG you can press OK button to access viewing options such as ROTATE SLIDESHOW SPEED and TRANSITION EFFECTS Note You can press the PAUSE button to interrupt playback and press the PLAY button to resume playback Playing Picture Files Disc 01 jpg Disc photos 01 02 03 04 05 06 07 08 Repeat Playback You can play a specific title or chapter repeatedly Chapter repeat title re...

Страница 16: ...d as precisely as you specified This method for accessing specific locations is available only within the current title of the disc Repeating a single track CD You can play a single track or an entire disc repeatedly You can play the same track repeatedly 1 While the disc is playing press the REPEAT DISC button until the indicator displays on the screen The current track is played repeatedly Repea...

Страница 17: ... Press the button to select Video 2 Use the button to move the highlight bar to the right press the or button to select TV Shape View Mode and HDMI Resolution press the OK button to select 3 Use the or button to select your settings then press the OK button to confirm 4 Press the button to go back to the previous menu Repeat steps 2 and 3 to adjust other options 5 To exit the SETUP MENU and return...

Страница 18: ...TV Note HDMI resolution can be only selected if the HDMI cable is connected to a TV General Setup 1 In STOP mode press the SETUP button Press the button to select General 2 Use the button to move the highlight bar to the right use the or button to select Screen Saver Software Update Use Default Settings and BD Data Storage press the OK button to select 3 Use the or button to select your settings t...

Страница 19: ...ty Gently clean the disc The disc is scratched The plugs and jacks are dirty Wipe them with a cloth slightly moistened with alcohol Clean the disc Make sure that the disc has the correct region code There is no disc inside the unit No Disc appears on the screen Insert the disc correctly with the graphics facing up Clean the disc A non NTSC disc has been inserted or the disc region number does not ...

Страница 20: ...caused by misuse accident improper operation or maintenance or use in violation of instructions provided with the product or to product which has been altered or modified without authorization of AVC or to products or parts thereof which have had the serial number removed or changed Out of Warranty In the event your product requires repair after the limited warranty period has expired please conta...

Отзывы: