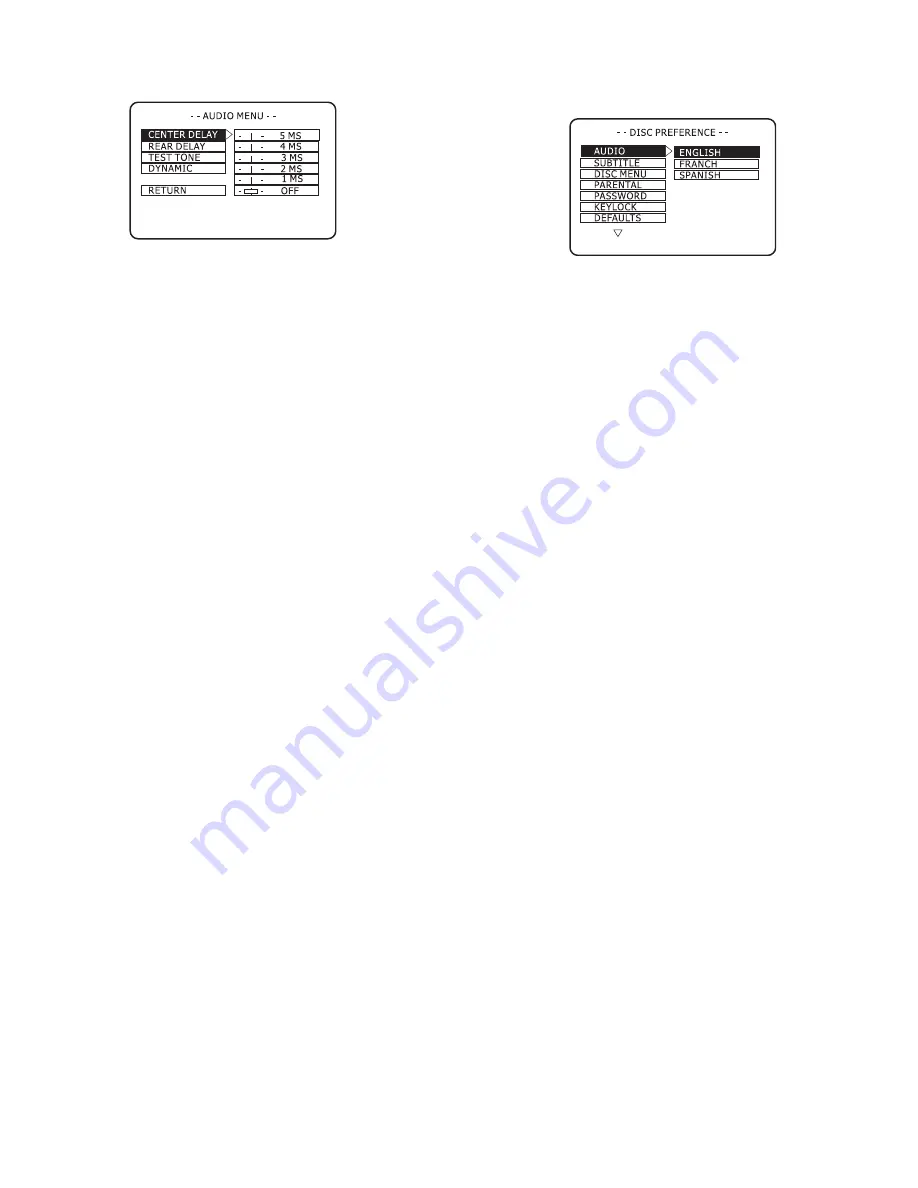
background image

16

Audio Menu

The Audio Menu allows you to set Center Delay, Rear Delay, Test 
Tone and Dynamic range.

1. Press

 DISC

 on the remote control, or rotate 

FUNCTION SELECTOR

 to select the 

DISC

 function.

2. Press SETUP/MENU to view the DVD Setup Menu.

3. Use

d

 and

 e

 to select 

AUDIO MENU

 and then press 

ENTER/SET

.

4. Use the arrow keys to select each of the following, and then 

press 

ENTER/SET

 to set your preference.

Center Delay


delays the sound from the center speaker so that it 

arrives at your primary listening area at the same time as the left 
and right front speakers. Use only if the center speaker is closer 
to your primary listening area than your front speakers. Assume 
1 MS (millisecond) of delay for every 1 foot of difference in 
distance. For example, if your center speaker is 2 feet closer than 
your front speakers, then set the Center Delay to 2 MS.

Rear Delay 

delays the sound from the rear speakers so that it 

arrives at your primary listening area at the same time as the left 
and right front speakers. Use only if the rear speakers are closer 
to your primary listening area than your front speakers. Assume 
1 MS (millisecond) of delay for every 1 foot of difference in 
distance. For example, if your rear speakers are 9 feet closer than 
your front speakers, then set the Rear Delay to 9 MS.

Test Tone

 sends a test tone to each of the five primary speakers 

so you can fine tune the levels for your primary listening area. 
Listen carefully to the test tone as it moves to each speaker in the 
following order: Left, Center, Right, Right Surround, Left 
Surround. When finished, use 

SPK LEVELS

 on the remote 

control or front panel to adjust the levels for each individual 
speaker.

Dynamic


limits the dynamic range (the difference between the 

loudest and quietest portions of the audio track) during DVD 
playback. For example, when you are watching a movie late at 
night and want to reduce loud noises (like explosions) and 
increase the volume of soft noises (like whispering). Choose 
from 

1

/

8

 (minimum compression) to Full (maximum 

compression).

5. Press 

SETUP/MENU

 to save and exit.

Disc Preferences

The Disc Preferences menu allows you to set language preferences 
(for Audio formats, Subtitles and Disc Menus), Parental Control 
options, and system defaults.

1. Press 

DISC 

on the remote control, or rotate 

FUNCTION SELECTOR

 to select the 

DISC

 function.

2. Press 

SETUP/MENU

 to view the DVD Setup Menu.

3. Use 

d

 and

 e

 to select 

DISC PREFERENCES

, and then press 

ENTER/SET

.

4. Use the arrow keys to select each of the following, and then 

press 

ENTER/SET

 to set your preference.

Audio


sets your preferred language for DVD audio soundtracks. 

Select English, French or Spanish. Languages vary from disc to 
disc. The disc itself may override your selection.

Subtitle


sets your preferred language for Subtitles. Select 

English, French or Spanish. Languages vary from disc to disc. 
The disc itself may override your selection. Select 

OFF

 to always 

turn Subtitles off.

Disc Menu


sets your preferred language for DVD disc menus. 

Select English, French or Spanish. Languages vary from disc to 
disc. The disc itself may override your selection.

Parental


sets a rating to block playback of inappropriate content 

with a password-protected Rating system. DVDs that are rated 
higher than the level you select will not play without entering 
the correct password. Not all discs are rated.

Password


allows you to set a password to lock the Parental 

rating (see “Parental” above).

• Select 

CHANGE

.

• Use

 0-9 

to enter the OLD PASSWORD.

• Enter the NEW PASSWORD.

• Re-enter the password to confirm.

If you forget your password, you can use the universal password 
(3-3-0-8) to unlock it. The default password is 1-2-3-4.

Keylock 

locks the front panel keys so the unit can only be 

operated with the remote control. Select 

On

 or 

Off

.

Defaults


resets all Disc Preferences to their default settings.


Содержание 31-5030

Страница 1: ...owner s manual 300W Home Theater System with Intergrated DVD VCR ...

Страница 2: ...r Satellite Receiver 13 Connecting the AM FM Antennas 13 AM Antenna 13 FM Antenna 13 Connecting the TV 13 Connecting the TV to RF Antenna 13 Connecting the TV to Composite Video 13 Connecting the TV to S Video 13 Connecting the TV to Component Video DVD only 14 Connecting External Devices 14 Line 1 In 14 Line 2 In 14 Line Out 14 Digital In Coaxial 14 Setup 15 Running Auto Setup 15 Power on the Sys...

Страница 3: ...Service and Repair 27 2003 RadioShack Corporation All Rights Reserved Manufactured under license from Dolby Laboratories Dolby Pro Logic and the double D symbol are trademarks of Dolby Laboratories DTS and DTS Digital Surround are trademarks of Digital Theater Systems Inc All other brand and product names are trademarks or registered trademarks of their respective companies This product incorporat...

Страница 4: ...he instructions may cause harmful interference to radio communications However there is no guarantee that interference will not occur in a particular installation If this equipment does cause harmful interference to radio or television reception which can be determined by turning the equipment off and on the user is encouraged to try to correct the interference by one or more of the following meas...

Страница 5: ... attachment plug having overload protection This is a safety feature See Instruction Manual for replacement or resetting of protective device If replacement of the plug is required be sure the service technician has used a replacement plug specified by the manufacturer that has the same overload protection as the original plug 14 If an outside antenna or cable system is connected to the product be...

Страница 6: ...l your favorite home entertainment media in one package UNPACK YOUR HOME THEATER SYSTEM DVD VCR Receiver 1 Satellite Speakers 5 Passive Subwoofer 1 Composite Video cable 1 Audio Video cable 1 16 Speaker cables for L R front 2 10 Speaker cable for Center 1 25 Speaker cables for L R surround 2 RF Antenna Cable 1 Remote control 1 1 5V AAA alkaline batteries 2 AM loop antenna 1 FM wire antenna 1 User ...

Страница 7: ...sc or VHS tape TUNING I Press to tune the radio to the desired station OR Press to scan a disc backwards or forward at variable speeds OR Press to rewind or fast forward a VHS tape in the STOP mode OR Press to a scan a VHS tape backward or forward at variable speeds in the PLAY mode RETURN CANCEL Press to cancel certain selections in the menu system PAUSE Press once to pause playback Press repeate...

Страница 8: ...ress to display the DVD disc menu 14 ENTER SET Press to enter and confirm menu settings 15 f e g d Press to navigate the on screen menus 16 REC Press to start recording in the VCR deck 17 REW F In the Disc function press to skip to the previous chapter track In the VCR function press to rewind the tape In Play mode press to scan backward at variable speeds 18 PLAY Press to start playback of a disc...

Страница 9: ... 1 or AV 2 function is active 15 TIMER Lights if a timed recording is programmed 16 RECORD Lights if the VCR is in Record mode 17 TAPE Lights if a tape is loaded in the VCR deck 18 SPEAKERS Shows the currently active speakers 19 DOLBY PRO LOGIC Lights if Dolby Pro Logic surround sound is active 20 DTS Lights if a DVD with a DTS soundtrack is loaded 21 STEREO Lights if stereo audio is selected in F...

Страница 10: ...AM ANTENNA Connect to the supplied AM Antenna 7 SPEAKERS FR C FL SR SL SUB Connect to the supplied speakers Front Right Center Front Left Surround Right Surround Left and Subwoofer with speaker cables 8 RF OUTPUT SWITCH Switch to 3 or 4 whichever is used by your local area broadcast for TV when connecting the system with the RF out connection 9 DIGITAL AUDIO IN Connect to the digital audio output ...

Страница 11: ...degrees to the primary listening area Center Speaker C The center speaker should be positioned with its top surface flush with the front speakers However you may place the speaker either on top of or next to your TV set Rear Speakers LS RS Set the surround speakers further back parallel to the walls at two to three feet above the ear level of the primary listening area If the space behind the list...

Страница 12: ...ound gray Subwoofer black 3 To insert a speaker wire press down on the red or black thumb lever insert the tip of the wire and then release thethumb lever to lock the wire in place CAUTION Short circuits may damage the system Make sure the exposed tip of each speaker wire does not touch another speaker wire or terminal NOTE To obtain the best possible surround sound use the test tone feature and b...

Страница 13: ... FM on the back panel Be sure to fully extend the FM wire antenna Make use of the small loop at the free end of the antenna to maintain its position If noise or interference occurs use an external antenna with a 75 ohm coaxial cable not included CONNECTING THE TV Connecting the TV to RF Antenna Use this connection if you have an older television with only a basic antenna input Connect an RF coaxia...

Страница 14: ...s PSCAN OFF appears on the front panel display IMPORTANT When Progressive Scan is enabled no Composite or S Video signals are available from the DVD player CONNECTING EXTERNAL DEVICES Four additional audio video inputs and outputs are provided to connect external devices such as a VCR satellite receiver or digital cable box optional AV INPUT 1 Connect to the audio video outputs of a video game cam...

Страница 15: ...R on the front panel or the remote control to turn on the unit About Standby Mode The system is always in Standby mode when the AC power cord is plugged into an electrical outlet In Standby mode the clock is shown on the front panel display and the blue power indicator light turns off In Power On mode the system status is shown on the front panel display and the blue power indicator light turns on...

Страница 16: ...or example when you are watching a movie late at night and want to reduce loud noises like explosions and increase the volume of soft noises like whispering Choose from 1 8 minimum compression to Full maximum compression 5 Press SETUP MENU to save and exit Disc Preferences The Disc Preferences menu allows you to set language preferences for Audio formats Subtitles and Disc Menus Parental Control o...

Страница 17: ...audio input jack and do not wish to use the surround speakers 5 Press ENTER SET to save and exit Channel Preset The Channel Preset menu allows you to specify whether you are using an antenna or cable and then allows you to search automatically or manually for local channels 1 Press TV VCR on the remote control or rotate FUNCTION SELECTOR to select the VCR function 2 Press SETUP MENU to view the VC...

Страница 18: ... Press ENTER SET to save and exit Setting the Clock Manually If the Auto feature sets the clock incorrectly you can set the clock manually 1 Press TV VCR on the remote control or rotate FUNCTION SELECTOR to select the VCR function 2 Press SETUP MENU to view the VCR Setup Menu 3 Use the arrow keys to select CLOCK and then press ENTER SET 4 Use the arrow keys to select MANUAL and then press ENTER SE...

Страница 19: ...racking press CHANNEL e and d at the same time RECORDING A TV PROGRAM 1 Turn on the system and press TV VCR 2 Insert a standard VHS tape with a record safety tab into the VCR deck 3 Press SP EP on the remote control to set the record speed to SP Standard Play for best quality EP Extended Play for maximum recording time 3 times longer than SP 4 Use 0 9 or CHANNEL e d to select the channel you wish ...

Страница 20: ... ETC Records every week on the same day 6 Use e d to set the channel to record and then press g 7 Use e d to set the starting time and then press g Press the AM PM button to select AM or PM 8 Use e d to set the stop time and then press g Press the AM PM button to select AM or PM 9 Use e dto set the record speed SP or EP then press g 10 When finished press ENTER SET to save the programmed event 11 ...

Страница 21: ...tops when the system tunes in a station To tune in weak stations manually press TUNING repeatedly 3 Press SLOW MEM on the remote control or STORE PRESETS on the front panel P appears on the front panel display 4 Use the 0 9 buttons or press PRESET to enter a preset number from 01 to 40 You must enter the desired preset number within five seconds 5 Press SLOW MEM on the remote control or STORE PRES...

Страница 22: ...or Chapter 2 Use the 0 9 buttons to enter the desired Title or Chapter number and then press ENTER SET 3 Press GO TO twice to jump to a specific time 4 Use the 0 9 keys to enter the desired hours minutes and seconds and then press ENTER SET CD Operation 1 Press GO TO to jump to a specific time 2 Use the 0 9 keys to enter the desired minutes and seconds TITLE When you play a DVD that contains sever...

Страница 23: ... DVD disc tray After a brief delay the MP3 NAV screen will appear Folders appear on the left and tracks appear on the right 2 Use the arrow keys to select the desired folder and press ENTER SET 3 Use the arrow keys to select the desired track and press ENTER SET or PLAY to begin playback of the track 4 To play the entire folder press REPEAT until you select one of the following REPEAT TRACK Plays ...

Страница 24: ...ft SUB Subwoofer VOLUME All 2 Use e and d to adjust the dB decibel level of the selected speaker relative to the other speakers 3 Continue in this manner until you have balanced the speaker levels ideally for your listening area SETTING EQ MODES The EQ MODE feature offers five preset equalizer settings 1 Press EQ MODE to view the current EQ setting 2 Press EQ MODE repeatedly to select STANDARD CLA...

Страница 25: ...h a cloth slightly moistened with alcohol Clean the disc No surround effect during playback of Dolby Digital soundtrack Check speaker connections and settings Depending on the DVD the output signal may not use all 5 1 channels but rather output monaural or stereo sound even if the soundtrack is recorded in Dolby Digital format Cannot tune in radio stations Make sure antennas are securely connected...

Страница 26: ...7mm sec 0 66 i p s EP 11 12 mm sec 0 44 i p s Channel Coverage VHF 2 13 UHF 14 69 CATV 1 125 Antenna Input 75ohm Video Input 0 5 to 2 0 Vp p 75ohm unbalanced Video Output 1 0 Vp p 75ohm unbalanced Audio Input 8dBs 47kOhm unbalanced 0 dBs 0 775 Vrms Audio Output 8 dBs 1kOhm unbalanced 0 dBs 0 775 Vrms Memory Backup 5 seconds OTHER Operating temperature 32ºF to 109 4ºF 0ºC to 43ºC Power supply 120V ...

Страница 27: ... a cleaning cloth Wipe the disc from the center out Do not use solvents such as benzine thinner commercially available cleaners or anti static spray intended for vinyl LPs NOTES ABOUT VIDEOCASSETTES Cassette Tape Requirements This video cassette recorder VCR uses ONLY cassette tapes NTSC video signals and 120 VAC 60 Hz standard household current Cassette Erase Protection A cassette has a removable...

Страница 28: ...efect during the warranty period take the product and the RadioShack sales receipt as proof of purchase date to any RadioShack store RadioShack will at its option un less otherwise provided by law a correct the defect by product repair without charge for parts and labor b replace the product with one of the same or similar design or c refund the purchase price All replaced parts and products and p...

Отзывы: