background image

15

Remote Control Operation

Auto Preset

1. Press 

BAND

 to select the desired band.

2. Hold down 

MEMORY

 for about 3 seconds.

3. The tuner automatically begins scanning, and stores the first 30

strong signals it receives.

4. Scanning stops automatically after radio stations have been

stored in the auto preset memory.

Note: Press 

MEMO

 again to stop auto scanning earlier.

To store stations on the other band, repeat Steps 1–4, substituting
the other band in Step 1.

Listening to Preset Stations

To listen to a radio station stored in the station memory, press 

TUN-

ING MODE

 then 

TUNING/PRESET


)

)

)

)


or 

-

-

-

-

.

Switching Between Preset Stations and Manual 
Tuning

If you store preset stations, pressing 

TUNING/PRESET


)

)

)

)


or 

-

-

-

-

scrolls through the preset stations, rather than changing the frequen-
cy station by station.

To switch to scrolling by individual stations, press 

TUNING MODE

,

then repeatedly press 

TUNING/PRESET


)

)

)

)


or 

-

-

-

-

 quickly to change

the frequency by one step. Or hold down 

TUNING/PRESET 

:

:

:

:

 or 

;

;

;

;

to tune to the next clear station.

To switch back to scrolling through the preset stations, press 

TUNING

MODE

, then repeatedly press 

TUNING/PRESET


)

)

)

)


or 

-

-

-

-

 until you

reach the desired station.

CONTROLLING THE CD PLAYER

You can use the receiver’s 3-DVD changer to listen to audio CDs.

Important: You can only use audio CDs and some CD-Rs with the
reciever. CD-ROM, CD-G, photo CD, and CD-i discs can not be
played on this player.

1. Press 

POWER

.

2. Press 

DVD

.

3. On the receiver, press 

DISC 1

DISC 2

, or 

DISC 3

 to open the

desired drawer.

4. Place the desired CDs in the tray, then press the appropriate

DISC button again to close the drawer.

Note: If you want to load more than one CD, you can press
another DISC button. The receiver closes the open drawer and
opens the drawer of the DISC button you pressed.

5. To select a CD, repeatedly press 

DISC SKIP

 until the desired

CD’s number blinks.

6. To play, press 

BAND

/

7

7

7

7

To pause playback, press (

pause icon

). To resume playback,

press 

(pause icon) 

again or press 

BAND

/

7

7

7

7

.

To move forward through a track, hold down 

TUNING/PRESET


-

-

-

-

for about 2 seconds. Repeat up to two times to increase the fast-
forward speed. To resume playback, press 

BAND

/

7

7

7

7

.

To move backward through a track, hold down 

TUNING/PRESET

)

)

)

)


for about 2 seconds. Repeat up to two times to increase the

rewind speed. To resume playback, press 

BAND

/

7

7

7

7

.

Note: At the beginning or end of a track on an audio CD, the
scan speed returns to normal.

To skip to the next track on the CD, press 

TUNING/PRESET 

-

-

-

-

once.

To return to the beginning of the current track, press 

TUNING/

PRESET


)

)

)

)

.

To return to the previous track, press 

TUNING/PRESET


)

)

)

)


twice.

To stop playback, press 

FM MODE/ 

'

. The disc icon stops rotat-

ing, and 

H;IKC;

H;IKC;

H;IKC;

H;IKC;

 appears. To resume playback, press 

BAND

/

7

7

7

7

.

To stop playback completely, press 

FM MODE/


'


again.

Changing the Sound Mode

For a surround mode, repeatedly press 

SURROUND

 until the desired

mode (

J>;7J;H

J>;7J;H

J>;7J;H

J>;7J;H

>7BB

>7BB

>7BB

>7BB

IJ7:?KC

IJ7:?KC

IJ7:?KC

IJ7:?KC

IJ;H;E

IJ;H;E

IJ;H;E

IJ;H;E

, or 

FHEýBE=?9

FHEýBE=?9

FHEýBE=?9

FHEýBE=?9

) appears.

Note: Dolby Digital and DTS modes do not work with CDs.

Using GUI Menu Icons

GUI menu icons show the current track number and elapsed time of a
CD. Some icons only show the indicated information. Other icons al-
low the settings to be changed.

Important:  You must turn on your television to view the GUI menu
icons.

Follow these steps to view or change GUI information.

1. Press 

GUI

 during playback. Icons of the current track number

and the elapsed time appear. 

2. Press the remote’s 

6

6

6

6

 or 

7

7

7

7

 to select the desired item. The cur-

rently selected item is highlighted. 

The first icon is the track icon. If you select it, you can jump to the
desired track number by pressing the number keys and 

ENTER

,

or by pressing 

)

 or 

-

.

The second icon is the time icon. It shows the elapsed time. You
cannot change it. It is only for viewing.

Repeat Play

Press 

REPEAT

 during playback. Each time you press this button, the

TV screen displays the repeat mode setting and the disc will repeat a
track.

The repeat mode changes between 

H;F;7JýED;

H;F;7JýED;

H;F;7JýED;

H;F;7JýED;

H;F;7Jý7BB

H;F;7Jý7BB

H;F;7Jý7BB

H;F;7Jý7BB

H;F;7J

H;F;7J

H;F;7J

H;F;7J

7BBý:?I9I

7BBý:?I9I

7BBý:?I9I

7BBý:?I9I

, and 

H;F;7JýE<<

H;F;7JýE<<

H;F;7JýE<<

H;F;7JýE<<

 as you press the button.

To return to normal play, press 

REPEAT

 several times until 

H;F;7JýE<<

H;F;7JýE<<

H;F;7JýE<<

H;F;7JýE<<

appears.

Note: Repeat play works only with discs for which the elapsed play-
ing time appears in the display window during playback.

Содержание 3-DVD Changer

Страница 1: ...Owner s Manual Please read before using this equipment Complete 7 Piece 600 Watt Home Theater Audio System with 3 DVD Changer ...

Страница 2: ...zed Discs You may not be able to play back some DVD video discs on this play er if they were purchased from outside your geographic area or made for business purposes When you try to play back an unauthorized disc Check Regional Code appears on the TV screen NOTES ON COPYRIGHT It is forbidden by law to copy broadcast show broadcast on cable play in public and rent copyrighted material without perm...

Страница 3: ...cart carefully Quick stops excessive force and uneven surfaces may cause the product cart to overturn 6 Disc Tray Keep your fingers well clear of the disc tray as it is closing It may cause serious personal injury 7 Burden Do not place a heavy object on or step on the product The object may fall causing serious personal injury and serious damage to the product 8 Connecting When you connect the pro...

Страница 4: ...d by the manufacturer or having the same characteristics as the origi nal part Unauthorized substitutions may result in fire electric shock or other hazards 24 Safety Check Upon completion of service or repairs to this product ask the service technician to perform safety checks to determine that the product is in proper operating condition 25 Wall or Ceiling Mount The product should be mounted to ...

Страница 5: ... Speaker Distance 13 Surround Effects 14 Changing System Settings Special Circumstances 14 Using the Remote Control Unit to Control Additional Components 14 Controlling the Tuner 14 Listening To FM Stereo Broadcasts 14 Presetting Radio Stations 14 Manual Preset 14 Auto Preset 15 Listening to Preset Stations 15 Switching Between Preset Stations and Manual Tuning 15 Controlling the CD Player 15 Chan...

Страница 6: ...ttings let you use the Home Theater Audio System for a movie theater surround sound experience Adjustable Speaker Size Channel Level and Distance lets you customize your setup for a true surround sound experience Additional Component Connections let you connect other audio and audio visual components to the receiver so that you can use the system s surround sound speakers Night Mode lets you compr...

Страница 7: ...ting a Digital Optical Audio Devices You can connect a digital audio device such as an DAT Digital Au dioTape or MD Mini Disc recorder to the receiver s DIGITAL OUT to record audio from the receiver Use Toslink optical cable to connect the DAT or MD recorder to the receiver s DIGITAL OUT optical jack You can also connect a satellite receiver MD or DAT recorder CD player or anything else with digit...

Страница 8: ...Brown Black 5 Release the speaker terminal 6 Plug the AC power cord into an AC wall socket PLACING THE SPEAKERS 1 Place the front left and right speakers at equal distances from the TV 2 Install the center speaker above or below the TV so that the sound of the center channel is localized at the TV screen Caution If you choose to install the center speaker on top of the TV be sure to secure it to r...

Страница 9: ...in DVD CD mode FUNCTION Rotate to select the desired audio or audio video source The selected source name appears on the display panel PHONES This jack is compatible with wide range of conventional dy namic headphone types When you connect headphones the unit automatically selects stereo mode DTS Press to switch to 5 1 Channel DTS from stereo mode STEREO Press to switch from surround mode to ste r...

Страница 10: ...ing TUNING PRESET ý ý ý ý or only moves the tuner to the next preset station instead of moving the frequency one step If this happens press TUNING MODE to return to manual tuning see Switching Between Preset Stations and Manual Tuning Auto Preset 1 Press BAND to select the desired band 2 Hold down MEMORY for about 3 seconds 3 The tuner automatically begins scanning and stores the first 30 strong s...

Страница 11: ...listen to your CDs using Stereo or Surround modes For stereo only press STEREO once For a surround mode repeatedly press SURROUND MODE until the desired mode J 7J H J 7J H J 7J H J 7J H 7BB 7BB 7BB 7BB IJ7 KC IJ7 KC IJ7 KC IJ7 KC or FHEýBE 9 FHEýBE 9 FHEýBE 9 FHEýBE 9 appears Note Dolby Digital and DTS modes do not work with CDs USING NIGHT MODE You can use Night Mode to compress large dynamic ran...

Страница 12: ...ing AM or FM reception you can scan through other frequencies or select the preset numbers MUTE Press to immediately decrease the sound lev el CKJ CKJ CKJ CKJ appears on the display panel To restore the sound press again SLEEP Press to set the sleep time The sleep time changes to minutes and E E E E former display TONE Lets you adjust the low frequency level BASS with left arrow icon or right ar r...

Страница 13: ... 9 9 until you reach the desired level to ýZ8 ýZ8 ýZ8 ýZ8 4 Press ENTER 9ýB L B 9ýB L B 9ýB L B 9ýB L B appears 5 Press 7 7 7 7 9ý Z8ý 9ý Z8ý 9ý Z8ý 9ý Z8ýappears To change the center speaker s level repeatedly press 8 8 8 8 or 9 9 9 9 until you reach the desired level to ýZ8 ýZ8 ýZ8 ýZ8 6 Press ENTER HýB L B HýB L B HýB L B HýB L B appears 7 Press 7 7 7 7 Hý Z8ý Hý Z8ý Hý Z8ý Hý Z8ýappears To cha...

Страница 14: ...ork correspond ingly with those on the components brands Experiment with the remote control and your components to see which buttons work If only a few functions operate repeat Step 4 to see if another code operates more buttons CONTROLLING THE TUNER 1 Press POWER The last selected function appears 2 Press TUNER 3 Press BAND to select the desired band 4 Repeatedly press TUNING PRESET or to tune in...

Страница 15: ... 7 7 7 7 To move backward through a track hold down TUNING PRESET for about 2 seconds Repeat up to two times to increase the rewind speed To resume playback press BAND 7 7 7 7 Note At the beginning or end of a track on an audio CD the scan speed returns to normal To skip to the next track on the CD press TUNING PRESET once To return to the beginning of the current track press TUNING PRESET To retu...

Страница 16: ...stops and F E F E F E F E appears Press BAND 7 7 7 7 to start program playback Modifying the Program and Adding a Track 1 Press STOP twice You cannot modify the programming in Resume Mode 2 Repeatedly press 8 8 8 8 or 9 9 9 9 to select the desired programmed track To clear the track press CLEAR To change the track to another track press the numeric buttons then ENTER To change the track to a track...

Страница 17: ...Do not push on the disc tray or put any objects other than discs on the disc tray Doing so may cause the DVD player to malfunc tion Keep your fingers well clear of the disc tray as it is closing Keep children s fingers away from the closing disc tray as there is a risk of personal injury When the inhibit icon appears on the TV screen while a button is pressed it means that the function is not avai...

Страница 18: ...nt angle number appear Below each icon is the current information for that menu for example appears under the chapter icon when you are watch ing the movie s second chapter Note Some DVDs might not provide all of the above GUI menu icons 2 Press the remote s 6 6 6 6 or 7 7 7 7 to select the desired item The cur rently selected item is highlighted The first icon is the title icon When you select it...

Страница 19: ...d Note This function only works for discs having scenes recorded at different angles Using Repeat Play Press REPEAT during playback Each time you press this button the TV screen displays the repeat mode setting and the disc will repeat a chapter or title The repeat mode changes between 9 7FJ Hý H F 7J 9 7FJ Hý H F 7J 9 7FJ Hý H F 7J 9 7FJ Hý H F 7J J JB ýH F 7J J JB ýH F 7J J JB ýH F 7J J JB ýH F ...

Страница 20: ...FI 0 ýFI 0 ýFI Pan Scan If you have a conventional TV set and your DVD is not formatted for widescreen viewing use this set ting 0 ýB8 0 ýB8 0 ýB8 0 ýB8 Letterbox If you have a conventional TV set and your DVD is formatted for widescreen viewing use this setting All video material not formatted in the Pan Scan style is played back in the letterbox style Black bands appear at top and bottom of scre...

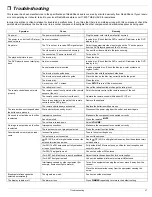
Страница 21: ...properly The remote control is not pointed at the remote sensor of the unit Point the remote control at the remote sensor of the unit The remote control is too far from the unit Operate the remote control within about 23 ft 7 m There is an obstacle in the path of the remote control and the DVD player Remove the obstacle The remote s batteries are exhausted Replace the batteries with new ones The r...

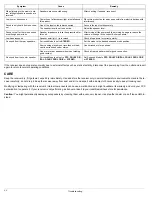
Страница 22: ...g After checking if needed reconnect Low hum or buzz sound Power line of a fluorescent light is installed near this product Place this product as far away as possible from electric devices with interference Sound is only heard from one chan nel One of the input cords is disconnected Connect the input cords securely The speaker level is set to one side Adjust the speaker level Sound cuts off or the...

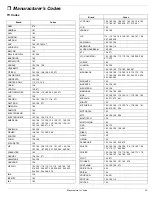
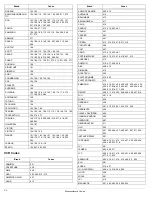
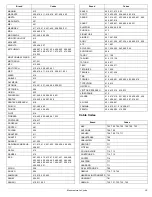
Страница 23: ...244 245 246 248 279 IMA 138 INFINITY 162 JBL 162 JC PENNY 104 105 106 108 122 152 154 158 163 172 185 187 205 228 271 272 281 JCB 102 JENSEN 104 106 JVC 112 113 154 156 160 165 166 167 189 257 258 259 KAWASHO 102 104 106 KENWOOD 104 106 119 KLOSS NOVABEAM 169 283 KTV 138 271 LG GOLDSTAR 104 105 106 112 119 156 158 255 256 271 272 LOEWE 162 LUXMAN 104 106 LXI 106 149 162 172 185 262 281 MAGNAVOX 10...

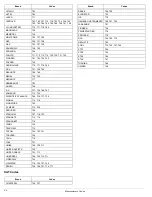
Страница 24: ... YANAHA 104 105 106 119 ZENITH 104 247 253 254 Brand Codes ADMIRAL 531 ADVENTURA 426 AIWA 426 AKAI 403 404 512 513 AMERICAN HIGH 421 ASHA 413 Brand Codes AUDIO DYNAMICS 409 410 AUDIOVOX 414 BEAUMARK 413 BELL HOWELL 411 CALIX 414 CANDLE 413 414 423 461 CANON 421 CARVER 462 CCE 461 CITIZEN 413 414 415 416 417 418 COLORTYME 409 COLT 461 CRAIG 413 414 423 461 CURTIS MATHES 409 412 413 416 418 421 515 ...

Страница 25: ...84 486 487 488 489 490 491 494 507 509 515 520 525 531 RICHO 528 RUNCO 504 SAMSUNG 413 415 433 453 SANKY 504 531 SANSUI 410 511 523 Brand Codes SANYO 405 411 413 423 SCOTT 415 432 435 438 465 493 516 SEARS 401 414 421 423 448 449 450 451 455 456 507 518 SHARP 417 429 431 494 495 496 531 SHINTOM 404 456 46 498 SHOGUN 413 SIGNATURE 531 SINGER 421 461 528 SONY 404 421 425 427 434 498 499 519 528 STS ...

Страница 26: ... 738 786 787 SAMSUNG 714 734 SCIENTIFIC ATALANTA 706 736 737 738 SIGNAL 714 718 SIGNATURE 703 SL MARX 714 525 SPRUCER 752 STARCOM 707 718 753 STARGATE 714 718 STARQUEST 718 TANDY 740 TELEVIEW 714 TOCOM 704 723 741 TOSHIBA 726 TSUA 718 TV86 727 UNIKA 708 709 711 UNITED ARTISTS 702 UNITED CABLE 753 713 UNIVERSAL 708 709 710 711 VIDEOWAY 744 VIEWSTAR 715 725 727 740 ZENITH 726 750 751 774 777 Brand C...

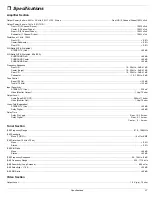
Страница 27: ...ter Large 10 20 kHz 3 dB 1 dB Rear L R 10 20 kHz 3 dB 1 dB Subwoofer 10 120 Hz 3 dB Tone Control Bass 100 Hz 10 dB Treble 10 kHz 10 dB Input Sensitivity STEREO TV Line 320 mV Video Monitor Output 1 Vpp 75 ohm Output Level Audio Tape REC OUT 280 mV 1 kohm Video Monitor Out 1 Vpp 75 ohm Cross Talk Separation STEREO TV Line 55 dB Dolby Digital 45 dB Delay Time Dolby Pro Logic Rear 15 30 msec Dolby Di...

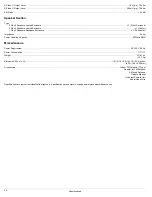
Страница 28: ... Subwoofer Impedance 6 ohm Power Handling Capacity 60 Watts RMS Miscellaneous Power Requirement AC 120 V 60 Hz Power Consumption Weight 37 lb 1 oz 16 7 kg Dimension W x H x D 16 15 16 5 8 16 15 12 16 inches 430 140 400 mm Accessories Indoor FM Antenna T Type Adapter for FM Antenna AM Loop Antenna Owner s Manual Universal Remote Unit Audio Video Wire Specifications are typical individual units migh...

Отзывы: