background image

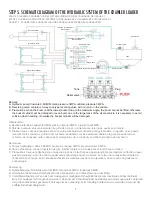
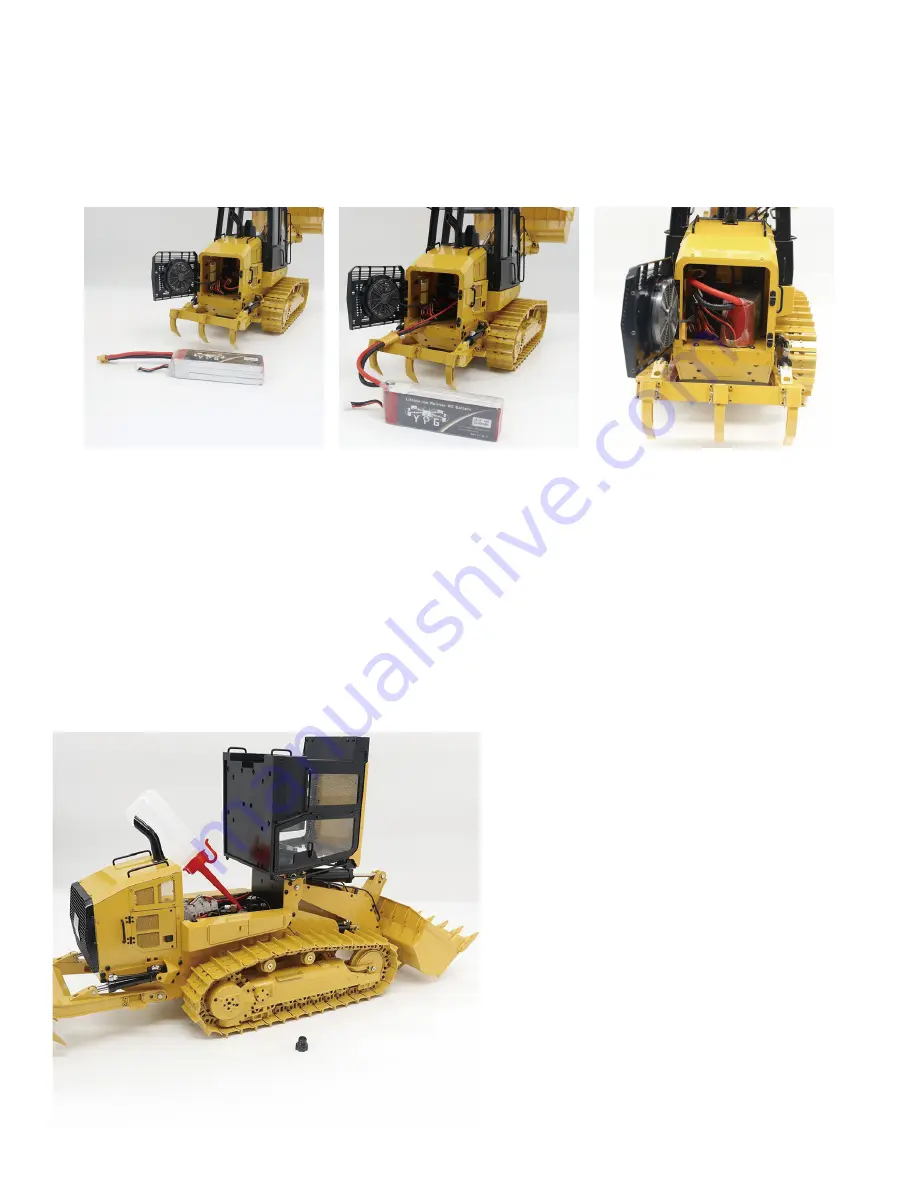
1. Raise the cockpit.

2. Unscrew the fuel tank cap.

3. Add 80ML hydraulic oil, and screw the fuel tank cap.

4. Close the cockpit.

1. Levante la cabina.

2. Desenrosque la tapa del tanque de combustible.

3. Agregue 80ML de aceite hidráulico y atornille la tapa 

    del tanque de combustible.

4. Cierre la cabina.

1. Relevez le cockpit.

2. Dévissez le bouchon du réservoir de carburant.

3. Ajoutez 80ML d'huile hydraulique et vissez le 

    bouchon du réservoir de carburant.

4. Fermez le cockpit.

1. Heben Sie das Cockpit an.

2. Schrauben Sie den Tankdeckel ab.

3. Fügen Sie 80ML Hydrauliköl hinzu und schrauben 

    Sie den Tankdeckel fest.

4. Schließen Sie das Cockpit.

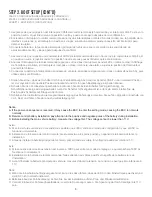
STEP 4. FUELING

PASO 4. ALIMENTANDO // ÉTAPE 4. RAVITAILLEMENT // SCHRITT 4. TANKEN

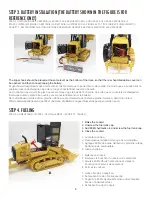
The ripper hook should be placed at the same level as the bottom of the track, so that the rear heat dissipation cover can 

be opened, and then connect/unplug the battery.

El gancho del desgarrador debe colocarse al mismo nivel que la parte inferior de la pista, de modo que se pueda abrir la 

cubierta trasera de disipación de calor y luego conectar/desconectar la batería.

Le crochet du ripper doit être placé au même niveau que le bas de la chenille, de sorte que le couvercle de dissipation 

thermique arrière puisse être ouvert, puis connecter/débrancher la batterie.

Der Aufreißhaken sollte auf der gleichen Höhe wie die Unterseite der Schiene platziert werden, damit die hintere 

Wärmeableitungsabdeckung geöffnet und dann die Batterie angeschlossen/abgezogen werden kann.

STEP 3. BATTERY INSTALLATION (THE BATTERY SHOWN IN THE FIGURE IS FOR 

REFERENCE ONLY)

PASO 3. INSTALACIÓN DE LA BATERÍA (LA BATERÍA QUE SE MUESTRA EN LA FIGURA ES SOLO PARA REFERENCIA) // 
ÉTAPE 3. INSTALLATION DE LA BATTERIE (LA BATTERIE ILLUSTRÉE SUR LA FIGURE EST À TITRE INDICATIF UNIQUEMENT) // 
SCHRITT 3. BATTERIEINSTALLATION (DIE IN DER ABBILDUNG GEZEIGTE BATTERIE DIENT NUR ALS REFERENZ)

6

Содержание VV-JD00059

Страница 1: ...IONES DETALLADAS CONSULTEZ RC4WD COM POUR DES INSTRUCTIONS PLUS D TAILL ES BESUCHEN SIE RC4WD COM F R MEHR DETAILLIERTE ANWEISUNGEN VV JD00059 1 14 Earth Mover RC693T Hydraulic Track Loader RTR GU A D...

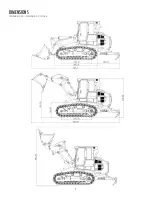
Страница 2: ...DIMENSIONS DIMENSIONES DIMENSIONS MA E 1...

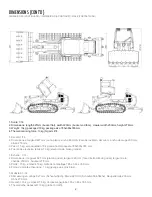
Страница 3: ...i n te rica 13 kg elevaci n de brazo grande 1 chelle 1 14 2 Dimensions longueur 627 mm plat du godet largeur 220 mm face d extr mit du godet largeur de la chenille 200 mm hauteur 278 mm 3 Poids 15 kg...

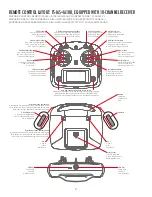
Страница 4: ...ts Big arm down Gran brazo hacia abajo Gros bras baiss Gro er Arm nach unten CH1 Big arm up CH1 Brazo grande arriba CH1 Gros bras lev CH1 Gro er Arm hoch CH2 Right track forward CH2 Camino correcto ha...

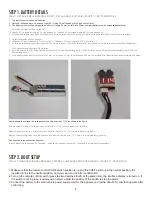
Страница 5: ...ITT 1 BATTERIEDETAILS The remote control uses 4 AA batteries Using 2S half speed at 6 5V and shut off at 6V Using 3S half speed at 9 75V and shut off at 9V The battery size must be no bigger than 140m...

Страница 6: ...n neutra y pueda encenderlo despu s de la confirmaci n 2 Encienda el interruptor de control remoto presione los dos interruptores durante 2S al mismo tiempo la pantalla de la interfaz se enciende si...

Страница 7: ...be opened and then connect unplug the battery El gancho del desgarrador debe colocarse al mismo nivel que la parte inferior de la pista de modo que se pueda abrir la cubierta trasera de disipaci n de...

Страница 8: ...u niveau le plus bas de la chute du godet jusqu l angle maximal la fl che ne peut pas tre soulev e sinon le v rin du godet sera endommag ou m me clat en raison de la masse importante de l ensemble du...

Страница 9: ...r Sound system need to purchase separately Oil pump motor 10 channel receiver Oil valve steering gear 002 Brushed ESC B Sound system Oil valve steering gear 003 Brushless ESC Reserved engineering ligh...

Страница 10: ...attery packs of any type including other LiPos Store and transport your battery pack s in a cool dry place DO NOT store in direct sunlight DO NOT allow the storage temperature to exceed 140 F or 60 C...

Страница 11: ...le items and combustible materials from the charging area DO NOT leave the charger and battery unattended while charging discharging or anytime the charger is ON with a battery connected If there are...

Страница 12: ...las bater as de LiPo con o cerca de otras bater as o paquetes de bater as de cualquier tipo incluyendo otros LiPos Guarde y transporte su s bater a s en un lugar fresco y seco NO lo guarde bajo la luz...

Страница 13: ...go y en una superficie no inflamable como el hormig n NO CARGUE las bater as dentro de un autom vil NO cargue las bater as mientras conduce un autom vil NUNCA cargue las bater as en madera tela alfomb...

Страница 14: ...tion de cellules tiquettes manquantes ou tout autre dommage ou irr gularit Si l une de ces conditions est observ e ne chargez pas ou n utilisez pas le bloc de batteries Suivez les instructions de disp...

Страница 15: ...d passer le taux de charge maximum recommand par le fabricant Ne laissez pas les contacts ou les c bles de la batterie expos s se toucher Cela provoquerait un court circuit et cr erait un risque d inc...

Страница 16: ...nnenlicht lagern Vermeiden Sie Temperaturen ber 60 C wie im Kofferraum eines Autos oder die Zellen k nnten besch digt werden und ein Brandrisiko darstellen Zerlegen Sie LiPo Batterien oder Zellen NIEM...

Страница 17: ...n IMMER in einem gut bel fteten Bereich Auch sind brennbare oder leicht entz ndliche Gegenst nde von der Ladeanordnung fernzuhalten Akkus d rfen nur unter Aufsicht geladen werden Wenn es Anzeichen f r...

Страница 18: ...tructions may cause harmful interference to radio communications The user is cautioned that changes or modifications not expressly approved by the party responsible for compliance could void the user...

Страница 19: ...no se utiliza de acuerdo con las instrucciones puede causar interferencias perjudiciales para las comunicaciones de radio Se advierte al usuario que los cambios o modificaciones que no hayan sido exp...

Страница 20: ...tilis conform ment aux instructions il peut causer des interf rences nuisibles aux communications radio Nous avertissons l utilisateur que les changements ou modifications non express ment approuv s p...

Страница 21: ...t regelm ige Wartungsvorg nge berpr fen Sie vor jeder Inbetriebnahme den Sitz aller Schrauben und das gesamte Ger t auf Besch digungen Ebenso ist der Akku zu berpr fen verwenden Sie niemals einen besc...

Страница 22: ...la pr sente que le produit VV JD00059 1 14 Earth Mover RC693T Hydraulic Track Loader RTR est conforme la directive europ enne 2014 53 EU sous condition que son usage initial soit respect Vous trouver...

Отзывы: