background image

26 | For gamers by gamers™ 


6. SAFETY AND MAINTENANCE


SAFETY GUIDELINES 

In order to achieve maximum safety while using your Razer Naga, we suggest that you 
adopt the following guidelines: 

 
1.


Avoid looking directly at the tracking beam of your mouse or pointing the beam 
in  anyone  else’s  eye.  Note  that  the  tracking  beam  is  NOT  visible  to  the  naked 
human eye and is set on an Always-On mode. 
 

2.


Should you have trouble operating the device properly and troubleshooting does 
not  work,  unplug  the  device  and  contact  the  Razer  hotline  or  go  to 
www.razersupport.com for support. Do not attempt to service or fix the device 
yourself at any time. 


3.


Do  not  take  apart  the  device  (doing  so  will  void  your  warranty)  and  do  not 
attempt to


operate it under abnormal current loads. 


4.


Keep the device away from liquid, humidity or moisture. Operate the device only 
within the specific temperature range of 0°C (32°F) to 40°C (104°F). Should the 
temperature exceed this range, unplug and switch off the device in order to let 
the temperature stabilize to an optimal level. 


COMFORT 

Here  are  some  tips  to  ensure  that  you  are  comfortable  while  using  your  device. 
Research  has  shown  that  long  periods  of  repetitive  motion,  improper  positioning  of 
your computer peripherals, incorrect body position, and poor habits may be associated 
with physical discomfort and injury to nerves, tendons, and muscles.  Below are some 
guidelines to avoid injury and ensure optimum comfort while using your Razer Naga. 

Содержание Naga

Страница 1: ...Naga comes with optimized button placement three interchangeable side grips to suit your personal grip style and is powered by Razer Synapse 2 0 Of course the new Razer Naga still harnesses the power...

Страница 2: ...OF CONTENTS 1 PACKAGE CONTENTS SYSTEM REQUIREMENTS REGISTRATION 2 2 KEY FEATURES 3 3 INSTALLING YOUR RAZER NAGA 4 4 USING YOUR RAZER NAGA 5 5 CONFIGURING YOUR RAZER NAGA 7 6 SAFETY AND MAINTENANCE 26...

Страница 3: ...e Master Guide SYSTEM REQUIREMENTS PC or Mac with a free USB port Windows 8 Windows 7 Windows Vista Windows XP 32 bit Mac OS X 10 6 10 8 Internet connection 100MB of free hard disk space REGISTRATION...

Страница 4: ...C Scroll Wheel D Mouse Button 5 E Mouse Button 4 F 12 total programmable Hyperesponse buttons G Razer Precision 3 5G Laser Sensor H Basic 123 Advanced Num Switch I Ultraslick Mouse Feet J 3 Interchan...

Страница 5: ...into the USB port of your computer Step 2 Download the Razer Synapse 2 0 installer from www razerzone com synapse2 Step 3 Run the installer and follow the on screen instructions Step 4 Register for a...

Страница 6: ...ic 123 and Advanced Num To change between the Basic 123 and Advanced Num mode simply use the switch at the bottom of your Razer Naga Basic 123 Configuration In Basic 123 mode the 12 button thumb grid...

Страница 7: ...keypad s numerical keys These buttons allow you to have quicker access to in game commands without having the need to reach for the keypad Note Depending on your configuration using the shift key or...

Страница 8: ...Synapse 2 0 These features are also subject to change based on the current software version and your Operating System MOUSE TAB The Mouse Tab is your default tab when you first install Razer Synapse...

Страница 9: ...new profile by clicking the button or delete the current profile by clicking the button The button allows you to Copy Import and Export profiles Your current profile by default is named Profile howeve...

Страница 10: ...he basic functionalities of your device such as button assignments to suit your gaming needs The changes made in this tab are automatically saved to your current profile Top View The Top View is where...

Страница 11: ...h the Basic 123 and the Advanced NUM modes using the toggle located on the middle of the screen Configuring the thumb grid buttons on any mode does not require you to use the switch underneath the Raz...

Страница 12: ...Default This option enables you to return the key to its original function To choose the DEFAULT simple select it from the Key Assignment Menu Keyboard Function This option enables you to change the m...

Страница 13: ...l Down Performs a Scroll Down command using the assigned button Sensitivity Sensitivity refers to how fast the mouse pointer can travel across the screen When you select the Sensitivity function from...

Страница 14: ...a submenu will appear wherein you can choose which keymap to use The LED on the thumb module will automatically change color to correspond with the keymap Macro A Macro is a prerecorded sequence of k...

Страница 15: ...ed below are the multimedia playback controls you can choose from the submenu Volume Down Decreases the audio output Volume Up Increases the audio output Mute Volume Mutes the audio Mic Volume Up Incr...

Страница 16: ...Tab the changes made here are automatically saved to your current profile Listed below are the performance options and their descriptions Sensitivity Sensitivity pertains to how much effort is needed...

Страница 17: ...le X Y Sensitivity concurrently with this option Note that whenever you configure a sensitivity stage your current sensitivity will match that setting Acceleration Acceleration increases the cursor s...

Страница 18: ...to configure the LEDs of your Razer Naga Simply toggle the ON or OFF options to enable or disable the Scroll Wheel Thumb Grid and Logo lighting Similar to the previous tabs the changes made here are...

Страница 19: ...macro by typing on the field below MACRO NAME There are also other options available in the macro section such as creating a new macro by clicking the button deleting the current macro by clicking the...

Страница 20: ...ay in between commands are registered as how it is entered The DEFAULT DELAY uses a predefined time expressed in seconds as the delay And NO DELAY omits all the pauses in between keystrokes and button...

Страница 21: ...is arranged sequentially with the first command shown at the top of the screen The button allows you to edit a particular command and the button enables you to delete a command The and buttons gives...

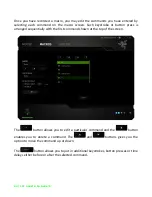
Страница 22: ...pressed the button a new display window will appear beside the list of macro commands The dropdown menu on this window allows you to choose a keystroke or a delay to be added in before or after the hi...

Страница 23: ...22 For gamers by gamers You may add in a new set of macro commands by clicking the button on the keystroke menu or input time delays on the duration field using the delay menu...

Страница 24: ...zer ADD ON TAB The Add On Tab expands your device s usability by adding game specific settings such as a custom interface To start using Razer Add Ons first you must enable the Use Razer Naga Add On o...

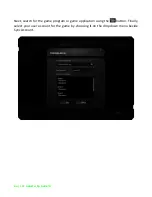
Страница 25: ...24 For gamers by gamers Next search for the game program or game application using the button Finally select your user account for the game by choosing it on the dropdown menu beside Sync Account...

Страница 26: ...25 razer The Account Information screen will show you all the relevant information regarding your user account...

Страница 27: ...me 3 Do not take apart the device doing so will void your warranty and do not attempt to operate it under abnormal current loads 4 Keep the device away from liquid humidity or moisture Operate the dev...

Страница 28: ...on all day Get up step away from your desk and do exercises to stretch your arms shoulders neck and legs 9 If you should experience any physical discomfort while using your mouse such as pain numbness...

Страница 29: ...ual property right The Razer Naga the Product may differ from pictures whether on packaging or otherwise Razer assumes no responsibility for such differences or for any errors that may appear Informat...

Страница 30: ...e Product was purchased If any term herein is held to be invalid or unenforceable then such term in so far as it is invalid or unenforceable shall be given no effect and deemed to be excluded without...

Отзывы: