background image

PAGE

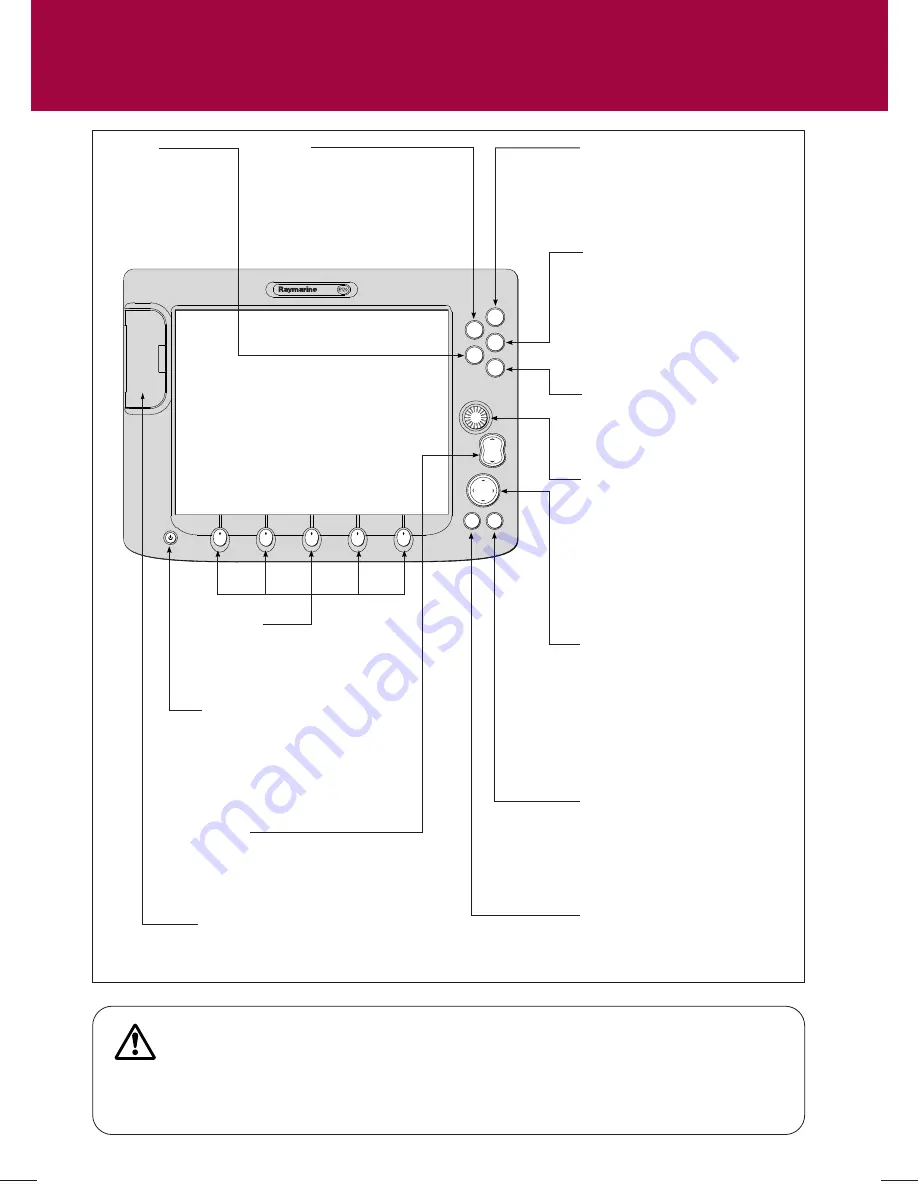
ACTIVE

WPTS

MOB

MENU

DATA

CANCEL

OK

RANGE

IN

OUT

D7

52

3_

1

OK

Press to select an on-screen option, or 

return to the previous set of soft keys 

or menu.

DATA

Press to access 

ruler, chart vectors, 

archive & transfer 

and data bar 

on/off functions.

Trackpad

Used to control the on-screen cursor 

and to scroll through menu items.

Press the corresponding edge of the 

trackpad to move the cursor 

horizontally, vertically or diagonally.

Press and hold to move rapidly over 

larger distances.

CANCEL

Press to cancel the selected on-screen 

option when editing data; also used to 

return to the previous soft key set or 

menu.

MENU

Press to access the set up menus.

Press and hold to access help 

information.

ACTIVE

When multiple windows are open:

- Press to select required window.

- Press and hold to maximize current 

window.

- Press again to return to multiple 

windows.

PAGE

Press to scroll through available pages.

Press and hold to select different page 

set or customise your own layout.

WPTS/MOB

Press to display the waypoint soft keys.

Press again to place waypoint at your 

boat's position.

Press and hold to place a 

Man Overboard (MOB)


marker at 

your current position.  Press and hold 

again to exit MOB.

RANGE

Press to change the display scale 

so that a smaller or larger area 

can be seen on the screen.

Power

Press once to turn ON.

Press again to access backlight 

functions and scanner controls. 

Press and hold to turn the display 

OFF.

Chart Card slot


Open the cover to install 

CompactFlash cards.

Softkeys

Press to select the corresponding 

function identified by the on-

screen label

Rotary control

Use to edit alpha-numeric values, and 

scroll through lists.

Turn clockwise to increase value and 

counter-clockwise to decrease value.

Press to move the cursor to the next 

character when editing text. 

Use to edit symbology (VRM/EBL etc).

WARNING: NAVIGATION AID

This unit is only an aid to navigation. Its accuracy can be affected by many factors, including equipment failure 
or defects, environmental conditions, and improper handling or use. It is the User's responsibility to exercise 
common prudence and navigational judgements. This unit should not be relied upon as a substitute for such 
prudence and judgement.
Always keep a proper look-out.

General Operation

The control panel

Card No. 1

Содержание E120W

Страница 1: ... the fishfinder Card 18 Card 19 What is around me Understanding the radar Avoiding a collision Using MARPA AIS Card 13 Card 14 Card 15 Card 16 Where am I going Monitoring a course Card 17 Basic Navigation Working with waypoints How do I get to a point Card 11 Card 12 PAGE ACTIVE WPTS MOB MENU DATA CANCEL OK RANGE IN OUT What can I see Understanding the chart Using the chart Displaying additional i...

Страница 2: ...o place waypoint at your boat s position Press and hold to place a Man Overboard MOB marker at your current position Press and hold again to exit MOB RANGE Press to change the display scale so that a smaller or larger area can be seen on the screen Power Press once to turn ON Press again to access backlight functions and scanner controls Press and hold to turn the display OFF Chart Card slot Open ...

Страница 3: ...ghlight the next option If a key displays a single value or a slider above use the rotary control to adjust Within the text of this document they are written in capitals e g SORT LIST Buttons Soft keys D7366 1 The Cursor appears on the screen as a white cross To make it easier to locate on screen the cursor changes to a circle with a cross in it when it is moved after a 10 second period of inactiv...

Страница 4: ...confirm Highlight required page set Note Alternatively you can display the Select Page Set screen via the Menu key To customise EDIT PAGE SET Follow on screen instructions Or PAGE OK PAGE ACTIVE SOFT KEY ACTIVE The applications are shown using a combination of page sets pages and windows There are five page sets each containing five pages with a combination of windows and applications in each Thes...

Страница 5: ... CF CARD REMOVAL The system will now complete its checks When instructed to do so open the chart card door and remove the card Firmly click the chart door shut and press OK twice with the unit powered down Open the chart card door Grip the card and pull to remove it from its slot Firmly click the chart card door shut How do I remove a CompactFlash card General Operation Using CompactFlash cards Ca...

Страница 6: ... reaches window edge chart pans to a different area Press and hold to pan larger areas Press RANGE OUT to see a larger area of the chart Press RANGE IN to see a smaller area in more detail To change the scale To pan the chart Build and follow routes Manage and edit routes and tracks Distinguish between fixed moving objects radar overlay View photographs of ports and marinas View information normal...

Страница 7: ...n It is used in conjunction with motion mode see below to control how your boat and chart relate to one another and how they are displayed on screen The default mode is North Up N UP This displays your chart with true north upwards As your heading changes the boat symbol moves accordingly If desired you can change the orientation mode to PRESENTATION CHART MODE AND ORIENTATION ORIENTATION H UP N U...

Страница 8: ......

Страница 9: ......

Страница 10: ......

Страница 11: ...x Shows aerial view from above your boat What can I see Using the 3D chart Card No 10 How do I find where I am on the 3D chart If you cannot see your boat symbol Synchronize 3D chart with 2D chart D8736_1 Your position Turn The 3D chart automat ically redraws with the boat in forward looking view at your current position FIND SHIP GOTO ADJUST ON EYE CENTRE ADJUST ROTATE PITCH PRESENTATION Or Or FI...

Страница 12: ...recommend that you regularly back up your waypoints by archiving them to a CompactFlash card Waypoints can also be transferred to another NMEA compatible instrument Networked systems If you have networked two or more E Series Displays the waypoints are stored on the master display and transferred to other displays via the SeaTalk High Speed network Basic Navigation Working with Waypoints Card No 1...

Страница 13: ......

Страница 14: ...vations that you make a nearby small object may appear the same size on the screen as a distant large object However with experience the approximate size of different objects can be determined by the relative size and brightness of the echoes What is around me Understanding the radar Card No 13 VRM EBL TARGET TRACKING GAIN ENHANCE ECHOES PRESENTATION Range rings Use the range rings to gauge the ap...

Страница 15: ......

Страница 16: ... for up to 10 targets and provides continuous and rapid situation evaluation MARPA tracks the selected targets and calculates target bearing range true speed course Closest Point of Approach CPA and Time to Closest Point of Approach TCPA Each tracked target can be displayed with a CPA graphic depicting the approximate target speed vector length and course vector direction Alternatively move the cu...

Страница 17: ...e optional shows predicted distance travelled within given time Uncertain target Calculated CPA TCPA value uncertain AIS target symbols Lost target When signal of a dangerous AIS target not received for 10 seconds Target orientated in COG or CSE direction as appropriate Alarm sounds and target flashes COG SOG vector Heading Direction of turn See the AIS chapter of the reference manual for data cla...

Страница 18: ... Press DATA CHART VECTORS COG HDG VECTORS Use the Course Deviation Indicator CDI With your display receiving accurate heading and position information you can monitor your course and accurately steer to a target waypoint What does the CDI show me The CDI gives a graphical representation of your boat s course This rolling road format represents a width of sea equal to the Cross Track Error XTE limi...

Страница 19: ......

Страница 20: ...PLIT OFF Toggle as required FISHFINDER SETTINGS Both 200 kHz 50 kHz displayed simultaneously Only available if FREQ MODE set to DUAL 50 kHz for maximum depth penetration in deep water 200 kHz for maximum definition in shallow water Auto mode automatically selects 50 kHz or 200 kHz This is the default mode The system automatically adjusts the gain control to display the sharpest image If required y...

Страница 21: ...camera VIDEO 1 VIDEO 2 VIDEO 3 VIDEO 4 PRESENTATION The engine monitor application enables you to view data from up to three compatible engines The information is displayed in a series of panels which contain data relating to engine fuel and fuel resources These can be reconfigured to your needs Press the appropriate soft key to select the panel of your choice Press the appropriate soft key to sel...

Страница 22: ...the Reference Manual 1 2 Setup Chart Setup Cartography Setup AIS Layer Setup Navtex Messages To run the Sirius Weather application you will need to purchase an SR100 weather receiver and a subscription to Sirius weather Once connected the weather application superimposes historical current and forecasted weather graphics and environmental conditions on the world map and provides textual forecasts ...

Страница 23: ...ront purple Stationary front red blue Trough brown Isobars grey 1012 1010 Dry line brown Or Surface pressure Hurricane Category 1 5 Tropical storm Tropical disturbance or tropical depression Storm Tracks symbols Note Highlight the symbol for additional information F lo r id a Cuba 3 7 8 12 13 17 18 22 23 27 28 32 33 37 38 43 44 47 48 52 53 57 78 82 73 77 68 72 63 67 58 62 88 93 83 87 98 102 94 97 ...

Страница 24: ...is not switched on or because a master has not been selected an alarm will sound and you will be prompted to set a master display How is the network controlled How do I change the master display D8487_1 Select System Integration setup Menu DCM Message Seatalk Data Master Bridge NMEA Heading NMEA Output Setup ON ON ON OFF OFF ON Chart Setup Cartogrphy Setup AIS setup System Setup Alarm Setup GPS St...

Отзывы: