Raymarine a125 Скачать руководство пользователя страница 15

Powering the display off

1. Press and hold the

POWER

button until the

countdown reaches zero.

Note:

If the

POWER

button is released before the

countdown reaches zero, the power off is cancelled.

Adjusting the display brightness

1. Press the

POWER

button once.

The Shortcuts menu is displayed.

2. Adjust the brightness to the required level using the

on-screen brightness slider bar control, or

3. Touch the Sun icon to increase the brightness level

or the Moon icon to decrease the brightness level.

Note:

The brightness level can also be increased by

pressing the

Power

button multiple times.

Simulator mode

The Simulator mode enables you to practice operating
your display without data from a GPS antenna, radar
scanner, AIS unit, or fishfinder.

The simulator mode is switched on / off in the

System

Setup Menu

.

Note:

Raymarine recommends that you do NOT

use the simulator mode whilst navigating.

Note:

The simulator will NOT display any real data,

including any safety messages (such as those
received from AIS units).

Note:

Any system settings made whilst in Simulator

mode are NOT transmitted to other equipment.

Enabling and disabling simulator mode

You can enable and disable simulator mode by following
the steps below.

With the homescreen displayed:

1. Select

Set-Up

.

2. Select

System Settings

.

3. Select

Simulator:

.

4. Select On to turn simulator mode on, or

5. Select Off to turn simulator mode off.

Note:

The Demo movie option is for retail

demonstration purposes only.

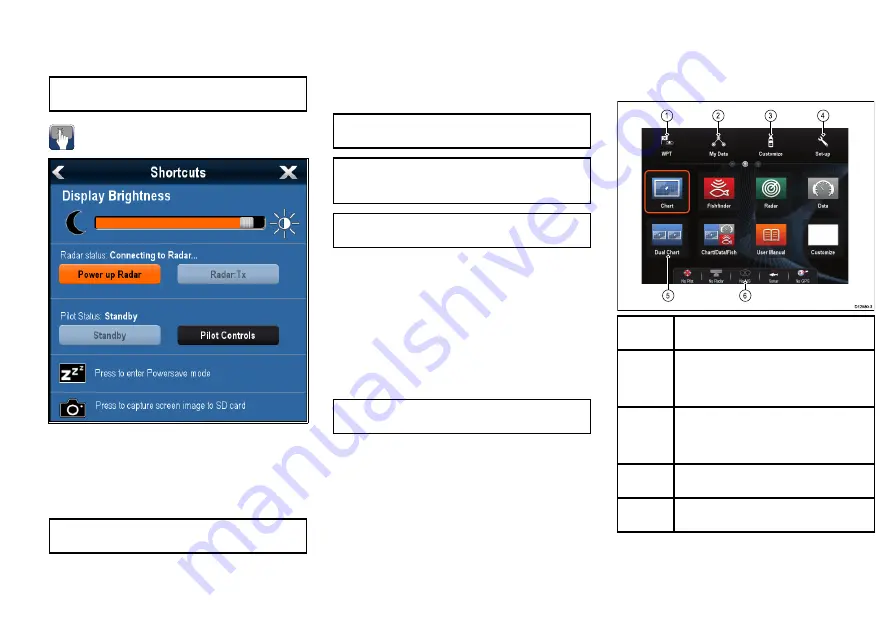
Homescreen overview — Touch only
displays

The Homescreen provides a central point of access for
your display's applications, data and settings.

• The Homescreen provides quick access to your data

(waypoints, routes, tracks, images and videos) and
backup settings.

• The Homescreen consists of a number of

Homescreen pages. Swipe the screen left or right

with your finger to scroll through the available
Homescreen pages.

• Each Homescreen page consists of a number of

icons. Applications are started by selecting the
relevant icon.

  D12580-3 

1

2

3

4

5

6

Screen
item

Description

1

Waypoint

— select the icon to access the

waypoint list. Select and hold on the icon to
place a Man Overboard (MOB) marker at your
vessel’s current position.

2

My Data

— this icon enables you to centrally

manage your data including route, track, and
waypoint lists. You can also access saved
pictures and videos and backup settings.

3

Customize

— select this icon to configure

application pages and display preferences.

4

Set-up

— select this icon to access the system

set-up menus.

15

Содержание a125

Страница 1: ...Mounting and Getting Started ENGLISH Date 05 2014 Document number 88032 1 EN 2014 Raymarine UK Limited a9x a12x EN ...

Страница 2: ...ENGLISH Document number 88032 1 Date 05 2014 ...

Страница 3: ...wer to this product ensure it has been correctly grounded in accordance with the instructions in this guide Warning Switch off power supply Ensure the vessel s power supply is switched OFF before starting to install this product Do NOT connect or disconnect equipment with the power switched on unless instructed in this document Warning FCC Warning Part 15 21 Changes or modifications to this equipm...

Страница 4: ... to facilitate use of official government charts not replace them Only official government charts and notices to mariners contain all the current information needed for safe navigation and the captain is responsible for their prudent use It is the user s responsibility to use official government charts notices to mariners caution and proper navigational skill when operating this or any other Rayma...

Страница 5: ...V technician for help Industry Canada This device complies with Industry Canada License exempt RSS standard s Operation is subject to the following two conditions 1 This device may not cause interference and 2 This device must accept any interference including interference that may cause undesired operation of the device This Class B digital apparatus complies with Canadian ICES 003 Industry Canad...

Страница 6: ...ating the serial number of the unit You will need this serial number when registering your product online You should retain the label for future reference IMO and SOLAS The equipment described within this document is intended for use on leisure marine boats and workboats NOT covered by International Maritime Organization IMO and Safety of Life at Sea SOLAS Carriage Regulations Technical accuracy T...

Страница 7: ...ence such as motors generators and radio transmitters receivers GPS location requirements In addition to general guidelines concerning the location of marine electronics there are a number of environmental factors to consider when installing equipment with an internal GPS antenna Mounting location Above Decks mounting Provides optimal GPS performance For equipment with appropriate waterproof ratin...

Страница 8: ...wever for some smaller vessels it may not be possible to locate the display this far away from a compass In this situation the following figures provide the minimum safe distance that should be maintained between the display and any compasses D12203 1 200 mm 7 87 in 350 mm 13 8 in 300 mm 11 8 in 700 mm 27 5 in 500 mm 19 7 in 250 mm 9 84 in 1 2 3 4 5 6 Item Compass position in relation to display M...

Страница 9: ...ecure using the provided fixings Note The supplied gasket provides a seal between the unit and a suitably flat and stiff mounting surface or binnacle The gasket should be used in all installations It may also be necessary to use a marine grade sealant if the mounting surface or binnacle is not entirely flat and stiff or has a rough surface finish Bracket trunnion mounting The display can be mounte...

Страница 10: ...ding ensure the memory card slot door is open D12584 1 01 1 2 2 2 2 1 2 1 2 1 2 1 2 Important Use care when removing the bezel Do not use any tools to lever the bezel doing so may cause damage 1 Place both your thumbs on the upper left edge of the display at the positions indicated in the diagram above 2 Place your fingers underneath the bezel at the positions indicated in the diagram above 3 In a...

Страница 11: ...e or a combined power and data cable Power cables available For flush mount installations a right angled power cable is available Cable Part number MFD variant Straight power cable supplied with a6x and a7x R70157 a6x and a7x Right angled power cable A80221 a6x and a7x Straight power and data cable supplied with a9x and a12x R62379 a9x and a12x Right angled power and data cable R70029 a9x and a12x...

Страница 12: ...ry with the drain wire also connected to the battery s negative terminal D13019 1 2 4 5 1 3 6 1 Vessel power supply positive 2 Vessel power supply negative 3 In line fuse If your products power cable does not have a built in fuse then an in line fuse should be fitted 4 Drain wire connected to vessel negative power supply 5 Product power cable 6 Vessel battery Note Only applicable to products that ...

Страница 13: ...nected using the power and data cable supplied with compatible MFDs 2 NMEA 0183 ports are available Port 1 Input and output 4800 or 38400 baud rate Port 2 Input only 4800 or 38400 baud rate Note The baud rate you want to use for each port input must be specified in the System Settings menu Homescreen Set up System Settings NMEA Set up NMEA Input Port Note For Port 1 both the input and output commu...

Страница 14: ...memory cards Some brands of memory card may not work in your unit Please contact customer support for a list of recommended cards Inserting a memory card or chart card 1 Open the card reader door 2 Insert the card as shown in the diagram below For slot 1 the card contacts should be facing DOWN For slot 2 the card contacts should be facing UP Do NOT force the card If the card does not fit easily in...

Страница 15: ...can enable and disable simulator mode by following the steps below With the homescreen displayed 1 Select Set Up 2 Select System Settings 3 Select Simulator 4 Select On to turn simulator mode on or 5 Select Off to turn simulator mode off Note The Demo movie option is for retail demonstration purposes only Homescreen overview Touch only displays The Homescreen provides a central point of access for...

Страница 16: ...ons You can also define the layout for each page which determines how the applications are arranged on the screen Changing an existing page on the homescreen With the homescreen displayed 1 Select Customize 2 Select Homescreen 3 Select Edit Page 4 Select the page icon that you want to change The Customize menu options are displayed 5 Select the appropriate page layout for example Splitscreen 6 Sel...

Страница 17: ...scroll through the available data pages Weather application North America only With a suitable weather receiver connected to your system the weather application overlays historical live and forecasted weather graphics on a world map Thermal cam application view and control a thermal camera using a compatible multifunction display Note The thermal camera application is not available on a6x and a7x ...

Страница 18: ...18 a9x a12x ...

Страница 19: ......

Страница 20: ...www raymarine com ...

Отзывы: