RG13II Operation • Maintenance • Parts
800.392.2686
31
Maintenance
remove a clear “kerf” from the stump without the body
of the tooth ever contacting the stump. This concept
reduces drag, which maximizes the use of the machine’s
horsepower. This also reduces wear on the tooth body
and on the attachment hardware. Many of the other
cutting tool systems available today do not address this
important aspect of cutting.
• Cutting Tool Dimensions: Rayco’s stump cutting teeth
are carefully designed to have the proper size of carbide
tip. Carbide tips ultimately become dull, and using
large, oversized carbide tips will induce extreme impact
energies into the machine’s structure.
• Debris Retention: Rayco’s cutting tool patterns are
designed to minimize the retention of debris in between
the cutting tools. This debris can cause imbalance. This
debris can also become a dangerous projectile. Non-
Rayco cutting tools may retain more debris.
Changing Teeth
Support the cutter wheel in a raised position when
changing teeth.
1) Clean all dirt from the cutting wheel (2) and teeth (3).
2) Remove the socket head bolts (4) from the teeth (3).
(The 1/2” hex key provided with the machine may be
used.)
3) Check the cutting wheel for cracks. Replace the wheel
if it is cracked.
4) Carefully select and properly position each tooth
according to diagrams.
5) Position teeth as shown in the diagram in the Parts
manual. Straight and angled teeth should be staggered
as shown in the drawing.
6) When using Rayco brand square-shanked teeth, set
the extreme edge of each tooth 1¼” away from the
edge of the pocket.
7) When using Rayco SUPERTEETH, because of one piece
construction, no pre-setting of the tooth is required.
8) Make sure teeth are placed in coordination with wheel
rotation.
9) After setting each tooth pair, tighten the socket head
bolts to 135 to 145 foot-pounds.
Replacement teeth and pockets are available from your Rayco
dealer or direct from Rayco. Refer to the Parts manual for
part numbers.
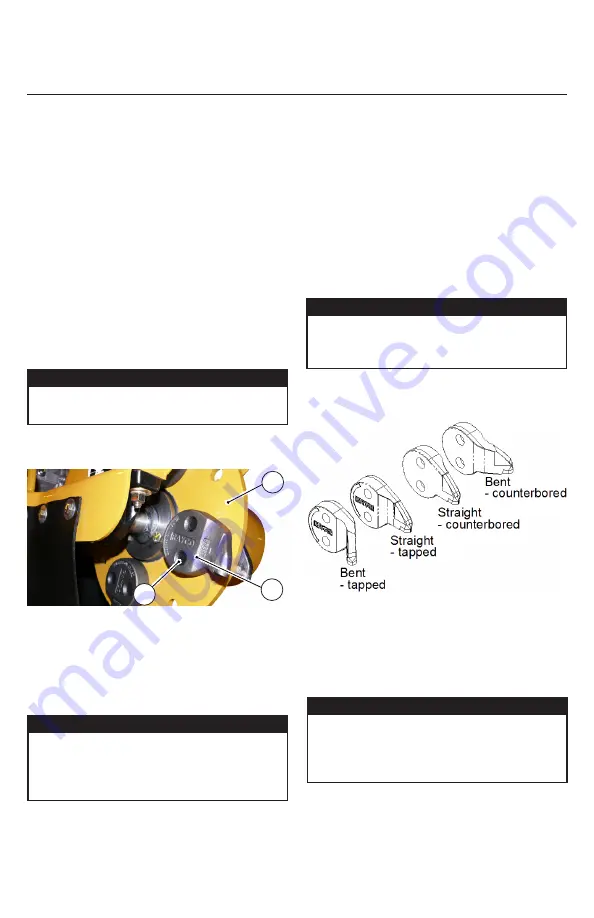
There are four types of Superteeth, as shown in the above
diagram. The counter bored teeth are on one side of the cutting
wheel, the tapped teeth on the opposite side. The tips of the
bent teeth will always point away from the cutting wheel.
Sharpening Teeth
Do not allow any tooth to wear too much before sharpening.
Discard any tooth that has lost more than 1/8” of original bite.
The teeth must be removed from the cutting wheel for proper
sharpening.
NOTICE
Read all of the following instructions before
beginning to change cutting wheel teeth.
NOTICE
The drawing in the Parts manual represents the
exact location required for positioning each tooth.
When followed exactly, optimum cutting wheel
performance is attained.
NOTICE
Do not hammer the tip of a tooth. Due to the super
hardness of the tooth, it is brittle and may chip from
such treatment.
NOTICE
Sharpening cemented carbide cutting teeth requires
a special process. Have your teeth sharpened only
by a qualified machinist for obtaining a proper edge
and to avoid injury.
2
3
4

