


Chapter 4
14
Challenger MT 7XXC and MT 8XXC Series SmarTrax Installation Manual
FIGURE 2.
Mounting Plate Example
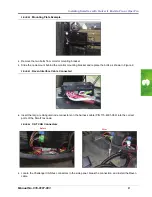
2.
Remove the two bolts from monitor mounting bracket and mount the node as shown.
FIGURE 3.
Raven Interface Cable Connected
3.
Insert the large, rectangular node connectors on the harness cable (P/N 115-4001-025) into the correct
ports of the SmarTrax node.
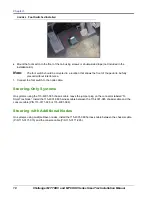
4.
Remove the side panel and locate the 3 pin power connector.
FIGURE 4.
Power Connector
Содержание Challenger MT 7XXC Series
Страница 4: ...Table of Contents ii Challenger MT 7XXC and MT 8XXC Series SmarTrax Installation Manuall ...
Страница 18: ...Chapter 4 16 Challenger MT 7XXC and MT 8XXC Series SmarTrax Installation Manual ...
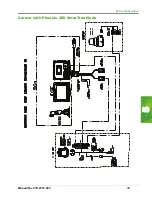
Страница 21: ...5 Manual No 016 0197 003 19 Wiring Schematics Cruizer with Phoenix 200 SmarTrax Node ...
Страница 23: ...5 Manual No 016 0197 003 21 Wiring Schematics Cruizer with Helix Antenna SmarTrax Node ...
Страница 24: ...Chapter 5 22 Challenger MT 7XXC and MT 8XXC Series SmarTrax Installation Manual ...
Страница 26: ...Index 24 Challenger MT 7XXC and MT 8XXC Series SmarTrax Installation Manual ...