background image

12 


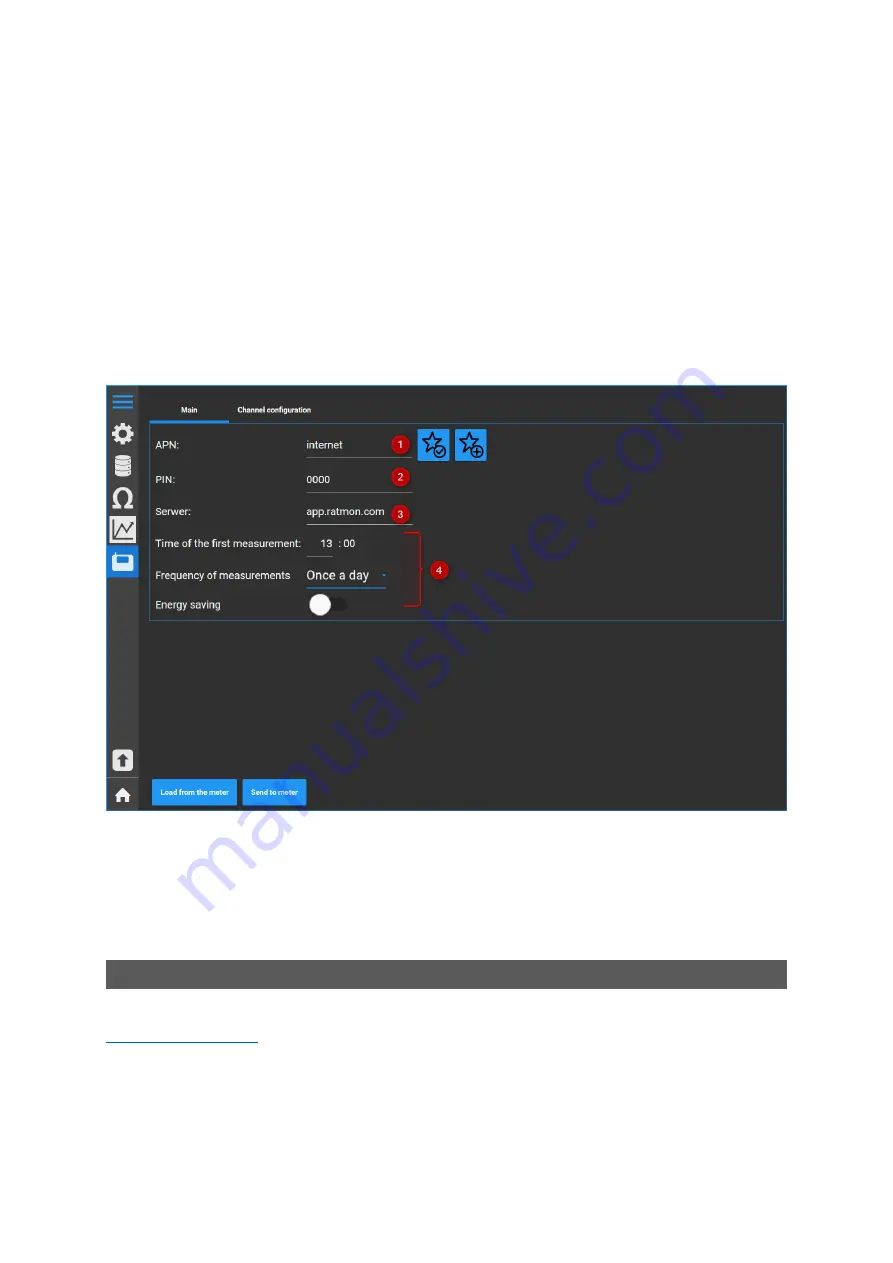
5.  Select  the  [Settings]  =>  [Meter  configuration].  The  application  should  automatically  load  the 
default settings. If this does not happen, click [Load from meter]. 

6. For proper operation of the device with the RATMON system you need to set below parameters: 

(1) APN address - individual for each GSM operator. 

(2) SIM card PIN - enter the correct SIM card PIN. If the SIM card is not blocked, enter "0000". 

(3)  Server  settings  -  enter  the  server  address  to  which  all  results  are  to  be  sent.  The  default  is 
app.ratmon.com 

(4) Setting of first measurement, frequency of test and energy saving mode  


7. After entering the configuration, click [Save to meter]. 

8. The device is ready to work with the RATMON system. 


In order to view the results and manage the device, log in to the RATMON system at: 

www.app.ratmon.com


The first step is to add the device to RATMON system and assign it to pipe loop. A detailed 
description is available in the "Help" of the RATMON system in Chapter 1 "First steps".

RATMON SYSTEM 


Содержание RAT-2

Страница 1: ...1 USER MANUAL...

Страница 2: ...the device 4 Connection of the device to the pipe 5 Configuration of the device before connecting to the pipe 10 Configuration of the device to work with RATMON system 11 RATMON system 12 Front panel...

Страница 3: ...manual without having to inform the users of the device The current version of the manual is available at www ratmon com RAT 2 is the detector of leaks and faults in pre insulated pipe network Leak Fa...

Страница 4: ...2 CH2 4 Alarm LED 14 Connection channel 3 CH3 5 Communication LED Arrows 15 Connection channel 4 CH4 6 Configuration LED 16 Connection RELAY 7 LED channel 1 CH1 17 Connection to power supply 8 LED cha...

Страница 5: ...ections of the detector to alarm wires and exchange of SIM card must be carried out with switched off power supply CONNECTION OF RAT 2 DETECTOR TO ALARM WIRES WITHOUT CONNECTION BOXES CONNECTION OF DE...

Страница 6: ...6 CONNECTION OF RAT 2 DETECTOR TO ALARM WIRES USING BOX 1...

Страница 7: ...7 CONNECTION OF RAT 2 DETECTOR TO ALARM WIRES USING BOX 2...

Страница 8: ...8 CONNECTION OF RATCOMBO TO ALARM WIRES WITHOUT CONNECTION BOXES...

Страница 9: ...9 CONNECTION OF RATCOMBO TO ALARM WIRES USING BOX 3...

Страница 10: ...e 500 k Alarm loop resistance Rc 100 Frequency of measurements 1 per day To change the settings use the RAT Manager 2 software available at www ratmon com see RAT Manager 2 manual settings If the devi...

Страница 11: ...2 Connect the RAT device to the power supply 3 Connect the RAT device to the computer using dedicated USB cable 4 The connection of the device with the computer will be notified in the upper right co...

Страница 12: ...0 3 Server settings enter the server address to which all results are to be sent The default is app ratmon com 4 Setting of first measurement frequency of test and energy saving mode 7 After entering...

Страница 13: ...green red orange purple white LEDs and buttons on front panel Status Alarm Communication Functions CH1 channel 1 CH2 channel 2 CH3 channel 3 CH4 channel 4 Setup Button to select function Start Button...

Страница 14: ...o weak signal strength to communicate via GSM constant flashing searching for GSM connection 3 x flashing successful connection with server RATMON slow flashing lack of SIM card or problem with SIM ca...

Страница 15: ...tion LED is flashing blue After connection to GSM network device shows GSM signal strength on LEDs CH1 to CH4 by lighting purple Next device starts to communicate server After successful communication...

Страница 16: ...Combo Press button Setup until LED flashes light blue Next press button Start LEDs of CH 1 to CH 2will inform which channel is ready for measurements By pressing button Setup you can change channel Fo...

Отзывы: