3 | Product description
en-US
16 / 88
80.06.575
3
Product description
3.1 VarioSmoker
1
Lid
2
Smoke box
3
Supply cable
4
Handle
3.2 Power supply unit
1
Power switch
2
Supply cable
3
Power cable
4
USB port
4
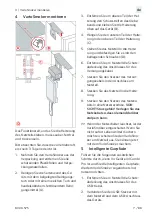
Assembling the VarioSmoker
Only attach the power supply unit holder
to a functional part that is clean, dry, and
free of grease.
Please note that full adhesive strength is
only achieved after 3 days.
1. Remove the VarioSmoker from the
packaging and remove all protective
plastic film and packaging materials.
2. Clean the side of the cooking system
using the cleaning cloth provided, or
with a soft cloth and commercially
available degreasing cleanser (A).
3. Remove the protective strip from the
adhesive on the top part of the
bracket, and then affix the bracket near
the top of the cooking system (B).
Содержание VarioSmoker
Страница 35: ...3 ja 80 06 575 35 88 3 3 1 VarioSmoker 1 2 3 4 3 2 1 2 3 4 USB 4 VarioSmoker 3 1 VarioSmoker 2 A 3 B...
Страница 40: ...ar 40 88 80 06 575 42 42 42 42 42 43 43 43 43 43 43 44 45 45 VarioSmoker 45 45 VarioSmoker 46 46 47 47 47 49 49...
Страница 41: ...ar 80 06 575 41 88 VarioSmoker 49 50 50...
Страница 43: ...ar 80 06 575 43 88 n SelfCookingCenter n CombiMaster Plus n CombiMaster 2004 VarioSmoker Combi 20 2 1 a 1 n...
Страница 45: ...ar 80 06 575 45 88 n VarioSmoker n VarioSmoker n VarioSmoker n n VarioSmoker n n n VarioSmoker 1 2 3 4 1...
Страница 83: ...3 zh CHS 80 06 575 83 88 2 1 n n n 3 3 1 VarioSmoker 1 2 3 4 3 2 1 2 3 4 USB 4 VarioSmoker...
Страница 87: ...80 06 575 87 88...


