NEUTRAL
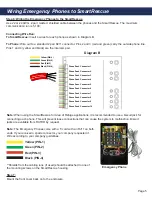
120vac
HOT
Handset Connection
Dedicated Analog
Phone Line
24v Power Input
Battery Backup
Optional Sub-Master
Phone Ports
RJ11
Plug-In
Transformer
Phone Push Connector 1
Phone Push Connector 2
Phone Push Connector 3
Phone Push Connector 4
Phone Push Connector 5
Phone Push Connector 6
Phone Push Connector 7
Phone Push Connector 8
Phone Push Connector 9
Phone Push Connector 10
Supplied by
RATH®
Supplied by
RATH®
GROUND
Yellow (PIN-1)
Green (PIN-2)
Red (PIN-3)
Black (PIN-4)
L N -V +V
Option 3
2500-PWR24U
Option 2
Hard-Wired
Transformer
Option 1
Powering the SmartRescue
Step 5: Powering the SmartRescue
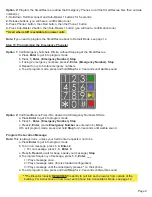
There are 3 options for powering the SmartRescue:
Option 1: Plug-In Transformer (2500-205 & 2500-210 models only)
• Plug transformer into a standard 120vac outlet
Option 2: Hard-Wired Transformer
• Connect the hot wire of the 120vac to the L screw
• Connect the neutral wire of the 120vac to the N screw
• Connect the ground wire of the 120vac to the ground screw
• Connect one lead of the dc power connection to the -V screw and the other to the +V screw
• Connect the other side of the dc power connection to the 24v power input on the lower left side of the
SmartRescue (polarity is not important)
Option 3: 2500-PWR24U Power Supply (Area of Refuge applications only)
• Use 1 pair, 18 AWG wire for power (maximum distance is 5,100’)
• Connect one wire to the positive side of distribution block within the 2500-PWR24U, and the other wire to
the negative side
• Connect the other side of wires to the 24v power input on the lower left side of the SmartRescue board
(polarity is not important)
Note:
Do not use the plug-in or hardwired transformer when using the 2500-PWR24U.
Page 4
Provided
by RATH®
Provided
by RATH®
Содержание SmartRescue 10
Страница 7: ...Page 7 Plug In Transformer...


