background image

EN

9

10.  RESIDUAL RISKS

11.  INSTALLATION AND USE

Even though the cutting unit is safe, operators must pay attention to preserve their and other

people’s safety.

At the end of the working operations, motor and metal parts could be very hot.

The cutting blade can work even when the protective device is disassembled.

To install and use the cutting unit manually, proceed as follows:

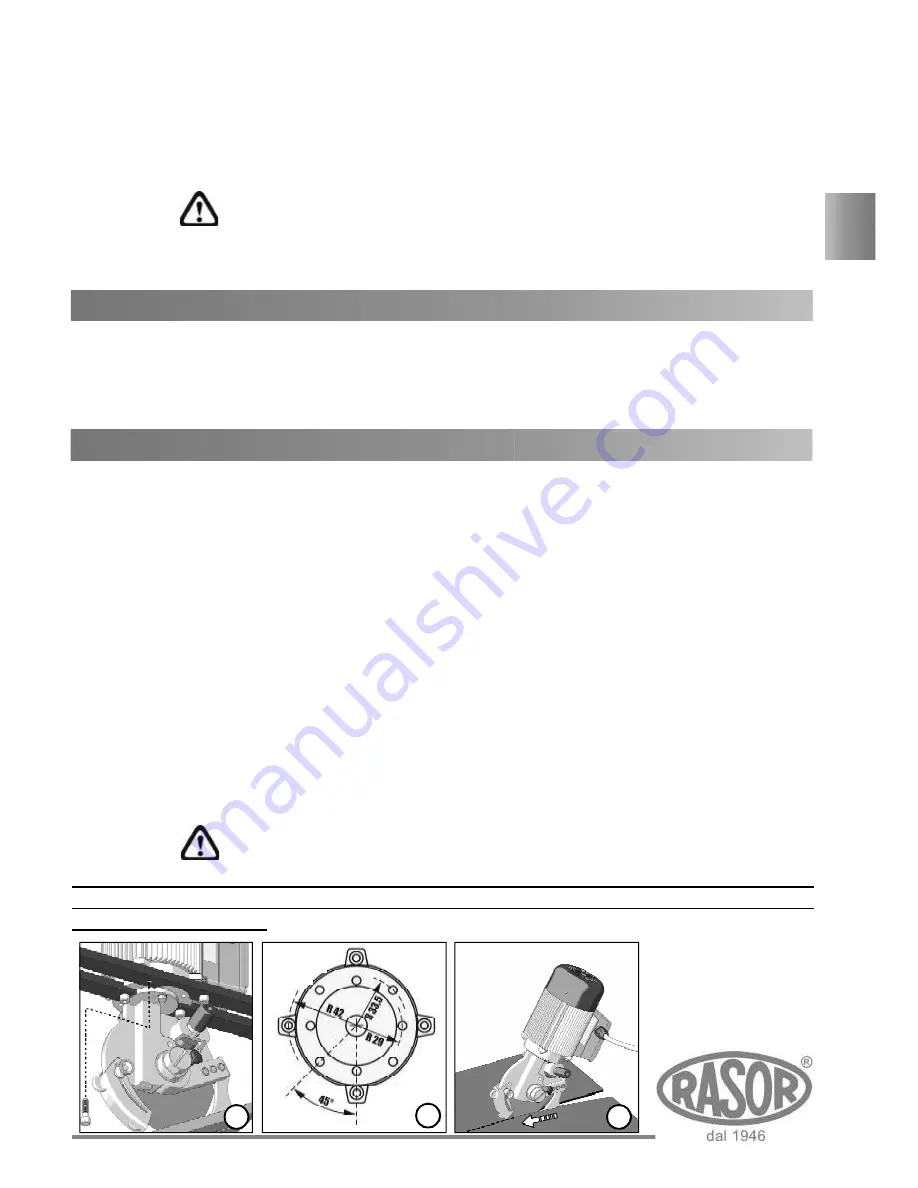
1) Fix the cutting unit on level squares or angles by means of four 5MA screws, by inserting

them in the eight holes located in the motor lower support (see pictures 4 and 5).

NOTE

The cutting unit can be installed in any position/angle: vertically, laterally and it can be turned

upside down. It is not compulsory for the aluminium base to touch the machine surface.

2) Lay the material to be cut;
3) Connect the cutting unit to the power supply;

4) Put the material on the cutting base (see picture 6);

5) Adjust the front mobile protection according to the thickness of the material to be cut;
6) Carry out the cutting operation.

NOTE

Cutting unit GRT12SM can work in a fixed position (the material has to be moved) or it can

move forward while the material is kept in the same position. Make sure the material to be cut
is properly stretched, preventing it from curling.

4

WARNING
Never use the two bolts which fix the motor to the cutting part to fasten cutting
unit GRT12SM. This operation may cause the motor shaft to break. In this case,

warranty is not valid.

5

Possible faulty earthing connections may cause unsafe working conditions. Possible damages

are not at RASOR

®

 s.r.l. charge.

The power supply must be provided by a line protected against overcurrent by means of an

automatic (magnetothermal) switch  or delayed fuses with a suitable dimensions. The current

allowing safety device enabling must be as low as possible considering the max. absorption
of the machine (see identification plate).

6

WARNING

The operator must install a disconnetting switch on the supply line in order to switch off the

machine, if necessary.

Содержание GRT12SM

Страница 1: ...use manual GRT12SM THREE PHASE CUTTING UNIT ...

Страница 2: ... by Luigi Spinelli For more than sixty years it has been producing automatic cutting systems cutting units for textile applications and electric and pneumatic cutters Initially considered as a point of reference for cutting systems in the textile applications the Rasor products are nowadays widely used in other fields chemical automotive nautical and sport sectors and in furniture manufacturing Ra...

Страница 3: ...ull the feeding cable of the machine It must never be replaced by the user If necessary contact professionally qualified staff KEEP THE WORKING AREA ALWAYS IN ORDER The workplace must always be kept in order and well lightened liquids or oil traces must not be present ALWAYS USE CUTTING UNITS GRT12SM PROPERLY Use the cutting units only to carry out the works they have been designed for do not use ...

Страница 4: ...ot work in case of rain In case of damage or malfunction cutting unit GRT12SM must not be used until the Customer Care Technical Service has repaired it The original configuration of the cutting unit must not be changed at all On receiving the machine make sure the supply corresponds to what has been ordered In case of non compliance immediately inform Rasor Also make sure the cutting unit has not...

Страница 5: ...t not be removed at all even if the machine is resold Always refer to the serial number written on the plate itself when contacting the manufacturer Several safety warnings are printed on a card which is applied to the cutting unit feeding cable such warnings must be strictly followed by everyone dealing with the machine The company is not to be held responsible for damage to property or accidents...

Страница 6: ...internal parts of cars and ships glass and carbon fibres The three phase motor with extremely compact dimensions and extreme reliability with 120 mm diameter blades guarantees cuts with thickness up to 5 cm A sharpener assembled on the cutting unit head allows whetting the blade at any moment without disassembling it After carrying out this operation it is possible to start cutting again A high po...

Страница 7: ...is forbidden to use cutting unit GRT12SM for purposes different from the above mentioned ones 5 TECHNICAL FEATURES The technical data are only indicative and they can be changed without notice 120 mm with hard metal counterblade 400 rev min about 50 mm Three phase Asynchronous 180 W IP65 CL F 0 52 A 4550 g 5500 g 1 5 mt LUX 200 2 5 m s 2 0 55 C 10 95 without condensate Working temperature Working ...

Страница 8: ...on that their original structure is not modified Otherwise the intervention must be certified by Rasor Firstly make sure that the lines are able to supply the cutting unit with power correctly in compliance with the safety rules for the feature required see par 5 We suggest installing a magnetothermic safety device before the cutting unit and check that the ground circuit is effective Before worki...

Страница 9: ...bile protection according to the thickness of the material to be cut 6 Carry out the cutting operation NOTE Cutting unit GRT12SM can work in a fixed position the material has to be moved or it can move forward while the material is kept in the same position Make sure the material to be cut is properly stretched preventing it from curling 4 WARNING Never use the two bolts which fix the motor to the...

Страница 10: ...t never be dirty with grease or oil 9 WARNING A 12 BLADE SHARPENING After many hours of a continuative use of the cutting unit or if it would not be able to cut anymore it is necessary to sharp the blade To carry out this operation start the blade and press sharpener 2 located on it for 3 4 seconds by pressing push button 1 as shown in picture 7 Repeat the operation 2 3 times If the sharpening ope...

Страница 11: ...the manufacturer as shown in picture 12 Remove the movable front safety protection B see picture 11 by unscrewing pin D and the washer E as shown in picture 12 3 Insert drift 3 see picture 10 into hole F so as to lock the blade the hole on the blade must correspond to the one on the structure 4 Use butterfly wrench 1 to unscrew nut G and remove blade H see picture 13 5 Replace the worn blade with ...

Страница 12: ...RT Monster T 104800 GREASER GRT12M19 MOTOR FAN SW108700 SHARPENER PIN SW125600 SUBBLADE RING T 105200 MOTOR SUPPORT FIXING BOLT GRT12M21 UPPER MOTOR COVER SW108800 EMERY SPRING Ø 11 mm SW126101 BLADE GUIDE PIN T 105300 WASHER GRT12M22 MOTOR COVER FIXING SCREW SW108900 SHARPENER BUSH SW126102 REFERENCE PIN T 105400 ANTI FRICTION BUSH GRT12M24 COMPLETE MOTOR FRAME SW109000 EMERY SPRING Ø 6 mm SW1261...

Страница 13: ...200 SW109300 SW124101 SW124000 T 105200 T 105300 SW108200 SW127502 SW127600 SW127500 SW127501 SW127201 T104700 T104800 SW1076S SW107900 SW126300 SW126102 SW127201 SW126101 12SHSS SW126103 GRT126201 GRT121300 dal 1946 T 107500 T 107900 T 107600 GMT 1200 3 PH 380V 50Hz GMT 1260 3 PH 380V 60Hz GMT 12480 3 PH 480V 60Hz GRT8615 GRT12M22 GRT12M18 GRT12M27 GRT12M19 GRT8616 SW121600 GRT12M17 GRT12M21 GRT1...

Страница 14: ...anty does not include failure caused by wrong use or assembly failure caused by external agents failure caused by lack of maintenance or neglicence blades and parts subject to wear WARRANTY FORFEITURE In case of arrearage or other breaches of contract Whenever changes or repairs are carried out on our cutting units without our prior authorization Whenever the serial number is tampered with or canc...

Страница 15: ...RASOR ELETTROMECCANICA SRL ViaVincenzo Caldesi 6 20161 Milan Italy ph 39 02 66 22 12 31 fax 39 02 66 22 12 93 info rasor cutters com www rasor cutters com FOLLOW US ...

Отзывы: