background image


Appendix A: Standard Specifications 


21


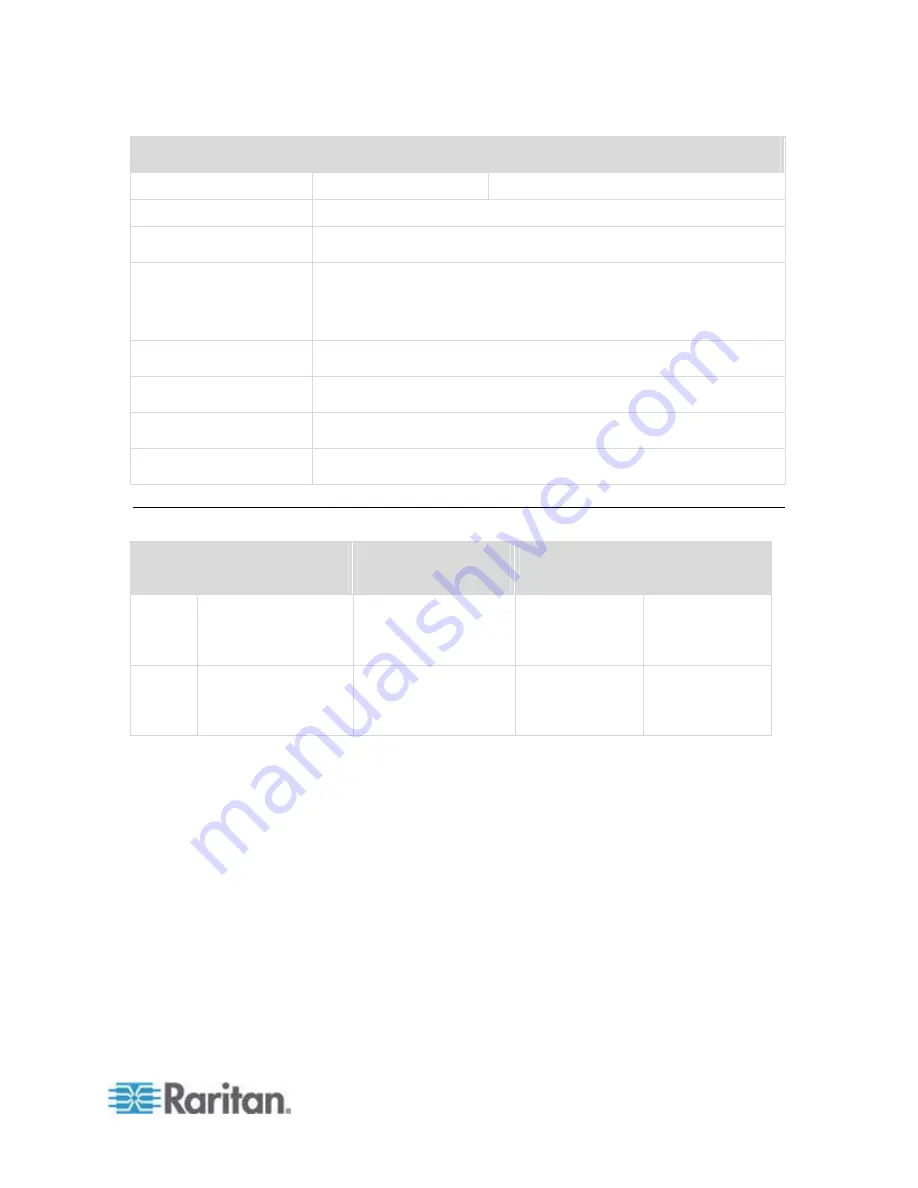
Item 

Description 


T1700


T1900


1280 x 1024, 60 / 70 / 75Hz 

Plug & Play DOC 

EDID 1.3 

Console Port (Combo) 

3-in-1 DB-5 connector for VGA / keyboard /mouse 

Support USB & PS2 servers or KVM switches 


Power Input 

Auto-sensing 100 to 240VAC, 50 / 60Hz 

Power Consumption 

Max. 40 Watt, Standby 5 Watt 

Compatibility 

Multi-platform - Mix PCs, SUNs, IBMs, HPs & DELLs. 

Regulation Approval 

FCC, CE, UL 


Dimension 


Model 

Product Dimension 
(W x D x H) 

Packing Dimension 
(W x D x H) 

Net Weight 

Gross Weight 

T1700 

442 x 650 x 44 mm 

17.4 x 25.6 x 1.73 
inch 

589 x 826 x 168 mm 

23.2 x 32.5 x 6.6 inch 

16 kg 

35 lb 

23 kg 

51 lb 

T1900 

442 x 650 x 44 mm 

17.4 x 25.6 x 1.73 
inch 

589 x 826 x 168 mm 

23.2 x 33.7 x 6.6 inch 

17 kg 

37 lbs 

23 kg 

51 lbs 


Содержание T1900

Страница 1: ...LCD KVM Console T1700 T1900 User Guide Release 1 1 Copyright 2010 Raritan Inc T1700_T1900 0E v1 1 E July 2010 255 37 0114 00...

Страница 2: ...an com logo are trademarks or registered trademarks of Raritan Inc All rights reserved Java is a trademark of Sun Microsystems Inc Internet Explorer is a registered trademark of Microsoft Corporation...

Страница 3: ...g the Rear L brackets 4 3 Fixing the LCD KVM Console into the Rack 5 How to Install One Man Installation Slides 6 Installing the Front Mounting Ear x 2 pcs 7 Installing into Rack 7 Connecting to the K...

Страница 4: ...Contents iv How to Use the Slides 18 Appendix A Standard Specifications 20 Specifications 20 Dimension 21 Appendix B Troubleshooting 22 Index 23...

Страница 5: ...f nature unauthorized product modification or failure to follow instructions supplied with the product Repair or attempted repair by anyone not authorized by us Any damage of the product due to shipme...

Страница 6: ...er it If you are using a power cord that didn t ship with the equipment ensure that it is rated for the voltage and current labeled on the equipment s electrical ratings label The voltage rating on th...

Страница 7: ...Raritan LCD KVM Console comes with the standard parts shown in this section Check and make sure they are included and in good condition If anything is missing or damaged contact the supplier immediat...

Страница 8: ...roduction 2 Structure Diagram 1 Carry handle to release the 2 pt lock 2 2 point lock 3 LCD screen 4 LCD membrane 5 Adjustable rear mounting L bracket 6 Micro switch for screen auto power off 7 Keyboar...

Страница 9: ...vironment The surface for placing and fixing the LCD KVM Console should be stable and level or mounted into a suitable cabinet Make sure the place has good ventilation is out of direct sunlight away f...

Страница 10: ...ar L bracket using two fasteners shown in the diagram b Leave the fasteners slightly loose 2 Aligning the Rear L brackets a Measure the front and rear mounting depth of the rack b Align each rear L br...

Страница 11: ...hapter 2 Installation 5 3 Fixing the LCD KVM Console into the Rack Fix the LCD KVM Console into the rack Note Hardware screws and cage nuts for fixing the mounting bracket into the rack is not provide...

Страница 12: ...Installation 6 How to Install One Man Installation Slides Component list 1 Mounting bracket x 2 pcs 2 Front mounting ear left right x 2 pcs 3 Support bracket x 4 pcs 4 M6 cage nut x 6 pcs 5 M6 washer...

Страница 13: ...6 15mm screw x 8 pcs 7 M3 2 4 5mm screw x 14 pcs Installing the Front Mounting Ear x 2 pcs 1 Disassemble the standard front mounting ears carefully 2 Install the optional front mounting ears with M3 2...

Страница 14: ...mounting rails Adjust the rear mounting bracket to fit your rack Repeat the above steps for the other side Caution Leave the screws slightly loose not release Attach support brackets to chassis with M...

Страница 15: ...that is installed on the LCD keyboard drawer to unlock Push at the same time Caution Be careful when pushing the chassis into the left and right slides Avoid pressing the red button located on either...

Страница 16: ...lation completed Connecting to the KVM Switch via PS 2 Interface This is an illustration of connecting the 3 in 1 KVM cable to the KVM switch via PS 2 Interface 1 3 in 1 KVM cable 2 KVM switch 3 Keybo...

Страница 17: ...ed on may cause irreversible damage to the servers KVM switches and LCD KVM Console Before attempting to connect anything to the product we suggest turning off the power to all devices Apply power to...

Страница 18: ...g to the Server via PS 2 Interface This is an illustration of connecting the 3 in 1 KVM cable to a server via PS 2 interface 1 3 in 1 KVM cable 2 Server 3 Keyboard port 4 Mouse port 5 VGA port Connect...

Страница 19: ...Chapter 2 Installation 13 1 3 in 1 KVM cable 2 Server 3 USB port 4 VGA port...

Страница 20: ...n Chapter 3 In This Chapter How to Use the LCD KVM Console 14 How to Use the Slides 18 How to Use the LCD KVM Console 1 Gently pull the tab toward the front of the LCD 2 Flip up the LCD to a suitable...

Страница 21: ...16 and Onscreen Menu on page 17 Touchpad Buttons The buttons adjacent to the touchpad function the same as those on a three button mouse Number Function 1 The button is similar to the left button on a...

Страница 22: ...the scrolling action a Press this button once and a scrolling icon appears indicating that you have entered the scrolling mode b Use the touchpad to scroll through a web page or document c To quit th...

Страница 23: ...Power on Power on off LCD Display the OSD menu Scroll through menu options and adjust the display control Exit the OSD screen Shortcut key to auto adjustment by pressing the button for 5 seconds or to...

Страница 24: ...clock sub menu H V POSITION H V Position Align the screen image left or right and up or down MISC Information Display the current resolution refresh rate and frequency information on the screen OSD Ti...

Страница 25: ...white arrow buttons together at both sides before pushing the LCD KVM Console into place Avoid pushing the red button located on each slide 3 Keep pushing the white arrow buttons until the LCD KVM Con...

Страница 26: ...ghtness cd m 300 Color Support 16 2 Mil 16 7 Mil Contrast Radio typ 700 1 1000 1 Viewing Angle H V 150 x 135 Display Area mm 337 x 270 376 x 301 Tr Response Time ms 2 1 3 LCD Panel MTBF hrs N A 50 000...

Страница 27: ...Hz Power Consumption Max 40 Watt Standby 5 Watt Compatibility Multi platform Mix PCs SUNs IBMs HPs DELLs Regulation Approval FCC CE UL Dimension Model Product Dimension W x D x H Packing Dimension W x...

Страница 28: ...ng the phase or pixel rate automatically or manually The membrane button power light is not ON Press the power On Off button on the LCD membrane to check if the monitor is in the ON mode Check the pow...

Страница 29: ...onnecting to the KVM Switch via PS 2 Interface 10 W What the Warranty Does Not Cover v Connecting to the KVM Switch via USB Interface 11 Connecting to the Server via PS 2 Interface 12 Connecting to th...

Страница 30: ...India Monday Friday 9 a m 6 p m local time Phone 91 124 410 7881 Japan Monday Friday 9 30 a m 5 30 p m local time Phone 81 3 3523 5991 Email support japan raritan com Europe Europe Monday Friday 8 30...

Отзывы: