


3
MAINTENANCE
Super Lube
®
(#SL1CC) applied to the piston rod will
prolong the life of the Piston Shaft Seal. This should be
done every spring and fall or more regularly if the head
is used frequently. Applying Super Lube to all moving
parts is also recommended.
Installation of a Knocks Out Odor Kit (#KO2) will
reduce the "rotten egg" smell associated with using salt
or brackish water to flush the toilet.
Before attempting repairs, refer to the
Troubleshooting section of this manual.
WINTERIZING
Improper winter lay up is a major cause of marine
toilet failures.
Parts Required
• 3/4" I.D. intake hose approximately 3 feet long.
• 1 1/2" I.D. discharge hose approximately 3 feet long.
• Two buckets
• Nontoxic antifreeze approximately 1 quart
1. Close the intake and discharge seacock. Disconnect
and drain the intake and discharge hoses.
2. Connect short hoses to toilet’s intake and discharge.
3. Place one bucket under short hose on discharge.
4. Pour nontoxic antifreeze in other bucket.
5. Place hose connected to intake into bucket with
antifreeze.
6. Flush toilet until antifreeze begins to be discharged
from toilet.
7. Antifreeze should remain in the toilet until
recommissioning. This will protect both intake and
discharge sides of the pump. Pouring antifreeze into
the bowl will only protect the discharge.
NOTE: Holding tanks, seacocks and treatment
systems need to be independently winterized,
stored and recommissioned (see manufacturer’s
instructions).
RECOMMISSIONING
1. Lubricate piston rod with Super Lube
®
.
2. Using the buckets, hoses and a gallon (3.8 liters)
of clean water, flush the antifreeze out of the toilet.
Dispose of antifreeze properly, in accordance with
local and federal regulations.
3. Reconnect the hoses and open both seacocks.
4. Check all connections for leaks with several test
flushes.
MAINTENANCE\WINTERIZA
TION
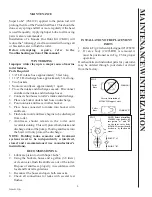
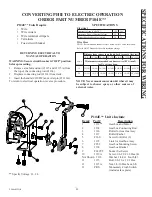
NOTE: Before reinstalling
1209BW valve handle, be
sure points "A" and "B"
on the inlet valve body
(#1203BW) are positioned
as shown by the double
arrow.
POINT "B"
Toilet
Base
Toilet
Base
Correct Orientation of
#1228CW Flapper Valves
FIG 2
CORRECT!
POINT "A"
WRONG!
INSTALLATION OF REPLACEMENT
PARTS
1. Refer to Fig. #2 when replacing part #1228CW.
2. If valve body (#1203BW) is removed it
must be positioned as in Fig. #3 for proper
operation.
Overhaul kits and individual parts for your toilet
may be ordered through your dealer or direct
from the factory.
FIG 3
3
L584v0222jlc


