background image


Chapter 2: Installation 


19


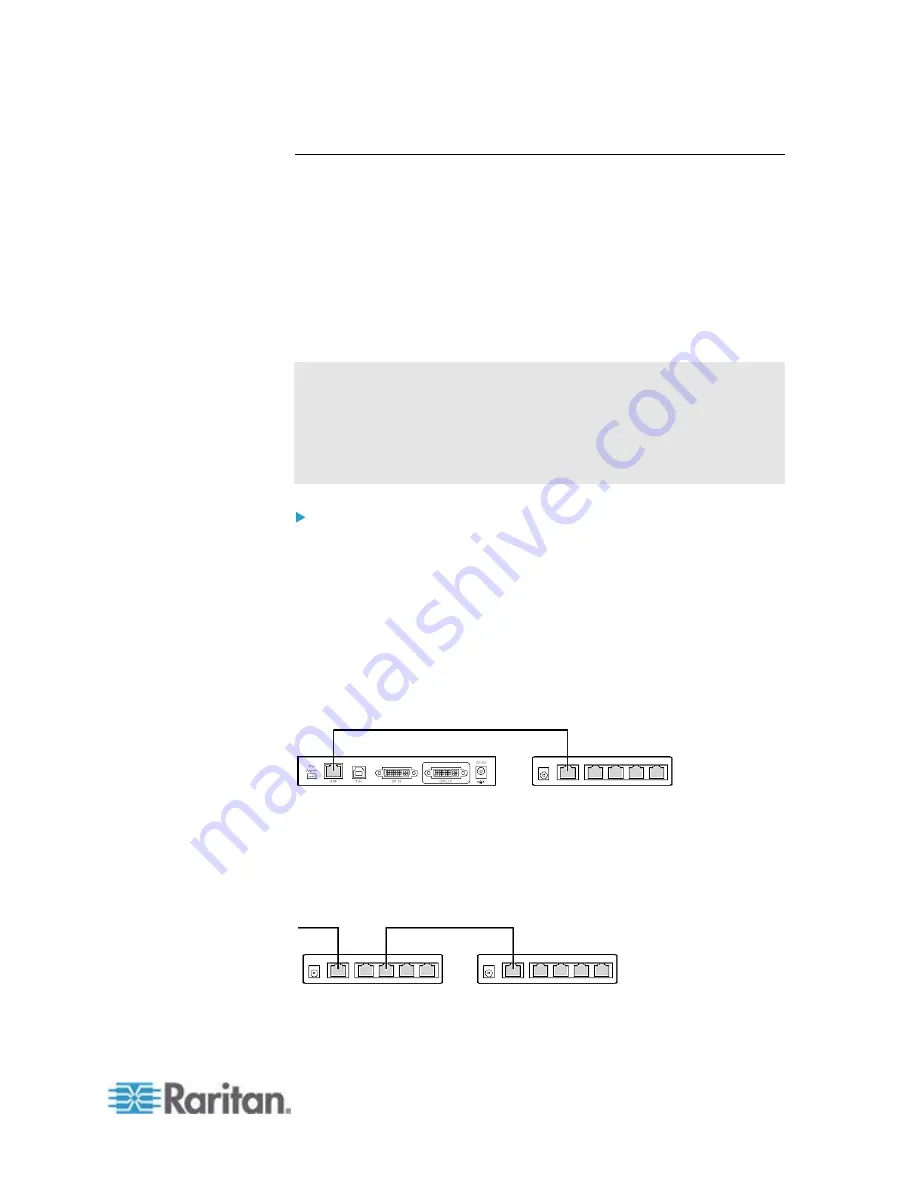
One Transmitter with Multiple Receivers Connected 

One transmitter can be connected to multiple receivers so that more than 
one remote user can view and control the connected computer or 
audio/video device. This configuration requires the use of at least one 
Ethernet switch. The maximum distance between the transmitter and any 
receiver can be 2,000 feet (600 meters) by daisy-chaining Ethernet 
switches or hubs. 

When attaching keyboards and mice to the receivers, you must use the 
same brand and model of keyboards and mice for all receivers. 
Otherwise, there may be operational issues. 

Warning: You CANNOT connect additional devices or utility to the 
remaining ports of any Ethernet switch connected between the Cat5 
Reach DVI transmitter and receiver, or there will be communication 
problems between them. Select an entry level or non-managed 
Ethernet switch. Turn on the broadcast mode of the Ethernet switch 
before use.   


To connect multiple receivers: 

1.  Turn off all devices. 

2.  Set up a local console with the transmitter, and a remote console 

with all receivers. For details, see 

Basic Installation

 (on page 9) for 

details. 

3.  Use a Cat5e/6 cable up to 500 feet (150 meters) long to connect the 

transmitter to an Ethernet switch. 

  Plug one end of the cable into the RJ-45 LINK port on the 

transmitter and the other end into the LINK port on the Ethernet 
switch. 


4.  If intending to expand the distance, use an additional Cat5e/6 cable 

up to 500 feet long to connect the Ethernet switch attached with the 
transmitter to an additional Ethernet switch. 

  Plug one end of the cable into one of the LAN ports on the prior 

Ethernet switch and the other end into the LINK port on the 
subsequent Ethernet switch. 


Содержание Cat5 Reach DVI

Страница 1: ...Cat5 Reach DVI User Guide Release 1 0 Copyright 2015 Raritan Inc Cat5ReachDVI 0C v1 0 E February 2015 255 80 0030 00 ...

Страница 2: ...ons may cause harmful interference to radio communications However there is no guarantee that interference will not occur in a particular installation If this equipment does cause harmful interference to radio or television reception which can be determined by turning the equipment off and on the user is encouraged to try to correct the interference by one or more of the following measures Reorien...

Страница 3: ...allation 16 Increasing the Distance via Ethernet Switches or Hubs 17 One Transmitter with Multiple Receivers Connected 19 KVM Switch Scenarios 20 Compatible Raritan KVM Switches or Products 20 Connecting KVM Switches 21 Audio Broadcasting 24 Chapter 3 Operation 26 Enabling or Disabling the Remote Console 26 Using EDID to Synchronize Video Resolutions Optional 27 Firmware Upgrade 27 Appendix A Spec...

Страница 4: ...Contents iv Appendix B Rack Mounting Cat5 Reach DVI 38 Index 39 ...

Страница 5: ...ontrol up to 3 000 feet 900 meters away from your computer server KVM switch or an audio video device like a TV or DVD player There are two types of Cat5 Reach DVI devices one is the transmitter C5R DVI TX and the other is the receiver C5R DVI RX In This Chapter Product Features 2 Package Contents 3 Product Overview 3 Cat5 Reach DVI Transmitter 3 Cat5 Reach DVI Receiver 6 1 ...

Страница 6: ...en the transmitter and receiver Capability to locate the transmitter and receiver up to 3 000 feet 900 meters apart with the use of Ethernet switches or hubs IR infrared remote control for audio video equipment such as the TV or DVD player Support for multiple remote users Extended display identification data EDID emulation to synchronize video resolutions of a monitor Support for DDC and DDC2B Su...

Страница 7: ...d IR blaster cable 1 1 8 meter USB B to USB A adapter cable 1 Rackmount kit 1 Quick Setup Guide 1 Warranty card 1 Note The included DVI I to VGA adapters are used with the C5R DVI TX transmitter NOT the C5R DVI RX receiver You need to purchase Raritan s DVI D to VGA converter cable CVT DVI VGA in order to connect a VGA monitor to the receiver Product Overview This section describes the ports or co...

Страница 8: ... Connect a USB keyboard or connect to the USB Keyboard port of a KVM drawer or user station Audio In Connect to the Audio Out jack of a computer or TV or connect speakers for audio output Microphone Jack Connect to the Microphone jack of a computer or connect a microphone IR Jack Connect an IR blaster RX LED red Indicate the remote console state On The remote console is enabled so you can operate ...

Страница 9: ...onsole is marked with a white frame for easy identification Number Items Description Power Input Connect the power adapter Local Video DVI I OUT Connect a VGA or DVI monitor or connect to the Video In port of a KVM drawer or user station Note A DVI to VGA adapter is required if using a VGA monitor The DVI I to VGA adapters which are used on the transmitter are included in the package but you need ...

Страница 10: ...s to both DVI ports of the transmitter See Supported and Unsupported Video Connections to Transmitter on page 35 Cat5 Reach DVI Receiver The receiver is connected to the remote console Front View Number Items Description LINK LED green Indicate the cable connection status between the transmitter and receiver On The physical connection to the transmitter is detected Off No physical connection to th...

Страница 11: ...f using a VGA monitor The DVI I to VGA adapters which are used on the transmitter are included in the package but you need to purchase the DVI D to VGA converter cable which is used on the receiver See DVI to VGA Adapters on page 34 USB Mouse Port Used to set up a remote console Connect a USB mouse or connect to the USB Mouse port of a KVM drawer or user station USB Keyboard Port Used to set up a ...

Страница 12: ...K Port Connect to the transmitter via a Cat5e 6 cable There are two tiny LEDs adjacent to this port Green indicates a physical link and activity Yellow indicates communications at 10 100 BaseT speeds F W Upgrade Port Used to upgrade the firmware of the receiver ...

Страница 13: ... the transmitter and receiver is 500 feet 150 meters Connect the keyboard mouse video KVM or audio video source to the transmitter and you will be able to control it remotely through the receiver Tip To expand the number of remote users or the distance between the transmitter and receiver see Advanced Installation on page 16 Equipment that can be connected to the Cat5 Reach DVI transmitter as the ...

Страница 14: ...patible keyboards and mice see the release notes available on the Raritan website s Support page http www raritan com support To configure a basic installation for a computer 1 Turn off all devices including the desired computer 2 Optional To set up a local console connect the KVM input output devices to the transmitter a Connect a USB mouse to the USB Mouse port on the front panel b Connect a USB...

Страница 15: ...f the transmitter See Supported and Unsupported Video Connections to Transmitter on page 35 d Optional If the audio function is needed connect one end of the Raritan provided audio microphone cable to the Audio In and Microphone jacks on the front panel 3 To set up the remote console connect KVM input output devices to the receiver a Connect a USB mouse to the USB Mouse port on the back panel b Co...

Страница 16: ...one to the Audio Out and Microphone In jacks on the back panel 4 Use a Cat5e 6 cable to connect the transmitter and receiver Plug either end of the cable into the RJ 45 LINK port of either device 5 Connect the transmitter and receiver to an appropriate power source respectively Each device s Power LED is then lit 6 Connect the computer to the transmitter a Plug one end of the Raritan provided DVI ...

Страница 17: ...connector of the Raritan provided USB cable into the USB B port on the back panel and the other end into the computer s USB A port c Optional If the audio microphone cable has been connected to the transmitter in Step 2 plug the other end of the audio microphone cable into the computer s Audio In and Microphone In jacks 7 Turn on the computer Note If the monitor connected to the Cat5 Reach DVI doe...

Страница 18: ...lso provide DVI connections If connecting a VGA monitor plug in the DVI I to VGA adapter that is shipped with the Cat5 Reach DVI before connecting the monitor When using the DVI I to VGA adapter always connect both adapters and both VGA devices to both DVI ports of the transmitter See Supported and Unsupported Video Connections to Transmitter on page 35 b Plug the audio connector of the Raritan pr...

Страница 19: ...ected the IR blaster to the transmitter in Step 2 plug the IR receiver cable into the IR jack on the receiver 4 Use a Cat5e 6 cable to connect the transmitter and receiver Plug either end of the cable into the RJ 45 LINK port of either device 5 Connect the transmitter and receiver to an appropriate power source respectively Each device s Power LED is then lit 6 Connect the TV to the transmitter us...

Страница 20: ... Video Connections to Transmitter on page 35 b Plug the audio connector of the Raritan provided audio microphone cable into the TV s Audio In jack An audio adapter may need to be used c Verify that the IR blaster connected to the transmitter in Step 2 aim at the IR sensor of the TV properly 7 Turn on the TV Advanced Installation In this section you will learn how to maximize the distance between t...

Страница 21: ... up an optional local console with the transmitter and a remote console with the receiver For details see Basic Installation on page 9 for details 3 Use a Cat5e 6 cable up to 500 feet 150 meters long to connect the transmitter to an Ethernet switch Plug one end of the cable into the RJ 45 LINK port on the transmitter and the other end into the LINK port on the Ethernet switch 4 To increase the dis...

Страница 22: ...n the receiver The diagram below illustrates the connection pattern 7 Connect the transmitter and receiver to an appropriate power source respectively Each device s Power LED is then lit 8 Connect the computer or audio video device to the Cat5 Reach DVI transmitter See Basic Installation on page 9 9 Turn on the connected computer or audio video device ...

Страница 23: ...smitter and receiver or there will be communication problems between them Select an entry level or non managed Ethernet switch Turn on the broadcast mode of the Ethernet switch before use To connect multiple receivers 1 Turn off all devices 2 Set up a local console with the transmitter and a remote console with all receivers For details see Basic Installation on page 9 for details 3 Use a Cat5e 6 ...

Страница 24: ...al receivers one by one 8 Connect the transmitter and all receivers to appropriate power sources 9 Connect the computer or audio video device to the Cat5 Reach DVI transmitter See Basic Installation on page 9 10 Turn on the connected KVM or audio video source device KVM Switch Scenarios The Cat5 Reach DVI transmitter and receiver can be used to expand the distances among the equipment involved in ...

Страница 25: ...r detailed information on setting up the local and remote consoles see Connecting a Keyboard Mouse Video Source on page 10 To increase the distance between a KVM switch and its user console user station 1 Set up the local and remote consoles with the Cat5 Reach DVI transmitter and receiver respectively 2 Use a Cat5e 6 cable to connect the transmitter and receiver 3 Connect the transmitter and rece...

Страница 26: ...the DVI I to VGA adapter always connect both adapters and both VGA devices to both DVI ports of the transmitter See Supported and Unsupported Video Connections to Transmitter on page 35 b Plug the USB B connector of the Raritan provided USB cable into the USB B port on the transmitter and the other end into the KVM switch s local USB A port 5 Turn on the KVM switch ...

Страница 27: ...ct this USB CIM to any channel port on the KVM switch via a Cat5 cable 2 Use a Cat5e 6 cable to connect the transmitter and receiver 3 Connect the transmitter and receiver to an appropriate power source respectively 4 Connect the KVM switch to the transmitter 5 Turn on both KVM switches To increase the distance between any computer and a KVM switch 1 Set up an optional local console with the trans...

Страница 28: ...All you need to do is to connect speakers and microphones to both the transmitter and receiver s The audio signals input from the microphone connected to the transmitter is transmitted to the speakers connected to the receiver and vice versa To establish an audio broadcasting system between the Cat5 Reach DVI devices 1 Turn off all devices 2 Connect the microphone and speaker to the Audio In and M...

Страница 29: ...the receiver 4 Use a Cat5e 6 cable to connect the transmitter and receiver Plug either end of the cable into the RJ 45 LINK port of either device 5 Connect the transmitter and receiver to an appropriate power source respectively Each device s Power LED is then lit 6 Turn on all speakers and microphones 25 ...

Страница 30: ...ult is to enable the remote console and the keyboard and mouse control is determined on a first come first served basis To prevent the local console operation from being disturbed by a remote user you can disable the remote console and re enable it after completing your local operation To disable the remote console 1 Press the REMOTE button on the transmitter 2 Verify that the RX LED turns OFF ind...

Страница 31: ... 3 seconds to adjust the correct resolution from the connected receiver s monitor Firmware Upgrade You can upgrade the firmware of both the Cat5 Reach DVI transmitter and receiver by connecting either device to a computer running the firmware upgrade utility Unless otherwise specified both the transmitter and receiver should be upgraded with the same firmware file Firmware files are available on R...

Страница 32: ... firmware upgrade utility Prog exe on a computer that will be connected to the Cat5 Reach DVI device 4 Use a mini USB cable to connect the Cat5 Reach DVI device to the computer Connection to the transmitter Connection to the receiver ...

Страница 33: ...et programmer s that will be updated Note that the transmitter has two programmers implemented while the receiver has only one programmer Select both MCU1 and MCU2 for upgrading the transmitter Select MCU1 for upgrading the receiver Then select the firmware file The file selected for MCU1 and MCU2 must be the same ...

Страница 34: ...Chapter 3 Operation 30 7 Click Program to start upgrading the firmware 8 A status message is shown at the bottom of the utility window indicating the device is being upgraded ...

Страница 35: ...Chapter 3 Operation 9 When the firmware is updated successfully the utility shows Program OK 31 ...

Страница 36: ... Video out 1 x DVI I 1 x DVI D Keyboard 1 x USB type A 1 x USB type A Mouse 1 x USB type A 1 x USB type A Speakers 1 x audio jack pink 1 x audio jack pink Microphone 1 x audio jack green 1 x audio jack green Console connectors IR infrared Blaster Receiver Video in 1 x DVI I N A PC connectors USB USB type B N A Extension port RJ 45 For communications of keyboard mouse video audio and IR signals RX ...

Страница 37: ...s long Max resolution Full HD 1080p 1920x1080 60Hz Video Resolution 1920x1080 60Hz 1680x1050 60Hz 1440x900 60Hz 1280x1024 60Hz 1152x864 60Hz 75Hz 1024x768 60Hz 70Hz 800x600 60Hz 640x480 60Hz Supported operating systems Windows Linux Mac OS OSX and Sun Microsystems Power supply DC 5V 2A power adapter Dimension 7 09 x 3 31 x 1 42 180 x 84 x 36 mm Housing material Metal Operating temperature 32 122 0...

Страница 38: ...A device to the transmitter Note that it does NOT support the conversion of VGA signals to DVI signals or vice versa Important When using the DVI I to VGA adapter always connect both adapters and both VGA devices to both DVI ports of the transmitter See Supported and Unsupported Video Connections to Transmitter on page 35 Items Description DVI I x1 Connector types VGA x1 Availability 2 units inclu...

Страница 39: ...d NOT SUPPORTED by the Cat5 Reach DVI transmitter In the diagrams a computer represents the video source which can be other equipment like a KVM switch or TV set and a monitor represents the video input device which can be other equipment like a KVM drawer or user station Supported scenario DVI connection The video source transmits DVI signals to the transmitter and the video input device receives...

Страница 40: ...e video input device receives VGA signals from the transmitter Use of both DVI I to VGA adapters is required Unsupported scenarios mix of DVI and VGA signals Use of only one DVI I to VGA adapter for a mix of DVI and VGA signal transmission on the transmitter is NOT supported Therefore DO NOT make the following video connections ...

Страница 41: ...Appendix A Specifications 37 ...

Страница 42: ...g the front of the rack or the rear To rack mount Cat5 Reach DVI 1 Secure the bracket to the unit transmitter or receiver with three of the included screws Only one bracket for each unit Choose to lock the bracket at the right side or left side of the unit depending on which side you want to install on the rack 2 Mount the unit in the rack and secure the brackets ears to the rack s front rails wit...

Страница 43: ... VGA Adapters 5 7 34 E Enabling or Disabling the Remote Console 26 F Firmware Upgrade 27 Front View 4 6 I Increasing the Distance via Ethernet Switches or Hubs 17 Installation 9 Introduction 1 K KVM Switch Scenarios 20 O One Transmitter with Multiple Receivers Connected 19 Operation 26 P Package Contents 3 Product Features 2 Product Overview 3 R Rack Mounting Cat5 Reach DVI 39 Rear View 5 7 S Spec...

Страница 44: ... India Monday Friday 9 a m 6 p m local time Phone 91 124 410 7881 Japan Monday Friday 9 30 a m 5 30 p m local time Phone 81 3 5795 3170 Email support japan raritan com Europe Europe Monday Friday 8 30 a m 5 p m GMT 1 CET Phone 31 10 2844040 Email tech europe raritan com United Kingdom Monday Friday 8 30 a m to 5 p m GMT Phone 44 0 20 7090 1390 France Monday Friday 8 30 a m 5 p m GMT 1 CET Phone 33...

Отзывы: