Raptor Eagle EA4240-CL Скачать руководство пользователя страница 9

EA4240-CL and EA4710-CL / USER MANUAL Rev1.3 
February 2018 

9


4.  

EPIX XCAP 

For minimum computer system requirements, please contact Epix for the latest information. 

4.1  

Download and Install XCAP 

Using  the  following  link, 

http://www.epixinc.com/support/files.php

,  please  select  the  appropriate 

version of XCAP for your computer.  Please ensure you are downloading from the section labelled.  

Pre-

release  version  with  support  for  the  latest  cameras  and  latest  PIXCI®  imaging  boards.

    Open  the 

downloaded file when complete and follow the onscreen instructions.  Be sure to accept the board 
driver installation.  

4.2 

Operating your camera using XCAP. 

1. Open XCAP from within your operating system enabling administrative privileges.   

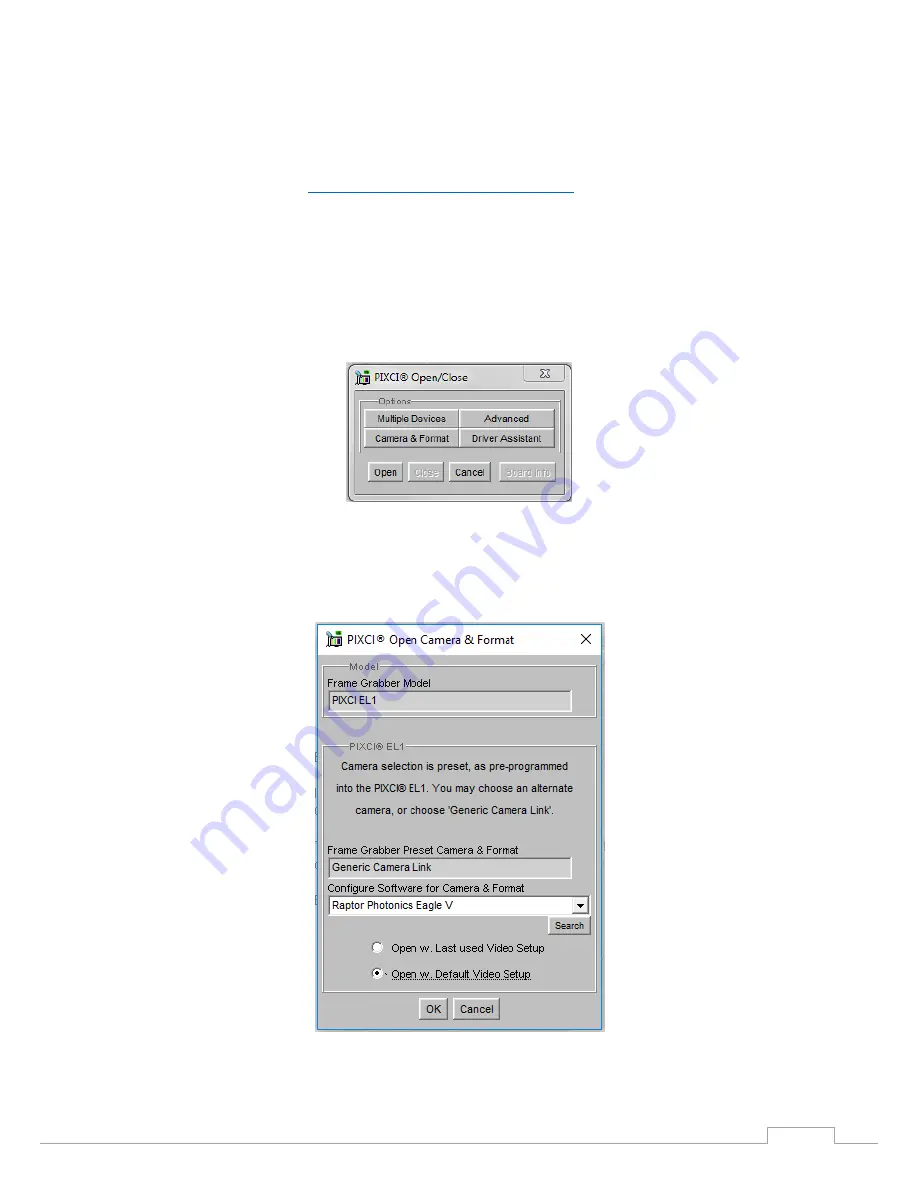
2. Select PIXCI dropdown menu and select PIXCI Open Close, Figure 3 should appear. 


Figure 3: Open / Close 

3. Select Close, and then Click on the Camera & Format button. 

4. Using the dropdown menu scroll down and select Raptor Photonics Eagle V-from the list (Figure 4).  
Selecting OK when done. 


Figure 4: Camera Selection 

Содержание Eagle EA4240-CL

Страница 1: ...Eagle Models EA4240 CL and EA4710 CL USER MANUAL ...

Страница 2: ...EA4240 CL and EA4710 CL USER MANUAL Rev1 3 February 2018 2 CONTENT CONTENT 2 1 INTRODUCTION 3 2 SPECIFICATION 4 3 GETTING STARTED 6 4 EPIX XCAP 9 5 MICRO MANAGER 19 ...

Страница 3: ... glass window between the camera sensor and the microscope or lens Should any other issues occur please contact your local agent To clean the sensor window gently wipe the face of the sensor window with a small amount of optical grade isopropyl alcohol and lens paper Apply forced air again to remove any loose particles CAUTION The camera s sensor and circuits are sensitive to static discharge Ensu...

Страница 4: ...81mm diagonal Typical Readout Noise RMS 2 3e 75kHz pixel readout rate 9 0e 2MHz pixel readout rate Binned Readout Noise RMS 16x16 binning 5 0e 75kHz Peak Quantum Efficiency 90 550nm Full Well Capacity Minimum 80ke Typical 100ke Non linearity 1 Digital Output Format 16 bit Camera Link Base Configuration Dark Current e p s 0 0001 90 C Dynamic Range 81dB 2MHz pixel readout rate 93dB 75kHz pixel reado...

Страница 5: ...EA4240 CL and EA4710 CL USER MANUAL Rev1 3 February 2018 5 2 2 Mechanical Outline 3D drawings STEP are available upon request ...

Страница 6: ...et mount with a 44 mm throat and a flange to focal plane distance of 46 5 mm 3 3 Mounting to a tripod or optical table The camera has three x3 20 BSW Whitworth threaded holes to mount to a tripod s or an optical table The image below shows an optical table mount with the 20 BSW threads 20 BSW Power Trig in SMA Trig out SMA Exposure Trig out SMA Readout Camera Link Connector MDR Water taps F mount ...

Страница 7: ...ra Link cable to connect the camera to the computer Connect the other end of the Camera Link cable to the camera Carefully thread the F mount lens onto the camera s lens ring until it is securely fastened Use the lens controls to adjust focus We suggest that the camera be mounted on a tri pod or an optical bench The Eagle V has its own custom 12V power supply module and camera power cable Connect ...

Страница 8: ... tubes to the camera and the pre filled circulator Switch on the circulator you will now see bubbles traveling along the tubing Wait for the bubbles to bleed into the reservoir top up the reservoir as required You should tilt the camera side to side to ensure there are no bubbles remaining in the camera Now adjust the Temperature set point on the circulator for the Eagle V camera 20 C is preferred...

Страница 9: ...pport for the latest cameras and latest PIXCI imaging boards Open the downloaded file when complete and follow the onscreen instructions Be sure to accept the board driver installation 4 2 Operating your camera using XCAP 1 Open XCAP from within your operating system enabling administrative privileges 2 Select PIXCI dropdown menu and select PIXCI Open Close Figure 3 should appear Figure 3 Open Clo...

Страница 10: ...hould reflect your chosen camera For example for the Eagle V it should read EPIX PIXCI E8DB Raptor Photonics Eagle V If not you need to select a different camera 8 Check that the camera is communicating see animated icon Figure 6 on bottom right of control screen Figure 6 Active Communication 9 You are now configured and connected ready to acquire an image 10 Check the Serial Connect box to establ...

Страница 11: ...8 11 Figure 7 Image Capture 12 You should now see an image On the bottom of the screen you should see something similar to the following Frame 0 Size 2048 x 2048 Resize 3 4x3 4 Video 0 4 fps Capture 0 4 fps Display 0 4fps Figure 8a Live Image Capture Window ...

Страница 12: ...or temperature To operate the camera for long exposures you will need to adjust the temperature of the Eagle V to deep cooling using a combination of the TEC and a water re circulator The camera is capable of cooling to 90C Ensure that the camera is connected to the circulator and that the temperature is set to 20 C Make sure to rock the camera to ensure that the coolant is flowing evenly through ...

Страница 13: ...s an option for high preamp gain which is already pre selected offering the lowest noise If you have a bright signal then there is the option to deselect offering more signal albeit with about x5 less counts You can also adjust the exposure from 0 023msec through to 2 77 msec You should adjust it to 300 msec at the start while setting up ...

Страница 14: ...control closed open or exposure If you select exposure you have to determine the shutter close delay and shutter open delay A good test set up to begin with is go to live set exposure to 300msec and shutter control to exposure Then set closed to 49 15 and Open to 19 66 and set Read out mode to Normal 4 7 Trigger Click on the trigger tab as in Figure 12 Figure 12 Trigger Tab ...

Страница 15: ...so a readout mode where you can select Normal data or a Test Pattern option 4 8 AOI Click on the AOI tab as in Figure 13 Use this tab to set the binning options which are as follows 1x1 2x2 2x1 4x1 8x1 16x1 32x1 1x2 4x4 2x4 4x2 8x2 16x2 32x2 1x4 8x8 2x8 4x8 8x4 16x4 32x4 1x18 16x16 2x16 4x16 8x16 16x8 32x8 1x16 32x32 2x32 4x32 8x32 16x32 32x16 You also have the option to choose an Area of Interest...

Страница 16: ...EA4240 CL and EA4710 CL USER MANUAL Rev1 3 February 2018 16 Figure 13b AOI settings You can see how the image have focused on this particular area of interest in Figure 13b Figure 13c AOI Example Image ...

Страница 17: ... only The Viewing Pallet is not automatically adjusted in the XCAP software This needs manually configured to give the best display of the RAW image data from the camera 1 Go to the Modify Contrast Modification menu Figure 21 2 Select Stretch Contrast Histogram Percentile Endpoints and Preview Figure 20 Stretch Contrast 3 Adjust the Low Percentile Endpoint and High Percentile Endpoint to optimize ...

Страница 18: ...EA4240 CL and EA4710 CL USER MANUAL Rev1 3 February 2018 18 Figure 15 Contrast Modification Figure 16 Stretch Contrast ...

Страница 19: ...tory It also is a software framework for implementing advanced and novel imaging procedures extending functionality customization and rapid development of specialized imaging applications Micro Manager has been developed at UCSF since the beginning of the project Starting on October 1 2015 Micro Manager is developed and maintained by Open Imaging a company founded by the Micro Manager development ...

Страница 20: ...pening Micro Manager for the first time you will see the window shown in figure 22 You need to make sure none is selected then click Ok Figure 18 Hardware Configuration 1 Start the Hardware Configuration Wizard by going to tools then Hardware Configuration Wizard Figure 19 Hardware Configuration Wizard ...

Страница 21: ...a new configuration and add the raptor adapter from the list shown in Figure 20 now click Next Figure 20 Add a New Device 3 Continue to click Next until you are faced with the screen shown in Figure 20 4 Rename and save new configuration e g Eagle V as shown in Figure 21 ...

Страница 22: ...UAL Rev1 3 February 2018 22 Figure 21 Save Configuration The connected camera should now be recognized Next time you open Micro Manager you can simply select the saved Raptor Eagle V cfg from the drop down menu figure 22 then click Ok ...

Страница 23: ...EA4240 CL and EA4710 CL USER MANUAL Rev1 3 February 2018 23 Figure 22 Selecting Saved Camera Configurations 5 3 Operating your camera using Micro Manager Figure 23 Opening Screen ...

Страница 24: ...EA4240 CL and EA4710 CL USER MANUAL Rev1 3 February 2018 24 1 Click on snap Figure 23 for Micro Manager to open the viewing window as shown in Figure 24 Figure 24 Viewing Window ...

Страница 25: ...nging Camera settings All of the camera parameters are controlled within the Device Property Browser this can be accessed by selecting Tools from the menu bar then Device Property Browser Figure 25 Camera Control Options From here you can access all the camera settings ...

Страница 26: ...0 CL and EA4710 CL USER MANUAL Rev1 3 February 2018 26 CORPORATE HEADQUARTERS Raptor Photonics LTD Willowbank Business Park Larne Co Antrim BT40 2SF Northern Ireland PH 44 2828 270141 www raptorphotonics com ...

Отзывы: