background image

Step 3

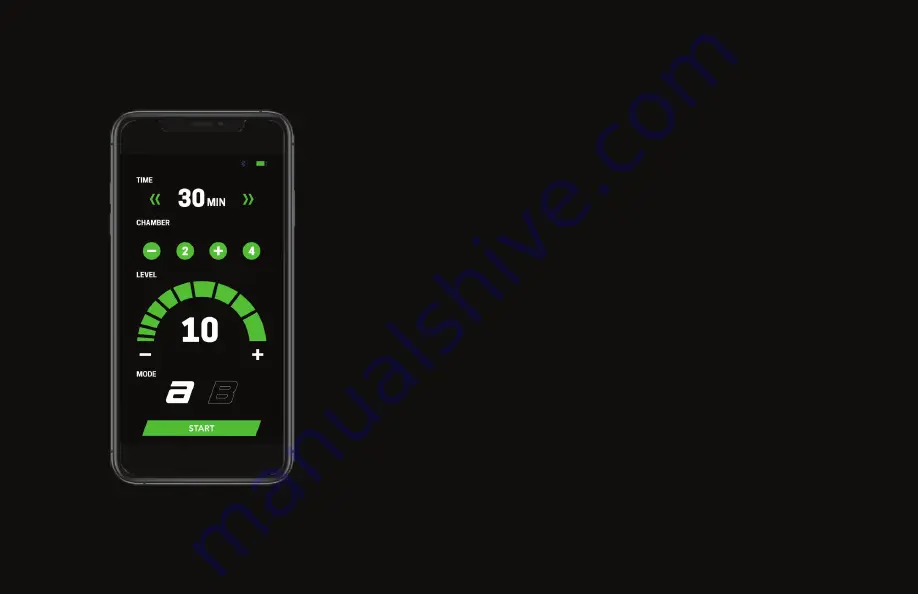
Adjust the settings as desired.

Note: You can pair your device with your 

GENESIS

 before or during a session; 

the unit only has to be on. If a session is in progress when you pair, your 
device’s screen will automatically reflect the settings on the control unit.


Changes to settings made in the app will instantly be reflected on 

the control unit. Similarly, changes to settings made using the 

control unit interface will be reflected on your device.

Select the 

START 

button to begin the session.

13

Содержание GENESIS

Страница 1: ......

Страница 2: ...ESIS with the provided power adapter To use the unit without the adapter please allow it time to charge STEP 2 Press the power button once to turn the control unit on STEP 3 Put on your attachment and...

Страница 3: ...he attachment is properly fastened see OWNER S MANUAL for more information on how to wear your respective attachment properly STEP 5 Select the attachment you are using Adjust settings as desired STEP...

Страница 4: ...TIME Chamber STATE Pressure level Bluetooth battery mode on off Light indicator BLACK Off PULSING WHITE Charging CIRCLING GREEN Booting STATIC GREEN On...

Страница 5: ...ide 10 App Control 11 Connecting Your Device 12 GENESIS GLOSSARY 14 menu 15 additional information 16 Quick Setup 1 quick look 3 SETTINGS guide 5 Time 6 Mode 7 Pressure 8 Chamber Tuning 9 TABLE OF CON...

Страница 6: ...SETTINGS GUIDE How to adjust settings on the GENESIS pg 6 9...

Страница 7: ...er located at the top of the screen Note Time can be adjusted during a session When a time is applied the session duration will begin at that new time and count down by minutes until reaching 0 Once t...

Страница 8: ...quence or order in which chambers are pressurized A Mode is a sectional mode meaning only one chamber at a time is pressurized beginning with the first active chamber and proceeding in order This is c...

Страница 9: ...ADJUST PRESSURE Adjust the pressure by either sliding your finger along the dial or by using the and in the center of the screen 8...

Страница 10: ...chambers by tapping one of the numbered chambers towards the top of the screen The icon increases pressure by 1 level The icon decreases pressure by 1 level Hold the desired chamber to deactivate it...

Страница 11: ...APP GUIDE How to pair your device and more on the GENESIS pg 11 13...

Страница 12: ...PP CONTROL The GENESIS allows for Bluetooth connectivity with a smart device Once paired you will be able to remotely control settings using your device instead of using the control unit s interface 1...

Страница 13: ...ir your unit to your device by using the toggle feature next to the unit green means it is selected and selecting APPLY If no unit is shown on the PAIR UNIT screen ensure the control unit is powered o...

Страница 14: ...sion is in progress when you pair your device s screen will automatically reflect the settings on the control unit Changes to settings made in the app will instantly be reflected on the control unit S...

Страница 15: ...ber For example on the Boots attachment Chamber 1 corresponds to the foot section Chamber 2 to the calf section Chamber 3 to the knee section and Chamber 4 to the thigh section GENESIS GLOSSARY On OFF...

Страница 16: ...ty terms conditions contact customer service consult FAQs find helpful articles in FOR THE RECORD library and for Amazon and other 3rd party purchases quickly register your warranty FEEDBACK Help us c...

Страница 17: ...gline Train Reboot Repeat are the intellectual property and registered trademarks of Rapid Reboot Recovery Products LLC They may not be used without the express consent of Rapid Reboot 2020 Rapid Rebo...

Страница 18: ...CUSTOMER SERVICE Office 801 899 7511 Fax 302 269 9349 Hours M F 9 5 MST service rapidreboot com REF SP GEN QS REV 2 12 2020 2020 Rapid Reboot CYCLONE TM...

Отзывы: