background image

LN-9259-07.1

Bearing Air / Drive Air Test

This test is to verify the applicator responds to 

changes in setpoints in the speed selector.

1.  Raise the safety spin guard and lock it in place 

with the pin.

N O T E

>  Bell cup and shroud must be attached 

to end of turbine.

TURBINE TEST

The purpose of this test is to verify the applica-

tor rotates properly and sprays reasonably well.  

With de-ionized or distilled water as the test fluid 

it is difficult to accurately assess the spray per-

formance characteristics.  However, it can give a 

relative indication of how well the bell will spray 

in production.

Test Stations - Operation

15

2.  Adjust the air regulator for bearing air to 90 

psig minimum.  

3.  The turbine shaft must rotate freely with bear-

ing air supplied.

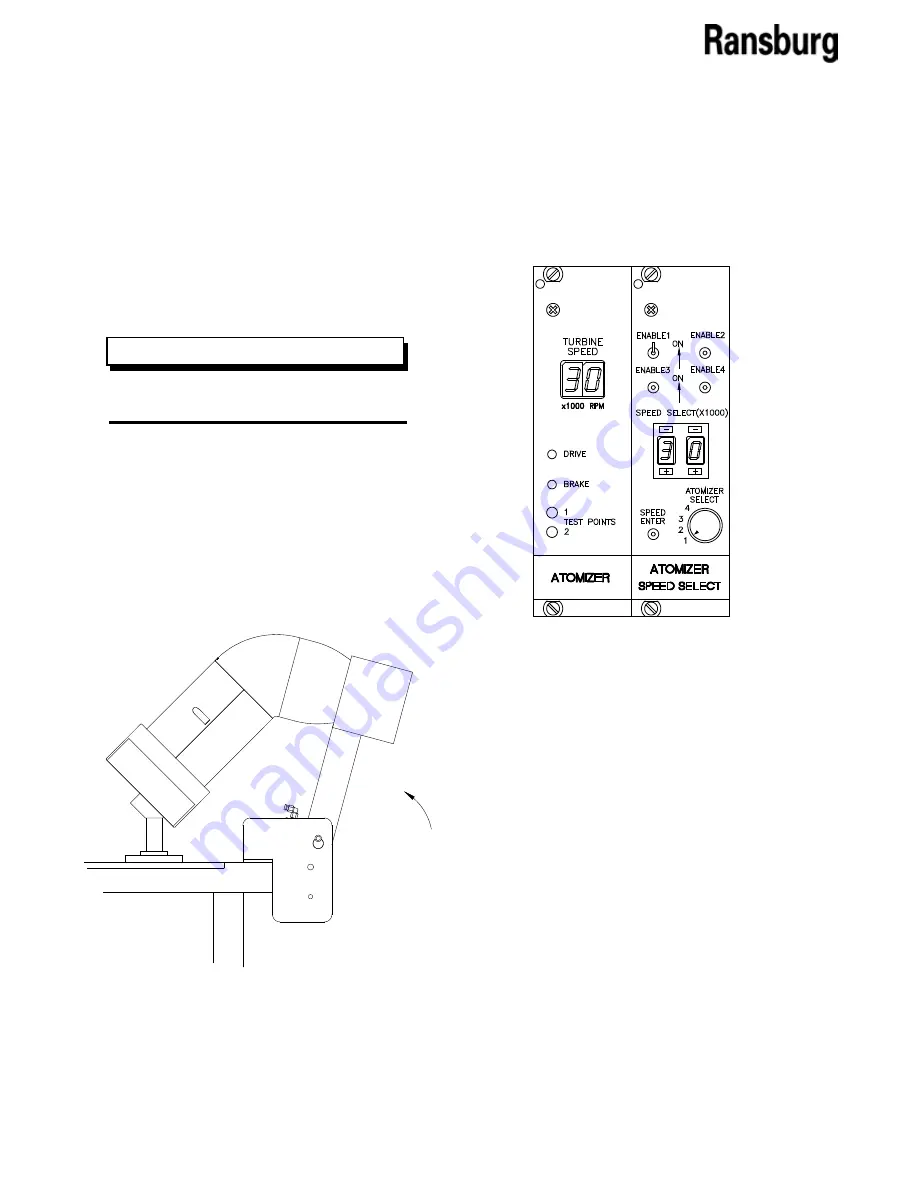
4.  Set the atomizer speed select to 30,000 rpm.  

5.  Toggle “Enable 1” “On” or in the “Up” position 

on the atomizer speed select card.  Then press 

the “Speed Enter” button.  The turbine should now 

begin spinning.  This should be audible. 

6.  Adjust the speed select to 50,000 rpm.  Press 

the “Speed Enter” button to enter the new speed.  

An audible difference in speed should be de-

tected.  Adjust the speed again to 70,000 rpm 

and press “Speed Enter” to enter the new speed.

7.  Observe the atomizing air gauge.  At 70,000 

rpm the air consumption should not exceed 17.0 

SCFM.

Brake Test

1.  Re-adjust the turbine speed select card to 

70k rpm.

2. Set the atomizer speed card to 1k rpm.  (Do not 

activate this speed until the next step.)

3. Using a stop watch to time the brake speed, 

press the atomizer speed card button and watch 

the time it takes for the applicator to reach 1k rpm.

4. Brake time should NOT exceed 14 seconds.

Содержание RMA-303

Страница 1: ...is Service Manual for future reference SERVICE MANUAL LN 9259 07 1 Replaces LN 9259 07 April 2013 RMA 303 INDIRECT RMA 303 DIRECT EVOLVER 303 EVOLVER NE TEST STATIONS Service Manual Price 30 00 U S TU...

Страница 2: ...LN 9259 07 1...

Страница 3: ...TS MAINTENANCE 21 22 INTRODUCTION GENERAL INFORMATION SPECIFICATIONS FEATURES 5 8 5 5 6 7 9 20 OPERATION RMA TEST PROCEDURE INITIAL TEST SETTIN GS TESTTRIGGERS TURBINE TEST 9 9 10 11 14 15 16 16 17 17...

Страница 4: ...ble Compare thismanualwithyoursysteminstallationdrawings and appropriate Ransburg equipment manuals to reconcile such differences Careful study and continued use of this manual will provide a better u...

Страница 5: ...loose clothing while working around the applicator NEVERruntheapplicatorwithanyonenear the bell Serious injury COULD OCCUR if the bell is contacted while it is rotating NEVER stop the rotation of the...

Страница 6: ...hose used for general cleaning must have flash points above 100 F 37 8 C Spray booth ventilation must be kept at the rates required by NFPA33 OSHA and local codes In addition ventilation must be maint...

Страница 7: ...s of flam mable or combustible materi als may occur Personnel are exposed to high voltage during operation and maintenance Protection against inadvertent arcing that may cause a fire or explosion is l...

Страница 8: ...and will verify performance of single or dual fluid applicators bearing air shaping air brake air turbine drive air and fiber optic func tionality As well it checks kV and A electrical performance of...

Страница 9: ...NUFACTURER CAT MANUFACTURER CAT DESC TURBINE S A O FAN S A I ATOM Figure 1a Basic Station Features Test Stations Introduction 6 FEATURES 1 Main Control Panel 2 Air Flow Meters 3 Test Applicator 4 Tabl...

Страница 10: ...Meter Inner Shaping Air 8 Fluid Enable Paint In Cup Wash Solvent In Cup Wash Air In 9 Atomizer Speed Select Card 10 Atomizer Card 11 MicroPak Power Supply 12 Applicator Enable Paint Trigger Cup Wash...

Страница 11: ...LN 9259 07 1 Test Stations Introduction 8 NOTES...

Страница 12: ...tubing securely by hand or clamp to prevent whipping rma TEST PROCEDURE Setup 2 Provide air filtration to the manifold that has the capability of passing 30 SCFM with particulate removal of 3 to 6 mic...

Страница 13: ...3 M10 screws 78268 00 4 Connect tubing from the Test Stand to the ap plicator as labeled 5 Supply 100 psig air pressure to the stand reference supply air gauge on panel If required adjust air input re...

Страница 14: ...oggle on the Paint Trigger switch air should be escaping from the feed tube Turn off the Paint Trigger 6 Toggle Paint Fluid Enable switch to the off down position 7 Turn on the Cup Wash Air switch now...

Страница 15: ...off 1 00 Static Decay Water Pressure Test The purpose of this test is to verify that each of the valves in the applicator will pass fluid Also this test verifies all seals along the fluid passages hav...

Страница 16: ...onized or distilled water 5 Close the lid tighten the lid clamps so that the lid is secure and no air pressure may escape 6 Turn the Fluid switch to Water position 7 Turn the Fluid Air regulator to th...

Страница 17: ...ches and turn the Fluid switch to Off Shaping Air Consumption Test Inner and Outer 1 Reduce the turbine speed from 70k to 30k rpm 2 Turn on the Shaping Air dial and adjust the outer shaping air to 60...

Страница 18: ...reely with bear ing air supplied 4 Set the atomizer speed select to 30 000 rpm 5 Toggle Enable 1 On or in the Up position on the atomizer speed select card Then press the Speed Enter button The turbin...

Страница 19: ...to the HV GND port of the mounting manifold 3 Turn on the main power to the MicroPak possible causes The most likely are a Transmitter inside the bell is bad or is positioned incorrectly Refer to the...

Страница 20: ...l until there is 50 psi flowing on the fan air outer shaping air gauge 1 00 1 00 Air Operation 1 Connect the Test Air Cap to the spray head Toggle the Applicator Trigger switch on by placing the High...

Страница 21: ...Air control knob on the panel until there is 50 psi flowing on the fan air gauge Check that the fan air pressure test gauge shows a pressure 1 00 1 00 S A O FAN 4 Turn the Bell Applicator switch to O...

Страница 22: ...he line 7 Shut off the paint trigger 8 Turn off Pressure Pot valve Turn the Water Air switch to the Air position 9 Turn on the Applicator switch and the Dump Trigger switch until all traces of water a...

Страница 23: ...LN 9259 07 1 Test Stations Operation 20 NOTES...

Страница 24: ...LN 9259 07 1 Test Stations Maintenance 21 If any maintenance is required consult factory for spare part availability maintenance NOTES...

Страница 25: ...LN 9259 07 1 Test Stations Maintenance 22 NOTES...

Страница 26: ...er supplies control units etc is one 1 year from date of purchase wrapping the applicator in plastic SHRINK WRAP ETC will void THIS war ranty RANSBURG S ONLYOBLIGATION UNDERTHIS WARRANTY IS TO REPLACE...

Страница 27: ...LN 9259 07 1...

Страница 28: ...subject to change without notice Manufacturing 1910 North Wayne Street Angola Indiana 46703 9100 Telephone 260 665 8800 Fax 260 665 8516 Technical Service Assistance Telephone 800 233 3366 Fax 419 470...

Отзывы: