Rangemaster Kitchener 90 Electric Скачать руководство пользователя страница 10

10

Whole poultry must be thoroughly defrosted before 
placing in the oven. 
Check that meat and poultry are fully cooked 
before serving.

Both Ovens

Before using for the first time, to dispel 
manufacturing odours turn the ovens to 230°C 
and run for an hour. To clear the smell make sure 
the room is well ventilated to the outside air, by 
opening windows for example.

Both ovens are fanned ovens. The fan circulates hot 
air continuously which results in faster heat transfer 
to the food. 

The wire shelves should always be pushed firmly to 
the back of the oven.

Baking trays meat tins etcetera should be placed level 
centrally on the oven’s wire shelves. Keep all trays 
and containers away from the sides of the oven, as 
overbrowning of the food may occur.

For even browning, the maximum recommended size 
of a baking tray is 340mm by 340mm for the main 
oven and 230mm by 320mm for the Tall oven.

Cooking high moisture content foods can create a 
‘steam burst’, when the oven door is opened. When 
opening the oven stand well back and allow any 
steam to disperse.

When the oven is on, don’t leave the door open for 
longer than necessary, otherwise the knobs may get 
very hot.

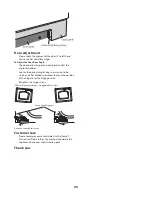
•  Always leave a ‘fingers width’ between dishes on 

the same shelf. This allows the heat to circulate 
freely around them.

•  The Cook & Clean oven liners (see Cleaning your 

cooker) work better when fat splashes are avoided. 
Cover meat when cooking.

•  To reduce fat splashing when you add vegetables 

to hot fat around a roast, dry them thoroughly or 
brush lightly with cooking oil.

•  If you want to brown the base of a pastry dish, 

preheat a baking tray for 15 minutes before placing 
the dish in the centre of the tray.

•  Where dishes may boil and spill over during 

cooking, place them on a baking tray.
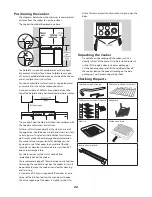
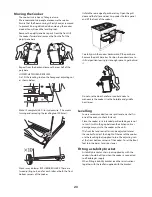
Main Oven shelves

the shelf guard should be at the back pointing upwards

As well as the flat shelf some models are supplied 
with a drop shelf. The drop shelf increases the 
possibilities for oven shelf spacing.

The oven shelves can be easily removed and refitted.

Pull the shelf forward 
until the back of the shelf 
is stopped by the shelf 
stop bumps in the oven 
sides.
Lift up the front of the 
shelf so the back of the 
shelf will pass under the 
shelf stop and then pull 
the shelf forward.

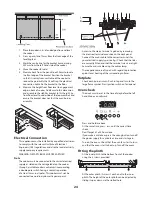
To refit the shelf, line up the shelf with a groove in the 
oven side and push the shelf back until the ends hit 
the shelf stop. Lift up the front so the shelf ends clear 
the shelf stops, and then lower the front so that the 
shelf is level and push it fully back.

Содержание Kitchener 90 Electric

Страница 1: ...Kitchener 90 Ceramic Users Guide Installation Service Instructions U109720 01...

Страница 2: ...d you read General Safety Instructions especially if you have not used a ceramic cooker before where we describe some basic guidelines on how to use your cooker safely Electricity on Make sure that th...

Страница 3: ...ain Oven shelves Page 10 The Handyrack Page 11 Oven light Page 11 Tall oven shelves Page 12 Oven cooking guide Page 13 Cleaning your cooker Page 14 Moving your cooker Page 16 Troubleshooting Page 17 G...

Страница 4: ...ys use pans that are the same size as or slightly larger than the areas marked on the hob top Using smaller pans wastes heat and any spillage will be burnt on Using a lid will help the contents boil m...

Страница 5: ...h sugar content aluminium foil or plastic items are accidentally allowed to melt on the hob surface remove them immediately from the hot cooking area using a scraper to avoid any possible damage to th...

Страница 6: ...d on the grill pan grid slide the grill pan onto the side supports Adjust the heat to suit by turning the knob Make sure it is pushed right in and touches the back stop Never close the grill door when...

Страница 7: ...ntil the oven has reached the temperature you selected It will then cycle on and o during cooking During cooking food naturally produces steam particulary when cooking foods with high water content e...

Страница 8: ...d Stop Time shows AUTO will show in the display When your cooking is nished the beeper sounds TURN THE OVEN KNOB TO 0 FIRST then press once to stop the beep press again to return to manual cooking To...

Страница 9: ...key symbol goes out and On shows on the display Let go of the buttons After a few seconds the display will revert to show the time of day The oven and the clock oven control functions can now be used...

Страница 10: ...ay get very hot Always leave a ngers width between dishes on the same shelf This allows the heat to circulate freely around them The Cook Clean oven liners see Cleaning your cooker work better when fa...

Страница 11: ...standing on the base of the oven When the Handyrack is used in its lowest position other dishes can be cooked on the second shelf position of the oven or standing on the base of the oven To t the Han...

Страница 12: ...oven than in a conventional oven When using recipes reduce the temperature by 10 C and the cooking time by 5 10 minutes The temperature in a fanned oven does not vary with height in the oven so you ca...

Страница 13: ...00g 20 25mins 190 C 15 20mins per 500g 15 20mins Turkey 150 C 20 25mins per 500g 20 25mins 190 C 15 20mins per 500g 15 20mins Stu ed Poultry Cook at 200 C or at 200 C for 20mins then 160 C for remaind...

Страница 14: ...t is completely cooled down and follow the instructions below Cleaning for burned on spills If you accidentally melt anything on the cooking or if you spill foods with a high sugar content preserves t...

Страница 15: ...cleans itself This does not stop all marks on the lining but helps to reduce the amount of manual cleaning needed The Cook Clean panels work better above 200 C If you do most of your cooking below thi...

Страница 16: ...t or sand between the pan and the surface of the hob may cause scratches Use the recommended cleaning methods Make sure pan bottoms are smooth and clean Tiny scratches are not removable but will becom...

Страница 17: ...en the back of the cooker should be raised up or the front lowered If the cooker is not level arrange for your supplier to level it for you The left hand Main oven not coming on when turned on manuall...

Страница 18: ...CAUTION CORROSIVE CAUSTIC OVEN CLEANERS FOLLOW MANUFACTURERS INSTRUCTIONS Do not allow contact with the oven elements Cook Clean Oven Panels some models only Special enamel that partly cleans itself T...

Страница 19: ...d in this guide In the interests of hygiene and safety the cooker should be kept clean at all times as a build up in fats and other food stu could result in a re We recommend that you avoid wiping any...

Страница 20: ...ose a portion of the surface unit to direct contact and may result in ignition of clothing Proper relationship of pans to surface unit will also improve e ciency Do not allow anyone to climb stand or...

Страница 21: ...ns and also the local electricity supply company requirements You will need the following equipment to complete the cooker installation satisfactorily Multimeter for electrical checks Cooker levelling...

Страница 22: ...sed by normal use of the cooker to any material that de laminates or discolours at temperatures less than 65 C above room temperature For safety reasons curtains must not be tted immediately behind th...

Страница 23: ...front of the cooker Carefully push the cooker backwards o the pack base Remove the pack base tray Position the cooker close to its nal position leaving just enough space to get behind it Do not use t...

Страница 24: ...it incorporating a double pole switch having a contact separation of at least 3mm in all poles This cooker must not be connected to an ordinary domestic power point Access to the mains terminal is gai...

Страница 25: ...e xing screws and use the notch and a at bladed screwdriver to move the position of the hinge to set the hinge position Retighten the hinge screws E ect of hinge adjustment exaggerated for clarity Cen...

Страница 26: ...ve the handrail by removing the 2 end bracket xing screws Pull o the push t control panel end caps at each end and remove the end xing screws under the end cap Pull o all the control knobs Open the gr...

Страница 27: ...nd lift clear Feed the thermostat capillary out of the oven Disconnect wiring from thermostat Remove 2 screws holding thermostat to mounting panel Fit new thermostat and reassemble in reverse order En...

Страница 28: ...or slightly and remove the front panel xing screws from the door sides two each side thermostat capillary earthing plate Right hand oven The oven thermostat capillary is clamped to the right hand rear...

Страница 29: ...s 3 o each and lift the fan away from the rear of the cooker Fit new fan and reassemble in reverse order Check operation of oven 20 To Remove an Oven element Thermal Cut Out Disconnect from the electr...

Страница 30: ...e cover and disconnect the terminals from the rear Fit new element and reassemble in reverse order Check operation of oven 22 To change oven light bulb LH Oven Remove the oven furniture and side linin...

Страница 31: ...ing See Positioning of Cooker Minimum space above hotplate 650mm Ratings Total Load At 230V 50Hz 15 6kW approximate total including oven lights oven fan etc Hob Main Oven Tall Oven Ovens Forced air co...

Страница 32: ...H3 H2 F1 F2 B1 A2 A1 B2 G C1 C2 D1 D2 3 P1 4 P2 2 1 P3 P4 3 P1 4 P2 2 1 P3 P4 r r r r r r r r r r y y y y v v v v V w w w w w w w w o o o br br br br br V br br br br br br br br br br br br br br br...

Страница 33: ...fan J1 Left hand oven thermostat J2 Left hand oven switch block J3 Left Fan oven element 2 5kW J4 Left hand oven fan K Clock H1 Grill energy regulator H3 Right hand grill element 1 15kW H3 Left hand g...

Страница 34: ......

Страница 35: ......

Страница 36: ...271106...

Отзывы: