INSTALLATION
Check the appliance is electrically safe and gas sound when you have finished.
22
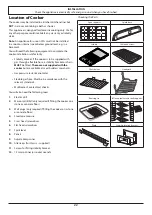
Checking the Parts:
3 pan supports
Splashback
ArtNo.000-0001 90 Pan supports
ArtNo.421-0002 - Splashback
Griddle
Grill pan & trivet
ArtNo.330-0001 - Grill pan
2 flat shelves
Handyrack
ArtNo.324-0003 Handyrack
Roasting tin
Tall oven shelves and shelf supports
ArtNo.324-0004 Roasting tin
ArtNo.000-0010 Tall oven shelves
Plinth
Stability location bracket
Location of Cooker
The cooker may be installed in a kitchen/kitchen diner but
NOT
in a room containing a bath or shower.
This appliance is designed for domestic cooking only. Use for
any other purpose could invalidate any warranty or liability
claim.
Note
: An appliance for use on LPG must not be installed
in a room or internal space below ground level, e.g. in a
basement.
You will need the following equipment to complete the
cooker installation satisfactorily:
•
Stability bracket: If the cooker is to be supplied with
gas through a flexible hose, a stability bracket or chain
MUST
be fitted.
These are not supplied with the
cooker
but are available at most builders’ merchants.
•
Gas pressure tester/manometer.
•
Flexible gas hose: Must be in accordance with the
relevant standards.
•
Multimeter: For electrical checks.
You will also need the following tools:
1.
Electric drill
2.
Masonry drill bit (only required if fitting the cooker on a
stone or concrete floor)
3.
Wall plugs (only required if fitting the cooker on a stone
or concrete floor)
4.
Steel tape measure
5.
Cross head screwdriver
6.
Flat head screwdriver
7.
Spirit level
8.
Pencil
9.
Adjustable spanner
10.
Allen keys (for Classic – supplied)
11.
Screws for fitting stability bracket
12.
13 mm spanner (or socket wrench)
Содержание Classic 90 Dual Fuel - 3 Button Clock
Страница 4: ...ii...
Страница 38: ...34 Notes...


