background image

- 25 -

FUNCIONAMIENTO

Mandos

La campana se pone en funcionamiento
usando los 5 mandos situados en el lado
derecho de la campana.
El  interruptor luz enciende y apaga las
lámparas halógenas. Pulsando la tecla una
vez, la luz se enciende a intensidad 1,
pulsándolo una segunda vez, la luz se
enciende a intensidad 2 (luz más intensa) y,
pulsándolo otra vez más, la luz se apaga
completamente.
El  mando de encendido- apagado y
velocidad 1
 del aspirador pone en
funcionamiento el aspirador a una velocidad
mínima. Manteniendo presionado el mando durante dos segundos
aproximadamente, se apaga el aspirador.
El  mando de velocidad 2 pone el aspirador a una velocidad media- baja. Si
acciona este mando otra vez se pone en funcionamiento un timer que mantiene el
aspirador funcionando a dicha velocidad durante diez minutos. El diodo se
mantiene encendido durante ese tiempo y el aspirador se apaga automáticamente.
El mando de velocidad 3 y el de velocidad 4 funcionan como el de velocidad 2
pero el de velocidad 3 funciona a una velocidad medio- alta y el de velocidad 4 lo
hace a una velocidad alta.
Después de unas 30 horas de funcionamiento, el diodo rojo del mando “velocidad
1” parpadea, indicando que hay que limpiar los filtros antigrasa.
Una vez vueltos a colocar los filtros limpios, mantenir presionado el interruptor luz
durante dos segundos aproximadamente, mientras que la pantalla o diodos
(espias) parpadean.

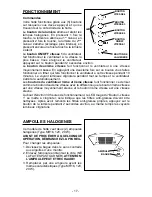
DIODO

(espias)

MANDO DE

ENCENDIDO/

APAGADO Y

VELOCIDAD 1

MANDO DE

VELOCIDAD 3

MANDO DE

VELOCIDAD 2

MANDO DE

VELOCIDAD 4

INTERRUPTOR

LUZ

LAMPARAS HALOGENAS

Este tipo de campana necesita dos (2)
lámparas halógenas (Tipo MR16, 12V, 20W).
ANTES DE PROCEDER  A CUALQUIER
OPERACIÓN, ES NECESARIO DESCO-
NECTAR EL APARATO.
Para cambiar las lámparas:

1. Destornillar la abrazadera en sentido

antihorario.

2. Extraiga la lámpara oblicuamente (NO LA

GIRE) -  ATENCIÓN: LAS LÁMPARAS
PUEDEN ESTAR CALIENTES.

3. Sustituir con lámparas del tipo (MR16, 12V,

20W).

ABRAZADERA

LÁMPARA

Содержание RM65000 Series

Страница 1: ...s Broan NuTone LLC 926 West State Street Hartford WI 53027 NuTone Inc 4820 Red Bank Road Cincinnati OH 45227 Broan NuTone Canada INC 1140 Tristar Drive Mississauga Ontario L5T 1H9 ENGLISH 3 FRAN AIS 1...

Страница 2: ...Clean ventilating fans frequently Grease should not be allowed to accumulate on fan or filter D Useproperpansize Alwaysusecookwareappropriate for the size of the surface element WARNING TO REDUCE THE...

Страница 3: ...ng 2 Mounting Brackets 1 Flue Mounting Bracket 10 Mounting Screws 4 8 x 38mm Pan Head 2 Mounting Screws 3 9 x 9 5mm Pan Head 10 Drywall Anchors 1 Installation Instructions MOUNTING BRACKETS FLUE MOUNT...

Страница 4: ...ood location Use duct tape to seal the joints between ductwork sections INSTALL MOUNTING BRACKETS 1 Construct wood wall framing that is flush with interior surface of wall studs Make sure a the framin...

Страница 5: ...is too short have a qualified electrician install an outlet near the appliance Set the electrical power supply within the space covered by the decorative flues Position the power socket at a maximum...

Страница 6: ...ing bracket to the ceiling and wall as shown 2 Use 6 round metal duct to connect the discharge collar on the hood to the ductwork above 3 Use duct tape to make all joints secure and air tight 4 Insert...

Страница 7: ...with a clean soft cloth to avoid water marks l For discolorations or deposits that persist use a non scratching household cleanser or stainless steel polishing powder with a little water and a soft c...

Страница 8: ...speed 3 and blower speed 4 switches operate the same as blower speed 2 switch except Blower speed 3 is medium high and blower speed 4 is high After every 30 hours of operation the LED above the blowe...

Страница 9: ...above limitation may not apply to you BROAN NUTONE LLC S OBLIGATION TO REPAIR OR REPLACE AT BROAN NUTONE LLC S OPTION SHALL BE THE PURCHASER S SOLE AND EXCLUSIVE REMEDY UNDER THIS WARRANTY BROAN NUTON...

Страница 10: ...r le ventilateur ou sur le filtre D Utilisez des casseroles de taille appropri e Utilisez toujours des ustensiles de cuisson dont la taille est appropri e la surface de votre l ment de cuisson AVERTIS...

Страница 11: ...et avec 2 triers d assemblage 1 trier de support 10 Vis d assemblage 4 8 x 38mm T te ronde 2 Vis d assemblage 3 9 x 9 5mm T te ronde 10 Chevilles 1 Instructions pour l installation ETRIERS D ASSEMBLAG...

Страница 12: ...rm tiques au moyen d un ruban pour tuyaux INSTALLATION DES ETRIERS D ASSEMBLAGE 1 Construisez un cadre en bois pour le mur dont les vis pivot ne d passent pas Assurez vous a que le cadre est centr au...

Страница 13: ...RUCTIONS POUR LAMISEALATERRE Cet appareil doit tre reli la terre En cas de court circuit la mise la terre r duit le risque de d charge lectrique en fournissant un c ble permettant au courant d tre d v...

Страница 14: ...ion qui se trouve sur votre hotte au syst me de conduction qui se trouve au dessus au moyen d un tuyau rond en m tal de 6 3 Utilisez un ruban pour tuyauterie afin de rendre toutes les jonctions sures...

Страница 15: ...et doux afin d viter les taches d eau l Si des d colorations ou des d p ts persistent utilisez un nettoyant domestique non abrasif ou de la poudre pour l acier inoxydable et un peu d eau et un chiffon...

Страница 16: ...tomatiquement Les boutons du ventilateur 3 me et 4 me vitesse font fonctionner ce dernier comme le bouton deuxi me vitesse avec la diff rence que le bouton 3 me vitesse est une vitesse moyennement lev...

Страница 17: ...par cons quent la limitation indiqu e ci dessus peut ne pas vous concerner L OBLIGATIONDEREPAREROUDEREMPLACERDELAPARTDEBROAN NUTONELLCSERALESEULET EXCLUSIF REMEDE DE L ACHETEUR COUVERTPAR CETTE GARAN...

Страница 18: ...utensiliosdecocinadetama oymaterialadecuados ADVERTENCIA PARA EVITAR EL RIESGO DE DA OS A PERSONAS EN CASO DE FUEGO POR ALTO N VEL DE GRASA TENGA EN CUENTA LO SIGUIENTE 1 SOFOQUELALLAMAconunatapadera...

Страница 19: ...porte para el montaje del tubo 10 Tornillos de montaje 4 8 x 38mm cabeza redonda 2 Tornillos de montaje 3 9 x 9 5mm cabeza redonda 10 Escarpias 1 Instrucciones para instalaci n SOPORTES DE MONTAJE SOP...

Страница 20: ...ION DE LOS SOPORTES PARA EL MONTAJE 1 Construya una estructura de madera en la pared que quedar nivelada con la parte interior de los tacos en la pared Aseg rese de que a La estructura se encuentra ce...

Страница 21: ...le un enchufe cerca del aparato Conecte la alimentaci n el ctrica en el espacio cubierto por el tubo decorativo Coloque el enchufe a una distancia m xima de 33 7 16 85 cm desde el cable de la campana...

Страница 22: ...etal de 6 de di metro para unir el casquillo que se encuentra encima de la campana al tubo de extracci n situado arriba 3 Use cinta para ajustar todas las junturas y que quede herm tico 4 Introduzca e...

Страница 23: ...e s quela con un pa o suave y limpio para evitar las huellas que deja el agua l Para las manchas o restos de grasa que persistan use un producto qu mico dom stico que no raye un limpiador para acero i...

Страница 24: ...se apaga autom ticamente El mando de velocidad 3 y el de velocidad 4 funcionan como el de velocidad 2 pero el de velocidad 3 funciona a una velocidad medio alta y el de velocidad 4 lo hace a una velo...

Страница 25: ...taci n arriba indicada podr a no aplicarse LA PRESENTE GARANTIA CUBRIRA EXCLUSIVAMENTE AL COMPRADOR LOS SERVICIOS DESCRITOS ANTERIORMENTE BROAN NUTONE LLC NO SE HACE RESPONSABLE DE DANOS PRODUCIDOS DE...

Страница 26: ...orative Flue Top 120 BE3342057 Flue Mounting Bracket 123 B03292283 Discharge collar 135 B03292362 Trimming 144 B03292287 Wire Clamp 147 BR2300132 Terminal Block 151 B032920200 Electrical Box Wires Sto...

Страница 27: ...atif inf rieur 119 BE3342056 Conduit d coratif sup rieur 120 BE3342057 Etrier de support 123 B03292283 Collier d vacuation 135 B03292362 Enjoliveur 144 B03292287 Serre cable 147 BR2300132 Borne 151 B0...

Страница 28: ...ativo superior 120 BE3342057 Soporte de montaje del tubo 123 B03292283 Casquillo 135 B03292362 Tarjeta de mandos 144 B03292287 Sujeta cabos 147 BR2300132 Cuadro el ctrico 151 B032920200 Sujeta cabos 1...

Страница 29: ...30 SERVICE PARTS LISTE PIECES DE RECHANGE LISTA DE PIEZAS DE RECAMBIO MODEL K274...

Страница 30: ...32 04306814...

Отзывы: