background image

Manual-4

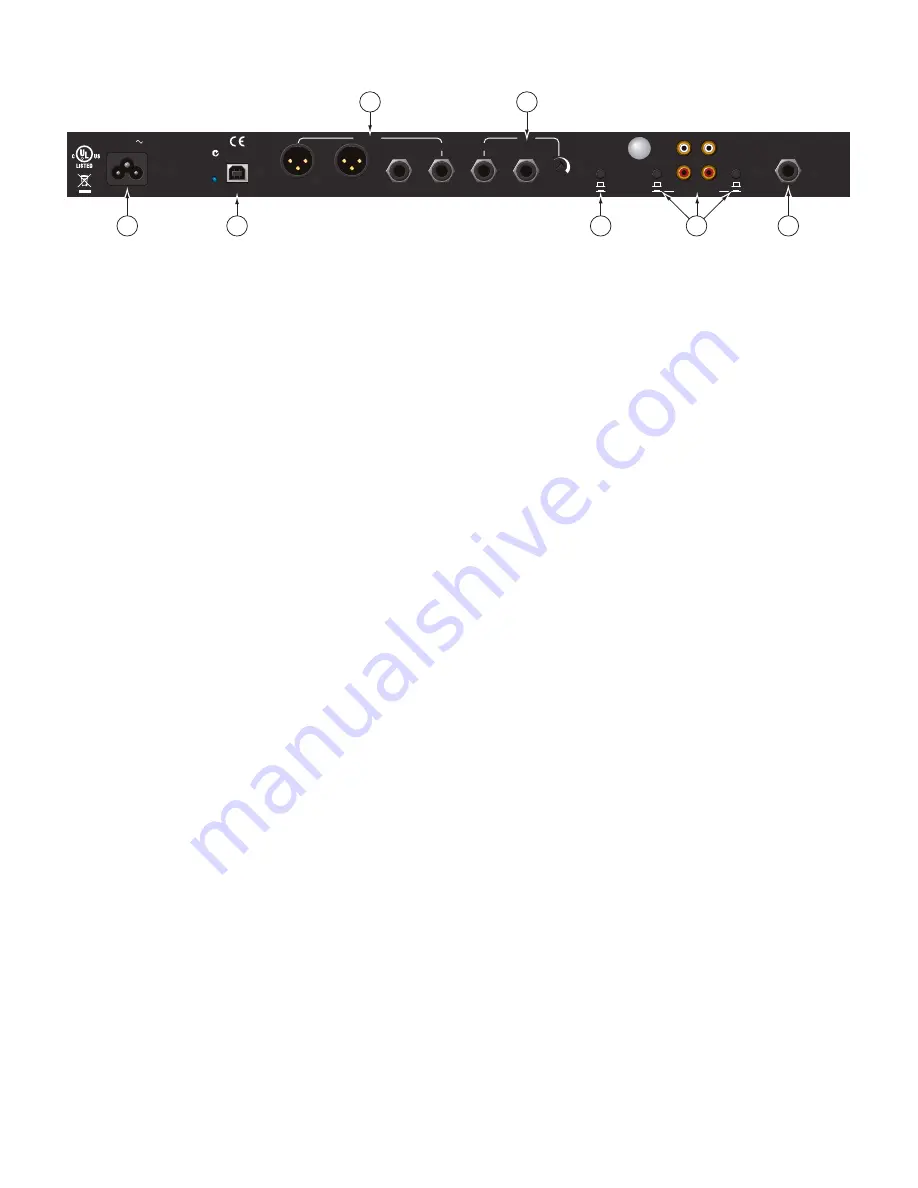
Rear Panel Description

1


Universal Voltage Input:

 via a miniature IEC 60320 C6 appliance inlet. This mates with an IEC 60320 C5 line cord (USA 

domestic). Do 

not

 lift the ground connection!

2


USB

 connection:

 Attach the included USB cable from here to the computer. The blue LED illuminates when the cable is con-

nected and receiving power. USB delivers two stereo inputs from the computer to the mixer (

USB 1

 and 

USB 2

), and one stereo 

record signal from the mixer to the computer.

3


HOUSE

 Output:

 The front panel 

HOUSE LEVEL

 control affects the volume at this Output. Connect either the XLR or ¼" TRS 

(tip-ring-sleeve) jacks to a balanced equalizer or amplifier. Both Output types may be used simultaneously if needed. Though not 

recommended, unbalanced ¼" TS (tip-sleeve) cables may be used for short runs (under 3 meters [10 feet]) to an amplifier with 

unbalanced inputs. See the RaneNote

 “Sound System Interconnection”

 for wiring recommendations.

4


AUX

 Output:

 This delivers the same signal as the 

HOUSE

 Output, but has its own rear panel 

LEVEL

 control. 

This Output is 

not

 af-

fected by the front panel 

HOUSE LEVEL

 control.

 These balanced ¼" TRS (tip-ring-sleeve) Outputs connect to a balanced equalizer 

or amplifier (for a possible second listening zone) and follow the same interconnection rules as above.

5


MIC TO USB RECORD

 switch:

 In the 

YES

 position the Mic signal along with the Program mix is routed to the USB record output. 

In the 

NO

 position only the Program mix is sent to the USB record output.

6


INPUTS 1 & 2

:

 These stereo Inputs are each switchable from a 

PHONO

 (RIAA) stage for magnetic cartridges (switch 

in

) to a 

LINE


level Input suitable for any line level device such as a CD player (switch 

out

). Each of these may be assigned to 

PROGRAM A 

or 

B

 using the front panel 

INPUT

 selectors. The 

PHONO GROUND


screw connects those extra wires coming out of the turntables.

7


MIC

 Input jack:

 Accepts either a ¼" balanced (TRS) or unbalanced (TS) microphone plug, controlled by the front panel 

MIC 

LEVEL

 control.

MADE IN U.S.A.

RANE CORP.

RIGHT

LEFT

RIGHT

RIGHT

LEFT

LEFT

LEVEL

R

L

PHONO

LINE

PHONO
GROUND

MIC TO

USB RECORD

MP 4

HOUSE

AUX

IN 2

IN 1

MIC

ACN 001 345 482

BALANCED OUTPUTS: TIP = (+), RING = (–), SLEEVE = SIGNAL GROUND

BALANCED INPUT

PHONO

LINE

YES

NO

USB

100-240V

50/60 Hz  7 WATTS

FOR CONTINUED 

GROUNDING PROTECTION

DO NOT REMOVE SCREW

COMMERCIAL AUDIO

EQUIPMENT 24TJ

R

Fader Cleaning

With heavy use in harsh environments, the fader may need lu-

brication. This treatment extends longevity and can make a used 

fader as good as new. The fader assembly must be removed from 

the MP 4 for proper cleaning. We recommend any of the follow-

ing cleaning solutions:

Caig DeoxIT FaderLube F100 spray lubricant 

(

www.caig.com

)

Caig DeoxIT FaderLube F5 spray cleaner 

(

www.caig.com

)

CRC 2-26 

(

www.crcindustries.com

)

Order CaiLube MCL

®

 from:

CAIG Laboratories, Inc.

12200 Thatcher Ct.

Poway, CA  92064

Phone 858-486-8388

Fax 858-486-8398

Web 

www.caig.com

CLEANING INSTRUCTIONS

A. Fader assembly replacement (part #11646)

1. Unplug the MP 4.

2. Remove the bottom cover.

3. Remove the fader screws from the front panel.

4. Draw fader assembly out through the bottom.

5. Remove ribbon cable from old fader.

6. Attach ribbon cable to new fader, screw onto front panel and 

replace bottom cover.

B. Fader cleaning

1. Hold the fader assembly away from the mixer.

2. Position the fader at mid-travel.

3. Spray cleaner/lubricant into both ends of the fader in sufficient 

amounts to flush debris.

4. Move the fader over its full travel back and forth a few times.

5. Shake excess fluid from the fader assembly.

6. Wipe off excess fluid.

Содержание Scratch 17357

Страница 1: ...USB LINE USB INPUT INPUT PGM CUE A B MP 4 MIXER A PROGRAM A PROGRAM B CUE PHONES MIC B PAN HOUSE LEVEL POWER 1 2 2 1 1 2 2 1 10 0 2 4 8 6 10 0 2 4 8 6 10 0 2 4 8 6 10 0 2 4 8 6 10 0 2 4 8 6 0 24 12 1...

Страница 2: ...g has two blades and a third grounding prong The wide blade or third prong is provided for your safety If the provided plug does not fit into your outlet consult an electrician for replacement of the...

Страница 3: ...isplay 12 Beat Matching display 12 Gain adjustment 12 Master gain 12 Tap Tempo 12 Organizing your music 13 Grouping tracks into crates 13 Sorting your files 13 Using the song browser 14 Searching 14 P...

Страница 4: ...ed as a generic sound card with other software applications for best performance and support we highly recommend using Scratch LIVE Performance using other applications may vary and compatibility is n...

Страница 5: ...d When it s all the way right only PROGRAM B is heard When it s in the middle both PROGRAM A and B are mixed together equally This is an Active Crossfader which uses a VCA to deliver an extended life...

Страница 6: ...ch out Each of these may be assigned to PROGRAM A or B using the front panel INPUT selectors The PHONO GROUND screw connects those extra wires coming out of the turntables 7 MIC Input jack Accepts eit...

Страница 7: ...with it On the Mac you can use the MP 4 with any audio application though technical support is limited to Scratch LIVE Getting started on Windows Windows XP 1 Disconnect any unneccessary USB devices f...

Страница 8: ...install the Scratch LIVE driver Windows Troubleshooting If you have a USB PCI card your computer may have allocated bandwith to other devices including your mouse preventing Scratch LIVE from recogni...

Страница 9: ...erviews If you run Scratch LIVE with the hardware interface discon nected you will notice a button labeled build overviews on the main screen Click this to automatically build the overviews for all th...

Страница 10: ...hold the shift key and drag the pitch slider to move it slowly Drag the center of the small pitch slider to make fine pitch adjustments or click on either side of the small slider to pitch bend Play...

Страница 11: ...ered from the Crossfader using the fader start feature To start playback using the Crossfader pause the track at the desired position and press the fader start button Now each time you move the Crossf...

Страница 12: ...ehind the loop number will be green Press the x button to clear the loop If you click on the number of a occupied loop slot a red border will appear This indicates the loop is locked and you will not...

Страница 13: ...sync Visual aids When the track is playing several waveforms are displayed Each shows a different aspect of the track being played Track Overview display This view provides a complete overview of the...

Страница 14: ...po Matching display 2 Adjust the pitch of the right deck until the blue peaks sit under the orange peaks in the Tempo Matching display Once they are aligned the two tracks have the same tempo 3 Next a...

Страница 15: ...the setup screen applies to removing editing and renaming crates Check this option to prevent changes to your crates If you do delete a crate by ac cident you can get it back from the recycle bin tras...

Страница 16: ...e or playlist that you might be in and into your main library so you can find any track in your collection If you then click on a crate or playlist the search query will be cleared To select which fie...

Страница 17: ...p to add tracks to the prepare window Tip Select the contents of the prepare window and drag them onto the new crate button to save the selection Review window The review window shows the tracks you...

Страница 18: ...ram B respectively The mic function will ignore all other inputs saving only the microphone input Press the red record button to start and stop recording Enter a name for the recording in the text fie...

Страница 19: ...track from library remove track from crate delete crate does not delete the file ctrl shift del and ctrl shift backspace Delete the file from your library and send to the recycle bin Note to iTunes us...

Страница 20: ...te and looping settings copied This setting overrides the play from start and play from first cue point options Play from first cue point Enable this option to start all tracks from the first cue poin...

Страница 21: ...is setting to automatically generate the track overview as soon as a track is loaded If this setting is not enabled the track overview will be generated as the track plays Automatically generating the...

Страница 22: ...on visit www support microsoft com I want to backup my library and crates or move them to another machine so where are they stored Your database and crates are stored in the folder Home Mu sic Scratch...

Страница 23: ...dB EQ 12 dB 12 A LOW HI EQ LOW HI 12 dB EQ 12 dB 12 B MAIN RIGHT MST REC LEFT MST REC RIGHT LEFT RIGHT MIC LEVEL 24 0 12 24 0 12 USB 2L USB 1L RIAA PHONO LINE IN 1 RIAA PHONO LINE IN 2 USB 2R USB 1R S...

Страница 24: ...frames belonging to multiple MPEG layers Scratch LIVE does not support MP3s that contain frames from multiple layers some frames may be output as silence Unsupported file This file is more than 2GB in...

Отзывы: