R&S TSMA6 Скачать руководство пользователя страница 14

Preparing for Use

R&S

®

TSMA6

14

Getting Started 4900.8040.02 ─ 07
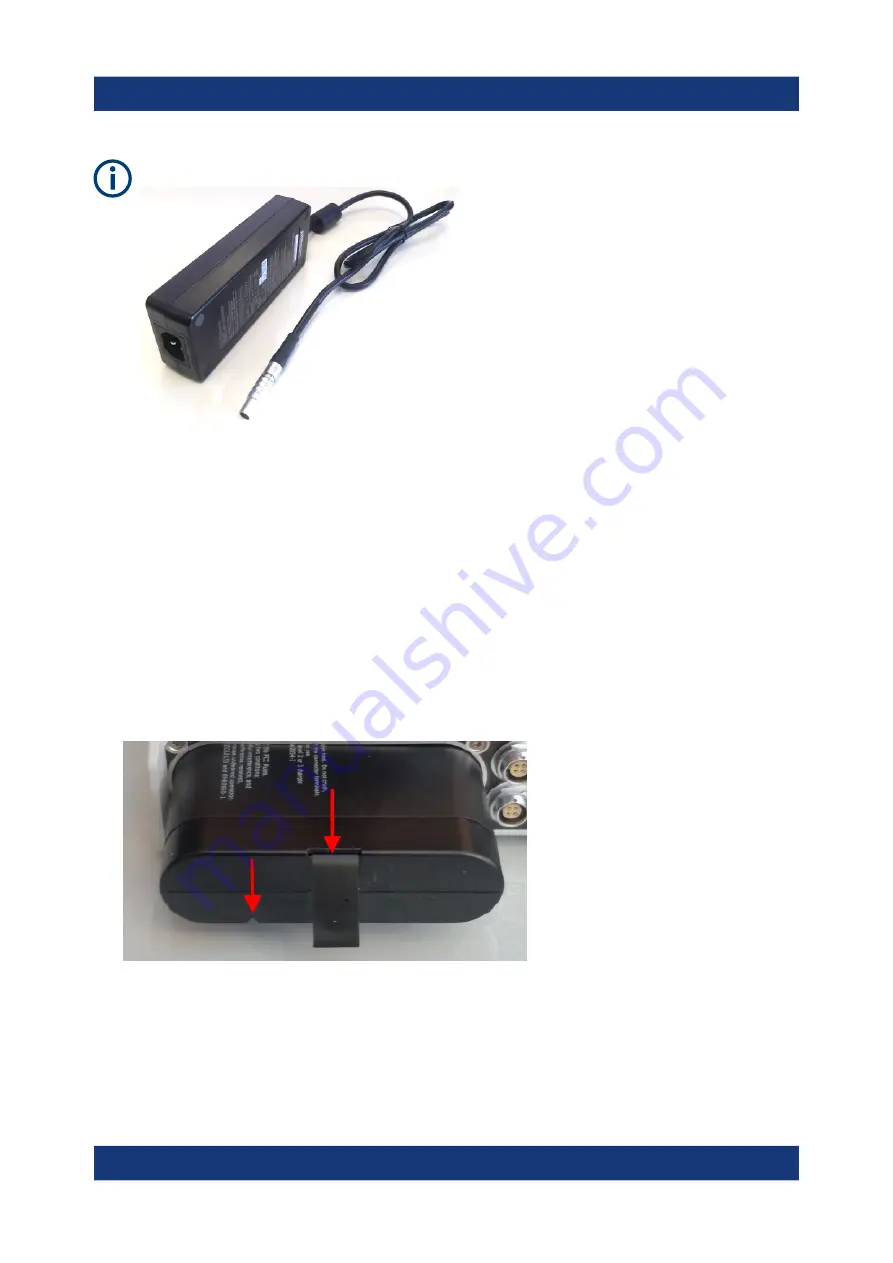
Use only the R&S


TSMA6-Z1, R&S No. 4901.0550.02 as power supply.

Figure 4-2: R&S


TSMA6-Z1 Power Supply

4.3.3


Connecting the R&S


TSMA6-BP Battery Pack Unit

Alternatively, it is possible to power the R&S


TSMA6 via the R&S


TSMA6-BP Bat-

tery Pack Unit.

To use the R&S


TSMA6 with the battery pack, the following steps must be per-

formed.

1. Insert the batteries into the R&S


TSMA6-BP.

Figure 4-3: Battery orientation

Note: 

The R&S


TSMA6 may be used only with closed battery cover.

2. Remove the cover cap from the docking connector of the R&S


TSMA6.

Connecting Power Supply

Содержание TSMA6

Страница 1: ...R S TSMA6 Autonomous Mobile Network Scanner Getting Started 4900804002 Version 07 a0 X2...

Страница 2: ...uld like to thank the open source community for their valuable contribution to embed ded computing 2021 Rohde Schwarz GmbH Co KG M hldorfstr 15 81671 M nchen Germany Phone 49 89 41 29 0 Email info roh...

Страница 3: ...s 8 4 Preparing for Use 9 4 1 Unpacking the Instrument 10 4 2 Connecting External Devices 11 4 3 Connecting Power Supply 12 4 3 1 Connecting to a Vehicle DC Power Supply 12 4 3 2 Connecting an AC Powe...

Страница 4: ...Connection 30 6 2 Selecting Measurement Mode 31 6 3 Measurement Modes 31 6 3 1 PC Mode 32 6 3 2 Remote ViCom Server Mode 32 6 3 3 QualiPoc Mode 33 6 3 4 NESTOR and NESTOR Probe Mode 36 6 3 5 ROMES Mod...

Страница 5: ...vironments Use the R S TSMA6 only for its designated purpose Observe the operating conditions and performance limits stated in the data sheet Where do I find safety information Safety information is p...

Страница 6: ...structions etc A printed version is delivered with the instrument 2 2 User Manuals and Help Contains the description of all instrument modes and functions Includes the con tents of the getting started...

Страница 7: ...Acknowledg ment OSA The release notes list new features improvements and known issues of the cur rent firmware version and describe the firmware installation The open source acknowledgment document pr...

Страница 8: ...SB With its ultra broadband front end the integrated scanner measures all supported technologies 350 to 6000 MHz simultaneously The future proof architecture and the in field upgradability for both ha...

Страница 9: ...ition read and observe the safety instructions in the following sec tions Notice that the data sheet may specify additional operating condi tions Risk of instrument damage during operation An unsuitab...

Страница 10: ...he Instrument The following section describes how to setup the instrument Risk of instrument damage due to inappropriate operating conditions Specific operating conditions are required to ensure accur...

Страница 11: ...A6 Z5 Carrying Box 4 2 Connecting External Devices The following external devices must be connected before connecting the power supply The SMA connector is sensitive to mechanical stress Use the follo...

Страница 12: ...10 11 4 3 Connecting Power Supply This section describes how to connect the R S TSMA6 to a power supply unit 4 3 1 Connecting to a Vehicle DC Power Supply For 12V Vehicle DC Supply Only The R S TSMA6...

Страница 13: ...7 Figure 4 1 Supplied power cable with cigarette lighter adapter 4 3 2 Connecting an AC Power Supply To operate the R S TSMA6 with an AC power supply connect the DC IN connec tor with the AC power sup...

Страница 14: ...Unit Alternatively it is possible to power the R S TSMA6 via the R S TSMA6 BP Bat tery Pack Unit To use the R S TSMA6 with the battery pack the following steps must be per formed 1 Insert the batteri...

Страница 15: ...arted 4900 8040 02 07 3 Attach the R S TSMA6 with the bottom side see Figure 4 5 on top of the R S TSMA6 BP see Figure 4 4 Figure 4 4 R S TSMA6 BP 1 Mechanical connectors for R S TSMA6 2 Power connect...

Страница 16: ...ivery the power connector is protected by a cover cap 4 Set the R S TSMA6 vertically on top of the R S TSMA6 BP 1 5 Slide the R S TSMA6 horizontally 2 until it engages in the mechanical con nectors on...

Страница 17: ...S TSMA6 Auto Power On The R S TSMA6 starts automatically when power is applied at the DC IN connector of the R S TSMA6 or at the DC IN connector of a connected R S TSMA6 Battery Pack Remember Last Sta...

Страница 18: ...8040 02 07 4 5 Connecting with R S TSMA6 WLAN Access Point 1 Click the Network symbol in the task bar 2 Select the correct WLAN in this example TSMA6 101084 3 Select Connect automatically and click C...

Страница 19: ...e R S TSMA6 19 Getting Started 4900 8040 02 07 4 Select Connect using a security key instead 5 Enter the network security key and click Next Default security key instrument Connecting with R S TSMA6 W...

Страница 20: ...TSPC USL Currently following LAN adapters are available Dual Gbit LAN port adapter TSPC U2L2 Single Gbit LAN port adapter TSPC U2L For information how to connect an additional adapter and required dr...

Страница 21: ...NESTOR or R S ViCom documentation 4 Wait until the used software reports a 3D fix time may vary depending on the configured GNSS 5 To calibrate the instrument the following driving procedures have to...

Страница 22: ...S TSMA6 Front Panel 5 2 Rear Panel View The following figure provides an overview of the control elements and the connec tors on the rear panel of the instrument Figure 5 2 R S TSMA6 Rear Panel 1 WLAN...

Страница 23: ...increasing bandwidth and measurement rate AUX Connector The AUX connector has two functions IN OUT synchronization with up to 4 connected R S TSME6 requires sync cable R S TSME6 ZC2 R S no 4900 1800...

Страница 24: ...anner State Scanner Pwr Mode and Meas indica ted different states of the R S TSMA6 For a detailed description see Chap ter 5 3 Status LEDs on page 26 Power ON OFF The POWER ON OFF button turns on and...

Страница 25: ...ecting external devices e g key board mouse or software dongle Power limit max 500 mA port Overall USB current USB C USB 3 0 and USB 2 0 max 3 A LAN Port Remote Control The LAN port provides a high sp...

Страница 26: ...f 20 dBm Non compliance destroys the input mixer Battery Pack Connector The battery pack connector is used to connect a battery pack unit R S TSMA6 BP R S No 4900 9001 02 allowing mobile operation 5 3...

Страница 27: ...een CONT SW ready green BLINKING 0 5 Hz green CONT green BLINKING SW measuring green blue BLINKING rapidly green CONT green BLINKING SW recording yellow BLINKING 2 Hz SW warning blue BLINK ING 1 Hz Re...

Страница 28: ...ssed from the internet which may be a security risk For example attackers might mis use or damage the product 6 1 Accessing the R S TSMA6 There are different ways to control measurements on the R S TS...

Страница 29: ...ble via the web GUI The WLAN connection between the tablet or smartphone and the R S TSMA6 device is established 2 On the tablet or smartphone start a web browser and enter the following URL http 192...

Страница 30: ...In the Remote Desktop Connection window click Options 4 In the General tab enter following parameters Computer The input depends on selected connection type see the Chap ter 6 1 1 Start the R S TSMA6...

Страница 31: ...he prerequisites of the desired measurement mode see Chapter 6 3 Measurement Modes on page 31 and adjust your device according to these requirements 2 Start the R S TSMA6 web GUI see Chapter 6 1 1 Sta...

Страница 32: ...mode for installation of software and for the inter active operation of the R S TSMA6 In this mode no software application NES TOR ROMES QualiPoc is started in the background 6 3 2 Remote ViCom Serve...

Страница 33: ...age 42 WLAN connection only Connect the tablet smartphone with the R S TSMA6 WLAN AP See Chap ter 4 5 Connecting with R S TSMA6 WLAN Access Point on page 18 Measurement with the rViCom sample App To r...

Страница 34: ...he following steps must be performed 1 Turn on the R S TSMA6 scanner 2 In the web GUI set the Mode of Operation to QualiPoc and press Sub mit 3 On the handheld device start the QualiPoc application 4...

Страница 35: ...an for NCM 7 Touch Disconnected touch the TSMA6 scanner in the list for example TSMA6 900012 and then touch OK to accept the pairing request Figure 6 3 Pair NCM Figure 6 4 Bluetooth pairing request 8...

Страница 36: ...TOR Mode The NESTOR UI engine and the NESTOR measurement engine are hosted on the R S TSMA6 NESTOR Probe Mode The R S TSMA6 hosts only the NESTOR measurement engine The NES TOR UI engine is hosted on...

Страница 37: ...R master installation to check the measurement on the R S TSMA6 NESTOR Mode To use the R S TSMA6 in NESTOR mode the following steps must be per formed 1 In the web GUI set the Mode of Operation to NES...

Страница 38: ...pidly NESTOR Probe mode 1 On the Mode tab select NESTOR Probe mode 2 Press Submit The R S TSMA6 is switched into NESTOR Probe mode In the status bar the entry is Changing mode of operation in progress...

Страница 39: ...connected to a USB port of the R S TSMA6 To control a ROMES measurement via IP from an external host PC the ROMES option ROMES4RCO is required After the installation R S ROMES must be started first ti...

Страница 40: ...urement via IP from an external host PC 3 Click Submit to save your selection For more details about the R S ROMES configuration and usage refer to the user documentation for R S ROMES 6 3 6 SmartONE...

Страница 41: ...R S SmartONE 6 4 Import of Workspace Files NESTOR ROMES Import NESTOR workspace file 1 Start the R S TSMA6 web GUI from the host PC see Chapter 6 1 1 Start the R S TSMA6 Web GUI on page 28 2 Navigate...

Страница 42: ...the Browse button select the desired ROMES workspace file on the remote PC and click Upload File 4 The file is copied by default in the directory C ProgramData Rohde Schwarz My ROMES Workspace Note T...

Страница 43: ...with Android versions 5 0 there may be problems with visibility of the device Refer to the R S TSMA6 user manual chapter 9 13 Bluetooth device not detected by R S TSMA6 4 In the R S TSMA6 web GUI cli...

Страница 44: ...Language By default the R S TSMA6 is delivered with the English version of Windows 10 and it supports the English keyboard To use the german keyboard or any other one proceed as follows 1 Open the Con...

Страница 45: ...e settings window opens and by default only English is listed there To add a new language click the Add a language tile 4 The selectable languages are listed Select the desired language by double clic...

Страница 46: ...chosen language 6 After successfully adding the language it should be listed as selectable lan guage 7 Change the keyboard language via windows taskbar 6 7 Enable Virtual Memory To enable virtual memo...

Страница 47: ...Configuring the R S TSMA6 R S TSMA6 47 Getting Started 4900 8040 02 07 2 Select System and Security 3 Select Advanced System Settings Enable Virtual Memory...

Страница 48: ...Configuring the R S TSMA6 R S TSMA6 48 Getting Started 4900 8040 02 07 4 Select the tab Advanced 5 Select Settings in the section Performance 6 Select the tab Advanced Enable Virtual Memory...

Страница 49: ...S TSMA6 49 Getting Started 4900 8040 02 07 7 Select Change in the section Virtual memory 8 Enable Automatically manage paging file size for all devices 9 Click OK to close the dialog 10 Reboot the de...

Страница 50: ...uct contact our customer support center A team of highly qualified engineers provides support and works with you to find a solution to your query on any aspect of the operation program ming or applica...

Страница 51: ...Customer support 50 D Data sheets 6 Dead reckoning 23 G Getting started 6 H HDMI Port 25 Help 6 L LAN Environment 28 LED LAN Connector 25 M Multi GNSS 23 N Network Environment 28 O Open source acknow...

Отзывы: