R
andall
UnIOn
l
Ock
-S
tItch
Thread Lock / Tension
Since 1858
technical Support
1-800-327-9420
10
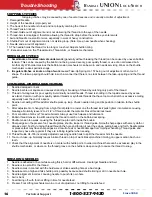
reGULAtING the threAD LoCK
• Normally the lock should lay towards the bottom portion of the
work. The position would need to be changed if a thicker needle
plate is installed.
• First bring the take up (UL-135/UL-141) to its’ highest point.
• To regulate the thread lock by adjusting the position of eccentric
screw (Ul-164).
• Loosen the nuts (UL-20) holding this screw on the back of the
brass block.
• By turning the UL-164 screw, the brass part UL-160 will move. If
the lock is showing on top, move part Ul-160 up. If the lock is
showing on the bottom of the work, then lower part Ul-160.
• When finished, tighten the nuts on the UL-164.
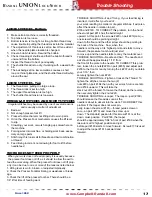
threAD teNSIoN
• Slight tension is needed on both the top and bottom threads.
proper tension has been obtained when the thread pulls out easily
with light tension, without excessive binding. It is recommended to
use less tension when working with threads made of natural fibers.
• To give more tension on the top thread, tighten the tension spring
nut (A) on upper wax pot.
• To apply more tension on the bobbin thread, adjust the lower
screw on the bobbin door (B). Loosen the nut, adjust the screw
(Ul-243), and then tighten the nut (Ul-174). loosen screw to
decrease tension and tighten screw clockwise to increase tension.
• The upper screw (C) is used to move this part in and out in order
to compensate for wear.
UL-160
UL-164
UL-164
A
B
C
StItCh LeNGth
• The stitch length is best set when the needle starts to desend after
feeding, and the shuttle point is in the 11 o’clock position.
• On the front rocker arm (UL-200) is a link that is horizontal to the
operator (bolt Ul-226 and link Ul-224).
• Adjust the link UL-224 up for a shorter stitch or down for a longer
stitch.
• Stitch length can be adjusted from 4 to 12 stitches per inch.


