background image

48

Vlaams 

RAIS/

attika

 - Gebruikershandleiding voor VIVA L Gas

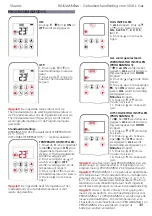
De kachel zonder afstandsbediening gebruiken

Indien de afstandsbediening niet kan worden gebruikt, is het mogelijk om de kachel 

handmatig aan te steken� 

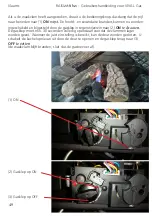
Ga zeer voorzichtig te werk wanneer u dit doet, want u moet hiervoor de verbran-

dingskamer openen� Om de kachel handmatig aan te steken, moet u de deur openen� 

Zo krijgt u toegang tot de gasklep� Deze bevindt zich achter de deur en onder de 

verbrandingskamer�

Draai de gasklep in wijzerzin naar 

OFF

� 

Zet de knop voor de handmatige bediening op 

man

� 

U ontsteekt het gas voor de waakvlam door de waakvlamgasklep 

met een spits voorwerp ingedrukt te houden� Steek de waakvlam 

met een lucifer of dergelijke aan� Houd de waakvlamgasklep ge-

durende ongeveer 20 seconden na het aansteken van de waak-

vlam ingedrukt of totdat de waakvlam niet meer uitgaat wanneer 

u de knop loslaat�

Knop voor handmatige 

bediening

Gasklep 

Waakvlamgasklep

Steek de waakvlam 

aan�

Содержание Viva 100 L Gas

Страница 1: ...1 POSITIV V I VA L G A S B E D I E N U N G S A N L E I T U N G U S E R M A N U A L M A N U E L D U T I L I S AT E U R G E B R U I K E R S H A N D L E I D I N G I S T R U Z I O N I D ...

Страница 2: ... 25 mbar G25 20 mbar G20 G25 3 25 mbar G30 G31 28 37 mbar G31 30 mbar G31 37 mbar G31 50 mbar G30 G31 30 mbar G30 G31 50 mbar 9 1 9 1 9 1 8 4 7 5 8 5 8 7 8 8 8 8 36 27 36 36 28 27 36 16 6 13 4 13 2 16 4 13 2 13 2 AT BG CH CZ DK EE ES FI GB GR HR IE IT LT LV NO PT RO SE SI SK TR DE LU PL RO BE FR DE NL BE CH CY CZ ES FR GB GR IE IT LT PT SI SK TR FI NL RO BE CH CZ ES FR GB GR HR IE IT LT NL PL PT S...

Страница 3: ...n dann zum Einsatz kommen wenn der Ofen auf die Nutzung mit LPG liquid petroleum gas umgestellt wurde siehe Typenschild unter PROPAN Diese Anleitung deckt folgende Modelle ab Viva 100 L Gas ohne Seitenglas Viva 100 LG Gas mit Seitenglas Viva 100 L Classic Gas ohne Seitenglas Viva 100 LG Classic Gas mit Seitenglas Viva 120 L Gas ohne Seitenglas Viva 120 LG Gas mit Seitenglas Viva 120 L Classic Gas ...

Страница 4: ...HORIZONTALER WANDABSCHLUSS VOM TYP C11 28 VERTIKAL DACHABSCHLUSS VOM TYP C31 29 EINBAU VON SEKUNDÄRBRENNERN 30 Anordnung von Glut und Scheiten 31 HOCHFAHREN BATTERIEN 36 EINSTELLUNG DES ELEKTRONISCHEN CODES 38 INBETRIEBNAHME 39 ERSTANZÜNDUNG 41 BEDIENUNGSANLEITUNG FERNBEDIENUNG 42 VERWENDUNG DES OFENS OHNE FERNBEDIENUNG 48 SERVICE SERVICE 50 REINIGUNG 51 ZUBEHÖR 52 MYFIRE WLAN BOX 53 ERSATZTEILVER...

Страница 5: ...einer Wohnung Wert auf Design und hohe Qualität legt Damit Sie in den vollen Genuss Ihres neuen Ofens kommen sollten Sie die Anleitung vor der Aufstellung und Inbetriebnahme sorgfältig lesen Bei Inanspruchnahme der Garantie und bei allen anderen Anfragen zum Ofen sollten Sie die Produktionsnummer des Ofens zur Hand haben Wir empfehlen Ihnen daher die Nummer in das nachstehende Feld einzutragen Sie...

Страница 6: ...hnungsgeräusche Batterien Die Garantie entfällt bei Schäden aufgrund einer Überhitzung Schäden aufgrund äußerer Einwirkungen und Verwendung nicht geeigneter Brennstoffe mangelnder Einhaltung der gesetzlichen oder empfohlenen Installations vorschriften sowie bei eigenen Änderungen des Ofens mangelndem Service und unzureichender Pflege Im Schadensfall wenden Sie sich bitte an Ihren Händler Bei Garan...

Страница 7: ...rad G20 I2H I2E 78 3 78 3 78 3 CO Gehalt PPM G20 I2H I2E 31 31 31 NOx Emission G20 I2H I2E 23 23 23 Intertek Testing Certification Ltd Eingetragener Firmensitz Academy Place 1to 9 Brook Street Brentwood Essex CM14 5NQ Großbritannien Registernr 3272281 England Umsatzsteuer ID Nr GB 672 7639 96 011 Tel 44 1277 223 400 Fax 44 1277 223 127 Abstände Abmessungen Siehe Maßzeichnungen am Ende der Anleitun...

Страница 8: ...d benötigt wenn der Ofen gewartet werden soll Es ist sicherzustellen dass der Abschluss des Schornsteins nicht verstopft und frei von Vegetation in Form von Bäumen Büschen etc ist Es dürfen auch keine Gegenstände oder Schutzabsperrungen am Schornsteinabschluss aufgestellt werden Das Türglas ist vor der Zündung des Ofens immer zu reinigen und Fingerabdrücke sind zu entfernen weil diese sich in das ...

Страница 9: ...ersorgung Wenn es nach Gas riecht ist die Gaszufuhr unmittelbar zu unterbrechen Das Zimmer durch Öffnen von Fenstern und Türen lüften und keine elek trischen Geräte in der Nähe des Ofens verwenden Einen offiziell zuge lassenen Heizungs Wasser Sanitär oder Gasinstallateur hinzurufen ...

Страница 10: ...ngen unter denen der Ofen installiert werden soll übereinstimmen Es ist sicherzustellen dass die Gasversorgung die erforderliche Gasmenge und den notwendigen Druck gemäß Typenschild liefern kann Gasanschluss Das Rohr des Gasschlauchs hat einen Außendurchmesser von 8 mm Belüftung Dieser Ofen hat eine geschlossene Verbrennungskammer und ist für einen ausgewogenen Abzug vorgesehen Daher wird keine zu...

Страница 11: ...ennbare Gegenstände z B Möbel mindestens die im nachfolgenden Abschnitt aufgeführten Abstände einhalten Brandge fahr Bei der Wahl des Ofenstandortes sollte an die Wärmeverteilung zu den anderen Räumen gedacht werden Auf diese Weise kann der Ofen optimal genutzt werden Bei der Anlieferung ist der Ofen auf Defekte zu untersuchen Änderung des Schornsteinanschlusses Der Ofen mit fertigem Abzug auf der...

Страница 12: ...am innersten Flansch unten am Ofen lösen Den Flansch abneh men 4 Die äußerste Abdeckplatte hinten am Ofen abschrauben und auf die Oberseite des Ofens verlegen 5 Zum Öffnen der Verschlüs se wird ein Gabelschlüssel der Größe 10 mm zum Drehen der beiden Haken oben und unten an der Tür verwendet 6 Die Sekundärbrenner können senkrecht angehoben und herausgenommen wer den ...

Страница 13: ...tücke entfernt 9 Danach kann die Rück seite abgenommen und die innere Abdeckplatte ausge baut werden 7 Falls keramische Scheite vorhanden sind müssen diese entfernt werden 10 Die innere Abdeckplat te wird dann gemäß Ab bildung auf der Unterseite der oberen Abdeckung angebracht 11 Die Stutzen dort mon tieren wo die Abdeckplat ten angebracht waren und dann Rückseite Scheite und Brenner wieder anbrin...

Страница 14: ... auch auf Gasflaschen LPG umgestellt werden Die Umstellung darf nur von einem offiziell zugelassenen Gasinstallateur vorgenommen werden Umbausatz Die Artikelnummer 3713595 ist zu verwenden Dieser Satz beinhaltet 4 neue Düsen für Propan LPG Gas Die Düsen der LPG Sekundär brenner tragen die Bezeichnung 100 Die Düsen der Erdgas Sekundär brenner tragen die Bezeichnung 260 ...

Страница 15: ...anleitung für VIVA L GAS Die Düse der LPG Pilotflamme trägt die Bezeichnung 27 Die Düse der Erdgas Pilotflamme trägt die Bezeichnung 32 Die Düse des LPG Hauptbrenners trägt die Bezeichnung 80 Die Düse des Erdgas Hauptbrenners trägt die Bezeichnung 120 ...

Страница 16: ...eitung für VIVA L GAS Die Gaseinheit muss abgenommen werden damit man Zugang zu den Düsen erhält Dabei ist wie folgt vorzugehen Die Lochplatte anheben und aus dem Ofen nehmen Die vier Schrauben lösen mit denen die Gaseinheit befestigt ist ...

Страница 17: ...szuziehen Die Gegenmutter lösen und anschließend die Düse abschrauben Die LPG Düse wird eingebaut und die Ge genmutter angezogen Abschließend wird der Umläufer wieder festgezogen Nach dem Ausbau der Gaseinheit sind die vier Düsen auszutauschen und die drei Lufteingänge zu justieren Danach kann die Gaseinheit vorsichtig herausgenommen werden indem sie leicht gekippt und gedreht wird ...

Страница 18: ... hen Anschließend kann die Düse abge schraubt werden Die LPG Düse wird ein gebaut und die Gegenmutter angezogen Abschließend wird der Umläufer wieder festgezogen Wenn die Düse der Pilotflamme ausge tauscht werden soll ist der Umläufer zu lö sen und das Rohr herauszuziehen Hinweis Die kleine Pilotflammendüse sollte heraus fallen und kann dann durch eine LPG Düse ersetzt werden ...

Страница 19: ...wa 90 gedreht werden Auf diese Weise sind beide Öffnungen im senk rechten Rohr offen klein auf der Rückseite und groß auf der Vorderseite Kleine Öffnung auf der Rückseite Große Öffnung auf der Vorderseite Die Luftzufuhr des Hauptbrenners wird auf LPG Konfiguration umgestellt indem man die beiden Muttern löst und die Platte ganz nach innen zum Brenner hin verschiebt Öff nung ganz offen ...

Страница 20: ...IVA L GAS Die Lufteingänge sind bei der Umstellung auf LPG also umzudrehen Die Gaseinheit wird mit den vier Schrauben wieder befestigt Die Lochplatte wird wieder eingebaut und der Ofen fertig montiert Siehe auch Abschnitt Einbau der Sekundär brenner ...

Страница 21: ...n oder den örtlichen Baubehörden aufneh men Es ist sicherzustellen dass brennbare Gegenstände z B Möbel mindestens die in der nachstehenden Tabelle aufgeführten Abstände einhalten Brandgefahr Normalaufstellung rechtwinklig Ohne Seitenglas Viva 100 L Gas Viva 120 L Gas Viva 160 L Gas Unisoliertes Rauchrohr A Möbelabstand min 700 mm Abstand zu brennbaren Materialien min D nach hinten Wand 50 mm E se...

Страница 22: ...itung für VIVA L GAS Normalaufstellung rechtwinklig Mit Seitenglas Viva 100 L G Gas Viva 120 L G Gas Viva 160 L G Gas Unisoliertes Rauchrohr A Möbelabstand min 700 mm Abstand zu brennbaren Materialien min D nach hinten Wand 50 mm E seitlich zur Wand 300 mm Norwegische Brandmauer D nach hinten Wand 50 mm E seitlich zur Wand 300 mm O Seitliche Ausdehnung der Brandmauer 425 mm P Ausdehnung der Brandm...

Страница 23: ...5 Deutsch RAIS attika Bedienungsanleitung für VIVA L GAS Eckaufstellung 45 Ohne Seitenglas Viva 100 L Gas Viva 120 L Gas Viva 160 L Gas Unisoliertes Rauchrohr A Möbelabstand min 700 mm Abstand zu brennbaren Materialien min D nach hinten Wand 50 mm ...

Страница 24: ... Deutsch RAIS attika Bedienungsanleitung für VIVA L GAS Eckaufstellung 45 Mit Seitenglas Viva 100 L G Gas Viva 120 L G Gas Viva 160 L G Gas Unisoliertes Rauchrohr A Möbelabstand min 700 mm Abstand zu brennbaren Materialien min D nach hinten Wand 150 mm ...

Страница 25: ...bei feuerfester Wand Aus Service und Installationsgründen wird ein Mindestabstand zu feuerfestem Material von 75 mm F empfohlen Bei einem rückwärtigen Abzug muss jedoch genügend Platz für einen Mess Stutzen zur Verbrennungskontrolle gelassen werden Normalaufstellung rechtwinklig Eckaufstellung 45 ...

Страница 26: ...hornstein der Marke On Top Metalotherm USD oder On Top Metalotherm US Weitere zugelassene Schornsteinhersteller sind Jeremias Muelink Grol und Pou joulat PGI Die Übergänge der Abzugsrohre müssen dicht und durch Sicherungsband gegen eine Trennung gesichert sein Am Abzug ist ein Mess Stutzen im selben Raum wie der Ofen anzubringen damit eine Verbrennungskontrolle möglich ist Das Abzug darf nicht in ...

Страница 27: ...ern 600 G Von einem senkrechten Fallrohr oder Abflussrohr 300 H Von einer Innen oder Außenecke 600 I Über der Erde auf Dach oder Balkonebene 300 J Von eine Oberfläche die zum Abschluss hin ausgerichtet ist 600 K Von einem Abschluss der zum Abschluss hin ausgerichtet ist 600 L Von einer Öffnung im Carport z B Tür Fenster in die Wohnung 1200 M Senkrecht von einem Abschluss in derselben Wand 1500 N H...

Страница 28: ...len Abzugsrohrs V 1 für Rohre der Größe Ø130 Ø200 2 X Länge des vertikalen Abzugsrohrs V für Rohre der Größe Ø100 Ø150 Höchstzulässige Länge H 15 m Mindestlänge des senkrechten Abzugsrohrs für Viva L 0 5 m Länge des senkrech ten Abzugsrohrs V in Metern Höchstlänge des waa gerechten Abzugsrohrs H in Metern Ø130 Ø200 Höchstlänge des waa gerechten Abzugsrohrs H in Metern Ø100 Ø150 0 5 1 1 1 3 2 1 5 5...

Страница 29: ...r den ganzen Schornstein verwendbar alter nativ Ø130 Ø200 Mit einem Adapter verwendbar Ø130 Ø200 hinter dem Adapter Abzugsabschluss Ø130 Ø200 Artikelnr USDVC 130 Ø100 Ø150 Artikelnr USDVC 100 Mindestlänge des senkrechten Abzugsrohrs 0 5 m Rauchgasbegrenzer auf Ø100 Ø150 Vertikalhöhe 1 m keine Begrenzer Vertikalhöhe 1 2 m Begrenzer Ø62 mm Vertikalhöhe 2 m Begrenzer Ø76 mm ...

Страница 30: ...n den Rohren angebracht die durch die Öffnungen der Platte ragen Dabei ist zu beacht en dass es einen rechten und einem linken Bren ner gibt Daher ist es wichtig die Anbringung gemäß Abbildung vorzunehmen also zur Seite mit den zusätzlichen Öffnungen nach außen Vorderseite mit Löchern Rückseite ohne Löcher ...

Страница 31: ...tflamme und ihr Thermofühler nicht be deckt werden Glutmaterial darf auch nicht unter den Pilotschutz gera ten Der andere Thermofühler muss ebenfalls frei von den keramischen Scheiten sein Bei Inbetriebnahme oder Service des Ofens ist sicherzustellen dass die Kreuzzündung vom Pilot zum Hauptbrenner funktioniert und die Sekun därbrenner nicht gezündet werden Pilotflamme 2 Thermofühler ...

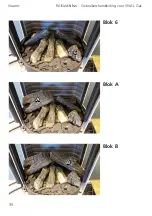
Страница 32: ...32 Deutsch RAIS attika Bedienungsanleitung für VIVA L GAS Keramische Scheite Scheit 1 Scheit 2 Scheit 3 Scheit 4 Scheit 5 Scheit 6 Scheit A Scheit B ...

Страница 33: ...ilotbereich darf sich keine Glut befinden Die 8 Scheite gemäß Abbildung anordnen Es ist zu beachten dass die beiden speziel len Scheite A und B auf der Unterseite eine Vertiefung haben die genau über die beiden Sekundärbrenner passen Die Glühdrähte werden zur Betonung des Gluteffektes zwischen den Scheiten verlegt Scheit 2 darf das Ther mofühler nicht berüh ren Scheit 2 ...

Страница 34: ...34 4 3 5 Deutsch RAIS attika Bedienungsanleitung für VIVA L GAS Scheit 3 Scheit 4 Scheit 5 ...

Страница 35: ...35 6 A B Deutsch RAIS attika Bedienungsanleitung für VIVA L GAS Scheit 6 Scheit A Scheit B ...

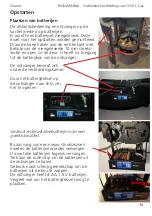
Страница 36: ...fänger benötigt 4 Batterien vom Typ AA 1 5 V Nicht vergessen den Fachdeckel wieder anzubringen Hochfahren Einlegen der Batterien Der Empfänger des Ofens und die Fernbedienung benötigen Batterien Zum Lieferumfang gehört ein Satz Batterien die vor der Inbetriebnahme einzulegen sind Das Batte riefach des Empfängers ist erreichbar nachdem die Tür durch Drehen der beiden Haken auf der rech ten Seite mi...

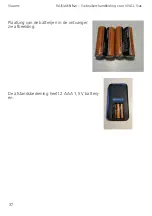
Страница 37: ...37 Deutsch RAIS attika Bedienungsanleitung für VIVA L GAS Die Batterien im Empfänger sind gemäß Abbildung anzuordnen Die Fernbedienung benötigt 2 Batterien vom Typ AAA 1 5 V ...

Страница 38: ...usgewählt wird Ofen und Fernbedienung werden wie folgt synchronisiert Die Reset Taste gedrückt halten bis ein kurzer und dann ein langer Piepton zu hören ist Die Taste freigeben Innerhalb von 20 Sekunde ist die Taste Pfeil Abwärts auf der Fernbedienung zu betätigen Die Taste gedrückt halten bis zwei kurze Pieptöne vom Empfänger zu hören sind Auf der Fernbedienung er scheint das Wort conn Empfänger...

Страница 39: ... 2 Den Inlet pressure tap am Gasventil öffnen und ein Manometer anschlie ßen 3 Überprüfen ob der gemessene Druck mit dem vorgeschriebenen Druck der Gasversorgungsgesellschaft übereinstimmt 4 Die Überprüfung vornehmen wenn der Ofen inklusive der Sekundärbren ner seine volle Leistung bringt und wenn lediglich die Pilotflamme brennt 5 Bei niedrigem Druck ist zu überprüfen ob die Gasversorgungsrohre d...

Страница 40: ...40 Deutsch RAIS attika Bedienungsanleitung für VIVA L GAS ...

Страница 41: ...ann ein eigentümlicher Geruch und eine gewisse Rauchentwicklung auf der Oberfläche des Ofens entstehen Das liegt an der Härtung von Lackierung und Material aber der Geruch verschwindet schnell wieder Eine gute Belüftung ist sicherzustellen möglichst Durchzug Kinder und Haustiere sollten in dieser Phase Abstand vom Ofen halten Im Verlauf dieses Prozesses ist darauf zu achten dass die sichtbaren Flä...

Страница 42: ... wenn das Funktionssymbol erscheint Folgende Funktionen können deaktiviert aktiviert werden KINDERSICHERUNG PROGRAMMIERBETRIEB THERMOSTATBETRIEB gleichzeitige Deaktivie rung von PROGRAMMIERBETRIEB SPARBETRIEB LICHT DÄMPFER BETRIEB RAUMVENTILATOR BETRIEB HILFSFUNKTION COUNTDOWN UHR Deaktivierung der Funktionen 1 Einsetzen der Batterien Alle Symbole sind zu sehen und blinken 2 Während die Symbole bl...

Страница 43: ...etätigung der Taste oder wird die Minute ausge wählt 7 Die Bestätigung erfolgt durch gleichzeitige Betätigung der Tasten und Bei gleichzeitiger Betätigung der Tasten und wird zwischen C und F umge schaltet HINWEIS Bei der Wahl von F wird die Uhr auf 12 Stun den umgestellt Bei der Wahl von C wird die Uhr auf 24 Stunden umgestellt ON Die Aktivierung erfolgt durch gleichzeitige Betätigung der Tasten ...

Страница 44: ...und eine Reihe blinkender Striche bestätigt dass die Startsequenz ange laufen ist Danach die Tasten wieder freigeben Die Hauptgasversorgung läuft an sobald die Pilotzün dung bestätigt wurde Das Handgerät schaltet automatisch auf manuel len Betrieb um sobald der Hauptbrenner gezündet wurde HINWEIS Die Taste zur Umschaltung von 2 auf 1 Tasten zündung unmittelbar nach dem Einlegen der Batteri en 10 S...

Страница 45: ... Temperatur verglichen Die Flammen höhe wird auf diese Weise automatisch zur Erreichung der eingestellten Temperatur angepasst Programmierbetrieb PROGRAMM 1 und 2 kön nen beide so programmiert werden dass sie bei einer bestimmten Temperatur zu bestimmten Zeitpunkten ein oder ausgeschaltet werden Sparbetrieb Die Flammenhöhe schwankt zwischen hoch und niedrig Wenn die Zimmertempera tur unter der ein...

Страница 46: ...rscheint ALL wird kurz angezeigt und HOUR blinkt 8 Durch die Betätigung der Taste oder wird die Stunde ausgewählt 9 Die Bestätigung erfolgt mit der Taste 1 ON erscheint ALL wird kurz angezeigt und Minutes blinkt 10 Durch die Betätigung der Taste oder wird die Minute ausgewählt 11 Die Bestätigung erfolgt mit der Taste EINSTELLUNG DER ZEIT ZUR ABSCHALTUNG PROGRAMM 1 12 1 OFF erscheint ALL wird kurz ...

Страница 47: ...n für einen einzelnen Wochentag oder für alle Tage der Woche eingestellt werden Warten bis die Einstellung abgeschlossen ist HILFSBETRIEB Nach der Zündung brennt Brenner 1 während Bren ner 2 sich in der letzten Einstellung befindet ON Der Brenner wird mit der Taste gezündet OFF Der Brenner wird mit der Taste abgeschaltet Hinweis Das schließende Magnetventil funktioniert manuell nicht Wenn die Batt...

Страница 48: ...sich hinter der Tür und unter der Brennkammer Das Gasventil im Uhrzeigersinn nach unten auf OFF stellen Den Schalter für die Manuelle Steuerung auf man drehen Durch Drücken wird Gas für die Pilotflamme gezündet wenn das Pilotgasventil mit einem spitzen Gegenstand eingedrückt wird Die Pilotflamme mit einem Zündholz oder dergleichen anzünden Das Pilotgasventil ist etwa 20 Sekunden nach der Zündung d...

Страница 49: ...l im Gegenuhrzeigersinn auf 2 ON eingestellt werden Das Gasventil sollte min 30 Sekunden vollständig geöffnet sein bevor die Flammen eventuell heruntergedreht werden Sobald die richtige Einstellung erreicht ist kann die Tür geschlossen werden Der Ofen wird abgeschaltet indem die Tür geöffnet und das Gasventil zurück auf 3 OFF gestellt wird Wenn die Pilotflamme weiter brennt ist die Gasversorgung a...

Страница 50: ...it dem Staubsauger reinigen 6 Den Pilotbrenner mit einer weichen Bürste und einem Staubsauger reinigen Die Thermofühler dürfen nicht verbogen oder ausgerichtet werden 7 Die Gasversorgung einschalten und auf Undichtigkeiten achten Überprüfen ob sich Brenner und Piloteinheit in einem guten Zustand befinden und funktionieren 8 Die Lochplatte wieder einsetzen 9 Die Glut und die keramischen Scheite wie...

Страница 51: ...ichtig mit einer weichen Bürste und einem Staubsau ger gereinigt werden Nur beschädigte Teile durch Originalbauteile von Rais ersetzen Nicht mehr verwendbare Keramik ist in Plastiktüten zu verpacken und bei den entspre chenden Abfallstationen zu entsorgen Es empfiehlt sich einen Staubsauger mit einem HEPA Filtersystem zu verwenden Die Glut wieder einsetzen und die Tür schließen Sicherstellen dass ...

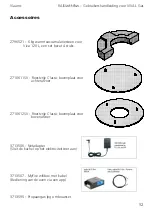
Страница 52: ...ck ein Satz 2710611SV Classic Deckplatte aus Edelstahl für den rückwärtigen Abzug 2710612SV Classic Deckplatte aus Edelstahl für den oberen Abzug 3713506 Mains Adapter Der Ofen ist an das Stromnetz anzus chließen 3713507 MyFire Wi Fi Box incl cable Steuerung des Ofens über eine App 3713595 Propane Gas LP Conversion kit ...

Страница 53: ...et Dazu wird die Ofentür geöffnet und der kleine Stecker der WLAN Leitung mit dem Eingang SI verbunden Der breite Stecker der WLAN Lei tung wird mit der WLAN Box ver bunden Beim Anschluss der WLAN Box wird der Mains Adapter Anschluss an das Stromnetz für die Verbindung mit dem Empfänger verwendet Der Mains Adapter wird an den Empfänger des Ofens angeschlos sen Die Batterien sind aus dem Empfänger ...

Страница 54: ...k setzt voraus dass ein Heimnetzwerk zur Verfügung steht dass Name und Zugangscode für das Heim netzwerk korrekt sind dass der SSID Schlüssel des WLAN Routers nicht verborgen ist dass das Signal des Heimnetzwerkes innerhalb der Reichweite liegt dass der WLAN Router mit dem UDP Protokoll User Datagram Protocol arbeitet DIE EINSTELLUNGEN DER FEUERSTELLE BESTÄTIGEN 1 Nach der Bestätigung der Einstell...

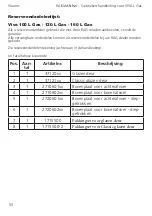
Страница 55: ...auft werden Siehe Ersatzteilverzeichnis am Ende der Anleitung xx beliebiger Farbcode Pos Anzahl Artikelnr Beschreibung 1 1 37120xx Glastür 2 1 37121xx Glastür Classic 3 1 2710601xx Deckplatte für rückwärtigen Abzug 4 1 2710602xx Deckplatte für Abzug auf der Oberseite 5 1 2720601xx Deckplatte für rückwärtigen Abzug tiefge zogen 6 1 2720602xx Deckplatte für Abzug auf der Oberseite tiefgezogen 7 1 17...

Страница 56: ...0xx Glastür 2 1 37121xx Glastür Classic 3 1 2710601xx Deckplatte für rückwärtigen Abzug 4 1 2710602xx Deckplatte für Abzug auf der Oberseite 5 1 2720601xx Deckplatte für rückwärtigen Abzug tiefge zogen 6 1 2720602xx Deckplatte für Abzug auf der Oberseite tiefgezogen 7 1 1715500 Dichtungssatz für die Glastür 8 1 1715500 2 Dichtungssatz für die Classic Glastür 9 1 1715500 4 Dichtungssatz für das Sei...

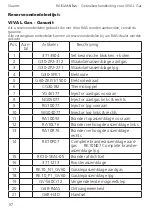
Страница 57: ...ner Top Assembly Front 12 RA10L76 Burner Raised Assembly Left 13 RA10R76 Burner Raised Assembly Right 14 RK10P07 Complete Burner Assembly Natural RK10N07 Complete Burner Assembly LPG 15 RK10 SEAL 05 Burner Seal Set 16 3711213 Grate Assembly 17 RK10_N1_GV60 Gas Valve Assembly Natural 18 RK10_P1_GV60 Gas Valve Assembly LPG 19 GV S60C 12 Latching Solenoid 20 G6R R4AS Receiver unit 21 G6R H4D Handset ...

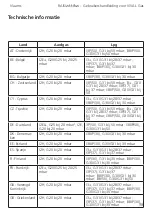
Страница 58: ...37 mbar I3P 37 G31 at 37 mbar I3B P 50 G30 G31at 50 DE Deutsch land I2ELL G25 at 20 mbar I2E G20 at 20 mbarI 3P 50 G31 at 50 mbar I3B P 50 G30 G31 at 50 DK Dänemark I2H G20 at 20 mbar I3B P 30 G30 G31 at 30 mbar EE Estland I2H G20 at 20 mbar I3B P 30 G30 G31 at 30 mbar ES Spanien I2H G20 at 20 mbar I3 G31 G31 at 28 37 mbar I3P 37 G31 at 37 mbar FI Finnland I2H G20 at 20 mbar I3P 30 G31 at 30 mbar ...

Страница 59: ...lta I3B P 30 G30 G31 at 30 mbar NL Nieder lande I2L G25 at 25 mbar I2EK G25 3 at 25 mbar I3P 50 G31 at 50 mbar I3P 30 G31 at 30 mbar I3P 37 G31 at 37 mbar I3B P 30 G30 G31 at 30 mbar NO Norwe gen I2H G20 at 20 mbar I3B P 30 G30 G31 at 30 mbar PL Polen I2E G20 at 20 mbar I3P 37 G31 at 37 mbar PT Portugal I2H G20 at 20 mbar I3 G31 G31 at 28 37 mbar I3P 37 G31 at 37 mbar RO Rumänien I2E G20 at 20 mba...

Страница 60: ...7 6 7 7 6 8 Consumption m hr 0 84 0 840 0 905 0 89 0 8 Burner Pressure hot mbar 13 2 13 2 16 4 16 6 13 4 Injector Marking 120 Centre 260 Left 260 Right Pilot G30 ZP2 312 31 2 in Efficiency Class 2 Nox Class 5 Type C11 C31 Gas type City gas G150 1 Supply Pressure mbar 8 Nominal Heat Input Gross Hs kW 9 4 Nominal Heat Input Nett Hi kW 8 4 Consumption m hr 1 5 Burner Pressure hot mbar 3 5 Injector Ma...

Страница 61: ...on m hr 0 225 0 225 0 29 0 29 0 29 0 253 Burner Pressure hot mbar 27 27 36 36 36 28 Injector Marking 80 Centre 100 Left 100 Right Pilot G30 ZP2 271 27 1 in Efficiency Class 2 Nox Class 5 Type C11 C31 Dieser Ofen wurde in Bezug auf die Verwendung mit Erdgas City gas LPG und Biopropangas getestet und offiziell zugelassen Biopropangas kann dann zum Einsatz kommen wenn der Ofen auf die Nutzung mit LPG...

Страница 62: ...62 V 20 0 5m 20 0 5m Deutsch RAIS attika Bedienungsanleitung für VIVA L GAS BEISPIELE FÜR SCHORNSTEINLÖSUNGEN Vertikaler Dachabschluss Abstand V 500 mm 12 m min max ...

Страница 63: ...3 V H 7 4 17 F 17 17 1 2 3 6 5 Deutsch RAIS attika Bedienungsanleitung für VIVA L GAS Vertikaler Dachabschluss PT 3 von 3 PT 1 von 3 PT 2 von 3 Vorhandener Schornstein Flexible Rauchkanalverlegung Ø100 AISA 316Ti ...

Страница 64: ...edienungsanleitung für VIVA L GAS Vertikaler Schrägdachabschluss Abstand H 0 3 m min max Abstand V1 500 mm 10 m min max Abstand V2 200 mm 10 m min max Abstand V3 500 mm 10 m min max Abstand V V1 V2 V3 1 2 m 12 m min max Abstand V 2 X H min ...

Страница 65: ...h RAIS attika Bedienungsanleitung für VIVA L GAS Vertikaler Dachabschluss mit Knick Abstand H 0 3 m min max Abstand V1 500 mm 10 m min max Abstand V2 500mm 10 m min max Abstand V V1 V2 1 m 12 m min max Abstand V 2 X H min ...

Страница 66: ...für VIVA L GAS Vorhandener Schornstein Renovierungspaket PT 3 von 3 PT 1 von 3 PT 2 von 3 Vorhandener Schornstein Flexible Rauchkanalverlegung Ø100 AISA 316Ti Abstand V 1 m 12 m min max Vorhandener Schornstein der Rauchka nal ist von einem qualifizierten Techniker zu warten ...

Страница 67: ...rnstein Flexible Rauchkanalver legung Ø100 AISA 316Ti PT 3 von 3 PT 1 von 3 PT 2 von 3 Abstand H 0 3 m min max Abstand V1 500 mm 10 m min max Abstand V2 200 mm 10 m min max Abstand V3 500 mm 10 m min max Abstand V V1 V2 V3 1 2 m 12 m min max Abstand V 2 X H min Vorhandener Schornstein mit Knick Renovierungspaket ...

Страница 68: ...68 Vertikaler Dachabschluss mit Hinterausgang Weitere Informationen finden Sie im Abschnitt Anordnung der Schorn steinabschlüsse Deutsch RAIS attika Bedienungsanleitung für VIVA L GAS ...

Страница 69: ...69 Deutsch RAIS attika Bedienungsanleitung für VIVA L GAS Horizontales Wandterminal Weitere Informationen finden Sie im Abschnitt Position der Schornstein anschlüsse ...

Страница 70: ...Snorkel Snorkel Horizontales Wandterminal Weitere Informationen finden Sie im Abschnitt Position der Schornstein anschlüsse Obenausgang Hinterausgang Deutsch RAIS attika Bedienungsanleitung für VIVA L GAS ...

Страница 71: ...A L GAS Schornsteinbauteile 1 US 25 100 Ø100 US 25 130 Ø130 Länge 250 mm 2 US 50 100 Ø100 US 50 130 Ø130 Länge 500 mm 3 US 100 100 Ø100 US 100 130 Ø130 Länge 1000 mm 4 USKB 100 Ø100 USKB 130 Ø130 Sicherungsband 5 USAB 100 Ø100 USAB 130 Ø130 Schutzband ...

Страница 72: ...A L GAS 6 USPP 100 Ø100 USPP 130 Ø130 Verstellbare Länge 7 USDV2 100 Ø100 Vertikaler Abschluss USKB 8 USDHCE 10 Horizontalabschluss Exzentrischer Aus gang 9 USEB 100 Ø100 USEB 130 Ø130 Montageband 10 USMB 100 Ø100 USMB 130 Ø130 Verstellbares Wand band ...

Страница 73: ...SB 90 130 Ø130 90 Rohrknie 14 USSR 100 Ø100 USSR 130 Ø130 Eindeckung 12 USB 45 100 Ø100 USB 45 130 Ø130 45 Rohrknie 15 USDPAL 100 Ø100 USDPAL 130 Ø130 Flachdacheindeckung Aluminium 13 USB 15 100 Ø100 USB 15 130 Ø130 15 Rohrknie 16 USDP 100 Ø100 USDP 130 Ø130 Flachdacheinde ckung ...

Страница 74: ...SCP 130 Ø130 Verstellbare Einde ckung Lieferung paarweise 18 USDH 100 Ø100 USDH 130 Ø130 Schräge Eindeckung 5 30 21 USMPG 100 Ø100 USMPG 130 Ø130 Wandabdeckung 19 USLS 100 Ø100 USLS 130 Ø130 Schräge Eindeckung 20 45 22 ADAPTOR UNIVERSAL SYSTEM ADAPTOR USA Ø 100 130 USA D 99 129 ...

Страница 75: ...75 Deutsch RAIS attika Bedienungsanleitung für VIVA L GAS D O P ...

Страница 76: ...1 POSITIV V I VA L G A S GB ...

Страница 77: ...he following models Viva 100 L Gas without side glass Viva 100 LG Gas with side glass Viva 100 L Classic Gas without side glass Viva 100 LG Classic Gas with side glass Viva 120 L Gas without side glass Viva 120 LG Gas with side glass Viva 120 L Classic Gas without side glass Viva 120 LG Classic Gas with side glass Viva 160 L Gas without side glass Viva 160 LG Gas with side glass Viva 160 L Classic...

Страница 78: ...SPACING FOR NON FLAMMABLE WALL 25 CHIMNEY VENT 26 LOCATION OF CHIMNEY TERMINALS 27 HORIZONTAL WALL TERMINAL TYPE C11 28 VERTICAL ROOF TERMINAL C31 29 ASSEMBLY OF SECONDARY BURNER 30 Arrangement of Embers and Logs 31 START UP BATTERIES 36 SETTING UP THE ELECTRONIC CODE 38 COMMISSIONING 39 INITIAL IGNITION 41 USER INSTRUCTIONS REMOTE CONTROL 42 USING STOVE WITHOUT REMOTE CONTROL 48 SERVICE SERVICE 5...

Страница 79: ...efit from your new stove it is important that you read the manual thoroughly before it is installed and put to use For the purpose of the guarantee and all contact regarding the stove in general it is important that you can state the stove s production number We therefore recommend that you write down the number in the form below The production number can be found at the bottom of the stove Instal...

Страница 80: ...event of damage due to overfiring damage due to external influences and the use of unsuitable fuels failure to comply with statutory or recommended installation instructions and in the event the user s own modifications of the stove lack of servicing and care the stove must be serviced annually In the event of damage please contact your dealer In the event of claims under the guarantee we will dec...

Страница 81: ...ox 130 Efficiency G20 I2H I2E 78 3 78 3 78 3 CO content PPM G20 I2H I2E 31 31 31 NOx emissions G20 I2H I2E 23 23 23 Intertek Testing Certification Ltd Registered office Academy Place 1 to 9 Brook Street Brentwood Essex CM14 5NQ United Kingdom Registered No 3272281 England VAT No GB 672 7639 96 011 T 44 1277 223 400 F 44 1277 223 127 Distances template See scale drawings at back of the manual I Dis...

Страница 82: ...hould be left with the customer who should keep this for later use The manual is necessary when the stove is to be serviced Ensure that the chimney terminal is not blocked in any way and is free of vegetation in the form of trees bushes etc and that objects are not resting against the chimney s terminal or the protection around the terminal The door glass should always be cleaned before the stove ...

Страница 83: ...errupted immediately Turn off the stove at the isolation tap and the gas meter Ventilate the room by opening windows and doors do not use electrical appliances in the vicinity of the stove Or operate any electrical switches The gas supply must not be switch on until a Gas Safe Registered engi neer has checked the system and deem it as being safe ...

Страница 84: ...a plate It is advisable to wear gloves when installing and servicing the stove Gas connection The inlet supply pipe has an external diameter of Ø8mm An isolation tap must be fitted Ventilation This stove has a sealed combustion chamber and is intended for a bal anced draught There is therefore no need for an extra air supply It is recommended that sufficient fresh air is supplied to the room to ma...

Страница 85: ... are not po sitioned closer than the distances stated in the following sections with regard to installation risk of fire When you choose where you wish to position your stove you should consider the heat distribution to the other rooms Then you will get the maximum possible pleasure from your stove Inspect the stove for defects upon receipt Changes to chimney connection The stove is supplied ready...

Страница 86: ...ews on the inner flange on the bottom surface of the stove And remove it 4 Unscrew the outer cover plate at the rear of the stove and move it to the upper sur face of the stove 5 To open the door a 10mm open ended spanner is re quired to turn the two catches at the top and bottom of the door 6 The secondary burners are removed by lifting them verti cally up and out ...

Страница 87: ... can then be removed 9 The back plate can now be removed and the inter nal cover plate dismounted 7 If the ceramic logs are fitted remove these 10 The internal cover plate is now fitted to the un derside of the top plate as shown It is vital that this plate fits and seals correctly 11 Fit the connecting piec es where the cover plates were and replace the back plate logs and burners ...

Страница 88: ... can be converted to bottled gas LPG The conversion must only be carried out by a Gas Safe Registered engineer Conversion kit Use article number 3713595 This set contains 4 new injectors suitable for propane LPG gas The injectors for the secondary burners for LPG are marked 100 The injectors for the second ary burners for natural gas are marked 260 ...

Страница 89: ...l for VIVA L Gas The injector for the pilot light for LPG is marked 27 The injector for the pilot light for natural gas is marked 32 The injector for the main burner for LPG is marked 80 The injector for the main burner for nat ural gas is marked 120 ...

Страница 90: ...er manual for VIVA L Gas The gas unit needs to be dismantled to gain access to the injectors Do this in the following manner Lift the perforated plate up and out of the stove Loosen the four screws holding the gas unit in place ...

Страница 91: ...fully pulling the pipe out Loosen the locknut and then unscrew the injector Fit the LPG injector and tighten the lock nut Finally re tighten the coupling Once the gas unit has been dismounted replace the four injectors and adjust the three air intakes Now the gas unit can be lifted out carefully by tilting and rotating the unit a little ...

Страница 92: ...ulling the pipe out and then unscrewing the injec tor Fit the LPG injector and tighten the lock nut Finally re tighten the coupling Replace the injector for the pilot light by loosening the coupling and carefully pull ing the pipe out Note The small pilot light injector should now fall out and can be replaced with the LPG injector ...

Страница 93: ... and rotating the air intake by 90 So that both holes in the vertical pipe are now open the small one at the rear and the large one at the front Small hole at the rear Large hole at the front The air intake to the main burner is adjust ed for LPG configuration by loosening the two nuts and pushing the plate all the way towards the burner The hole fully open ...

Страница 94: ...VA L Gas The air intakes need to be reversed therefore when the stove is config ured for LPG The gas unit is reassembled using the four screws Replace the perforated plate and fully assemble the stove See Section Assembly of secondary burn ers ...

Страница 95: ...ct or the local building authorities It must be ensured that flammable objects e g furniture are not positioned closer than the distances stated in the following tables risk of fire Normal installation at right angle Without side glass Viva 100 L Gas Viva 120 L Gas Viva 160 L Gas A Furniture distance min 700 mm Distance to flammable material min D rear wall 50 mm E to side to wall 250 mm Norwegian...

Страница 96: ...for VIVA L Gas Normal installation at right angle With side glass Viva 100 L G Gas Viva 120 L G Gas Viva 160 L G Gas A Furniture distance min 700 mm Distance to flammable material min D rear wall 50 mm E to side to wall 300 mm Norwegian Firewall D rear wall 50 mm E to side to wall 300 mm O Extent of firewall to the side 425 mm P Extent of firewall to front 400 mm ...

Страница 97: ...50 D 50 235 235 English RAIS attika User manual for VIVA L Gas Corner installation 45 Without side glass Viva 100 L Gas Viva 120 L Gas Viva 160 L Gas A Furniture distance min 700 mm Distance to flammable material min D rear wall 50 mm ...

Страница 98: ...D 150 E 235 235 English RAIS attika User manual for VIVA L Gas Corner installation 45 With side glass Viva 100 L G Gas Viva 120 L G Gas Viva 160 L G Gas A Furniture distance min 700 mm Distance to flammable material min D rear wall 150 mm ...

Страница 99: ...n flammable wall We recommend a minimum distance of 75mm F to non flammable material to allow service and installation Where the outlet is to the rear there should however be space for a measuring connection piece for combustion control Normal installation at right angle Corner installation 45 ...

Страница 100: ...ust be airtight and protected against separation by using locking bands or suitable rivets screws If possible a measuring connection piece should be installed on the flue in the same room as the stove so that a combustion check can be performed Where the terminal is accessible this is unnecessary Ensure the flue terminal position complies with Building Regulations Approved Docu ment J BS EN 5440 1...

Страница 101: ...port roof 600 G From a vertical drainpipe or earth pipe 300 H From an internal or external corner 600 I Overground roof or balcony level 300 J From a surface facing the terminal 600 K From a terminal facing the terminal 600 L From an opening in carport e g door window into the dwelling 1200 M Vertical from a terminal on same wall 1500 N Vertical from a terminal on same wall 300 P From a vertical c...

Страница 102: ...cal outlet pipe length V 1 for Ø130 Ø200 pipe 2 X Vertical outlet pipe length V for Ø100 Ø150 pipe Maximum permissible length H 15M Minimum vertical height of outlet pipe for Viva L 0 5m vertical length of out let pipe V in metres Maximum length of Horizontal outlet pipe H in metres Ø130 Ø200 Maximum length of Horizontal outlet pipe H in metres Ø100 Ø150 0 5 1 1 1 3 2 1 5 5 3 2 7 4 2 5 9 5 3 11 6 ...

Страница 103: ...ve Ø100 Ø150 Can be used for the entire chimney or Ø130 Ø200 Adapter can be used so that you can use Ø130 Ø200 after the adapter Outlet terminal Ø130 Ø200 Art no USDVC 130 Ø100 Ø150 Art no USDVC 100 Minimum vertical length of outlet pipe 0 5m Flue gas Limiter to Ø100 Ø150 Vertical height 1m No limiter Vertical height 1 2m Ø62mm limiter Vertical height 2m Ø76mm limiter ...

Страница 104: ...ers The burners are inserted above the pipes sticking through the perforated plate Note that there is a right burner and a left one so it is important that they are posi tioned as shown i e that the side with the extra holes faces the front Front with holes Rear without holes ...

Страница 105: ...flame and its thermosen sor are not covered over And that no glowing material finds its way down under the pilot plate guard The other thermosensor must also be kept free of the ceramic Embers When commissioning or servicing the stove it should be ensured that the cross ignition from the pilot to the main burner works and that the secondary burners are easily ignited 2nd thermosensor Pilotflame ...

Страница 106: ...32 English RAIS attika User manual for VIVA L Gas ceramic Logs Log 1 Log 2 Log 3 Log 4 Log 5 Log 6 Log A Log B ...

Страница 107: ...st be kept clear of Embers Be sure not to block the holes of the center burner Position the 8 logs as shown Note the two special logs marked A and B have a groove moulded on their undersides that fits on top of the two secondary burners The glow wires are positioned between the Embers on the center burner to empha sise the glow effect Log 2 must not touch the 2nd thermosensor Log 2 ...

Страница 108: ...34 4 3 5 English RAIS attika User manual for VIVA L Gas Log 3 Log 4 Log 5 ...

Страница 109: ...35 6 A B English RAIS attika User manual for VIVA L Gas Log 6 Log A Log B ...

Страница 110: ...ut of the box The receiver uses 4 x AA 1 5 V batteries Remember to replace the battery cover Start up Insertion of Batteries The receiver on the stove and the remote con trol use batteries A set of batteries to be inserted prior to start up is included To access the battery box on the receiver open the door by rotating the two catches at the right hand side by means of the 10mm open ended spanner ...

Страница 111: ...37 English RAIS attika User manual for VIVA L Gas The batteries in the receiver must face the directions shown in the illustration The remote control uses 2 x AA 1 5 V batteries ...

Страница 112: ...ble codes The stove and remote control are synchronised in the following manner Press and hold down the Reset button until you hear a short beep followed by a long beep Release the button Now you have 20 seconds to press the Down Arrow button on the remote control Hold down the button until you hear two short beeps from the receiver Now you can see the word conn on the remote control The receiver ...

Страница 113: ...ecessary 1 Close the gas valve Main Valve Knob 2 Open the Inlet pressure tap on the gas valve and connect a manome ter 3 Check that the pressure measured concurs with the prescribed pressure from the gas supply company 4 Carry out the test when the stove is at maximum heat output including the secondary burners and when the stove only has the pilot light ignited 5 If the pressure is low check that...

Страница 114: ...40 English RAIS attika User manual for VIVA L Gas ...

Страница 115: ... surface may occur during the initial ignition This is because the paintwork and ma terial need to harden but the smell will quickly disappear Ensure there is a lot of ventilation preferably a draught Children and pets should be kept at a safe distance from the stove during this process During this process you should be careful not to touch the visible sur faces glass very hot In addition while he...

Страница 116: ... same time Now the software version is displayed Model number of the handset Press on the and buttons at the same time Now the model number of the handset is dis played NOTE When you press on a deactivated button nothing happens and two horizontal lines are dis played NOTE Deactivation remains in effect after replace ment of batteries Activation of functions 1 Install batteries All icons are displ...

Страница 117: ...Select minutes by pressing on the or button 7 This is confirmed by pressing the and buttons at the same time or waiting Change between C and F by pressing and holding the and buttons at the same time NOTE When F is selected a twelve hour clock is dis played When C is selected a twenty four hour clock is displayed ON Activation takes place by pressing the and buttons at the same time When is displa...

Страница 118: ... same time until you hear a short beep and a se ries of flashing lines confirm that the start sequence has commenced Then release the buttons The main gas supply starts as soon as pilot ignition is confirmed The handset automatically goes into Manual mode after ignition of the main burner NB Move from two button to one button ignition by pressing and holding down the button for 10 seconds immediat...

Страница 119: ...d and compared to the temperature set The flame height is then adjusted automatically to reach the temperature set Program mode PROGRAMS 1 and 2 can both be programmed to start or stop at specific times at a set temperature Eco mode The flame height fluctuates between high and low If the room temperature is lower than the temperature set the flame height remains at high for a longer period of time...

Страница 120: ...layed ALL is displayed briefly and HOUR flashes 13 Select hour by pressing on the or button 14 This is confirmed by pressing on the button 1 OFF is displayed ALL is displayed briefly and Min utes flashes 15 Select minutes by press ing on the or button 16 This is confirmed by pressing on the button NB Either continue to PROGRAM 2 and set oper ating time and time for shutting down or stop pro grammi...

Страница 121: ...or an individual weekday for several week days or for all days of the week Wait until set up is complete HELP MODE After ignition burner 1 is ignited and burner 2 is in the last setting ON A burner is ignited by pressing the button is displayed OFF A burner is turned off by pressing the button disappears NB The locking magnet valve cannot function manu ally If the battery in the receiver runs out ...

Страница 122: ...48 ...

Страница 123: ...49 ...

Страница 124: ...m cleaner The ther mosensors must not be bent or adjusted 7 Put on the gas supply and check for leaks Check that the burners and pilot unit are in good condition and work 8 Refit the perforated plate 9 Refit embers and ceramic logs 10 Check the flue gas system and chimney terminal and ensure it is not blocked 11 Turn on the stove and check the set pressure 12 Ensure the stove is safe to use 13 Che...

Страница 125: ...e ceramic parts carefully with a soft brush and a vacuum cleaner Only replace damaged parts with original Rais specified parts Pack scrap ceramics in plastic bags and deliver to the correct waste locations It is recommended using a vacuum cleaner with a HEPA filter system Replace embers and close the door Ensure the stove works correctly and is safe to use Servicing of the Burners See section Conv...

Страница 126: ...ne for Viva 120 L 4 in a set 2710611SV Stainless Classic Top plate for Rear outlet 2710612SV Stainless Classic Top plate for Top outlet 3713506 Mains Adapter Connecting the stove to a network 3713507 MyFire Wi Fi Box incl cable App based control of the stove 3713595 Propane Gas LP Conversion kit ...

Страница 127: ...ustion chamber by opening the stove door and inserting the narrow plug on the Wi Fi lead into the opening marked SI The wide plug on the Wi Fi lead is inserted into the Wi Fi box When connecting the Wi Fi box use the mains adapter connection to electricity mains which is con nected to the receiver The mains adapter is connected to the receiver on the stove batteries should be removed from the rece...

Страница 128: ...Wi Fi router home network you need to ensure That a home network is available That the name and access code of the home network are correct That the Wi Fi router s SSID key is not hidden That the home network s signal is within range That the Wi Fi router supports the UDP protocol User Datagram Protocol CONFIRM THE SETTINGS FOR THE FIREPLACE 1 Afterconfirmingthesettingsforfireplace touchthe Finish...

Страница 129: ...spare parts from your RAIS dealer See spare part drawings back of the manual xx optional colour code Pos Number Article no Description 1 1 37120xx Glass door 2 1 37121xx Classic Glass door 3 1 2710601xx Top plate for rear outlet 4 1 2710602xx Top plate for top outlet 5 1 2720601xx Top plate for rear outlet Embossed 6 1 2720602xx Top plate for top outlet Embossed 7 1 1715500 Gasket set for Glass do...

Страница 130: ...Description 1 1 37120xx Glass door 2 1 37121xx Classic Glass door 3 1 2710601xx Top plate for rear outlet 4 1 2710602xx Top plate for top outlet 5 1 2720601xx Top plate for rear outlet Embossed 6 1 2720602xx Top plate for top outlet Embossed 7 1 1715500 Gasket set for Glass door 8 1 1715500 2 Gasket set for Glass door Classic 9 1 1715500 4 Gasket set for side glass Glass 10 1 1715500 5 Gasket set ...

Страница 131: ...urner Top Assembly Front 12 RA10L76 Burner Raised Assembly Left 13 RA10R76 Burner Raised Assembly Right 14 RK10P07 Complete Burner Assembly Natural RK10N07 Complete Burner Assembly LPG 15 RK10 SEAL 05 Burner Seal Set 16 3711213 Grate Assembly 17 RK10_N1_GV60 Gas Valve Assembly Natural 18 RK10_P1_GV60 Gas Valve Assembly LPG 19 GV S60C 12 Latching Solenoid 20 G6R R4AS Receiver unit 21 G6R H4D Handse...

Страница 132: ...31 at 28 37 mbar I3P 37 G31 at 37 mbar I3B P 50 G30 G31at 50 DE Germany I2ELL G25 at 20 mbar I2E G20 at 20 mbarI 3P 50 G31 at 50 mbar I3B P 50 G30 G31 at 50 DK Denmark I2H G20 at 20 mbar I3B P 30 G30 G31 at 30 mbar EE Estonia I2H G20 at 20 mbar I3B P 30 G30 G31 at 30 mbar ES Spain I2H G20 at 20 mbar I3 G31 G31 at 28 37 mbar I3P 37 G31 at 37 mbar FI Finland I2H G20 at 20 mbar I3P 30 G31 at 30 mbar ...

Страница 133: ...I3B P 30 G30 G31 at 30 mbar NL The Neth erlands I2L G25 at 25 mbar I2EK G25 3 at 25 mbar I3P 50 G31 at 50 mbar I3P 30 G31 at 30 mbar I3P 37 G31 at 37 mbar I3B P 30 G30 G31 at 30 mbar NO Norway I2H G20 at 20 mbar I3B P 30 G30 G31 at 30 mbar PL Poland I2E G20 at 20 mbar I3P 37 G31 at 37 mbar PT Portugal I2H G20 at 20 mbar I3 G31 G31 at 28 37 mbar I3P 37 G31 at 37 mbar RO Romania I2E G20 at 20 mbar I...

Страница 134: ... 8 2 8 2 7 6 7 7 6 8 Consumption m hr 0 84 0 840 0 905 0 89 0 8 Burner Pressure hot mbar 13 2 13 2 16 4 16 6 13 4 Injector Marking 120 Centre 260 Left 260 Right Pilot G30 ZP2 312 31 2 inj Efficiency Class 2 Nox Class 5 Type C11 C31 Gas type City gas G150 1 Supply Pressure mbar 8 Nominal Heat Input Gross Hs kW 9 4 Nominal Heat Input Nett Hi kW 8 4 Consumption m hr 1 5 Burner Pressure hot mbar 3 5 I...

Страница 135: ...t Hi kW 7 4 7 4 7 4 7 4 6 5 Consumption m hr 0 225 0 225 0 29 0 29 0 29 0 253 Burner Pressure hot mbar 27 27 36 36 36 28 Injector Marking 80 Centre 100 Left 100 Right Pilot G30 ZP2 271 27 1 inj Efficiency Class 2 Nox Class 5 Type C11 C31 This stove has been tested and certified for use with natural gas City gas LPG and Biopropane Biopropane can be used if the stove is adjusted for use with LPG liq...

Страница 136: ...62 V 20 0 5m 20 0 5m English RAIS attika User manual for VIVA L Gas EXAMPLES OF CHIMNEY SOLUTIONS Vertical Roof Terminal Distance V 500mm 12m min Max ...

Страница 137: ...IS attika User manual for VIVA L Gas Vertical Roof Terminal Renovation kit PT 3 of 3 PT 1 of 3 PT 2 of 3 Existing chimney Flexible flue insert Ø100 AI SA 316Ti If the existing chimney is not completely sound the air inlet must also be lined recommended ...

Страница 138: ...ika User manual for VIVA L Gas Vertical Pitched Roof Terminal Distance H 0 3m Min Max Distance V1 500mm 10m Min Max Distance V2 200mm 10m Min Max Distance V3 500mm 10m Min Max Distance V V1 V2 V3 1 2m 12m Min Max Distance V 2 X H Min ...

Страница 139: ...nglish RAIS attika User manual for VIVA L Gas Vertical Roof Terminal with Bend Distance H 0 3m Min Max Distance V1 500mm 10m Min Max Distance V2 500mm 10m Min Max Distance V V1 V2 1m 12m Min Max Distance V 2 X H Min ...

Страница 140: ...imney Renovations kit PT 3 of 3 PT 1 of 3 PT 2 of 3 Existing chimney Flexible flue insert Ø100 AISA 316Ti Distance V 1m 12m Min Max Existing chimney Flue must be inspected by a qualified technician If the existing chimney is not complete ly sound the air inlet must also be lined recommended ...

Страница 141: ...Ti PT 3 of 3 PT 1 of 3 PT 2 of 3 Distance H 0 3m Min Max Distance V1 500mm 10m Min Max Distance V2 200mm 10m Min Max Distance V3 500mm 10 m Min Max Distance V V1 V2 V3 1 2m 12m Min Max Distance V 2 X H Min Existing chimney with Bend Renovations kit If the existing chim ney is not completely sound the air inlet must also be lined recommended ...

Страница 142: ...68 English RAIS attika User manual for VIVA L Gas Vertical Roof Terminal with Back outlet for more information see paragraph Location of chimney terminals ...

Страница 143: ...69 English RAIS attika User manual for VIVA L Gas Horizontal wall Terminal for more information see paragraph Location of chimney terminals ...

Страница 144: ...70 Snorkel Snorkel Top outlet Back outlet Horizontal wall Terminal for more information see paragraph Location of chimney terminals English RAIS attika User manual for VIVA L Gas ...

Страница 145: ...as Chimney components 1 US 25 100 Ø100 US 25 130 Ø130 Length 250mm 2 US 50 100 Ø100 US 50 130 Ø130 Length 500mm 3 US 100 100 Ø100 US 100 130 Ø130 Length 1000mm 4 USKB 100 Ø100 USKB 130 Ø130 Locking band 5 USAB 100 Ø100 USAB 130 Ø130 Protective band ...

Страница 146: ...VA L Gas 6 USPP 100 Ø100 USPP 130 Ø130 Adjustable length 7 USDV2 100 Ø100 Vertical Terminal USKB 8 USDHCE 10 Horizontal Terminal Eccentric outlet 9 USEB 100 Ø100 USEB 130 Ø130 Fitting strap 10 USMB 100 Ø100 USMB 130 Ø130 Adjustable Wall Strap ...

Страница 147: ...SB 90 130 Ø130 90 elbow bend 14 USSR 100 Ø100 USSR 130 Ø130 Cover 12 USB 45 100 Ø100 USB 45 130 Ø130 45 elbow bend 15 USDPAL 100 Ø100 USDPAL 130 Ø130 Flat roof Cover Aluminium 13 USB 15 100 Ø100 USB 15 130 Ø130 15 elbow bend 16 USDP 100 Ø100 USDP 130 Ø130 Flat roof Cover ...

Страница 148: ... Ø100 USCP 130 Ø130 Adjustable Cover Supplied as a pair 18 USDH 100 Ø100 USDH 130 Ø130 Angular Cover 5 30 21 USMPG 100 Ø100 USMPG 130 Ø130 Wall Cover 19 USLS 100 Ø100 USLS 130 Ø130 Angular Cover 20 45 22 ADAPTOR UNIVERSAL SYSTEM ADAPTOR USA Ø 100 130 USA D 99 129 ...

Страница 149: ...75 English RAIS attika User manual for VIVA L Gas D O P ...

Страница 150: ...1 POSITIV V I VA L G A S F ...

Страница 151: ...pour une utilisation avec du GPL gaz de pétrole liquéfié voir la plaque signalétique sous PROPANE Le présent manuel porte sur les modèles suivants Viva 100 L Gas sans vitre latérale Viva 100 LG Gas avec vitre latérale Viva 100 L Classic Gas sans vitre latérale Viva 100 LG Classic Gas avec vitre latérale Viva 120 L Gas sans vitre latérale Viva 120 LG Gas avec vitre latérale Viva 120 L Classic Gas s...

Страница 152: ...S NON INFLAMMABLES 25 CHEMINÉE TIRAGE 26 INSTALLATION DES TERMINAUX DE CHEMINÉE 27 TERMINAL MURAL VERTICAL DE TYPE C11 28 TERMINAL DE TOITURE VERTICAL DE TYPE C31 29 INSTALLATION DES BRÛLEURS SECONDAIRES 30 Disposition des Embers braises et des Logs bûchettes 31 DÉMARRAGE PILES 36 RÉGLAGE DU CODE ÉLECTRONIQUE 38 MISE EN SERVICE 39 ALLUMAGE POUR LA PREMIÈRE FOIS 41 INSTRUCTIONS DE L UTILISATEUR TÉL...

Страница 153: ...de profiter au maximum de votre nouveau poêle il est important de lire attentive ment le présent manuel avant l installation et l utilisation À des fins de garantie et pour toute référence future veuillez noter le numéro de fabrication de votre poêle Nous vous conseillons dès lors d inscrire ce numéro dans le schéma ci dessous Le numéro de fabrication se trouve sous le poêle Installateur Date Fran...

Страница 154: ...ient caduque en cas de Dommages causés par une surchauffe Dommages causés par des effets extérieurs et par une utilisation d un carburant inapproprié Non respect des consignes d installation légales ou recommandées et modifica tions propres apportées au poêle Manque de maintenance et de soins En cas de dommages veuillez contacter votre revendeur En cas d intervention de la ga rantie nous décidons ...

Страница 155: ...ons de NOx G20 I2H I2E 23 23 23 Intertek Testing Certification Ltd Siège social Academy Place 1to 9 Brook Street Brentwood Essex CM14 5NQ Royaume Uni N d enregistrement 3272281 Angleterre N de TVA GB 672 7639 96 011 Tél 44 1277 223 400 Fax 44 1277 223 127 Distance dimensions Voir les schémas au dos du présent manuel I Distance entre le sol et le haut de l évacuation de fumée J Distance entre le so...

Страница 156: ...e toute maintenance du poêle Veillez à ce que le terminal de la cheminée ne soit en aucun cas bloqué à ce qu il soit dégagé de toute végétation à savoir des arbres des arbustes etc à ce que rien ne se trouve contre le terminal de la cheminée ni aucune protection autour du terminal La vitre de la porte doit toujours être nettoyée avant d allumer le poêle Les empreintes de doigt doivent être essuyée...

Страница 157: ...il convient de couper l alimentation en gaz sans délai Aérez la pièce en ouvrant les fenêtres et les portes Ne pas utiliser d appareils élec triques à proximité du poêle Contactez un installateur gaz chauffage agréé Français RAIS attika Manuel d utilisateur pour VIVA L Gas ...

Страница 158: ...ce que l alimentation en gaz puisse fournir la quantité et la pression de gaz requises décrites sur la plaque signalétique Raccordement au gaz La conduite de gaz présente un diamètre extérieur de Ø8 mm Ventilation Ce poêle est équipé d une chambre de combustion fermée et est destiné à un tirage équilibré C est la raison pour laquelle aucune prise d air supplémentaire n est requise Il est recommand...

Страница 159: ...placé à une distance inférieure aux distances indiquées dans le chapitre suivant portant sur l installation risque d incendie Quand vous décidez de l emplacement de votre poêle il convient de réfléchir à la répar tition de la chaleur dans les autres pièces Vous pourrez ainsi profiter au maximum de votre poêle À la réception du poêle vérifiez la présence éventuelle de vices Modification du raccord ...

Страница 160: ... trois vis du plateau intérieur sur la partie inférieure du poêle Retirez les 4 Dévissez le couvercle externe à l arrière du poêle et placez le sur le dessus du poêle 5 Pour ouvrir la porte il convient d utiliser une clé à écrous de 10 mm pour tourner les deux crochets en haut et en bas de la porte 6 Les brûleurs secondaires se re tirent en les soulevant verticalement ...

Страница 161: ...a plaque arrière peut mainte nant être retirée et la plaque de couverture intérieure peut être démontée 7 Si les bûchettes en céramique sont disposées il convient de les retirer 10 La plaque de couverture inté rieure s installe maintenant sur le dessous de la plaque supérieure comme illustré 11 Installez les raccords où se trouvaient les plaques de couver ture et replacez la plaque arrière les bûc...

Страница 162: ...rti pour le gaz de pétrole liquéfié GPL La conversion ne peut être réalisée que par un installateur de gaz agréé Kit de conversion Le numéro d article 3713595 doit être utilisé Cet en semble contient 4 nouvelles buses adaptées pour le propane GPL Les buses des brûleurs secon daires pour le GPL portent le numéro 100 Les buses des brûleurs se condaires pour le gaz naturel portent le numéro 250 ...

Страница 163: ...pour VIVA L Gas La buse de la veilleuse pour le GPL porte le numéro 27 La buse de la veilleuse pour le gaz naturel porte le numéro 32 La buse du brûleur principal pour le GPL porte le numéro 30 La buse du brûleur principal pour le gaz naturel porte le numéro 120 ...

Страница 164: ...tilisateur pour VIVA L Gas L unité de gaz se démonte pour permettre l accès aux buses Pour ce faire il convient de procéder comme suit Soulevez la plaque perforée et sortez la du poêle Desserrez les quatre vis qui fixent l unité de gaz ...

Страница 165: ...nduit Desserrez le contre écrou puis dévissez la buse Installez la buse de GPL et serrez le contre écrou Enfin serrez de nouveau l écrou Une fois l unité de gaz démontée les quatre buses doivent être rempla cées et les trois prises d air doivent être ajustées Maintenant l unité de gaz peut être délica tement soulevée en inclinant et en tournant légèrement l unité ...

Страница 166: ... et tirez délicatement le tube Ensuite dévissez la buse Installez la buse de GPL et serrez le contre écrou Enfin serrez de nouveau l écrou Pour remplacer la buse de la veilleuse desserrez l écrou et retirez le conduit Re marque La petite buse de la veilleuse doit maintenant sortir et peut être remplacée par la buse de GPL ...

Страница 167: ...z les deux vis et tournez la prise d air sur env 90 Afin que les deux trous du conduit vertical soient ouverts petit à l arrière et grand à l avant Petit trou à l arrière Grand trou à l avant Adaptez la prise d air du brûleur principal à une configuration GPL en desserrant les deux écrous et poussez la plaque tout contre le brûleur trou complètement ou vert ...

Страница 168: ...as Les prises d air doivent tourner comme illustré quand le poêle est confi guré pour le GPL Replacez l unité de gaz avec les quatre vis Repositionnez la plaque perforée et le poêle est maintenant prêt à l emploi Voir section Montage des brûleurs secon daires ...

Страница 169: ...veiller à ce qu aucun objet inflammable par ex du mobilier ne soit placé à une distance inférieure aux distances indiquées dans les tableaux suivants risque d incendie Installation standard angle droit Sans vitre latérale Viva 100 L Gas Viva 120 L Gas Viva 160 L Gas Conduit de fumée non isolé A Distance min du mobilier 700 mm Dégagement min par rapport aux matériaux inflammables D arrière mur 50 m...

Страница 170: ...roit Avec vitre latérale Viva 100 L G Gas Viva 120 L G Gas Viva 160 L G Gas Évacuation de fumée non isolée A Distance min du mobilier 700 mm Dégagement min par rapport aux matériaux inflammables D arrière mur 50 mm E latéral vers le mur 300 mm Mur réfractaire norvégien D arrière mur 50 mm E latéral vers le mur 300 mm O Extension du mur réfractaire latéralement 425 mm P Extension du mur réfractaire...

Страница 171: ...tika Manuel d utilisateur pour VIVA L Gas Installation en angle 45 Sans vitre latérale Viva 100 L Gas Viva 120 L Gas Viva 160 L Gas Conduit de fumée non isolé A Distance min du mobilier 700 mm Dégagement min par rapport aux matériaux inflammables D arrière mur 50 mm ...

Страница 172: ...ka Manuel d utilisateur pour VIVA L Gas Configuration en angle 45 Avec vitre latérale Viva 100 L G Gas Viva 120 L G Gas Viva 160 L G Gas Conduit de fumée non isolé A Distance min du mobilier 700 mm Dégagement min par rapport aux matériaux inflammables D arrière mur 150 mm ...

Страница 173: ...ommandons un dégagement minimal par rapport aux matériaux non inflam mables de 75 mm F de façon à faciliter la maintenance et l installation Pour une évac uation par l arrière il doit toutefois encore y avoir l espace pour un raccord de mesure pour le contrôle de la combustion Installation standard angle droit Installation en angle 45 ...

Страница 174: ...p Metalotherm US D autres fabricants de cheminée agréés Jeremias Muelink Grol Poujoulat PGI Les assemblages de conduits d évacuation doivent être étanches et leur séparation doit être évitée à l aide de ruban de fixation Un raccord de mesure doit être monté sur le tirage dans la même pièce que le poêle afin de permettre un contrôle de la combustion Le tirage ne doit pas déboucher dans un abri de v...

Страница 175: ... À partir d un conduit d évacuation ou d un conduit pour mise à la terre vertical 300 H À partir d un angle interne ou externe 600 I Au dessus du niveau du sol du toit ou d un balcon 300 J À partir d une surface tournée vers le terminal 600 K À partir d un terminal tourné vers le terminal 600 L À partir d une ouverture d un abri de voiture par ex porte fenêtre dans le bâtiment 1200 M Verticalement...

Страница 176: ...ngueur du conduit d évacuation vertical V 1 pour conduit Ø130 Ø200 2 x la longueur du conduit d évacuation vertical V pour conduit Ø100 Ø150 Longueur maximale autorisée H 15 m Hauteur verticale minimale du conduit d évacuation pour Viva L 0 5 m longueur verticale du conduit d évacuation V en mètres Longueur maximale du conduit d évacuation horizontal H en mètres Ø130 Ø200 Longueur maximale du cond...

Страница 177: ...oute la cheminée alterna tivement Ø130 Ø200 Un adaptateur peut être utilisé pour permettre l utilisation Ø130 Ø200 après l adaptateur Terminal de tirage Ø130 Ø200 N de produit USDVC 130 Ø100 Ø150 Réf de produit USDVC 100 Longueur verticale minimale du conduit d évacuation 0 5 m Gaz de fumée Limiteurs à Ø100 Ø150 Hauteur verticale 1 m Sans limiteur Hauteur verticale 1 2 m Limiteur Ø 62 mm Hauteur v...

Страница 178: ...ez les brûleurs par dessus les conduits qui ressortent de la plaque perforée Notez qu il y a un brûleur droit et un brûleur gauche Il est dès lors important de les placer comme illustré c est à dire le côté avec les trous supplémentaires tourné vers l extérieur Face avant avec trous Face arrière sans trou ...

Страница 179: ...euse et son capteur thermique Il convient de veiller égale ment à ce que du matériau incandescent ne tombe pas sous le panneau de la veilleuse L autre capteur thermique doit également être dégagé de toute Braise en céramique À la mise en service ou lors de la maintenance du poêle il convient de veiller à ce que l allumage croisé de la veilleuse au brûleur principal fonctionne et à ce qu il y ait u...

Страница 180: ...32 Français RAIS attika Manuel d utilisateur pour VIVA L Gas Bûchettes en céramique Bûchette 1 Bûchette 2 Bûchette 3 Bûchette 4 Bûchette 5 Bûchette 6 Bûchette A Bûchette B ...

Страница 181: ...zone de la veilleuse doit être dégagée de toute Braise Placez les 8 bûchettes comme illustré Remarque les deux bûchettes spéciales marquées A et B présentent une cavité moulée dans le bas qui se place par dessus les deux brûleurs secondaires Placez les fils incandes cents entre les Braises pour accentuer l effet incandescent Bûchette 2 ne doit pas toucher le 2e capteur thermique Bûchette 2 ...

Страница 182: ...34 4 3 5 Français RAIS attika Manuel d utilisateur pour VIVA L Gas Bûchette 3 Bûchette 4 Bûchette 5 ...

Страница 183: ...35 6 A B Illustrations Français RAIS attika Manuel d utilisateur pour VIVA L Gas Bûchette 6 Bûchette A Bûchette B ...

Страница 184: ...mpartiment Le récepteur utilise 4 piles AA 1 5 V N oubliez pas de remettre le couvercle du compartiment des piles Démarrage Installation des piles Le récepteur du poêle et la télécommande fonctionnent sur piles Un lot de piles doit donc être installé avant le démarrage Pour accéder au compartiment des piles du récepteur ouvrez la porte en tournant les deux crochets à droite à l aide de la clé à éc...

Страница 185: ...37 Français RAIS attika Manuel d utilisateur pour VIVA L Gas Les piles du récepteur doivent être position nées comme illustré ci contre La télécommande utilise 2 piles AAA 1 5 V ...

Страница 186: ...hronisés de la manière suivante Appuyez et maintenez enfoncé le bouton Reset jusqu à ce que vous entendiez un bip court suivi d un long bip Relâchez le bouton Vous avez maintenant 20 secondes pour appuyer sur le bouton de la flèche pointant vers le bas de la télécommande Appuyez et mainte nez le bouton enfoncé jusqu à ce que le récepteur émette deux bips courts Le mot conn s affiche maintenant sur...

Страница 187: ... Knob 2 Ouvrez Inlet pressure tap sur la vanne de gaz et raccordez un mano mètre 3 Vérifiez que la pression mesurée correspond à la pression prescrite par la compagnie de distribution de gaz 4 Procédez au test quand le poêle est à pleine puissance y compris les brû leurs secondaires et quand seule la veilleuse du poêle est allumée 5 Si la pression est faible vérifiez que les conduits d alimentatio...

Страница 188: ...40 Français RAIS attika Manuel d utilisateur pour VIVA L Gas ...

Страница 189: ...r particulière et des fumées émanant de la surface du poêle peuvent se former lors du premier allumage Cela est dû au durcissement de la peinture et du matériau mais l odeur disparaît rap idement Veillez à une puissante ventilation de préférence un courant d air Les enfants et les animaux doivent rester à distance du poêle tout au long de ce processus Veillez également à ne pas toucher les surface...

Страница 190: ...de la fonction s affiche Les fonctions suivantes peuvent être désactivées activées SÉCURITÉ ENFANTS MODE PROGRAMME MODE THERMOSTAT désactive également le MODE PROGRAMME MODE ÉCO FLAMME VARIATEUR FONCTIONNEMENT VENTILATEUR FONCTIONNEMENT FONCTION AIDE COMPTE À REBOURS Désactivation de fonctions 1 Insérez des piles Toutes les icônes s affichent et clignotent 2 Quandlesicônesclignotent appuyezsurlato...

Страница 191: ...rlebouton ou 7 Pourconfirmer appuyezsurlesboutons et simultanément ou attendez quelques instants Le passage de C à F est opéré en appuyant sur les boutons et simultané ment REMARQUE Pour la sélection F on obtient un affichage de l heure en format de 12 heures Pour la sélection C on obtient un affichage de l heure en format de 24 heures ON Pour activer appuyez sur les boutons et simultané ment À l ...

Страница 192: ...puyez sur les boutons et simultanément jusqu à ce que soient émis deux bips courts et qu une série de barres clignotantes confirme que la séquence de démar rage est en cours Relâchez ensuite les boutons L alimentation en gaz prin cipale commence dès que l allumage de la veilleuse est confirmé La télécommande passe automatiquement en mode Manuel après l allumage du brûleur principal Remarque Passez...

Страница 193: ...st ainsi réglée automatiquement pour atteindre la tempéra ture préréglée Mode Programme Le PROGRAMME 1 et 2 peuvent tous deux être programmés pour démar rer et s interrompre à des moments précis à une température préréglée Mode économie d éner gie La hauteur de la flamme varie entre haute et basse Si la température ambiante est inférieure à la tempéra ture préréglée la hauteur de la flamme reste é...

Страница 194: ...jours RÉGLAGE DU JOUR 5 ALL clignote Appuyez sur le bouton ou pour sélectionner ALL SA SU 1 2 3 4 5 6ou 7 6 Pour confirmer appuyez sur le bouton RÉGLAGE DE L HEURE POUR L EXTINCTION PROGRAMME 1 12 1 OFF s affiche ALL s affiche brièvement et HOUR clignote 13 Pour l heure appuyez sur le bouton ou 14 Pour confirmer appuyez sur le bouton 1 OFF s affiche ALL s affiche briè vement et Minutes clignote 15...

Страница 195: ...re de fonctionnement et l heure d extinction pour le samedi et le dimanche Daily Timer Des heures de fonctionnement et des heures d extinction uniques peuvent être réglées pour un seul jour de la semaine pour plusieurs jours de la semaine ou pour tous les jours de la semaine Attendez jusqu à ce que le réglage soit terminé MODE D AIDE Après l allumage le brûleur 1 est allumé et le brûleur 2 est dan...

Страница 196: ...e la porte et sous la chambre de combustion Tournez la vanne de gaz avec l heure sur OFF Tournez le bouton du contrôle manuel sur man Le gaz est allumé pour la veilleuse en appuyant et en maintenant appuyée la vanne de gaz de veilleuse à l aide d un objet pointu Allumez la veilleuse à l aide d une allumette ou analogue La vanne de gaz de veilleuse doit être maintenue enfoncée pendant environ 20 se...

Страница 197: ...tournant la vanne de gaz dans le sens contraire des aiguilles d une montre sur 2 ON La vanne de gaz doit être complète ment ouverte pendant min 30 sec avant d être éventuellement tournée vers le bas pour obtenir des flammes Une fois le réglage adéquat obtenu la porte peut être fermée Pour éteindre le poêle ouvrez la porte et remettez la vanne de gaz sur 3 OFF si la veilleuse reste allumée coupez l...

Страница 198: ...tégralement les brûleurs 6 Nettoyez l assemblage du brûleur de la veilleuse à l aide d une brosse souple et d un aspirateur Les capteurs thermiques ne doivent pas être pliés ni redressés 7 Ouvrez l alimentation de gaz et vérifiez en l étanchéité Vérifiez le bon état et le bon fonctionnement des brûleurs et de la veilleuse 8 Replacez la plaque perforée 9 Replacez les braises et les bûchettes en cér...

Страница 199: ...te nance Les pièces en céramique se nettoient délicatement à l aide d une brosse souple et d un aspirateur Ne remplacez les pièces endommagées que par des pièces d origine Rais Emballez la céramique cassée dans des sacs en plastique et déposez les aux points de collecte de déchets appropriés Il est recommandé d utiliser un aspirateur équipé d un système de filtre HEPA Redisposez les braises et fer...

Страница 200: ...710611SV Plaque supérieure Classic en acier inoxydable pour évacuation par l arrière 2710612SV Plaque supérieure Classic en acier inoxydable pour une évacuation par le dessus 3713506 Adaptateur secteur branchez le poêle au réseau électrique 3713507 MyFire WiFi Box câble inclus commande du poêle via une application 3713595 Kit de conversion LP pour propane ...

Страница 201: ...ous la chambre de combustion en ouvrant la porte du poêle et insérez la petite fiche du câble wifi dans l entrée marquée SI La large fiche du câble wifi se branche à la WiFi Box Pour raccorder la WiFi Box l adap tateur secteur raccordement au réseau électrique raccordé au récepteur est utilisé L adaptateur secteur est raccordé au récepteur du poêle Les piles doivent être retirées du récepteur pour...

Страница 202: ...GURATION DE L APPLICATION MYFIRE Remarque Pour connecter MyFire WiFi Box au routeur wifi ré seau domestique veuillez vous assurer que Un réseau domestique est disponible Le nom et le mot de passe du réseau domes tique sont corrects La clé SSID du routeur wifi n est pas masquée Le signal du réseau domestique a une portée suffisante Le routeur wifi prend en charge le protocole UDP User Datagram Prot...

Страница 203: ...dos du présent manuel xx code couleur en option Pos Quantité Réf d article Description 1 1 37120xx Porte vitrée 2 1 37121xx Porte vitrée Classic 3 1 2710601xx Plaque supérieure pour une évacua tion par l arrière 4 1 2710602xx Plaque supérieure pour une évacua tion par le dessus 5 1 2720601xx Plaque supérieure pour une évacua tion par l arrière Tirée en profon deur 6 1 2720602xx Plaque supérieure p...

Страница 204: ... Classic 3 1 2710601xx Plaque supérieure pour une évacuation par l arrière 4 1 2710602xx Plaque supérieure pour une évacuation par le dessus 5 1 2720601xx Plaque supérieure pour une évacuation par l arrière Tirée en profondeur 6 1 2720602xx Plaque supérieure pour une évacuation par le dessus Tirée en profondeur 7 1 1715500 Kit de joint pour porte vitrée 8 1 1715500 2 Kit de joint pour porte vitrée...

Страница 205: ...r supérieur avant 12 RA10L76 Ensemble brûleur surélevé gauche 13 RA10R76 Ensemble brûleur surélevé droite 14 RK10P07 Ensemble brûleur complet gaz na turel RK10N07 Ensemble brûleur complet GPL 15 RK10 SEAL 05 Jeu de joints de brûleur 16 3711213 Ensemble de grille 17 RK10_N1_ GV60 Ensemble de vanne de gaz pour gaz naturel 18 RK10_P1_GV60 Ensemble de vanne de gaz pour GPL 19 GV S60C 12 Solénoïde à ve...

Страница 206: ...G31 G31 à 28 37 mbars I3P 37 G31 à 37 mbars I3B P 50 G30 G31 à 50 DE Allemagne I2ELL G25 à 20 mbars I2E G20 à 20 mbars I 3P 50 G31 à 50 mbars I3B P 50 G30 G31 à 50 DK Danemark I2H G20 à 20 mbars I3B P 30 G30 G31 à 30 mbars EE Estonie I2H G20 à 20 mbars I3B P 30 G30 G31 à 30 mbars ES Espagne I2H G20 à 20 mbars I3 G31 G31 à 28 37 mbars I3P 37 G31 à 37 mbars FI Finlande I2H G20 à 20 mbars I3P 30 G31 ...

Страница 207: ...MT Malte I3B P 30 G30 G31 à 30 mbars NL Pays Bas I2L G25 à 25 mbars I2EK G25 3 à 25 mbars I3P 50 G31 à 50 mbars I3P 30 G31 à 30 mbars I3P 37 G31 à 37 mbars I3B P 30 G30 G31 à 30 mbars NO Norvège I2H G20 à 20 mbars I3B P 30 G30 G31 à 30 mbars PL Pologne I2E G20 à 20 mbars I3P 37 G31 à 37 mbars PT Portugal I2H G20 à 20 mbars I3 G31 G31 à 28 37 mbars I3P 37 G31 à 37 mbars RO Roumanie I2E G20 à 20 mba...

Страница 208: ...t Hi kW 8 2 8 2 7 6 7 7 6 8 Consommation m h 0 84 0 840 0 905 0 89 0 8 Pression brûleur chaud mbars 13 2 13 2 16 4 16 6 13 4 Marquage injecteur 120 Centre 260 Gauche 260 Droit Veilleuse G30 ZP2 312 31 2 inj Classe de rendement 2 Classe NOx 5 Type C11 C31 Gas type City gas G150 1 Supply Pressure mbar 8 Nominal Heat Input Gross Hs kW 9 4 Nominal Heat Input Nett Hi kW 8 4 Consumption m hr 1 5 Burner ...

Страница 209: ...7 4 Consommation m h 0 225 0 225 0 29 0 29 0 29 0 253 Pression brû leur chaud mbars 27 27 36 36 36 28 Marquage injecteur 80 Centre 100 Gauche 100 Droit Veilleuse G30 ZP2 271 27 1 inj Classe de rendement 2 Classe NOx 5 Type C11 C31 Ce poêle a été testé et certifié pour une utilisation avec du gaz naturel du GPL et du biopropane Le biopropane peut être utilisé si le poêle a été converti pour une uti...

Страница 210: ...62 V 20 0 5m 20 0 5m Français RAIS attika Manuel d utilisateur pour VIVA L Gas EXEMPLES DE SOLUTIONS DE CHEMINÉE Terminal de toit vertical Distance V 500 mm 12 m min max ...

Страница 211: ...H 7 4 17 F 17 17 1 2 3 6 5 Français RAIS attika Manuel d utilisateur pour VIVA L Gas Terminal de toit vertical PT 3 de 3 PT 1 de 3 PT 2 de 3 Cheminée existante revêtement de conduit de fumée flexible Ø100 AISA 316Ti ...

Страница 212: ...d utilisateur pour VIVA L Gas Terminal de toit en pente vertical Distance H 0 3 m min max Distance V1 500 mm 10 m min max Distance V2 200 mm 10 m min max Distance V3 500 mm 10 m min max Distance V V1 V2 V3 1 2 m 12 m min max Distance V 2 X H min ...

Страница 213: ...S attika Manuel d utilisateur pour VIVA L Gas Terminal de toit vertical avec coude Distance H 0 3 m min max Distance V1 500 mm 10 m min max Distance V2 500 mm 10 m min max Distance V V1 V2 1 m 12 m min max Distance V 2 X H min ...

Страница 214: ... pour VIVA L Gas Cheminée existante kit de rénovation PT 3 de 3 PT 1 de 3 PT 2 de 3 Cheminée existante revêtement de conduit de fumée flexible Ø100 AISA 316Ti Distance V 1 m 12 m min max La cheminée existante conduit de fumée doivent être inspectés par un technicien qualifié ...

Страница 215: ...te revêtement de conduit de fumée flexible Ø100 AISA 316Ti PT 3 de 3 PT 1 de 3 PT 2 de 3 Distance H 0 3 m min max Distance V1 500 mm 10 m min max Distance V2 200 mm 10 m min max Distance V3 500 mm 10 m min max Distance V V1 V2 V3 1 2 m 12 m min max Distance V 2 X H min Cheminée existante avec coude kit de rénovation ...

Страница 216: ...68 Français RAIS attika Manuel d utilisateur pour VIVA L Gas Terminal de toit vertical avec sortie arrière Pour plus d informations voir le paragraphe Emplacement des terminaux de cheminée ...

Страница 217: ...69 Français RAIS attika Manuel d utilisateur pour VIVA L Gas Terminal mural horizontal Pour plus d informations voir le paragraphe Emplacement des terminaux de cheminée ...

Страница 218: ...el Snorkel sortie supérieure sortie arrière Terminal mural horizontal Pour plus d informations voir le paragraphe Emplacement des terminaux de cheminée Français RAIS attika Manuel d utilisateur pour VIVA L Gas ...

Страница 219: ...ments de cheminée 1 US 25 100 Ø100 US 25 130 Ø130 Longueur 250 mm 2 US 50 100 Ø100 US 50 130 Ø130 Longueur 500 mm 3 US 100 100 Ø100 US 100 130 Ø130 Longueur 1000 mm 4 USKB 100 Ø100 USKB 130 Ø130 Bande de verrouillage 5 USAB 100 Ø100 USAB 130 Ø130 Bande de protection ...

Страница 220: ... VIVA L Gas 6 USPP 100 Ø100 USPP 130 Ø130 Longueur réglable 7 USDV2 100 Ø100 Terminal vertical USKB 8 USDHCE 10 Terminal horizontal Sortie excentrique 9 USEB 100 Ø100 USEB 130 Ø130 Bande de montage 10 USMB 100 Ø100 USMB 130 Ø130 Bande murale réglable ...

Страница 221: ... USB 90 130 Ø130 Tube coudé 90 14 USSR 100 Ø100 USSR 130 Ø130 Capot 12 USB 45 100 Ø100 USB 45 130 Ø130 Tube coudé 45 15 USDPAL 100 Ø100 USDPAL 130 Ø130 Capot toiture plate Aluminium 13 USB 15 100 Ø100 USB 15 130 Ø130 Tube coudé 15 16 USDP 100 Ø100 USDP 130 Ø130 Capot toiture plate ...

Страница 222: ...utilisateur pour VIVA L Gas 20 USCP 100 Ø100 USCP 130 Ø130 Capot réglable livré par paire 18 USDH 100 Ø100 USDH 130 Ø130 Capot oblique 5 30 21 USMPG 100 Ø100 USMPG 130 Ø130 Capot mural 19 USLS 100 Ø100 USLS 130 Ø130 Capot oblique 20 45 ...

Страница 223: ...75 Français RAIS attika Manuel d utilisateur pour VIVA L Gas ...

Страница 224: ...1 POSITIV V I VA L G A S NL ...

Страница 225: ...uikt als de kachel werd aangepast voor gebruik met lpg liquid petroleum gas zie merkplaatje onder PROPAAN Deze handleiding is van toepassing op de volgende modellen Viva 100 L Gas zonder zijglas Viva 100 LG Gas met zijglas Viva 100 L Classic Gas zonder zijglas Viva 100 LG Classic Gas met zijglas Viva 120 L Gas zonder zijglas Viva 120 LG Gas met zijglas Viva 120 L Classic Gas zonder zijglas Viva 12...

Страница 226: ...RSTEEN AFVOER 26 PLAATSING VAN SCHOORSTEENTERMINALS 27 HORIZONTALE WANDTERMINAL TYPE C11 28 VERTICALE DAKTERMINAL TYPE C31 29 MONTAGE VAN SECUNDAIRE BRANDER 30 Schikken van kolen en blokken 31 OPSTARTEN BATTERIJEN 36 INSTELLEN VAN DE ELEKTRONISCHE CODE 38 INBEDRIJFSTELLING 39 EERSTE GEBRUIK 41 GEBRUIKSAANWIJZING AFSTANDSBEDIENING 42 DE KACHEL ZONDER AFSTANDSBEDIENING GEBRUIKEN 48 ONDERHOUD ONDERHO...

Страница 227: ...te kunnen benutten is het belangrijk dat u deze han dleiding vóór installatie en ingebruikname grondig leest In het kader van de garantie en voor alle overige vragen m b t de kachel is het be langrijk dat u het productienummer van de kachel kent Wij raden u daarom aan het nummer in het onderstaande vakje te noteren Het productienummer staat onderaan op de kachel Installateur Datum Vlaams RAIS atti...

Страница 228: ...r oververhitting schade door externe invloeden en gebruik van ongeschikte brandstoffen niet naleving van de wettelijk voorgeschreven of door ons aanbevolen installat ie instructies alsook bij zelf aangebrachte wijzigingen aan de kachel gebrek aan onderhoud en zorg In geval van schade dient u zich te wenden tot uw dealer Bij garantieaanspraken bep alen wij hoe de schade zal worden hersteld In geval...

Страница 229: ...I2H I2E 78 3 78 3 78 3 CO gehalte ppm G20 I2H I2E 31 31 31 NOx uitstoot G20 I2H I2E 23 23 23 Intertek Testing Certification Ltd maatschappelijke zetel Academy Place 1 to 9 Brook Street Brentwood Essex CM14 5NQ Verenigd Koninkrijk Registratienummer 3272281 Engeland btw nummer GB 672 7639 96 011 Tel 44 1277 223 400 Fax 44 1277 223 127 Afstanden afmetingen Zie maattekeningen achteraan in de handleidi...

Страница 230: ...ik bewaren De handleiding is noodzakelijk voor het onderhoud van de kachel Zorg ervoor dat de schoorsteenterminal niet geblokkeerd is en dat deze vrij is van ve getatie zoals bomen struiken enz Zorg er ook voor dat er zich geen items in de buurt van de schoorsteenterminal bevinden en dat er geen bescherming rond de terminal is aangebracht Maak steeds het deurglas schoon alvorens u de kachel aanste...

Страница 231: ...ing van gastoevoer Als u een gaslucht vaststelt moet u de gastoevoer onmiddellijk onder breken Verlucht de ruimte door de ramen en deuren open te zetten en gebruik geen elektrische apparaten in de buurt van de kachel Roep de hulp in van een erkendeloodgieter gasinstallateur ...

Страница 232: ...temmen met de plaat selijke gastoevoerverhoudingen voor de kachel Zorg dat de gastoevoer de vereiste hoeveelheid gas en druk kan leveren die op het gegevensplaatje wordt vermeld Gasaansluiting De leiding van de gasslang heeft een buitendiameter van Ø 8 mm Ventilatie Deze kachel heeft een gesloten verbrandingskamer en is bedoeld voor een gebalanceerde afvoer Er is dus geen extra luchttoevoer nodig ...

Страница 233: ...erpen bijv meubelen niet dichterbij plaatst dan de afstanden die in de volgende paragrafen aangaande plaatsing worden vermeld brandgevaar Installeer uw kachel op een plaats waar u zoveel mogelijk warmte naar de andere kamers kunt leiden Zo beleeft u het meeste plezier aan uw kachel Bij ontvangst wordt de kachel gecontroleerd op defecten Aanpassen van de schoorsteenaansluiting De kachel wordt gebru...

Страница 234: ...nenste flens aan de onderkant van de kachel los Verwijder deze 4 Schroef de buitenste af dekplaat aan de achterkant van de kachel eraf en plaats deze op de bovenkant van de kachel 5 Gebruik een 10 mm steeks leutel om de twee haken aan de boven en onderkant van de deur los te maken en zo de deur te openen 6 U verwijdert de secundaire branders door ze recht om hoog en vervolgens eruit te tillen ...

Страница 235: ...wijder vervolgens de zijkanten 9 Nu kan de steunplaat worden verwijderd en de binnenste afdekplaat wor den gedemonteerd 7 Verwijder de evt ge monteerde keramische blokken 10 Monteer nu de binnen ste afdekplaat op de on derkant van de bovenplaat Zie afbeelding 11 Monteer de aansluit monden op de plaats waar de afdekplaten zaten en plaats de steunplaat blok ken en branders terug ...

Страница 236: ...maar kan naar flessengas lpg worden omgezet De omschakeling dient door een er kend gasspecialist te worden uitgevoerd Ombouwset met artikelnummer 3713595 Deze set bevat 4 nieuwe spuitmonden voor propaan lpg De spuitmonden voor de se cundaire branders voor lpg zijn gemarkeerd met 100 De spuitmonden voor de secun daire branders voor aardgas zijn gemarkeerd met 250 ...

Страница 237: ...IVA L Gas De spuitmond voor de waak vlam voor lpg is gemarkeerd met 27 De spuitmond voor de waakvlam voor aardgas is gemarkeerd met 32 De spuitmond voor de hoofdbrander voor lpg is gemarkeerd met 30 De spuitmond voor de hoofdbrander voor aardgas is gemarkeerd met 120 ...

Страница 238: ...r VIVA L Gas Om toegang tot de spuitmonden te krijgen moet de gasunit worden gedemonteerd Dat gebeurt op de volgende manier Til de geperforeerde plaat omhoog en haal ze uit de kachel Maak de vier schroeven los die de gaseenheid op haar plaats houden ...

Страница 239: ... de leiding voorzichtig naar buiten te trekken Maak de borgmoer los Schroef vervolgens de spuitmond los Mon teer de lpg spuitmond en span de borg moer aan Span de moer opnieuw aan Vervang na het demonteren van de gasunit de vier spuitmonden en pas de drie luchtingangen aan Kantel en draai de gasunit lichtjes U kunt hem er nu voorzichtig uithalen ...

Страница 240: ...chtig naar buiten te trekken Schroef vervolgens de spuitmond los Mon teer de lpg spuitmond en span de borg moer aan Span de moer opnieuw aan Vervang de spuitmond voor de waakvlam door de moer los te maken en de leiding eruit te trekken Opgelet De spuitmond voor het waakvlammetje zou er nu moeten uitvallen en kan door de lpg spuitmond worden vervangen ...

Страница 241: ...een lpg configuratie om te zetten Beide openingen in de verticale buis dienen nu open te zijn klein aan de achterkant en groot aan de voorkant Kleine opening aan de achterkant Grote opening aan de voorkant Draai de twee moeren los en duw de plaat volledig naar de brander toe om de luch tinlaat voor de hoofdbrander naar een lpg configuratie om te zetten de opening is volledig open ...

Страница 242: ... Bij een lpg configuratie van de kachel moeten de luchtinlaten op deze manier draaien Gebruik de vier schroeven om de gasunit terug te plaatsen Plaats de geperforeerde plaat terug en voltooi de montage van de kachel Zie hoofdstuk Montage van secundaire branders ...

Страница 243: ...ent ervoor te zorgen dat u brandbare voorwerpen bijv meubelen niet dichterbij plaatst dan de afstanden die in de volgende tabellen worden vermeld brandgevaar Normale opstelling rechte hoek Zonder zijglas Viva 100 L Gas Viva 120 L Gas Viva 160 L Gas Ongeïsoleerd rookkanaal A Afstand tot meubilair min 700 mm Afstand tot brandbaar materiaal min D Achteraan wand 50 mm E Zijkant tot wand 250 mm Noorse ...

Страница 244: ...L Gas Normale opstelling rechte hoek Met zijglas Viva 100 L G Gas Viva 120 L G Gas Viva 160 L G Gas Ongeïsoleerd rookkanaal A Afstand tot meubilair min 700 mm Afstand tot brandbaar materiaal min D Achteraan wand 50 mm E Zijkant tot wand 300 mm Noorse brandmuur D Achteraan wand 50 mm E Zijkant tot wand 300 mm O Zijwaartse lengte brandmuur 425 mm P Voorwaartse lengte brandmuur 400 mm ...

Страница 245: ...Vlaams RAIS attika Gebruikershandleiding voor VIVA L Gas Hoekmontage 45 Zonder zijglas Viva 100 L Gas Viva 120 L Gas Viva 160 L Gas Ongeïsoleerd rookkanaal A Afstand tot meubilair min 700 mm Afstand tot brandbaar materiaal min D Achteraan wand 50 mm ...

Страница 246: ...Vlaams RAIS attika Gebruikershandleiding voor VIVA L Gas Hoekmontage 45 Met zijglas Viva 100 L G Gas Viva 120 L G Gas Viva 160 L G Gas Ongeïsoleerd rookkanaal A Afstand tot meubilair min 700 mm Afstand tot brandbaar materiaal min D Achteraan wand 150 mm ...

Страница 247: ...tanden bij niet brandbare wand Voor onderhoud en installatie raden wij een afstand van minimum 75 mm F tot niet brandbaar materiaal aan In geval van achterafvoer dient er plaats te zijn voor een meetaansluiting ter controle van de verbranding Normale opstelling rechte hoek Hoekmontage 45 ...

Страница 248: ...n het volgende merk aan On Top Metalotherm USD of On Top Metalotherm US Andere goedgekeurde schoorsteenfabrikanten zijn Jeremias Muelink Grol en Poujoulat PGI De afvoerpijpverbindingen moeten met behulp van klemband lekdicht worden gemaakt en stevig aan elkaar worden vastgezet In de ruimte waar de kachel zich bevindt moet er op de afvoer een meetaansluiting worden gemonteerd zodat er controle van ...

Страница 249: ...orts 600 G Vanaf een verticale afvoerbuis of aardleiding 300 H Vanaf een binnen of buitenhoek 600 I Bovengronds op dak of balkonniveau 300 J Van een naar de terminal gericht oppervlak 600 K Van een terminal gericht naar de terminal 600 L Vanaf een opening in de carport bijv deur of venster in de woning 1200 M Verticaal vanaf een terminal op dezelfde wand 1500 N Horizontaal vanaf een terminal op de...

Страница 250: ...d H 4x lengte verticale afvoerpijp V 1 voor Ø 130 Ø 200 buis 2x lengte verticale afvoerpijp V voor Ø 100 Ø 150 buis Max toelaatbare lengte H 15 m Min verticale hoogte afvoerpijp voor Viva L 0 5 m Verticale lengte van de afvoerpijp V in meter Max lengte horizon tale afvoerpijp H in meter Ø 130 Ø 200 Max lengte horizon tale afvoerpijp H in meter Ø 100 Ø 150 0 5 1 1 1 3 2 1 5 5 3 2 7 4 2 5 9 5 3 11 6...

Страница 251: ...n gebruikt voor de hele schoorsteen als alternatief Ø 130 Ø 200 adapter zodat Ø 130 Ø 200 kan worden gebruikt na de adapter Afvoerterminal Ø 130 Ø 200 Artikelnr USDVC 130 Ø 100 Ø 150 Artikelnr USDVC 100 Min verticale lengte afvoerpijp 0 5 m Rookgasbegrenzer voor Ø 100 Ø 150 Verticale hoogte 1 m Geen begrenzer Verticale hoogte 1 2 m Begrenzer Ø 62 mm Verticale hoogte 2 m Begrenzer Ø 76 mm ...

Страница 252: ...ers worden bovenop de leidingen gezet die door de geperforeerde plaat steken Opgelet er is een rechter en een linkerbrander Het is dus belangrijk dat deze worden geplaatst zoals weerge geven op de afbeelding m a w de zijde met de extra gaten naar buiten gericht Voorkant met gaten Achterkant zonder gat ...

Страница 253: ...t u de waakvlam en temperatuursen sor niet bedekt Er mag ook geen gloeiend materiaal onder het waak vlamscherm komen De tweede temperatuursensor moet eveneens vrij zijn van keramische kolen Bij inbedrijfstelling of onderhoud moet men ervoor zorgen dat de over loop van waakvlam naar hoofdbrander functioneert en dat de secundai re branders gemakkelijk ontsteken Waakvlam Tweede temperatuursensor ...

Страница 254: ...32 Vlaams RAIS attika Gebruikershandleiding voor VIVA L Gas Keramische blokken Blok 1 Blok 2 Blok 3 Blok 4 Blok 5 Blok 6 Blok A Blok B ...

Страница 255: ...ng Opgelet strooi geen kolen rond de waakvlam Plaats de 8 blokken zoals weergegeven op de afbeeldingen Opgelet de twee spe ciale blokken A en B hebben een uitsparing aan de onderkant die op de bovenkant van de twee secundaire branders past De gloeidraden bevin den zich tussen de kolen om het gloeieffect te bevorderen Blok 2 mag de tweede temperatuursensor niet aanraken Blok 2 ...

Страница 256: ...34 4 3 5 Vlaams RAIS attika Gebruikershandleiding voor VIVA L Gas Blok 3 Blok 4 Blok 5 ...

Страница 257: ...35 6 A B Vlaams RAIS attika Gebruikershandleiding voor VIVA L Gas Blok 6 Blok A Blok B ...

Страница 258: ...ippen De ontvanger heeft 4 AA 1 5 V batterijen Vergeet niet om het batterijdeksel terug te plaatsen Opstarten Plaatsen van batterijen De afstandsbediening en ontvanger op de kachel werken op batterijen Er wordt een batterijset meegeleverd Deze moet voor het opstarten worden gemonteerd Draai de twee haken aan de rechterkant met behulp van de meegeleverde 10 mm steeks leutel en open zo de deur U hee...

Страница 259: ...37 Vlaams RAIS attika Gebruikershandleiding voor VIVA L Gas Plaatsing van de batterijen in de ontvanger zie afbeelding De afstandsbediening heeft 2 AAA 1 5 V batterij en ...

Страница 260: ...matisch geselecteerd De synchronisatie van kachel en afstandsbediening verloopt als volgt Houd de Reset knop ingedrukt tot u eerst een korte en daarna een lange pieptoon hoort Laat de knop los Druk nu binnen de 20 seconden op de Pijl Omlaag knop op de afstands bediening Houd de knop ingedrukt tot u twee korte pieptonen van de ontvanger hoort Op de afstandsbediening verschijnt het woord conn De ont...

Страница 261: ...sklep Main Valve Knob 2 Open de Inlet pressure tap op de gasklep en sluit er een manometer op aan 3 Controleer of de gemeten druk overeenstemt met de voorgeschreven druk van de gasleverancier 4 Voer de test uit wanneer de kachel en secundaire branders op volle kracht branden alsook wanneer enkel de waakvlam brandt 5 Controleerbijeentelagedrukofdegastoevoerleidingendejuistegroot te hebben 6 Bij een...

Страница 262: ...40 Vlaams RAIS attika Gebruikershandleiding voor VIVA L Gas ...

Страница 263: ...en rook van het kacheloppervlak kunnen komen wanneer u hem voor het eerst aansteekt Dit komt doordat de verf en materialen moeten uitharden maar de geur verdwijnt snel Ventileer de ruimte grondig liefst met tocht Houd kinderen en huisdieren gedurende dit proces uit de buurt van de kachel Tijdens dit proces moet u erop letten dat u de zichtbare oppervlakken en het glas niet aanraakt zeer heet Boven...

Страница 264: ...ijen mogen niet gelijk tijdig worden gebruikt Hetzelfde geldt voor batterijen van verschillende merken Als er tegelijkertijd verschillende batterijen worden gebruikt kunnen deze oververhitten lekken en of ontploffen Softwareversie Druk tegelijkertijd op en De softwareversie wordt weergegeven Modelnummer van handset Druk tegelijkertijd op en Het modelnummer van de handset wordt weergegeven OPGELET ...

Страница 265: ...t 6 Druk op of om de minuten te kiezen 7 Druk tegelijkertijd op en om de tijd te bevestigen of wacht even Druk tegelijkertijd op en om tussen C en F te wisselen OPGELET Kiest u F dan krijgt u een 12 uursklok Kiest u C dan krijgt u een 24 uursklok ON Druk tegelijkertijd op en om de kinderbeveiliging te activeren Als wordt weergegeven kan de hand set niet worden gebruikt Enkel de OFF functie is dan ...

Страница 266: ...gelijkertijd op en tot er twee korte pieptonen weerklinken Verschillende knipperende streepjes bevestigen dat de startsequentie is begonnen Laat nu de knoppen los Zodra de waakvlamontste king is bevestigd wordt de hoofdgastoevoer ingescha keld Als de hoofdbrander is ontstoken gaat de handset automatisch over op hand matige modus Let op Houd onmiddellijk na het plaatsen van de batterijen de knop 10...

Страница 267: ...dt automatisch bijgesteld om de ingestelde tempera tuur te bereiken Programmamodus PROGRAMMA 1 en 2 kun nen beide worden gepro grammeerd om op bepaalde tijden bij een ingestelde temperatuur te starten of te stoppen Spaarstand De hoogte van de vlam varieert tussen hoog en laag Als de kamertemperatuur lager ligt dan de ingestelde temperatuur blijft de vlam hoogte langer hoog Als de kamertemperatuur ...

Страница 268: ...gegeven ALL wordt kortston dig weergegeven en HOUR knippert 8 Druk op of om de tijd te kiezen 9 Druk op om te bevestigen 1en ON worden weerge geven ALL wordt kortstondig weergegeven en Minutes knippert 10 Druk op of om de minuten te kiezen 11 Druk op om te bevesti gen UITSCHAKELTIJD INSTELLEN PROGRAMMA 1 12 1en OFF worden weer gegeven ALL wordt kortston dig weergegeven en HOUR knippert 13 Druk op ...

Страница 269: ...oor één enkele weekdag voor verschillende weekdagen of voor alle weekdagen Wacht tot het instellen voltooid is HELPMODUS Na ontsteking is brander 1 ingeschakeld en brander 2 heeft de laatste instelling ON Druk op om een brander in te schakelen wordt weergegeven OFF Druk op om een brander uit te schakelen verdwijnt Opgelet De vergrendelende magneetklep kan niet handmatig werken Als de batterij in d...

Страница 270: ...gt u toegang tot de gasklep Deze bevindt zich achter de deur en onder de verbrandingskamer Draai de gasklep in wijzerzin naar OFF Zet de knop voor de handmatige bediening op man U ontsteekt het gas voor de waakvlam door de waakvlamgasklep met een spits voorwerp ingedrukt te houden Steek de waakvlam met een lucifer of dergelijke aan Houd de waakvlamgasklep ge durende ongeveer 20 seconden na het aan...

Страница 271: ...geschakeld en bijgesteld door de gasklep in tegenwijzerzin naar 2 ON te draaien De gasklep moet min 30 seconden volledig openstaan voordat de vlammen lager worden gezet Wanneer de juiste instelling is bereikt kan de deur worden gesloten U schakelt de kachel opnieuw uit door de deur te openen en de gasklep terug naar 3 OFF te zetten de waakvlam blijft branden sluit dus de gastoevoer af 1 ON 2 Gaskl...

Страница 272: ...uit Neem de ge perforeerde plaat eruit 5 Stofzuig de volledige brander 6 Gebruik een zachte borstel en stofzuiger om de verbindingen van de waakvlambrander proper te maken Buig of corrigeer de tempera tuursensoren niet 7 Zet de gastoevoer aan en controleer op lekken Controleer of de bran ders en de waakvlameenheid in goede staat zijn en werken 8 Plaats de geperforeerde plaat terug 9 Plaats de kole...

Страница 273: ...k de keramische onderdelen voorzichtig schoon een zachte borstel en een stofzui ger Vervang beschadigde onderdelen enkel door originele door RAIS gespecificeerde on derdelen Afgedankt keramiek verpakt u in plastic zakken en levert u binnen op de juiste afvallo caties Wij raden u aan om een stofzuiger met een HEPA filtersysteem te gebruiken Vervang de kolen en sluit de deur Zorg dat de kachel corre...

Страница 274: ...r Viva 120 L een set bevat 4 stuks 2710611SV Roestvrije Classic bovenplaat voor achterafvoer 2710612SV Roestvrije Classic bovenplaat voor bovenafvoer 3713506 Netadapter Sluit de kachel op het elektriciteitsnet aan 3713507 MyFire wifibox met kabel Bediening van de oven via een app 3713595 Propaangas lpg ombouwset ...

Страница 275: ...door de kacheldeur te openen en de kleine plug van de wifikabel in de SI ingang te steken De brede plug van de wifikabel wordt op de wifibox geplaatst Bij het aansluiten van de wifibox wordt een nedadapter gebruikt aansluiting op het elektriciteitsnet die met de ontvanger wordt ver bonden De netadapter wordt verbonden met de ontvanger van de kachel neem de batterijen uit de ontvan ger om te vermij...

Страница 276: ...n dat Het thuisnetwerk toegankelijk is De naam en het wachtwoord voor het thuisnet werk correct zijn De SSID sleutel van de wifirouter niet verborgen is Het signaal van het thuisnetwerk binnen bereik is De wifirouter het UDP protocol User Datagram Protocol ondersteunt INSTELLINGEN VOOR STOOKPLAATS BEVESTIGEN 1 Drukop Finish Afsluiten nadatudeinstellin gen voor de stookplaats heeft bevestigd ER VER...

Страница 277: ...er worden gekocht Zie reserveonderdelentekening achteraan in de handleiding xx facultatieve kleurcode Pos Aan tal Artikelnr Beschrijving 1 1 37120xx Glazen deur 2 1 37121xx Classic glazen deur 3 1 2710601xx Bovenplaat voor achterafvoer 4 1 2710602xx Bovenplaat voor bovenafvoer 5 1 2720601xx Bovenplaat voor achterafvoer diep getrokken 6 1 2720602xx Bovenplaat voor bovenafvoer diep getrokken 7 1 171...

Страница 278: ...Beschrijving 1 1 37120xx Glazen deur 2 1 37121xx Classic glazen deur 3 1 2710601xx Bovenplaat voor achterafvoer 4 1 2710602xx Bovenplaat voor bovenafvoer 5 1 2720601xx Bovenplaat voor achterafvoer diepge trokken 6 1 2720602xx Bovenplaat voor bovenafvoer diepge trokken 7 1 1715500 Pakkingset voor glazen deur 8 1 1715500 2 Pakkingset voor Classic glazen deur 9 1 1715500 4 Pakkingset voor zijglas gla...

Страница 279: ...assemblage vooraan 12 RA10L76 Brander verhoogde assemblage links 13 RA10R76 Brander verhoogde assemblage rechts 14 RK10P07 Complete branderassemblage aard gas RK10N07 Complete brander assemblage lpg 15 RK10 SEAL 05 Brander afdichtset 16 3711213 Roosterassemblage 17 RK10_N1_GV60 Gasklepassemblage aardgas 18 RK10_P1_GV60 Gasklepassemblage lpg 19 GV S60C 12 Vergrendelende magneetklep 20 G6R R4AS Ontv...

Страница 280: ...mbar I3P 37 G31 bij 37 mbar I3B P 50 G30 G31 bij 50 DE Duitsland I2ELL G25 bij 20 mbar I2E G20 bij 20 mbar 3P 50 G31 bij 50 mbar I3B P 50 G30 G31 bij 50 DK Denemar ken I2H G20 bij 20 mbar I3B P 30 G30 G31 bij 30 mbar EE Estland I2H G20 bij 20 mbar I3B P 30 G30 G31 bij 30 mbar ES Spanje I2H G20 bij 20 mbar I3 G31 G31 bij 28 37 mbar I3P 37 G31 bij 37 mbar FI Finland I2H G20 bij 20 mbar I3P 30 G31 bi...

Страница 281: ...B P 30 G30 G31 bij 30 mbar NL Neder land I2L G25 bij 25 mbar I2EK G25 3 bij 25 mbar I3P 50 G31 bij 50 mbar I3P 30 G31 bij 30 mbar I3P 37 G31 bij 37 mbar I3B P 30 G30 G31 bij 30 mbar NO Noorwe gen I2H G20 bij 20 mbar I3B P 30 G30 G31 bij 30 mbar PL Polen I2E G20 bij 20 mbar I3P 37 G31 bij 37 mbar PT Portugal I2H G20 bij 20 mbar I3 G31 G31 bij 28 37 mbar I3P 37 G31 bij 37 mbar RO Roeme nië I2E G20 b...

Страница 282: ...kW 8 2 8 2 7 6 7 7 6 8 Verbruik m h 0 84 0 840 0 905 0 89 0 8 Branderdruk heet mbar 13 2 13 2 16 4 16 6 13 4 Injectormarkering 120 centraal 260 links 260 rechts Waakvlam G30 ZP2 312 31 2 inj Efficiëntieklasse 2 NOx klasse 5 Type C11 C31 Gas type City gas G150 1 Supply Pressure mbar 8 Nominal Heat Input Gross Hs kW 9 4 Nominal Heat Input Nett Hi kW 8 4 Consumption m hr 1 5 Burner Pressure hot mbar ...

Страница 283: ...W 7 4 7 4 7 4 7 4 7 4 Verbruik m h 0 225 0 225 0 29 0 29 0 29 0 253 Branderdruk heet mbar 27 27 36 36 36 28 Injectormarkering 80 centraal 100 links 100 rechts Waakvlam G30 ZP2 271 27 1 inj Efficiëntieklasse 2 NOx klasse 5 Type C11 C31 Deze kachel is getest en gecertificeerd voor gebruik met aardgas lpg en bioprop aan Biopropaan kan worden gebruikt als de kachel werd aangepast voor gebruik met lpg ...

Страница 284: ...62 V 20 0 5m 20 0 5m Vlaams RAIS attika Gebruikershandleiding voor VIVA L Gas VOORBEELDEN VAN SCHOORSTEENOPLOSSINGEN Verticale dakterminal Afstand V 500 mm 12 m min max ...

Страница 285: ...V3 V H 7 4 17 F 17 17 1 2 3 6 5 Vlaams RAIS attika Gebruikershandleiding voor VIVA L Gas Verticale dakterminal PT 3 van 3 PT 1 van 3 PT 2 van 3 Bestaande schoorsteen Flexibele rookkanaalvoering Ø 100 AISA 316Ti ...

Страница 286: ...kershandleiding voor VIVA L Gas Verticale dakterminal bij schuin dak Afstand H 0 3 m min max Afstand V1 500 mm 10 m min max Afstand V2 200 mm 10 m min max Afstand V3 500 mm 10 m min max Afstand V V1 V2 V3 1 2 m 12 m min max Afstand V 2 x H min ...

Страница 287: ... RAIS attika Gebruikershandleiding voor VIVA L Gas Verticale dakterminal met bocht Afstand H 0 3 m min max Afstand V1 500 mm 10 m min max Afstand V2 500 mm 10 m min max Afstand V V1 V2 1 m 12 m min max Afstand V 2 x H min ...

Страница 288: ...ing voor VIVA L Gas Bestaande schoorsteen renovatiekit PT 3 van 3 PT 1 van 3 PT 2 van 3 Bestaande schoorsteen Flexibele rookkanaalvoering Ø 100 AISA 316Ti Afstand V 1 m 12 m min max Bestaande schoorsteen rookkanaal moe ten door een bevoegde technicus worden gecontroleerd ...

Страница 289: ...schoor steen Flexibele rookka naalvoering Ø 100 AISA 316Ti PT 3 van 3 PT 1 van 3 PT 2 van 3 Afstand H 0 3 m min max Afstand V1 500 mm 10 m min max Afstand V2 200 mm 10 m min max Afstand V3 500 mm 10 m min max Afstand V V1 V2 V3 1 2 12 m min max Afstand V 2 x H min Bestaande schoorsteen met bocht renovatiekit ...

Страница 290: ...68 Verticale dakterminal met achteruitgang voor meer informatie zie paragraaf Plaatsing van schoorsteenterminals Vlaams RAIS attika Gebruikershandleiding voor VIVA L Gas ...

Страница 291: ...69 Vlaams RAIS attika Gebruikershandleiding voor VIVA L Gas Horizontale muurterminal for more information see paragraph Location of chimney terminals ...

Страница 292: ...70 Snorkel Snorkel Top outlet achteruitgang Horizontale muurterminal for more information see paragraph Location of chimney terminals Vlaams RAIS attika Gebruikershandleiding voor VIVA L Gas ...

Страница 293: ...Gas Schoorsteenonderdelen 1 US 25 100 Ø 100 US 25 130 Ø 130 Lengte 250 mm 2 US 50 100 Ø 100 US 50 130 Ø 130 Lengte 500 mm 3 US 100 100 Ø 100 US 100 130 Ø 130 Lengte 1000 mm 4 USKB 100 Ø 100 USKB 130 Ø 130 Klemband 5 USAB 100 Ø 100 USAB 130 Ø 130 Beschermband ...

Страница 294: ...A L Gas 6 USPP 100 Ø 100 USPP 130 Ø 130 Aanpasbare lengte 7 USDV2 100 Ø 100 Verticale terminal USKB 8 USDHCE 10 Horizontale terminal excentrische uitgang 9 USEB 100 Ø 100 USEB 130 Ø 130 Montagebeugel 10 USMB 100 Ø 100 USMB 130 Ø 130 Aanpasbare wandbeugel ...

Страница 295: ...0 130 Ø 130 90 elleboogpijp 14 USSR 100 Ø 100 USSR 130 Ø 130 Kap 12 USB 45 100 Ø 100 USB 45 130 Ø 130 45 elleboogpijp 15 USDPAL 100 Ø 100 USDPAL 130 Ø 130 Kap voor plat dak Aluminium 13 USB 15 100 Ø 100 USB 15 130 Ø 130 15 elleboogpijp 16 USDP 100 Ø 100 USDP 130 Ø 130 Kap voor plat dak ...

Страница 296: ...Gas 20 USCP 100 Ø 100 USCP 130 Ø 130 Aanpasbare kap geleverd als paar 18 USDH 100 Ø 100 USDH 130 Ø 130 Schuine kap 5 30 21 USMPG 100 Ø 100 USMPG 130 Ø 130 Wandafdekking 19 USLS 100 Ø 100 USLS 130 Ø 130 Schuine kap 20 45 22 USA Ø 100 130 USA D 99 129 ADAPTOR ...

Страница 297: ...1 POSITIV V I VA L G A S I ...

Страница 298: ...PL gas di petrolio liquefatti vedi la targhetta del tipo sotto PROPANO Queste istruzioni d uso riguardano i seguenti modelli Viva 100 L Gas senza vetro laterale Viva 100 LG Gas con vetro laterale Viva 100 L Classic Gas senza vetro laterale Viva 100 LG Classic Gas con vetro laterale Viva 120 L Gas senza vetro laterale Viva 120 LG Gas con vetro laterale Viva 120 L Classic Gas senza vetro laterale Vi...

Страница 299: ...OSIZIONE DEI COMIGNOLI 27 USCITA A MURO ORIZZONTALE DEL TIPO C11 28 USCITA A TETTO VERTICALE DEL TIPO C31 29 MONTAGGIO DI BRUCIATORI SECONDARI 30 Disposizione di brace e ciocchi 31 AVVIAMENTO PILE 36 IMPOSTAZIONE DI UN CODICE ELETTRONICO 38 MESSA IN FUNZIONE 39 PRIMA ACCENSIONE 41 ISTRUZIONI D USO TELECOMANDO 42 UTILIZZO DELLA STUFA SENZA TELECOMANDO 48 MANUTENZIONE MANUTENZIONE 50 PULIZIA 51 ACCE...

Страница 300: ...ione al design e alla qualità Per poter apprezzare al massimo le caratteristiche della stufa prima dell installazione e della messa in funzione si dovrebbero leggere accuratamente le Istruzioni d uso Per richiedere prestazioni in garanzia e per qualsiasi altra richiesta relativa alla stufa si dovrebbe avere a portata di mano il numero di serie della stufa Consigliamo pertanto di riportare il numer...

Страница 301: ...nsione Pile La garanzia decade nei seguenti casi danni causati da surriscaldamento danni causati da influssi esterni e dall impiego di combustibili non idonei mancato rispetto delle norme di legge o delle raccomandazioni per l installazione nonché modifiche arbitrarie della stufa manutenzione carente e cura insufficiente In caso di danni si prega di rivolgersi al proprio rivenditore In caso di riv...

Страница 302: ... I2E 78 3 78 3 78 3 Emissioni di CO PPM G20 I2H I2E 31 31 31 Emissioni di NOx G20 I2H I2E 23 23 23 Intertek Testing Certification Ltd Eingetragener Sede legale Academy Place 1to 9 Brook Street Brentwood Essex CM14 5NQ Gran Bretagna N registrazione 3272281 Inghilterra partita I V A GB 672 7639 96 011 Tel 44 1277 223 400 Fax 44 1277 223 127 Distanze Dimensioni Vedasi i disegni quotati al fondo del m...

Страница 303: ...rverà per impieghi successivi Le Istruzioni d uso sono necessarie per la manutenzione della stufa Occorre accertare che il terminale della canna fumaria non sia ostruito né coperto da rami arbusti e simili Inoltre non è consentito applicare oggetti o barriere di protezione al comignolo Pulire sempre il vetro dello sportello prima di accendere la stufa ed eliminare le impronte di mani e dita perché...

Страница 304: ...limentazione del gas Se si sente odore di gas chiudere immediatamente l afflusso di gas Aerare il locale aprendo porte e finestre e non utilizzare dispositivi elet trici nelle vicinanze della stufa Consultare un installatore autorizzato di impianti di riscaldamento idrici sanitari o del gas ...

Страница 305: ...i di erogazio ne del Paese in cui la stufa deve essere installata Va assicurato che l erogazione del gas avvenga nella quantità e con la pressione necessarie riportate sulla targhetta del tipo Allacciamento del gas Il tubo del gas deve avere un diametro esterno di 8 mm Ventilazione Questa stufa ha una camera di combustione chiusa ed è concepita per un flus so bilanciato Pertanto non è necessario a...

Страница 306: ... alle distanze minime riportate nel paragrafo seguente pericolo di incendio Quando si sceglie la collocazione della stufa si dovrebbe tenere conto della distribuzione del calore verso gli altri ambienti Ciò consentirà di sfruttare al me glio la stufa Controllare la stufa alla consegna per individuare eventuali difetti Modifica dell allacciamento alla canna fumaria La stufa viene consegnata con uno...

Страница 307: ...e viti sulla flangia più inter na nella parte bassa della stufa Togliere la flangia 4 Svitare la piastra di coper tura esterna sul retro della stufa e posarla sulla stufa 5 Per aprire le chiusure ruo tare i due ganci dello spor tello in alto e in basso con l aiuto di una chiave fissa da 10 mm 6 I bruciatori secondari pos sono essere sollevati ed estrat ti verticalmente ...

Страница 308: ...vere gli elementi laterali 9 Poi si può togliere il retro e smontare la piastra di copertura 7 Se sono presenti cioc chi in ceramica dovranno essere rimossi 10 La piastra di copertura interna viene applicata sul lato inferiore della coper tura superiore come in figura 11 Montare i raccordi dove si trovavano le piastre di copertura quindi riappli care il retro Riposizionare ciocchi e bruciatori ...

Страница 309: ...ita all uso di bombole del gas GPL La conversione deve essere effettuata esclusivamente da installatori autorizzati Kit di conversione Utilizzare l articolo n 3713595 Questo kit contiene 4 nuovi ugelli per il propano GPL Gli ugelli dei bruciatori secondari per GPL sono contrassegnati dal numero 100 Gli ugelli dei bruciatori secondari per gas naturale sono contrasse gnati dal numero 260 ...

Страница 310: ...fiamma pilota per GPL è contrassegnato dal nume ro 27 L ugello della fiamma pilota per gas naturale è contrassegnato dal numero 32 L ugello del bruciatore principale per GPL è contrassegnato dal numero 80 L ugello del bruciatore principale per gas naturale è contrassegnato dal numero 120 ...

Страница 311: ...ioni d uso per VIVA L GAS È necessario rimuovere l unità del gas in modo da poter accedere agli ugelli Si proceda come segue Sollevare la piastra traforata ed estrarla dalla stufa Svitare le quattro viti che fissano l uni tà del gas ...

Страница 312: ... cautela il tubo Svitare il contro dado e successivamente l ugello Montare l ugello per GPL e avvitare il controdado Infine si serra nuovamente il circolatore Dopo aver smontato l unità del gas si devono sostituire i quattro ugelli e regolare i tre ingressi dell aria Successivamente estrarre con cautela l unità del gas ruotandola e inclinandola legger mente ...

Страница 313: ...a il tubo Successivamente è possibile svitare l ugello Montare l ugello per GPL e avvitare il controdado Infine si serra nuovamente il circolatore Per sostituire l ugello della fiamma pilota è necessario svitare il circolatore e sfilare con cautela il tubo Avvertenza Il piccolo ugello della fiamma pilota dovrebbe cadere fuori ed essere sostituito da un ugello GPL ...

Страница 314: ...circa 90 gli ingressi In questo modo entrambe le aper ture nel tubo verticale piccola sul retro e grande sul fronte sono aperte Apertura piccola sul retro Apertura grande sul fronte L afflusso di aria del bruciatore principale viene riconfigurato per il GPL svitando i due dadi e spostando la piastra completamen te all interno verso il bruciatore apertura completamente libera ...

Страница 315: ...L GAS Per convertire al GPL le prese d aria devono essere quindi ruotate L unità del gas viene nuovamente fissata con le quattro viti La piastra perforata viene rimontata e la stufa completata Vedere anche il paragrafo Montaggio di bruciatori secondari ...

Страница 316: ...to o le autorità edilizie locali Va assicurato che oggetti infiammabili ad es mobili si trovino alle distanze minime riportate nella tabella pericolo di incendio Installazione normale ad angolo retto Senza vetro laterale Viva 100 L Gas Viva 120 L Gas Viva 160 L Gas Canale da fumo non isolato A Distanza da mobili min 700 mm Distanza da materiali infiammabili min D sul retro parete 50 mm E laterale ...

Страница 317: ...Installazione normale ad angolo retto Con vetro laterale Viva 100 L G Gas Viva 120 L G Gas Viva 160 L G Gas Canale da fumo non isolato A Distanza da mobili min 700 mm Distanza da materiali infiammabili min D sul retro parete 50 mm E laterale da parete 300 mm Muro refrattario norvegese D sul retro parete 50 mm E laterale da parete 300 mm O estensione laterale del muro refrattario 425 mm P estension...

Страница 318: ...ano RAIS attika Istruzioni d uso per VIVA L GAS Installazione a 45 Senza vetro laterale Viva 100 L Gas Viva 120 L Gas Viva 160 L Gas Canale da fumo non isolato A Distanza da mobili min 700 mm Distanza da materiali infiammabili min D sul retro parete 50 mm ...

Страница 319: ...no RAIS attika Istruzioni d uso per VIVA L GAS Installazione a 45 Con vetro laterale Viva 100 L G Gas Viva 120 L G Gas Viva 160 L G Gas Canale da fumo non isolato A Distanza da mobili min 700 mm Distanza da materiali infiammabili min D sul retro parete 150 mm ...

Страница 320: ...abile Per facilitare l installazione e la manutenzione si consiglia di rispettare una distanza mi nima di 75 mm F dal materiale refrattario Con uno scarico posteriore tuttavia deve esserci spazio sufficiente per un raccordo di misurazione per il controllo della combu stione Installazione normale ad angolo retto Installazione a 45 ...

Страница 321: ...ente marca On Top Metalotherm USD oppure On Top Metalotherm US Altri produttori di canne fumarie approvati sono Jeremias Muelink Grol e Poujou lat PGI Le giunzioni dei tubi di scarico devono essere a tenuta e assicurate con nastro di fissag gio Allo scarico deve essere applicato un raccordo di misurazione nello stesso locale in cui si trova la stufa per consentire un controllo della combustione Lo...

Страница 322: ...etti di carport 600 G Da un tubo di discesa o di scarico verticale 300 H Da un angolo interno o esterno 600 I Sopra la terra a livello del tetto o di un balcone 300 J Da una superficie che sia rivolta verso il terminale 600 K Da un terminale che sia rivolto verso il terminale 600 L Da un apertura nel carport ad es porta finestra nell abitazione 1200 M In verticale da un terminale nella stessa pare...

Страница 323: ...scarico verticale V 1 per tubi di dimensioni Ø 130 Ø 200 2 X lunghezza del tubo di scarico verticale V per tubi di dimensioni Ø 100 Ø 150 Lunghezza massima H 15 m Lunghezza minima per tubo di scarico verticale per Viva L 0 5 m Lunghezza del tubo di scarico verticale V in metri Lunghezza massima del tubo di scarico orizzontale H in metri Ø 130 Ø 200 Lunghezza massima del tubo di scarico orizzontale...

Страница 324: ... utilizzabile per tutta la canna fumaria alternati va Ø 130 Ø 200 utilizzabile con adattatore Ø 130 Ø 200 dietro l adattatore Terminale di scarico Ø 130 Ø 200 Art n USDVC 130 Ø 100 Ø 150 Art n USDVC 100 Lunghezza minima della canna fumaria verticale 0 5 m Limitatore fumi Ø 100 Ø 150 Altezza verticale 1 m nessun limitatore Altezza verticale 1 2 m limitatore Ø 62 mm Altezza verticale 2 m limitatore ...

Страница 325: ...ori vengono collegati ai tubi che fuoriescono dalle aper ture della piastra C è un brucia tore per il lato sinistro e uno per il lato destro È quindi importan te che siano montati come raf figurato cioè lateralmente con le aperture supplementari rivolte verso l esterno Fronte con fori Retro senza fori ...

Страница 326: ...ra non vengano coperti Neppure la brace deve finire al di sotto della fiamma pilota Anche l altro sensore della temperatura non deve essere coperto dai ciocchi in ceramica Prima della messa in funzione o di interventi di manutenzione alla stufa occorre accertare che l accensione incrociata funzioni dalla fiamma pilota al bruciatore principale e che i bruciatori secondari rimangano spenti Fiamma pi...

Страница 327: ...32 Italiano RAIS attika Istruzioni d uso per VIVA L GAS Ciocchi in ceramica Ciocco 1 Ciocco 2 Ciocco 3 Ciocco 4 Ciocco 5 Ciocco 6 Ciocco A Ciocco B ...

Страница 328: ...a non deve esserci brace nell area della fiamma pilota Disporre gli 8 ciocchi come raffigurato I ciocchi A e B sono dotati di una scana latura nella parte posteriore che si adatta perfettamente ai bruciatori secondari I fili incandescenti vengono posati tra i ciocchi per sottolineare l effetto brace 2 Sensore temperatura non deve toccare il se condo sensore di calore Ciocco 2 ...

Страница 329: ...34 4 3 5 Italiano RAIS attika Istruzioni d uso per VIVA L GAS Ciocco 3 Ciocco 4 Ciocco 5 ...

Страница 330: ...35 6 A B Italiano RAIS attika Istruzioni d uso per VIVA L GAS Ciocco 6 Ciocco A Ciocco B ...

Страница 331: ...Il ricevitore utilizza 4 pile di tipo AA 1 5 V Non dimenticare di riapplicare il coperchio al vano Avviamento Inserimento delle pile Il ricevitore della stufa e il telecomando funzionano a pile La dotazione comprende un set di pile che devo no essere inserite prima della messa in funzione Per raggiungere il vano pile del ricevitore aprire lo sportello ruotando i due ganci sul lato destro con l aiu...

Страница 332: ...37 Italiano RAIS attika Istruzioni d uso per VIVA L GAS Le pile nel ricevitore vanno disposte come raffigurato Il telecomando utilizza 2 pile di tipo AAA 1 5 V ...

Страница 333: ...camente un codice tra 65 000 possibili combinazioni Stufa e telecomando vengono sincronizzati come segue Tenere premuto il tasto Reset fino a sentire un beep breve e uno lungo Rilasciare il tasto Entro 20 secondi premere il tasto Freccia in basso sul telecomando Tenere pre muto il tasto fino a sentire due beep brevi dal ricevitore Sul telecomando compare la parola conn Ricevitore e telecomando ade...

Страница 334: ...udere la valvola del gas main valve knob 2 Aprire l inlet pressure tap della valvola del gas e collegare un manometro 3 Controllare che la pressione misurata coincida con la pressione prescritta dalla società erogatrice del gas 4 Eseguire il controllo quando la stufa bruciatori secondari inclusi sta ero gando il massimo calore e quando brucia solo la fiamma pilota 5 Se la pressione è bassa verific...

Страница 335: ...40 Italiano RAIS attika Istruzioni d uso per VIVA L GAS ...

Страница 336: ...arsi odori sgradevoli o fumi Ciò è dovuto all evaporazione o all essiccamento di vernici e materiali utilizzati ma l odore svanisce rapi damente È buona norma assicurare una buona aerazione possibilmente con una corrente di aria In questa fase tenere lontani dalla stufa bambini e animali domestici Nel corso di questo processo attenzione a non toccare le superfici a vista né il vetro perché raggiun...

Страница 337: ... ter mine dell attivazione L attivazione è terminata quando compare il simbolo della funzione Possono essere attivate e disattivate le seguenti funzioni BLOCCO BAMBINI MODALITÀ PROGRAMMAZIONE MODALITÀ TERMOSTATO contemporanea di sattivazione di MODALITÀ PROGRAMMAZIONE MODALITÀ RISPARMIO LUCE VARIATORE MODALITÀ VENTILATORE ARIA AMBIENTE MODALITÀ FUNZIONE ASSISTENZA TIMER PER COUNTDOWN Disattivazion...

Страница 338: ...asto o si scelgo no i minuti 7 Per confermare si premono con temporaneamente i tasti e Premendo contemporanea mente i tasti e si passa da C a F e viceversa AVVERTENZA Quando si impostano i gradi F l ora viene indicata nel formato a 12 ore Quando si impostano i gradi C l ora viene indica ta nel formato a 24 ore ON Per attivare premere con temporaneamente i tasti e Quando compare il telecomando può ...

Страница 339: ...eep e una serie di trattini lam peggianti non confermano che la frequenza di avvio è terminata Successivamente rilasciare i tasti L alimentazione principale del gas inizia non appena l accensione della fiamma pilota è stata confermata Non appena il bruciatore principale è stato acceso il telecomando passa auto maticamente alla modalità manuale AVVERTENZA Subito dopo aver inserito le pile tenere pr...

Страница 340: ...do l altezza della fiamma viene adattata automaticamente al fine di raggiungere la temperatura impostata Modalità programma zione I PROGRAMMI 1 e 2 possono essere program mati entrambi in modo da accendersi o spegnersi a una determinata temperatura e in determinati orari Modalità risparmio L altezza della fiamma oscilla tra alta e bassa Quando la temperatura ambiente è inferiore alla temperatura i...

Страница 341: ...DI FUNZIONA MENTO PROGRAMMA 1 7 Compaiono 1 ON ALL viene visualizzato breve mente e HOUR lampeggia 8 Premendo il tasto o si sceglie l ora 9 Si conferma con il tasto Compaiono 1 ON ALL viene visualizzato brevemente e Minutes lampeggia 10 Premendo il tasto o si scelgono i minuti 11 Si conferma con il tasto IMPOSTAZIONE DELL O RARIO DI SPEGNIMENTO PROGRAMMA 1 12 Compaiono 1 OFF ALL viene visualizzato...

Страница 342: ...e impostati per un singolo giorno della settimana o per tutti i giorni Attendere il termine dell impostazione MODALITÀ ASSISTENZA Dopo l accensione è attivo il bruciatore 1 mentre il bruciatore 2 si trova nell ultimo stato impostato ON Il bruciatore viene acceso con il tasto OFF Il bruciatore viene spento con il tasto Avvertenza La valvola elettromagnetica non fun ziona manualmente Quando la batte...

Страница 343: ...o la camera di combustione Ruotare la valvola del gas in senso orario verso il basso posizio nandola su OFF Ruotare l interruttore per il comando manuale su man Premendo l interruttore si accende il gas per la fiamma pilota quando la valvola del gas viene abbassata con un oggetto appun tito Accendere la fiamma pilota con un fiammifero o simili Dopo l accensione della fiamma pilota tenere la valvol...

Страница 344: ...rli su ON ruotando la valvola del gas in senso antiorario su 2 La valvola del gas dovrebbe rimanere completamente aperta per almeno 30 secondi prima di abbassare eventualmente le fiamme Una volta raggiunta la regolazione corretta si può chiudere lo sportello La stufa si spegne aprendo lo spor tello e riportando la valvola del gas su 3 OFF Se la fiamma pilota continua a bruciare chiudere l alimenta...

Страница 345: ...l aspirapolvere 6 Pulire il bruciatore pilota con una spazzola morbida e un aspirapolve re I sensori della temperatura non devono essere piegati né disalline ati 7 Accendere l alimentazione del gas e prestare attenzione a eventuali perdite Controllare che bruciatori e unità pilota siano in buone con dizioni e funzionino correttamente 8 Rimettere la piastra perforata 9 Riposizionare la brace e i ci...

Страница 346: ...i in ceramica utilizzando una spazzola morbida e un aspirapol vere Sostituire solo le parti danneggiate con ricambi originali Rais Raccogliere le parti in ceramica non più utilizzate in sacchetti di plastica e smaltirle negli appositi centri di raccolta Si consiglia di utilizzare un aspirapolvere con un sistema filtrante HEPA Inserire nuovamente la brace e chiudere lo sportello Controllare che la ...

Страница 347: ...0611SV Piastra di copertura Classic in acciaio legato per lo scarico posteriore 2710612SV Piastra di copertura Classic in acciaio legato per lo scarico superiore 3713506 Adattatore Mains La stufa va allacciata alla rete elettrica 3713507 Modulo WiFi MyFire cavo incl Comando della stufa tramite un app 3713595 Kit di conversione propano GPL ...

Страница 348: ...e A tale scopo si apre lo sportello e si collega il piccolo connettore del cavo WLAN all ingresso SI Il connettore largo del cavo WLAN viene collegato al modulo WLAN Quando si collega il modulo WLAN l adattatore Mains allacciamento alla rete elettrica viene utilizzato per il collegamento al ricevitore L adattatore Mains viene collegato al ricevitore della stufa Le pile de vono essere rimosse dal r...

Страница 349: ... rou ter WLAN rete domestica è necessario che sia disponibile una rete domestica il nome e il codice di accesso per la rete dome stica siano corretti la chiave SSID del router WLAN non sia nasco sta il segnale della rete domestica abbia una porta ta sufficiente il router WLAN utilizzi il protocollo UDP User Datagram Protocol CONFERMARE LE IMPOSTAZIONI DEL FOCOLARE 1 Dopo aver confermato le imposta...

Страница 350: ...cambi al fondo del manuale xx codice colore a scelta Pos Q tà Art n Descrizione 1 1 37120xx Sportello in vetro 2 1 37121xx Sportello in vetro Classic 3 1 2710601xx Piastra di copertura per scarico posteriore 4 1 2710602xx Piastra di copertura per scarico sul lato superiore 5 1 2720601xx Piastra di copertura per scarico posteriore imbutita 6 1 2720602xx Piastra di copertura per scarico sul lato sup...

Страница 351: ...assic 3 1 2710601xx Piastra di copertura per scarico posteriore 4 1 2710602xx Piastra di copertura per scarico sul lato superiore 5 1 2720601xx Piastra di copertura per scarico posteriore imbutita 6 1 2720602xx Piastra di copertura per scarico sul lato superiore imbutita 7 1 1715500 Set di guarnizioni per sportello in vetro 8 1 1715500 2 Set di guarnizioni per sportello in vetro Classic 9 1 171550...

Страница 352: ... 12 RA10L76 Gruppo bruciatore rialzato sinistro 13 RA10R76 Gruppo bruciatore rialzato destro 14 RK10P07 Gruppo bruciatore completo gas naturale RK10N07 Gruppo bruciatore completo GPL 15 RK10 SEAL 05 Set di guarnizioni per bruciatore 16 3711213 Gruppo focolare 17 RK10_N1_GV60 Gruppo valvola del gas per gas naturale 18 RK10_P1_GV60 Gruppo valvola del gas per GPL 19 GV S60C 12 Solenoide bistabile 20 ...

Страница 353: ...31 G31 a 28 37 mbar I3P 37 G31 a 37 mbar I3B P 50 G30 G31 a 50 DE Germania I2ELL G25 a 20 mbar I2E G20 a 20 mbarI 3P 50 G31 a 50 mbar I3B P 50 G30 G31 a 50 DK Danimarca I2H G20 a 20 mbar I3B P 30 G30 G31 a 30 mbar EE Estonia I2H G20 a 20 mbar I3B P 30 G30 G31 a 30 mbar ES Spagna I2H G20 a 20 mbar I3 G31 G31 a 28 37 mbar I3P 37 G31 a 37 mbar FI Finlandia I2H G20 a 20 mbar I3P 30 G31 a 30 mbar I3B P...

Страница 354: ... MT Malta I3B P 30 G30 G31 a 30 mbar NL Paesi Bassi I2L G25 a 25 mbar I2EK G25 3 a 25 mbar I3P 50 G31 a 50 mbar I3P 30 G31 a 30 mbar I3P 37 G31 a 37 mbar I3B P 30 G30 G31 a 30 mbar NO Norvegia I2H G20 a 20 mbar I3B P 30 G30 G31 a 30 mbar PL Polonia I2E G20 a 20 mbar I3P 37 G31 a 37 mbar PT Portogallo I2H G20 a 20 mbar I3 G31 G31 a 28 37 mbar I3P 37 G31 a 37 mbar RO Romania I2E G20 a 20 mbar I3P 30...

Страница 355: ...Hi kW 8 2 8 2 7 6 7 7 6 8 Consumo m h 0 84 0 840 0 905 0 89 0 8 Pressione bruciatore caldo mbar 13 2 13 2 16 4 16 6 13 4 Marcatura iniettori 120 centro 260 sx 260 dx Pilota G30 ZP2 312 31 2 in Classe di efficienza 2 Classe NOx 5 Tipo C11 C31 Gas type City gas G150 1 Supply Pressure mbar 8 Nominal Heat Input Gross Hs kW 9 4 Nominal Heat Input Nett Hi kW 8 4 Consumption m hr 1 5 Burner Pressure hot ...

Страница 356: ...Hi kW 7 4 7 4 7 4 7 4 7 4 Consumo m h 0 225 0 225 0 29 0 29 0 29 0 253 Pressione brucia tore caldo mbar 27 27 36 36 36 28 Marcatura iniettori 80 centro 100 sx 100 dx Pilota G30 ZP2 271 27 1 in Classe di efficienza 2 Classe Nox 5 Tipo C11 C31 Questa stufa è stata testata e omologata per l utilizzo di metano GPL e biopropano Il biopropano può essere impiegato quando la stufa è stata modificata per i...

Страница 357: ...62 V 20 0 5m 20 0 5m Italiano RAIS attika Istruzioni d uso per VIVA L GAS ESEMPI DI SOLUZIONI PER CANNE FUMARIE Uscita a tetto verticale Distanza V 500 mm 12 m min max ...

Страница 358: ...V3 V H 7 4 17 F 17 17 1 2 3 6 5 Italiano RAIS attika Istruzioni d uso per VIVA L GAS Uscita a tetto verticale PT 3 di 3 PT 1 di 3 PT 2 di 3 Canna fumaria presente Posa canale da fumo fles sibile Ø 100 AISA 316Ti ...

Страница 359: ...uzioni d uso per VIVA L GAS Uscita a tetto inclinato verticale Distanza H 0 3 m min max Distanza V1 500 mm 10 m min max Distanza V2 200 mm 10 m min max Distanza V3 500 mm 10 m min max Distanza V V1 V2 V3 1 2 m 12 m min max Distanza V 2 X H min ...

Страница 360: ... RAIS attika Istruzioni d uso per VIVA L GAS Uscita a tetto verticale con curva Distanza H 0 3 m min max Distanza V1 500 mm 10 m min max Distanza V2 500 mm 10 m min max Distanza V V1 V2 1 m 12 m min max Distanza V 2 X H min ...

Страница 361: ... Canna fumaria presente pacchetto ristrutturazione PT 3 di 3 PT 1 di 3 PT 2 di 3 Canna fumaria presente Posa canale da fumo flessibile Ø 100 AISA 316Ti Distanza V 1 m 12 m min max Canna fumaria presente la manutenzio ne del canale da fumo deve essere esegui ta da un tecnico qualificato ...

Страница 362: ...Posa cana le da fumo flessibile Ø 100 AISA 316Ti PT 3 di 3 PT 1 di 3 PT 2 di 3 Distanza H 0 3 m min max Distanza V1 500 mm 10 m min max Distanza V2 200 mm 10 m min max Distanza V3 500 mm 10 m min max Distanza V V1 V2 V3 1 2 m 12 m min max Distanza V 2 X H min Canna fumaria con curva presente pacchetto ristrutturazione ...

Страница 363: ...68 Uscita a tetto verticale con uscita posteriore Ulteriori informazioni si trovano nel paragrafo Disposizione dei comigno li Italiano RAIS attika Istruzioni d uso per VIVA L GAS ...

Страница 364: ...69 Italiano RAIS attika Istruzioni d uso per VIVA L GAS Terminale a parete orizzontale Ulteriori informazioni si trovano nel paragrafo Posizione dei comignoli ...

Страница 365: ...Snorkel Snorkel Terminale a parete orizzontale Ulteriori informazioni si trovano nel paragrafo Posizione dei comignoli Uscita in alto Uscita posteriore Italiano RAIS attika Istruzioni d uso per VIVA L GAS ...

Страница 366: ...canna fumaria 1 US 25 100 Ø 100 US 25 130 Ø 130 Lunghezza 250 mm 2 US 50 100 Ø 100 US 50 130 Ø 130 Lunghezza 500 mm 3 US 100 100 Ø 100 US 100 130 Ø 130 Lunghezza 1000 mm 4 USKB 100 Ø 100 USKB 130 Ø 130 Nastro di fissaggio 5 USAB 100 Ø 100 USAB 130 Ø 130 Nastro di protezione ...

Страница 367: ...6 USPP 100 Ø 100 USPP 130 Ø 130 Lunghezza regolabile 7 USDV2 100 Ø 100 Terminale verticale USKB 8 USDHCE 10 Terminale orizzontale Uscita eccentrica 9 USEB 100 Ø 100 USEB 130 Ø 130 Nastro di montaggio 10 USMB 100 Ø 100 USMB 130 Ø 130 Collare a muro regolabile ...

Страница 368: ...o del tubo 90 14 USSR 100 Ø 100 USSR 130 Ø 130 Copertura 12 USB 45 100 Ø 100 USB 45 130 Ø 130 Gomito del tubo 45 15 USDPAL 100 Ø 100 USDPAL 130 Ø 130 Copertura per tetto piano Alluminio 13 USB 15 100 Ø 100 USB 15 130 Ø 130 Gomito del tubo 15 16 USDP 100 Ø 100 USDP 130 Ø 130 Copertura per tetto piano ...

Страница 369: ...P 130 Ø 130 Copertura regolabile coppia 18 USDH 100 Ø 100 USDH 130 Ø 130 Copertura inclinata 5 30 21 USMPG 100 Ø 100 USMPG 130 Ø 130 Copertura parete 19 USLS 100 Ø 100 USLS 130 Ø 130 Copertura inclinata 20 45 22 ADATTATORE ADATTATORE SISTEMA UNIVERSALE USA Ø 100 130 USA D 99 129 ...

Страница 370: ...75 Italiano RAIS attika Istruzioni d uso per VIVA L GAS D O P ...

Страница 371: ...A A B B C A A B C 1000 965 I 831 J 133 5 L n470 n462 E 250 D 50 235 Viva 100 L Gas Måltegning A A B B C A A B C 1000 965 I 831 J 133 5 L n470 n462 E 250 D 50 D 50 235 235 ...

Страница 372: ...70 1218 1046 5 I 911 J 133 5 L 235 M D 75 E 400 A 850 D 75 D 75 A 8 5 0 100 103 149 152 Viva 120 L Gas Måltegning B B A A C B A A C n462 n 470 1218 1046 5 I 911 J 133 5 L 235 M D 75 E 400 A 850 D 75 D 75 A 8 5 0 100 103 149 152 ...

Страница 373: ... A A B B C A A B C n462 n470 231 M 971 J 133 5 L 1106 5 I 1618 100 103 149 152 D 75 E 400 A 850 D 75 D 75 A 8 5 0 A A B B C A A B C n462 n470 231 M 971 J 133 5 L 1106 5 I 1618 100 103 149 152 D 75 E 400 A 850 D 75 D 75 A 8 5 0 ...

Страница 374: ...1 2 3 4 5 6 7 8 Viva 100 L Gas Viva 120 L Gas Viva 160 L Gas ...

Страница 375: ...82 1 2 3 4 5 6 7 8 9 10 11 12 14 13 15 Viva 100 L G Gas Viva 120 L G Gas Viva 160 L G Gas ...

Страница 376: ...RAIS A S Industrivej 20 DK 9900 Frederikshavn Denmark www rais dk ATTIKA FEUER AG Brunnmatt 16 CH 6330 Cham Switzerland www attika ch ...

Отзывы: