System Start Up
1. Turn on the Water and Check for Leaks
• Close all faucets that were opened in
Step 5
of the
Installation
Instructions
.
• Turn the water back on at the meter or pressure tank.
• Check for leaks. If a leak is present, drain the plumbing again before
soldering.
2. Flush the System
• Open a cold water faucet and allow water to run for a few minutes
or until all foreign material from the installation is washed out; close
the faucet.
• Slowly move the bypass valve handles to the service position. The
bypass valve handles should be parallel to the pipes.
• Allow water to completely fill the tank.
• To purge any air trapped in the system, open a cold water faucet and
allow water to run for at least 2 minutes; close the faucet.
• To flush any remaining hard water from the hot water heater, run
hot water in the bathtub until cold; close the faucet.
3. Test the Water
• Test the water for the particular contaminant that the system is
designed to remove.
The installation is complete and the system is ready for use.
Maintenance Requirements
Replacing the Filter Media
The filter media will eventually become exhausted or consumed and will
need to be replaced. RainSoft replacement filter media (part number
14826) is available through your local RainSoft Dealer. If you are unable
to order replacement parts from your local RainSoft Dealer, please
contact RainSoft at 1-800-860-7638 for assistance.
Testing Your Water
If you are relying on this system to reduce contaminants, we recommend
having your water tested periodically (two times a year minimum) to
ensure that the system is performing properly. Your local RainSoft
Dealer can arrange this testing for a nominal fee.
6
Helpful Tip: We recommend replacing
the filter media every three years (or
earlier if necessary). Your local RainSoft
Dealer can give you specific replacement
schedules based on your water usage
and incoming water quality.
Содержание QRS SERIES
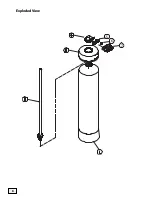
Страница 8: ...8 Exploded View 6 5 7...
Страница 11: ...11 NOTES...


