


16
www.raider.bg
3. Clean the tool regularly with a damp cloth and a little soap. Do not use any cleaner or detergent, they can
damage the plastic parts of the tool. Ensure that no water enters the tool.
MAINTENANCE
1. Recharge the battery at least once a year to maintain battery life.
INTENDED USE
The tool is intended for quickly tightening and loosening nuts, bolts and other fasteners. Not intended to be
used in place of a torque wrench or impact wrench, this tool will not break loose seized nuts. Always make
sure to use a calibrated torque wench to tighten your fasteners to the correct specification.
BEFORE USE
Before turning on the tool, read the following notes:
1. Charge the battery with the provided charger. A fully discharged battery recharges in about one hour.
2. Use only appropriate sockets and bits.
CHARGING THE BATTERY
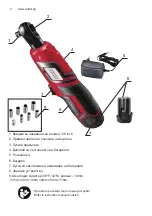
1. Remove the battery (6) from the tool by depressing both battery lock buttons (7) and pulling down.
2. Check if the power voltage on the charger’s (8) rating plate corresponds to the voltage available.
3. Plug charger’s power lead into the top of the battery. The red LED indicates that the battery is charging.
Once charged, the red LED turns off and the green LED stays on continuously.
4. During charging, it is normal for the battery to warm slightly. If the battery will not charge
check:
- That the socket has voltage.
- That the charger contacts are reliable.
- Verify there is no damage to the charging cord.
Starting Operation
1. Inserting the Battery: Only use the original brand of Li-ion batteries with the voltage listed
on the nameplate of your power tool. Using other batteries can lead to injuries and pose a fire hazard. Set
the direction switch to the center position to protect the power tool from accidentaly starting. Insert the
charged battery Into the handle until you feel it engage and it sits flush against the handle.
2. Reversing the Rotational Direction: The direction switch (2) is used to select the rotational direction of the
ratchet to be either clockwise or counter clockwise.
Clockwise - Right Rotation: For driving in screws and tightening nuts, turn the direction switch through to
the left stop.
Counter Clockwise - Left Rotation: For loosening and unscrewing screws and nuts, turn the direction switch
through to the right stop.
(NOTE: there are some styles of screws, nuts and bolts that are reverse threaded. Use the
above directions inversely.)
3. Switching On and 0ff: To start the tool, press the On/off trigger (3) and keep it pressed. To switch off the
tool, release the On/0ff trigger.
4. Working Advice: Apply the power tool to the screw/nut only when it is switched off. Make sure to verify
Содержание RD-RW01
Страница 4: ...4 www raider bg 1 2 3 1 2 3 4 5 6 1 2 3 4 5...
Страница 5: ...5 6 7 1 2 3 4 5 6 7 8 9 10 11...
Страница 6: ...6 www raider bg 1 2 3 4 1 2 1 2 3 1 1 2 1 6 7 2 8...
Страница 7: ...7 3 4 1 2 2 3 3 4 1 6 10 9...
Страница 8: ...8 www raider bg 10 C 30 C 40 4 C 40 C 5 230 V 1 2 1 3 1 2 3 40 150C 4 80 5 6 7...
Страница 9: ...9 8 9 10 11 12 13 14 15 16 10 17 18 19 20...
Страница 10: ...10 www raider bg 21 22 12 23 10 24 25 26 40 1 2 3 0 45 4 10 30 40 0 45 1 0 60 2 E 1...
Страница 11: ...11 2 3 4 5 6 7 8 RAIDER 9 RAIDER 10 11 1 e 2 3 4 5 6 7 8 9 10 11...
Страница 12: ...12 www raider bg 19 1 2 3 0 45 4 30 10 30 0 45 1 2012 19 EC 2 Li ion 2006 66 EC...
Страница 41: ...41 1 2 3 1 2 3 4 5 6 RCD RCD 1 2 3 4 5 6 7 1...
Страница 42: ...42 www raider bg 2 3 4 5 6 7 8 9 10 11 1 2 3 4 1 2 1 2...
Страница 43: ...43 3 1 1 2 1 6 7 2 8 3 LED LED LED 4 1 Li ion 2 2 3 3 On 0ff 4...
Страница 44: ...44 www raider bg 1 6 10 LED 9 ON OFF LED LED LED 10 C 30 C 40 4 C 40 C 5 230 V 1 2 LED 1 3 LED LED...
Страница 45: ...45 1 2 3 40 150C 4 80 5 6 7 8 9 10 11 12 13 14 15 16...
Страница 46: ...46 www raider bg 10 17 18 19 20 21 22 12 23 10 24 25 26 40 1 2 3 0 45 C 4 10 30 C 40 0 45 C 1 0 C 60 2...
Страница 47: ...47 1 2 3 4 5 6 7 8 RAIDER 9 RAIDER 10 11 1 2 3 4 5 6 7 8...
Страница 48: ...48 www raider bg 9 10 11 19 1 2 3 0 45 C 4 30 C 10 30 C 0 45 C 1 2012 19 2 Li ion 2006 66 EC...
Страница 50: ...50 www raider bg 1 2 3 1 2 3 4 5 6 1 2 3 4 5 6 7 1...
Страница 51: ...51 2 3 4 5 6 7 8 9 10 11 1 2 3 4 1 2 1 2...
Страница 52: ...52 www raider bg 3 1 1 2 1 6 7 2 8 3 4 1 2 2 3 0ff 3 On 0ff 4...
Страница 53: ...53 1 6 10 9 10 C 30 C 40 4 C 40 C 5 230 1 2 1 3...
Страница 54: ...54 www raider bg 1 2 3 40 150 4 80 5 6 7 8 9 10 11 12 13 14 15 16...
Страница 55: ...55 10 17 18 19 20 21 22 12 23 10 24 25 26 40 1 2 3 0 45 4 10 30 C 40 0 45 1 0 C 60 2...
Страница 56: ...56 www raider bg 1 2 3 4 5 6 7 8 RAIDER 9 RAIDER 10 11 1 2 3 4 5 6 7 8...
Страница 57: ...57 9 10 11 19 1 2 3 0 45 4 30 10 30 C 0 45 1 2012 19 EC 2 2006 66 EC...
Страница 68: ...68 www raider bg 1 2 3 1 2 3 4 5 6 RCD RCD 1 a 2 3 4 5 6 7 1...
Страница 69: ...69 2 3 4 5 6 7 8 9 10 11 1 2 3 4 1 2 1 2...
Страница 70: ...70 www raider bg 3 1 1 2 1 6 7 2 8 3 LED LED 4 1 2 2 3 0ff 3 On 0ff 4...
Страница 71: ...71 1 6 10 LED 9 ON OFF LED LED LED 10 C 30 C 40 4 C 40 C 5 230 V 1 2 LED 1 3 LED LED...
Страница 72: ...72 www raider bg 1 2 3 40 150C 4 80 5 6 7 8 9 10 on off 11 12 13 14 15 16...
Страница 73: ...73 10 17 18 19 20 21 22 12 23 10 24 25 26 40 1 2 3 0 45 C 4 10 30 C 40 0 45 C 1 0 C 60 2...
Страница 74: ...74 www raider bg 1 2 3 4 5 6 7 8 RAIDER 9 RAIDER 10 11 1 2 3 4 5 6 7 8...
Страница 75: ...75 9 10 11 19 1 2 3 0 45 C 4 30 C 10 30 C 0 45 C 1 2012 19 2 2006 66...
Страница 94: ...94 www raider bg EXPLODED VIEW RD RW01...
Страница 95: ...95 SPARE PARTS RD RW01...
Страница 100: ...246 0700 44 155...
Страница 102: ...102 1 5 2 bar Raider 18 Raider Industrial Raider Pro 12 Raider Power Tools Raider Garden Tools...
Страница 103: ...103 112 115 112 1 2 1 2 3 113 1 2 3 2 114 4 5 114 1 113 1 2 2 3 115 4 115 1 2 1 3 1 1...
Страница 109: ...109...
Страница 110: ...110 www raider bg 45...
Страница 113: ...113 1 2 3 4 GTC 5 24 6 www raider gr www gtc hardware gr...
Страница 114: ...114 www raider bg...
Страница 117: ...117...


