background image


15 


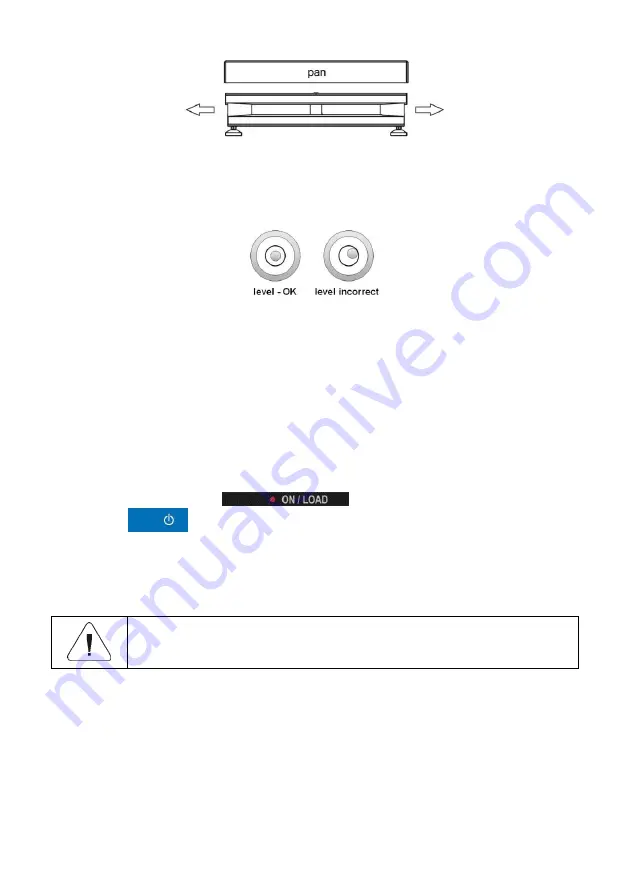
7.2. Levelling 


It is necessary to level the scale, do it by turning its feet. Keep turning the feet 
until the air bubble takes central position. 


7.3. Start-Up 


The weighing device can be connected to the mains only with a power supply 
that  comes  standard  with  the  particular  model.  Nominal  voltage  of  the  power 
supply  (specified  on  the  power  supply  data  plate)  has  to  be  compatible  with  
the mains nominal voltage. 


Procedure:  


  Plug the power supply to the mains. 

  Connect the power  supply plug to the  socket located  on the  scale's  side. 

An ON/LOAD diode, 

, on indicator housing is turned on. 

  Press 

  key,  it  is  to  be  found  at  the  top  of  the  operation  panel. 

Mind  to  keep  the  key  pressed  for  about  0.7  s.  Operation  system  and 
RADWAG  program  are  loaded,  this  is  signalled  with  blinking  of  red 
ON/LOAD diode. 

  Upon completed start-up, the home screen is displayed automatically. 


Detailed instruction on how to configure the home screen is 
to be found in „PUE 7.1 Indicator Software Manual”. 


8.  HOME SCREEN 


The  home  screen  features  4  sections:  a  top  bar,  a  weighing  result  window, 
a workspace, function buttons. 

Содержание WPY

Страница 1: ......

Страница 2: ...2 NOVEMBER 2020...

Страница 3: ...K 6kg 2g 300x300mm WPY 6 F1 R 6kg 2g 300x300mm WPY 15 D2 15kg 5g 195x195mm WPY 15 F1 15kg 5g 300x300mm WPY 15 F1 K 15kg 5g 300x300mm WPY 15 F1 R 15kg 5g 300x300mm WPY 15 C2 15kg 5g 400x500mm WPY 15 C2...

Страница 4: ...2 K 150kg 50g 400x500mm WPY 150 C2 R 150kg 50g 400x500mm WPY 150 C3 150kg 50g 500x700mm WPY 150 C3 K 150kg 50g 500x700mm WPY 300 C2 300kg 100g 400x500mm WPY 300 C2 K 300kg 100g 400x500mm WPY 300 C2 R...

Страница 5: ...r and UV radiation substances causing chemical reactions The device must not be operated in hazardous areas endangered with explosion of gases and in dusty environments In case of damage immediately u...

Страница 6: ...4 1 Technical Specifications 12 6 4 2 I O Schematic Diagrams 13 6 5 Operation Panel 13 7 INSTALLATION 14 7 1 UNPACKING AND INSTALLATION 14 7 1 1 WPY D2 Series 14 7 1 2 WPY F1 WPY C2 WPY C3 Series 14...

Страница 7: ...rer and user representatives C RADWAG does not bear any responsibility for damage or losses resulting from unauthorized or inadequate performing of production or service processes D The warranty does...

Страница 8: ...2 Cleaning Stainless Steel Components Avoid using cleansers containing any corrosive chemicals e g bleach with chlorine Do not use cleansers containing abrasive substances Always remove the dirt using...

Страница 9: ...issioned must be decommissioned in accordance with valid legal regulations 6 MECHANICAL DESIGN WPY scale is a 1 load cell device intended to carry out fast and precise mass measurement of up to 300 kg...

Страница 10: ...10 6 1 Dimensions Dimensions of WPY D2 scale Dimensions of WPY F1 R scale Dimensions of WPY F1 K scale Dimensions of WPY C2 R scale...

Страница 11: ...s of WPY C3 K scale 6 2 Connectors 1 Ethernet RJ45 connector 2 RS232 COM1 connector 3 USB connector 1 power supply socket 2 I O RS232 COM2 connector 6 3 RS232 Connector RS232 DB9 M connector male fron...

Страница 12: ...OUT RS232 DSUB15 F connector female front Pin1 GNDWE Pin2 OUT1 Pin3 OUT2 Pin4 COMM Pin6 IN4 Pin7 IN3 Pin11 IN2 Pin12 IN1 Pin14 OUT4 Pin15 OUT3 6 4 1 Technical Specifications Output parameters Output q...

Страница 13: ...uts 4 outputs 6 5 Operation Panel Keys Press to switch the scale ON OFF Press to zero the scale Press to tare the scale Press to send the weighing result to a printer or a computer Press to enter the...

Страница 14: ...a flat and even surface Keep it far away from any sources of heat C Install the weighing pan and the indicator holder in accordance with the figure below 7 1 2 WPY F1 WPY C2 WPY C3 Series Take the de...

Страница 15: ...ly to the mains Connect the power supply plug to the socket located on the scale s side An ON LOAD diode on indicator housing is turned on Press key it is to be found at the top of the operation panel...

Страница 16: ...name and symbol Log in entry Symbol informing that communication with a PC is on Symbol informing that Wi Fi connection is on Symbol informing that communication with E2R SYSTEM is on Device name Date...

Страница 17: ...tively 8 4 Function Buttons On screen function buttons are to be found underneath the workspace You can define on screen function buttons individually for each working mode 9 OPERATING THE MENU 9 1 Op...

Страница 18: ...to save the template to lb file the button becomes active upon USB flash drive connection Press to select printout template variables out of the list Press to go back Press to go to the home screen di...

Страница 19: ...fied by EN 45501 standard point 3 6 2 In case of eccentric loading make sure that a mass of load placed close to one of the pan edges does not exceed of max capacity b mass of load placed in the pan c...

Страница 20: ...20 11 DIAGRAMS OF CONNECTION CABLES Scale computer cable RS232 Scale printer cable ZEBRA Scale printer cable EPSON...

Страница 21: ...21 I O cable Scale Ethernet cable is a standard network cable terminated with RJ45 connectors on both ends 12 ERROR MESSAGES...

Страница 22: ...22...

Отзывы: