background image

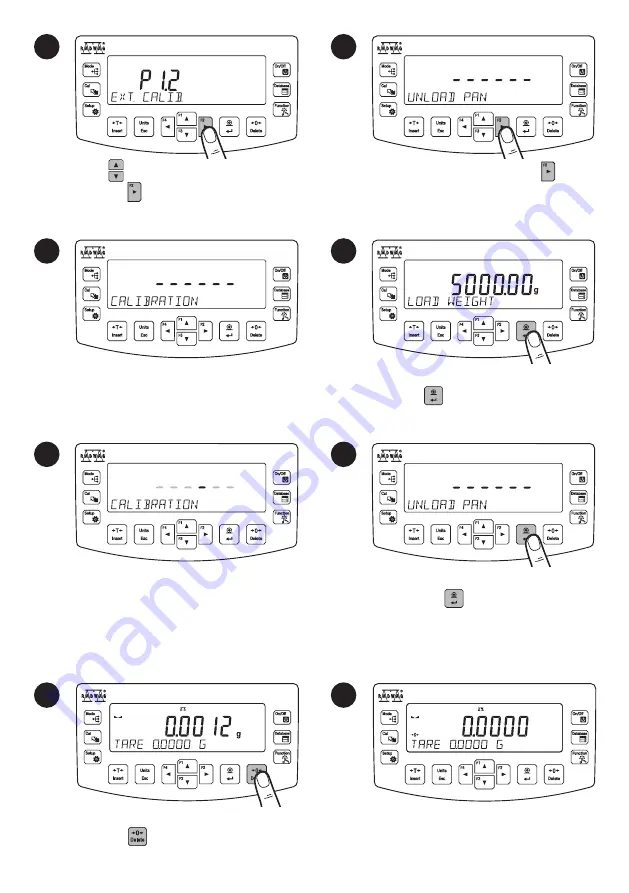
Using        keys select “External calibration”
and press        key.

The balance has been zeroed.

1

2

Make sure that the weighing pan is empty 
and press         key.

8.2. Zeroing

3

4

With unloaded weighing pan, press        key.

7

8

Wait for the adjustment completion.

Upon process completion unload the weighing 
pan and press         key.

5

6

Wait for completion of the start mass determina-
tion process.

Load the weighing pan with mass standard 
and press         key.

Содержание AS R2 PLUS

Страница 1: ...Start up Guide Analytical balances AS R2 PLUS Precision balances PS R1 PS R1 M PS R2 PS R2 M PS R2 H PS R2 M H Analytical and Precision Balances IMMB 03 02 11 21 EN...

Страница 2: ...To view a complete User Manual go to the website or scan QR code radwag com en manuals 198...

Страница 3: ...1 Centring ring 1 Bottom insert 1 Bottom insert 1 Power adapter 1 Power adapter 1 Models PS R1 d 1mg PS R2 d 1mg Balance 1 Weighing pan 1 Draft shield 1 Grounding foot 1 Foot 3 Power adapter 1 Power...

Страница 4: ...odels PS R2 H Models PS R2 M H Balance 1 Balance 1 Weighing pan 1 Weighing pan 1 Draft shield 1 Draft shield 1 The plug type may vary by country 2 UNPACKING 1 2 3 Keep the packaging should a warranty...

Страница 5: ...sults an anti vibration table is recommended Place the balance away from heat sources Avoid exposing the balance to the sunlight Avoid air drafts and air movements at the workstation Avoid exposing th...

Страница 6: ...emoval 4 2 Grounding spring check Models AS R2 Series Models AS R2 Series Models PS R2 series PS R1 series Models PS R2 series PS R1 series 1 2 1 2 Check whether the grounding spring takes its intende...

Страница 7: ...1 1 2 2 3 3 Install the grounding foot in a freely selected opening Models AS R2 d 0 1 mg Models PS R1 d 0 01 mg PS R2 d 0 01 mg 5 COMPONENTS ASSEMBLY 1 2 3 4 Models AS R2 d 0 01 mg...

Страница 8: ...1 1 1 2 2 2 Models PS R1 M PS R2 M Models PS R2 H Models PS R2 M H...

Страница 9: ...ted stabilisation time 1 8 hours Connect the power adapter to DC connector Connect the power adapter to the mains USB1 USB2 1 2 3 6 3 Switch the balance on To switch the device on press ON OFF key You...

Страница 10: ...de Switching ON OFF Start adjustment Databases Enter setup Working mode functions Taring Zeroing PRINT ENTER Unit selection ESC Navigation keys Measurement result Stable indication pictogram Pictogram...

Страница 11: ...djustment prepare the right mass standard You are recommended to use mass standard of class F1 or F2 View the table and select the mass standard you need It is recommended to carry out adjustment oper...

Страница 12: ...ghing pan is empty and press key 8 2 Zeroing 3 4 With unloaded weighing pan press key 7 8 Wait for the adjustment completion Upon process completion unload the weighing pan and press key 5 6 Wait for...

Страница 13: ...f the weighing result press key 8 3 Taring Using keys select Working mode and press key Using keys select working modes for which accessibility is to be set and press key 1 3 2 4 Press to enter Setup...

Страница 14: ...key to confirm 1 2 Using key enter working modes menu 8 5 Selecting working mode Detailed overview of the settings of the working modes is to be found in balance s main user manual Weighing Parts Cou...

Страница 15: ...ssibility Using keys select unit for which accessibility is to be set and press key 3 4 While Accessibility parameter is on press key 5 Using keys set accessibility parameter to Yes value for a select...

Страница 16: ...ey to enter Database menu 1 2 Press key to select the weighing unit 8 7 Weighing unit selection 1 Units available for verified balances exclusively The balance enables selecting the following weighing...

Страница 17: ...and press key to confirm 5 You have logged as the administrator Upon logging in pictogram is displayed 9 2 User settings 1 Press key to enter databases Using keys select View Edit option and press key...

Страница 18: ...user code and press key to confirm 6 8 7 9 Using keys enter user name and press key to confirm Press key to add a new user In the following steps set User name Code Passsword Permissions level Langua...

Страница 19: ...ssword and press key to confirm 10 11 Using keys select Access Level and press key to confirm Using keys select permissions level and press key to confirm 12 13 Using keys select Language and press ke...

Страница 20: ...10 PERIPHERAL DEVICES CONNECTORS Power adapter Computer Computer Computer Additional display Additional display Barcode scanner Barcode scanner Barcode scanner Printer Printer Printer Keyboard...

Страница 21: ...uid Dry sample leftovers can be removed using either brush or handheld vacuum cleaner Clean components can be dried using soft cloth or dust free paper towel with this the remaining moist will be abso...

Страница 22: ...the instrument 1 2 4 3 Press the moldings on the housing and lift the movable element up Press the moldings on the housing and lift the movable element up Now you can take out the front glass Now you...

Страница 23: ......

Страница 24: ...www radwag com...

Отзывы: