background image

E-5

Heavy Objects

Never place heavy object on top of
the product.
Doing so can make the product top
heavy, causing the product to tip
over or the object to fall from it,
creating the risk of personal injury.

Correct Stand

*

 Assembly

An incorrectly assembled stand can
tip over, causing the product to fall
and creating the risk of personal
injury.
Make sure you assemble the stand
correctly, following the assembly
instructions that come with it. Make
sure you mount the product on the
stand correctly.

*

Stand is available as an option.

IMPORTANT!

When using batteries, be sure to replace them or shift to one
of the alternate power sources whenever you notice any of
the following symptoms.

• Dim power indicator.
• Instrument does not turn on.
• Display that is flickering, dim, or difficult to read.
• Abnormally low speaker/headphone volume.
• Distortion of sound output.
• Occasional interruption of sound when playing at high

volume.

• Sudden power failure when playing at high volume.
• Flickering or dimming of the display when playing at high

volume.

• Continued sound output even after you release a key.
• A tone that is totally different from the one that is selected.
• Abnormal rhythm pattern and song play.
• Loss of power, sound distortion, or low volume when

playing from a connected computer or MIDI device.

• Abnormally low microphone volume.
• Distortion of microphone input.
• Dim power supply indicator when a microphone is used.

Display Screen

• Never push on the display

screen’s LCD panel or subject it
to strong impact. Doing so can
cause the LCD panel’s glass to
crack, creating the risk of personal
injury.

• Should the LCD panel ever crack

or break, never touch the liquid
inside of the panel. LCD panel
liquid can cause skin irritation.

• Should LCD panel liquid ever get

inside your mouth, immediately
wash out your mouth with water
and contact your physician.

• Should LCD panel liquid ever get

into your eyes or onto your skin,
rinse with clear water for at least
15 minutes, and then contact a
physician.

Sound Volume

Do not listen to music at very loud
volumes for long periods. Particular
care concerning this precaution is
required when using headphones.
High volume settings can damage
your hearing.

Health Precaution

In extremely rare cases, exposure to
strong sudden light or flashing light
can cause momentary muscle
spasms, loss of consciousness, or
other physical problems with some
individuals.
• If you suspect that you might be

susceptible to any condition such
as this, be sure to consult with
your physician before using this
product.

• Use this product in an area that is

well illuminated.

• S h o u l d   y o u   e v e r   f e e l   a n y

symptoms similar to those
described above when using this
product, stop using it immediately
and contact your physician.

648U-E-007A

LK-1261_e_01-07.p65

04.6.15, 3:33 PM

Page 5

Adobe PageMaker 6.5J/PPC

Содержание 42-4068

Страница 1: ...during the warranty period take the product and the RadioShack sales receipt as proof of purchase date to any RadioShack store RadioShack will at its option un less otherwise provided by law a correct...

Страница 2: ...device pursuant to Part 15 of the FCC Rules These limits are designed to provide reasonable protection against harmful interference in a residential installation This equipment generates uses and can...

Страница 3: ...roduct is operated incorrectly while ignoring this indication CAUTION This indication stipulates matters that have the risk of causing injury as well as matters for which there is the likelihood of oc...

Страница 4: ...dispose of them by incineration Never mix old batteries with new ones Never mix batteries of different types Do not charge the alkaline batteries Make sure the positive and negative ends of the batte...

Страница 5: ...atter Water other liquids and foreign matter such as pieces of metal getting into the product create the risk of fire and electric shock Take the following steps immediately 1 Turn off power 2 If you...

Страница 6: ...areas exposed to direct sunlight inside of a vehicle parked in the sun or any other area that subjects the product to high temperatures CAUTION AC Adaptor Misuse of the AC adaptor creates the risk of...

Страница 7: ...ow microphone volume Distortion of microphone input Dim power supply indicator when a microphone is used Display Screen Never push on the display screen s LCD panel or subject it to strong impact Doin...

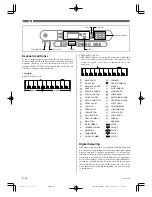
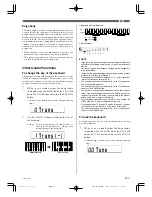
Страница 8: ...g along at the normal tempo for the tune A simulated human voice is used during Step 1 or Step 2 play to call out the fingers you should use to play the required notes Voice Fingering The timing of no...

Страница 9: ...Playing the demo tunes E 18 Playing rhythms E 18 Using auto accompaniment E 19 Improvising with the preset patterns E 21 3 Step Lesson System E 22 Using 3 Step Lesson System E 22 Voice Fingering Guid...

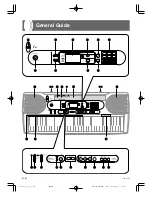
Страница 10: ...E 8 General Guide 648U E 010A A F G E B C D A I H K L M N O P Q J 4 2 7 9 5 8 0 6 3 1 LK 1261_e_08_13 p65 04 6 15 3 33 PM Page 8 Adobe PageMaker 6 5J PPC...

Страница 11: ...ator I POWER MODE selector J MAIN VOL slider K SYNCHRO FILL IN button L START STOP button M TEMPO buttons N 3 STEP LESSON buttons O PART SELECT button P ONE KEY PLAY buttons Q SPEAK button Attachment...

Страница 12: ...auto accompaniment and song play 6 Indicators showing when key lighting or voice fingering is turned on Also indicates the step number during 3 Step Lesson NOTE Display examples shown in this owner s...

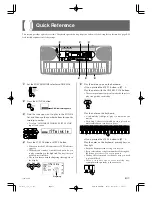
Страница 13: ...tions of these steps SONG indicator appears 5 Play the melody part on the keyboard If you pressed the STEP 1 button in 4 Play the notes with the ONE KEY PLAY buttons The accompaniment tempo automatica...

Страница 14: ...at is totally different from the one that is selected Abnormal rhythm pattern and Song play Loss of power sound distortion or low volume when playing from a connected computer or MIDI device Abnormall...

Страница 15: ...a year unplug the AC adaptor from the wall outlet and wipe away any dust that is built up in the area around the prongs of the plug IMPORTANT Make sure that the keyboard is turned off before connecti...

Страница 16: ...board to a musical instrument amplifier NOTE Be sure to use a connecting cord that has standard plugs on the ends you connect to the keyboard and amplifier Connection Example Keyboard or guitar amp To...

Страница 17: ...y again With certain tones such as percussion sounds and sound effects there may be very little or no change at all in the pitch no matter which keyboard key you press If you input the wrong first dig...

Страница 18: ...yboard have been recorded and processed using a technique called digital sampling To ensure a high level of tonal quality samples are taken in the low mid and high ranges and then combined to provide...

Страница 19: ...play Trans Trans Keys and their indicators Note Names B 1 tuning Normal tuning D F G A B C B C E C D E F G A B C B C D E F G A C NOTE If you leave the transpose screen on the display for about five se...

Страница 20: ...ntial endless loop until you switch it off The number and name of the demo tune currently playing are shown on the display You can play along on the keyboard while a demo tune is playing back Tun e 3...

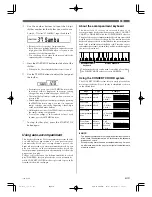
Страница 21: ...choice between two different methods for chord play FINGERED lets you play chords as you normally do while CONCERT CHORD makes it possible to play fully formed chords with one finger Samb a About the...

Страница 22: ...tton again Using standard fingerings The FINGERED mode lets you play a wider variety of chords In this mode you can start play of an accompaniment pattern by pressing three or four of the accompanimen...

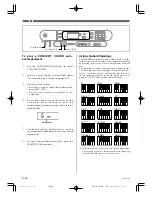
Страница 23: ...ent keyboard to start play of the auto accompaniment 5 Continue pressing keys on the accompaniment keyboard to play your chord progression 6 To stop auto accompaniment play press the START STOP button...

Страница 24: ...s the correct key Step 3 Play at normal speed At this level the keyboard s keys still light to indicate which notes to play but they no longer wait for you to press the correct key The auto accompanim...

Страница 25: ...also shows when you have to cross fingers to play notes and in which direction your fingers should cross Example Display for playing the notes below with the right hand C E D A B 3 3 1 1 2 C E D A B...

Страница 26: ...g keys with fingers 3 2 and then 1 648U E 026A NOTE Note length is not indicated when you are using two hand tunes 85 to 99 with 3 Step Lesson Steps 1 and 2 As soon as you press a lit key it goes out...

Страница 27: ...is started When the SONGS button is pressed in the normal mode page E 22 When the power on alert function operates page E 13 Number of Simultaneously Lit Keys Up to four keyboard keys can be lit at t...

Страница 28: ...tune follows along as you play the melody right hand part The keyboard key that corresponds to the next note to be played flashes and lights when you play the note The rhythm percussion part does not...

Страница 29: ...8U E 029A Step 2 Master the melody With Step 2 you have to play the note that the 3 Step Lesson System indicates But don t worry the accompaniment left hand part waits until you can play the correct n...

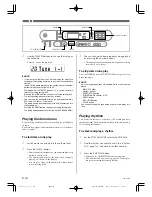
Страница 30: ...ton to switch the left hand play 4 Press the STEP 1 STEP 2 or STEP 3 button When you do the STEP 1 STEP 2 or STEP 3 indicator appears After a count beat sounds the right hand part starts to play and t...

Страница 31: ...e data key press etc Both the sending machine and the receiving machine must be set to the same channel for the receiving unit to correctly receive and play data If the receiving machine is set to Cha...

Страница 32: ...iving MIDI data it sounds percussion sounds produced by this keyboard PITCH BEND This message carries pitch bend information for smoothly sliding the pitch upwards or downwards during keyboard play Th...

Страница 33: ...n on LOCAL CONTROL To turn off GM mapping 1 While in any mode besides the Song Mode indicated when the SONG indicator is lit hold down the RHYTHM button and press the SONGS button Perform step 2 withi...

Страница 34: ...L 5 While 99 PERCUSSION is selected you can use only keys that are marked on the console with illustrations of percussion instruments 6 Turn on LOCAL CONTROL Replace the batteries with a set of new on...

Страница 35: ...to return to the normal mode Stop demo tune play Connect MIDI cables properly Turn off the MIDI THRU function on the computer or turn off LOCAL CONTROL on the keyboard 1 Use a recommended type microph...

Страница 36: ...Tuning Adjustable A4 Approx 440 Hz 50 cents Initial value A4 Approx 440 Hz MIDI 5 multi timbre receive Speakers 10 cm diameter x 2 Output 2W 2W I O Terminals MIDI Terminals IN OUT Sustain Standard ja...

Страница 37: ...o Do not use lacquer thinner or similar chemicals for cleaning Clean the keyboard with a soft cloth dampened in a weak solution of water and a neutral detergent Soak the cloth in the solution and sque...

Страница 38: ...48 55 49 44 50 51 52 91 53 85 56 58 57 60 59 61 69 62 63 83 70 Tone No Tone Name GM No 50 SOPRANO SAX 51 ALTO SAX 52 TENOR SAX 53 OBOE 54 CLARINET 55 PICCOLO 56 FLUTE 57 RECORDER 58 FLUTE ENSEMBLE 59...

Страница 39: ...ORLNS R R 20 R B JAZZ FUSION 21 BIG BAND 22 SWING 23 FOX TROT 24 JAZZ WALTZ 25 LATIN FUSION DANCE FUNK 26 TECHNO 27 TRANCE 28 DISCO 29 FUNK 30 RAP EUROPEAN 31 POLKA 32 MARCH 33 WALTZ 34 SLOW WALTZ 35...

Страница 40: ...This table shows the left hand fingerings including inverted forms for a number of often used chords 648U E 040A A 3 1 2 3 4 5 Left hand finger numbers LK 1261_e_A1 A5 p65 04 6 15 3 34 PM Page 4 Adob...

Страница 41: ...used instead Chords with same component notes as B aug D aug F aug Chords with same component notes as B aug E aug G aug Chords with same component notes as A dim7 C dim7 E dim7 F dim7 Chords with sa...

Страница 42: ...648U E 042A LK 1261_e_A1 A5 p65 04 6 15 3 34 PM Page 6 Adobe PageMaker 6 5J PPC...

Страница 43: ...648U E 043A LK 1261_e_A1 A5 p65 04 6 15 3 34 PM Page 7 Adobe PageMaker 6 5J PPC...

Страница 44: ...648U E 044A LK 1261_e_A1 A5 p65 04 6 15 3 34 PM Page 8 Adobe PageMaker 6 5J PPC...

Страница 45: ...648U E 045A LK 1261_e_A1 A5 p65 04 6 15 3 34 PM Page 9 Adobe PageMaker 6 5J PPC...

Страница 46: ...rol 6 38 Change 7 10 11 64 100 101 1 1 Mode 3 X 36 96 O 9nH V 100 X 9nH V 0 X X X X X X X X O X 1 Depends on tone 2 no relation Modulation Data entry Volume Pan Expression Hold1 RPN LSB MSB 1 4 10 1 4...

Отзывы: