


b) Technical data
1) Voltage: ...............................................220-240V~ 50/60Hz
2)
Power: ..................................................450W
3) Rotation speed : ..................................30000/min
4) Technology : .....HVLP (High Volume Low Pressure)
5) Flow : .................................................500 ml/min
6) Pressure : ..........................................0.3-040 bar
7) Nozzle diameter : ..............................1.8 mm
8) Sound pressure level: ........................80dB(A), K=3dB(A)
9) Sound power level: ............................91dB(A), K=3dB(A)
10) Vibration: .........................................0.4 m/s
2
, K=1.5m/s
2
Information:
- The declared vibration total value has been measured in accordance with a standard test method and
may be used for comparing one tool with another;
- The declared vibration total value may also be used in a preliminary assessment of exposure.
Warning:
- The vibration emission during actual use of the power tool can differ from the declared total value
depending on the ways in which the tool is used;
- need to identify safety measures to protect the operator that are based on an estimation of exposure in
the actual conditions of use (taking account of all parts of the operating cycle such as the times when
the tool is switched off and when it is running idle in addition to the trigger time).
6. USING THE DEVICE
Before plugging the device into the mains, make sure that the voltage of the power outlet
corresponds to the voltage on the label with the technical characteristics of the tool
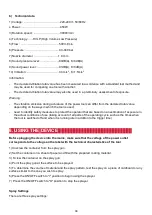
1) Unscrew the container from the spray gun.
2) Set the container on a sheet of paper and fill with the prepared coating material.
3) Screw the container on the spray gun.
4) Point the spray gun at the surface to be sprayed.
5) To determine the volume of material and the spray pattern, test the spray on a piece of cardboard or any
surface similar to the one you wish to spray.
6) Press the ON/OFF switch to "I" position to begin using the sprayer.
7) Press the ON/OFF switch to "O" position to stop the sprayer.
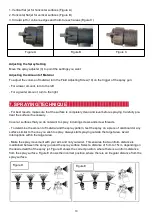
Spray Settings
There are three spray settings:
09


