background image

Set-up

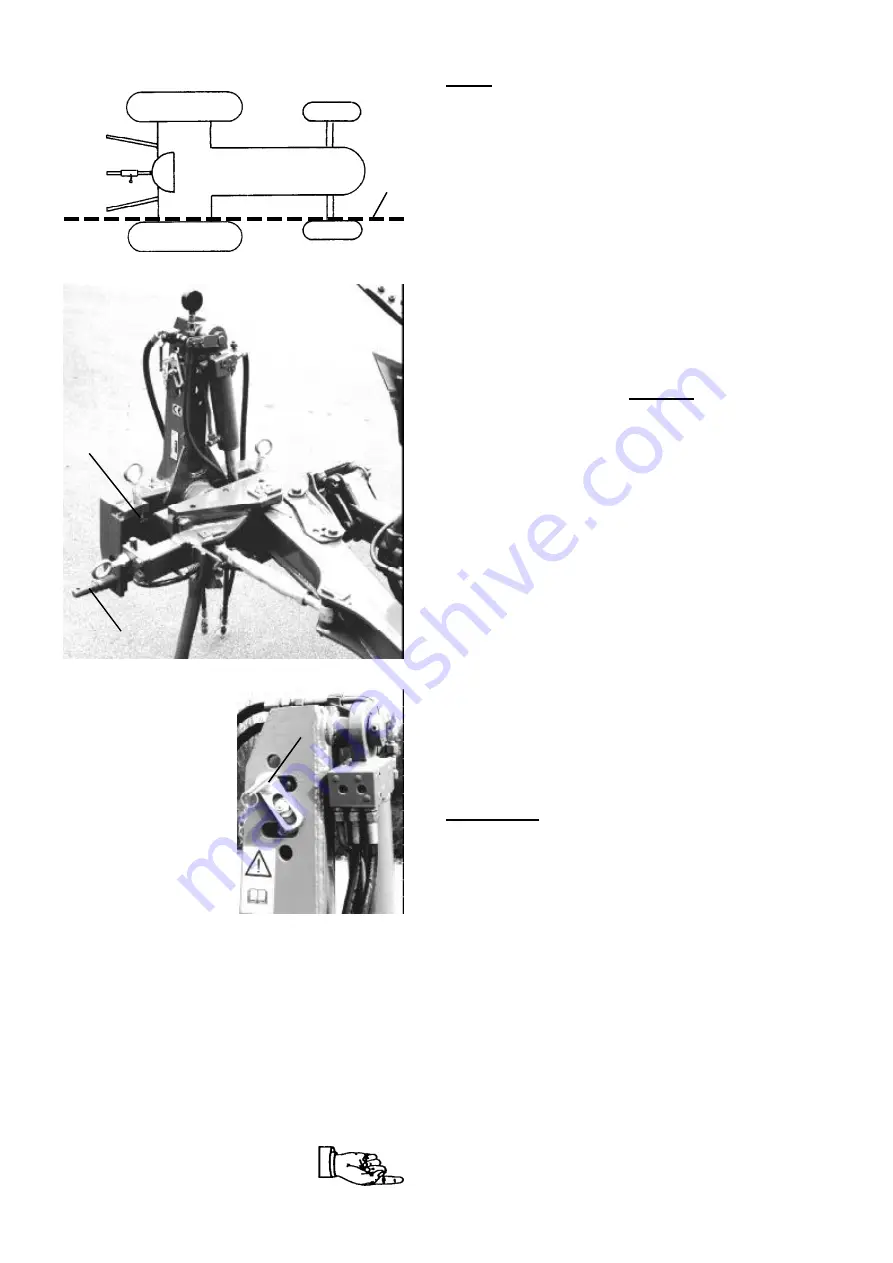
Ensure that couplings on the three-point linkages are
compatible (Cat.: Tractor/Plough).

Check tractor tyre pressures and measure the inner
clearance between the tyres. This distance should be
approximately the same for the front and rear wheels,
and the inner walls of the tyres should align (

2/1

).

Set the lower link arms to the same height.

Set the lower link pins (

3/1

) to a height where the

plough can be raised sufficiently, and/or the lower link
arms are in the correct position during operation. (See
tractor operating manual).

Set the top link on the plough head stock so that it lifts
slightly relative to the plough during operation. (Secure
the top link pin to prevent it turning (

4/1

); Fit on the

opposite side a washer and 

lynch pin.

Secure the three-point linkage in accordance with
safety regulations.

Connect the hydraulic hoses according to protective
cap colour.

Turnover: 

Connect


the


two hoses with the double

acting control unit on the tractor (red);
The hose marked ‘P’ on the hydraulic turnover cylinder
should be used for the ”UP” function.
For single acting turnover use the hose from ”T”  direct
into the oil reservoir of the tractor lift and the second
hose to the single acting spool valve.
In this case an additional single-action spool valve is
required for a hydraulically operated pick- up arm for
furrow press operation.

Hydraulic front furrow adjustment: 

Connect the two

hoses with a double acting spool valve on the tractor
(blue).

HydroAvant models: 

 Connect the one hose for the

hydraulic auto reset system with a single-action spool
valve (white).

2

1

3

1

4

1

2

Turnover test

Raise plough.  Release parking prop.

Activate the hydraulic control from ”Neutral” into ”UP”
position until the plough has rotated compl. and is flush
with the vertical adjuster screw (

3/2

),

or - in the case of a an hydraulic angling device – until
the re-angling sequence is also completed.
Then put the control back into ”Neutral”.

After about eight seconds, a new turnover sequence or
immediately if the hydraulic control is operated briefly in
”Down” position.

If, when reversing, it emerges that the plough is not
sufficiently raised (despite the lower link pins being
fitted in the bottom position), the lifting rods of the
three-point linkage will need to be shortened.
If this is also not sufficient, attach the top link at a
higher point on the plough.

Beware of the raised plough colliding with other objects,
e.g. the open rear window of the tractor cab, including
when turning.

4

Содержание Raven 1200

Страница 1: ...Operating Instruction Reversible Ploughs Raven Shearbolt Raven Hydro Avant Auto reset Order No 9900 00 01GB01...

Страница 2: ......

Страница 3: ......

Страница 4: ......

Страница 5: ...sage outside of these parameters is deemed to be improper usage The manufacturer accepts no responsibility for damage resulting from such usage and the risks are to be borne solely by the user Within...

Страница 6: ...should be kept clean to prevent the risk of fire Check the immediate surroundings before driving off and putting the machine into operation Beware of children Ensure that you have sufficient visibili...

Страница 7: ...ent is at a complete standstill Before leaving the tractor lower the implement to the ground switch off the engine and remove the ignition key Do not allow anyone to stand between the tractor and the...

Страница 8: ...implements Only use the drive shafts specified by the manufacturer A pipe shield and protective bell must be mounted on the drive shaft as well as a PTO guard also possible on the implement and must b...

Страница 9: ...er the stump of the PTO with a protective cover after dismounting the drive shaft Any damage which may arise should be repaired immediately Never work with a damaged implement 2 4 Hydraulic Equipment...

Страница 10: ...arked and cannot run away wheel chocks Fitting tyres requires having sufficient training and the correct fitting tools Wheel and tyre repairs may only be performed by qualified staff using the correct...

Страница 11: ...onal Hints and Tips Mechanical Seed Drills Danger Beware of rotating and oscillating machine parts when performing a calibration test Only use the tread plates for filling purposes Riding on the machi...

Страница 12: ......

Страница 13: ...n of the warning notices Voiding of guarantee This plough is designed and built exclusively for normal agricultural use Use for any other purpose will be regarded as unauthorised operation and no liab...

Страница 14: ...5 118 160 1365 1725 1645 133 180 80 75 80 100 35 40 45 50 Raven 2300 Raven Avant 2300 Raven HydroAvant 2300 1585 140 190 1505 1880 1805 155 210 1725 2080 170 230 80 75 80 93 33 37 42 47 Raven 2300 M R...

Страница 15: ...carry out adjustment or maintenance tasks before first lowering the unit on the ground Use the correct tools and wear suitable protective gloves when fitting parts with cutting edges When working alo...

Страница 16: ...of the tractor lift and the second hose to the single acting spool valve In this case an additional single action spool valve is required for a hydraulically operated pick up arm for furrow press oper...

Страница 17: ...lough is in a correct vertical alignment Dimension C depends along with other items on the inner clearance between the tyres A and furrow width per body B If no model specific furrow width is shown in...

Страница 18: ...during work This improves also faster penetration of the plough at the start of a furrow Depth wheel If the plough is fitted with a depth wheel or transport depth wheel combi wheel this is not brought...

Страница 19: ...mit stop sleeve 14 2 with the spanner provided 14 3 Secure with screw 14 4 in groove Shorten turnbuckle cylinder Three point linkage creeps towards ploughed side Extend turnbuckle cylinder Three point...

Страница 20: ...ket must be shifted as well 17 18 at the same pattern Every time the working width is changed realignment of the draft and front furrow width is absolutely necessary Refer to Preliminary adjustment pa...

Страница 21: ...of the trash board should be resting on the mould board There are slotted holes provided at the holder bracket for height adjustment Subsoilers Due to stability problems it is not permitted to store...

Страница 22: ...ver 29 2 and limit stop 29 3 In extremely heavy but stone free ground the Avant reset device can be blocked with a special locking device 29 4 available as accessory Shear bolt overload protection All...

Страница 23: ...ansporting with Combi wheel combination of depth and transport wheel Raise plough slightly Withdraw pin 30 1 turn wheel slightly along the vertical axis and secure by inserting in hole 30 3 Fix in pla...

Страница 24: ...screws 3 13 guide rails 33 2 spindle bearings 33 3 centre pin 33 4 pivot pins on angling ram 33 5 hydraulic furrow press arm disc coulters and depth combi wheel When used on very stony soil lubricate...

Страница 25: ...frog of the plough body begins to wear away When using shares with bolt on points reverse the tip first and then move forward Use ONLY original RABE parts and components and new original bolts and nu...

Страница 26: ...ficial permission No part may protrude from the machine in such a way as to endanger traffic more than that which is unavoidable 32 German Road TrafficAct If the protrusion of components cannot be avo...

Страница 27: ...t Enter filling platform only when the machine is not in motion 9998 02 56 4 Folding wings Keep away Keep clear and do not enter danger area When extending take care of sufficient space 9998 02 53 5 P...

Страница 28: ...tary harrow Use safe lifting gear and fit straps only on hooks provided 9998 02 57 9 Danger of Life by load from top For lifting seed drills use only straps No chains Fit straps on divider plate insid...

Страница 29: ...14 Never open or remove any safety guards when the unit is running Keep away 9998 02 64 15 Danger of Life by load from top Lift with empty hopper only and never with rotary harrow or any other implem...

Страница 30: ...ar The maximum rotational frequency of the PTO shaft must not exceed 1000 min 9998 02 80 22 Before uncoupling or parking an implement se cure with wheel chocks to prevent rolling 9998 02 83 23 Stop co...

Страница 31: ...Technical data subject to change 25 Safety catch for road transportation on combi wheel Disengage safety catch before working in the field 9998 02 88 9998 02 88...

Отзывы: