background image

User’s Manual

73

6.4.2  How to Set Up your Computer for Direct Connect

Follow these instructions to set up your PC or notebook. Check with your administrator if 
you are unable to change the settings as described here since you may need administrator 
privileges. The instructions are specifically for Windows 2000, but the interface is similar 
for other versions of Windows.

TIP:

If you are using a PC that is already on a network, you will disconnect the PC from 

that network to run these sample programs. Write down the existing settings before 
changing them to facilitate restoring them when you are finished with the sample pro-
grams and reconnect your PC to the network.

1. Go to the control panel (

Start > Settings > Control Panel

), and then double-click the 

Network icon.

2. Select the network interface card used for the Ethernet interface you intend to use (e.g., 

TCP/IP Xircom Credit Card Network Adapter

) and click on the “Properties” button. 

Depending on which version of Windows your PC is running, you may have to select 
the “Local Area Connection” first, and then click on the “Properties” button to bring up 
the Ethernet interface dialog. Then “Configure” your interface card for a “10Base-T 
Half-Duplex” or an “Auto-Negotiation” connection on the “Advanced” tab.

NOTE:

Your network interface card will likely have a different name.

3. Now select the 

IP Address

 tab, and check 

Specify an IP Address

, or select TCP/IP and 

click on “Properties” to assign an IP address to your computer (this will disable “obtain 
an IP address automatically”):

IP Address : 10.10.6.101

Netmask : 255.255.255.0

Default gateway : 10.10.6.1

4. Click 

<OK>

 or 

<Close>

 to exit the various dialog boxes.

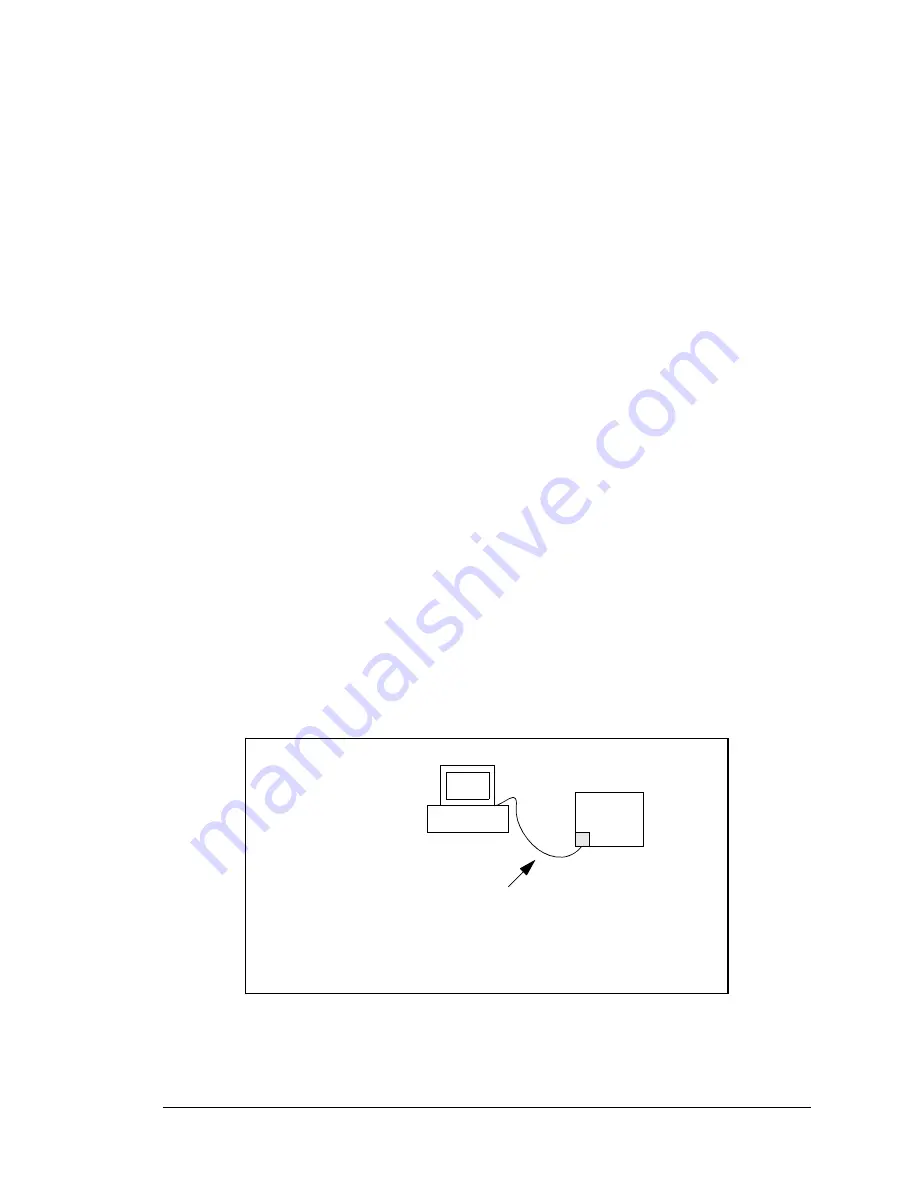
RCM4000

User’s PC

Ethernet
crossover 
cable

IP 10.10.6.101
Netmask
255.255.255.0


Direct Connection PC to RCM4000 Module

System

Содержание RabbitCore RCM4000

Страница 1: ...RabbitCore RCM4000 C Programmable Analog Core Module with Ethernet User s Manual 019 0157 060501 A...

Страница 2: ...M4000 User s Manual Part Number 019 0157 060501 A Printed in U S A 2006 Rabbit Semiconductor All rights reserved Rabbit Semiconductor reserves the right to make changes and improvements to its product...

Страница 3: ...2 Troubleshooting 12 2 4 Where Do I Go From Here 13 2 4 1 Technical Support 13 Chapter 3 Running Sample Programs 15 3 1 Introduction 15 3 2 Sample Programs 16 3 2 1 Use of NAND Flash RCM4000 only 18 3...

Страница 4: ...rk 70 6 4 Running TCP IP Sample Programs 71 6 4 1 How to Set IP Addresses in the Sample Programs 72 6 4 2 How to Set Up your Computer for Direct Connect 73 6 5 Run the PINGME C Sample Program 74 6 6 R...

Страница 5: ...cation 103 B 4 4 1 RS 232 104 B 5 Prototyping Board Jumper Configurations 105 Appendix C Power Supply 109 C 1 Power Supplies 109 C 1 1 Battery Backup Circuits 109 C 1 2 Reset Generator 110 Notice to U...

Страница 6: ...RabbitCore RCM4100...

Страница 7: ...his Develop ment Kit also contains a Prototyping Board that will allow you to evaluate the RCM4000 and to prototype circuits that interface to the RCM4000 module You will also be able to write and tes...

Страница 8: ...C FAT File System module Real time clock Watchdog supervisor There are two RCM4000 production models Table 1 summarizes their main features The RCM4000 is programmed over a standard PC serial port th...

Страница 9: ...mpared with the alternative of purchasing and assembling individual components Easy C language program development and debugging Rabbit Field Utility to download compiled Dynamic C bin files and cloni...

Страница 10: ...for use on the Prototyping Board Rabbit 4000 Processor Easy Reference poster Registration card Installing Dynamic C Insert the CD from the Development Kit in your PC s CD ROM drive If the installatio...

Страница 11: ...technical support module is also available for purchase Visit our Web site at www rabbit com or contact your Rabbit Semiconductor sales representative or authorized distributor for further informatio...

Страница 12: ...6 RabbitCore RCM4000...

Страница 13: ...llation program will guide you through the installation process Most steps of the process are self explanatory Dynamic C uses a COM serial port to communicate with the target development system The in...

Страница 14: ...X11 C X 39 UX30 UX10 UX12 UX14 UX16 RX79 C X 29 C X 17 RX67 U X 45 R X 85 GND GND GND 1 R24 R22 R21 R23 CX23 RX77 1 R 27 R 28 JP25 CX25 RX75 RX73 CX27 DS3 S3 S2 DS2 J3 UX49 UX4 UX47 5 V GND 3 3 V RCM1...

Страница 15: ...R23 CX23 RX77 1 R27 R28 JP25 CX25 RX75 RX73 CX27 DS3 S3 S2 DS2 J3 UX49 UX4 UX47 5 V GND 3 3 V RCM1 U2 RST_OUT IOWR VBAT EXT PA1 PA3 PA5 PA7 PB1 PB3 PB5 PB7 PC1 PC3 PC5 PC7 PE1 PE3 PE5 PE7 PD1 LN1 PD3...

Страница 16: ...3 3 V J2 R2 BT1 1 S1 RESET RXD TXD TXC RXC GND J4 UX29 RX81 RX87 CX41 RX83 RX11 CX39 UX30 UX10 UX12 UX14 UX16 RX79 CX29 CX17 RX67 UX45 RX85 GND GND GND 1 R24 R22 R21 R23 CX23 RX77 1 R27 R28 JP25 CX25...

Страница 17: ...d either edge pin is ground Plug in the AC adapter The PWR LED on the Prototyping Board next to the power con nector at J1 should light up The RCM4000 and the Prototyping Board are now ready to be use...

Страница 18: ...s Communications menu Select a slower Max download baud rate If a program compiles and loads but then loses target communication before you can begin debugging it is possible that your PC cannot handl...

Страница 19: ...oard For advanced development topics refer to the Dynamic C User s Manual also in the online documentation set 2 4 1 Technical Support NOTE If you purchased your RCM4000 through a distributor or throu...

Страница 20: ...14 RabbitCore RCM4000...

Страница 21: ...of the Dynamic C User s Manual for a sug gested reading list In order to run the sample programs discussed in this chapter and elsewhere in this manual 1 Your module must be plugged in to the Prototy...

Страница 22: ...the Dynamic C STDIO window Press 2 or 3 on your keyboard to select LED DS2 or DS3 on the Prototyping Board Then follow the prompt in the Dynamic C STDIO window to turn the LED ON or OFF A logic low w...

Страница 23: ...he battery backed onchip encryption RAM and how to enable a visual indicator Once this sample is compiled running you have pressed the F9 key while the sample program is open remove the programming ca...

Страница 24: ...You may ignore the error message NFLASH_INSPECT c This program is a utility for inspecting the contents of a NAND flash chip When the sample program starts running it attempts to communi cate with th...

Страница 25: ...d administrator privileges The instructions are specifically for Windows 2000 but the interface is similar for other versions of Windows TIP If you are using a PC that is already on a network you will...

Страница 26: ...r board then with the programming cable attached to the other module run the sample program PARITY C This program demonstrates the use of parity modes by repeatedly sending byte values 0 127 from Seri...

Страница 27: ...the module is operating in the Run mode Connect TxC TxD and GND on the sending board to RxC RxD and GND on the other board then with the programming cable attached to the other module run the sample...

Страница 28: ...le ended inputs The program will continuously display the voltage averaged over 10 samples that is present on the A D converter channels except LN7 Coefficients are read from the simulated EEPROM in t...

Страница 29: ...complete physical and electrical specifications Figure 5 shows the Rabbit based subsystems designed into the RCM4000 Figure 5 RCM4000 Subsystems 32 kHz osc RabbitCore Module RABBIT 4000 CMOS level sig...

Страница 30: ...der with a nominal 1 27 mm pitch Note These pinouts are as seen on the Bottom Side of the module 3 3 V_IN RESET_OUT IOWR VBAT_EXT PA1 PA3 PA5 PA7 PB1 PB3 PB5 PB7 PC1 PC3 PC5 PC7 PE1 PE3 PE5 SMODE0 PE7...

Страница 31: ...s the Rabbit 4000 factory defaults and the alternate configurations RABBIT 4000 Port A Port B Port D Port E PA0 PA7 PB2 PB7 PE0 PE7 PD0 PD7 RESET_OUT IOWR STATUS SMODE0 SMODE1 Watchdog 11 Timers Clock...

Страница 32: ...A 0 7 Input Output Slave port data bus SD7 SD1 External I O data bus ID7 ID1 16 PB0 Input Output SCLKB External I O Address IA6 CLKB used by RCM4000 A D converter 17 PB1 Input Output SCLKA External I...

Страница 33: ...CLKD Input Capture 28 PC4 Input Output TXB I O Strobe I4 PWM0 TCLKE Serial Port B used by RCM4000 A D converter 29 PC5 Input Output RXB TXB I O Strobe I5 PWM1 RCLKE Input Capture 30 PC6 Input Output T...

Страница 34: ...PE4 Input Output I O Strobe I4 A0 INT0 PWM0 TCLKE 37 PE5 SMODE0 Input Output I O Strobe I5 INT1 PWM1 RXB RCLKE Input Capture SMODE0 is the default configuration 38 PE6 SMODE1 Input Output I O Strobe...

Страница 35: ...l Ports D and E as specified in Table 2 may be used for input capture quadrature decoder DMA and pulse width modulator purposes 4 1 2 Other Inputs and Outputs The status and the two SMODE pins SMODE0...

Страница 36: ...is operating in the Run Mode Serial Port B is used by the A D converter and is not available for other use off the RCM4000 but is available on the RCM4010 Serial Ports C and D can also be operated in...

Страница 37: ...reverse to the order used here Figure 8 RJ 45 Ethernet Port Pinout Two LEDs are placed next to the RJ 45 Ethernet jack one to indicate an Ethernet link LINK and one to indicate Ethernet activity ACT T...

Страница 38: ...clock line usable as a general CMOS I O pin The programming port may also be used as a serial port via the DIAG connector on the programming cable In addition to Serial Port A the Rabbit 4000 startup...

Страница 39: ...RXD TXD TXC RXC GND J4 UX29 RX81 RX87 CX41 RX83 RX11 CX39 UX30 UX10 UX12 UX14 UX16 RX79 CX29 CX17 RX67 UX45 RX85 GND GND GND 1 R24 R22 R21 R23 CX23 RX77 1 R27 R28 JP25 CX25 RX75 RX73 CX27 DS3 S3 S2 DS...

Страница 40: ...nnector and reset the RCM4000 The RCM4000 may be reset by removing then reapplying power or by pressing the RESET button on the Prototyping Board The RCM4000 module may now be removed from the Prototy...

Страница 41: ...of a higher current draw The R0 resistors would then be 180 k to 900 k for a 10 1 attenuator The capacitor filters noise pulses on the A D converter input The actual voltage range for a signal going...

Страница 42: ...output current capability The internal buffer can source up to 20 mA and sink only up to 20 A Use a separate buffer amplifier if you need to supply any load current The A D converter s CONVERT pin is...

Страница 43: ...is isolated from digital noise generated by other components by way of a low pass filter composed of C1 L1 and C3 on the RCM4000 as shown in Figure 13 The V analog power supply powers the A D converte...

Страница 44: ...stronger setting The means for doing so is through a simple global macro as shown below NOTE Refer to the Rabbit 4000 Microprocessor User s Manual for more information on the spectrum spreading settin...

Страница 45: ...h differs from parallel NOR flash the type of flash memory used to store program code on Rabbit based boards and RabbitCore modules currently in production in two respects First the NAND flash require...

Страница 46: ...40 RabbitCore RCM4000...

Страница 47: ...ked data SRAM on the RCM4000 module but should be run from the program execution SRAM after the serial programming cable is disconnected Your final code must always be stored in flash memory for relia...

Страница 48: ...ard debugging features X Breakpoints Set breakpoints that can disable interrupts X Single stepping Step into or over functions at a source or machine code level C OS II aware X Code disassembly The di...

Страница 49: ...y transmission gaps or with user defined special characters Both libraries provide blocking functions which do not return until they are finished transmitting or receiving and nonblocking functions wh...

Страница 50: ...any protected variables The bbram keyword may also be used instead if there is a need to store a variable in battery backed SRAM without affecting the performance of the application program Data inte...

Страница 51: ...an A D converter Other generic functions applicable to all devices based on Rabbit microprocessors are described in the Dynamic C Function Reference Manual 5 2 4 1 Board Initialization Call this funct...

Страница 52: ...digital input for a set value or until a timeout occurs The RCM4000 will be in a low power mode during this time Once a timeout occurs or the correct byte is received this function call will enable th...

Страница 53: ...LN6 Input AIN6 LN7 Input AIN7 RESET Input Board reset device RISE FALL Input Pulled up for SCLK active on rising edge PIO0 Input Pulled down PIO1 Input Pulled down PIO2 Input Pulled down PIO3 Input Pu...

Страница 54: ...e registers addressed by the instruction byte Enter 0 if you are performing a read operation For example i anaInConfig 0x07 0x3b 0 write ref osc reg and enable baud is the serial clock transfer rate o...

Страница 55: ...D6 D4 Gain Code D3 D0 Channel Code Use the following calculation and the tables below to determine cmd cmd 0x80 gain_code 16 channel_code len the output bit length is always 12 for 11 bit conversions...

Страница 56: ...TURN VALUE A value corresponding to the voltage on the analog input channel 0 2047 for 11 bit conversions bit 12 for sign 1 overflow or out of range 2 conversion incomplete busy bit timeout SEE ALSO a...

Страница 57: ...VALUE A value corresponding to the voltage on the analog input channel 0 2047 for 11 bit A D conversions bit 12 for sign ADOVERFLOW defined macro 4096 if overflow or out of range ADTIMEOUT defined mac...

Страница 58: ...LN0_IN to LN7_IN opmode is the mode of operation SINGLE single ended input DIFF differential input mAMP milliamp input gaincode is the gain code of 0 to 7 int anaInCalib int channel int opmode int ga...

Страница 59: ...channel value 0 to 20 V or 4 to 20 mA value2 is the second A D converter channel raw count value volts2 is the voltage or current corresponding to the first A D converter channel value 0 to 20 V or 4...

Страница 60: ...range ADTIMEOUT defined macro 4095 if conversion is incomplete or busy bit timeout SEE ALSO anaInCalib anaIn anaInmAmps brdInit float anaInVolts unsigned int channel unsigned int gaincode Channel Code...

Страница 61: ...acro 4096 if overflow or out of range ADTIMEOUT defined macro 4095 if conversion is incomplete or busy bit timeout SEE ALSO anaInCalib anaIn anaInmAmps brdInit float anaInDiff unsigned int channel uns...

Страница 62: ...0 and 20 00 mA corresponding to the current on the analog input channel ADOVERFLOW defined macro 4096 if overflow or out of range ADTIMEOUT defined macro 4095 if conversion is incomplete or busy bit t...

Страница 63: ..._CALIB_ADDRM address start of milliamp analog input channels NOTE This function cannot be run in RAM PARAMETER channel is the analog input channel number 0 to 7 corresponding to LN0_IN to LN7_IN opmod...

Страница 64: ...parameter is ignored when channel is ALLCHAN RETURN VALUE 0 if successful 1 if address is invalid or out of range SEE ALSO anaInEEWr anaInCalib Gain Code Voltage Range V Applies to Prototyping Board...

Страница 65: ...address start of milliamp analog input channels NOTE This function cannot be run in RAM PARAMETER channel is the analog input channel number 0 to 7 corresponding to LN0_IN to LN7_IN opmode is the mod...

Страница 66: ...parameter is ignored when channel is ALLCHAN RETURN VALUE 0 if successful 1 if address is invalid or out of range SEE ALSO anaInEEWr anaInCalib Gain Code Voltage Range V Applies to Prototyping Board...

Страница 67: ...g the popular C OS II real time operating system as well as PPP Advanced Encryption Standard AES FAT file system RabbitWeb and other select libraries NOTE Version 2 10 or later of the Dynamic C FAT fi...

Страница 68: ...62 RabbitCore RCM4000...

Страница 69: ...at least a 10Base T Ethernet card available from your favorite computer supplier installed in a PC Two RJ 45 straight through Ethernet cables and a hub or an RJ 45 crossover Ethernet cable Figure 14 s...

Страница 70: ...t 10Base T hub and connect both the PC s network interface card and the RCM4000 module s Ethernet port to it using standard network cables The following options require more care in address selection...

Страница 71: ...network A similar situation will take place if you use a dial up line to send a packet to the Internet Windows may try to send it via the local Ethernet network if it is also valid for that network T...

Страница 72: ...o run the sample programs with out having to setup a direct connection between your computer and the RCM4000 You will also need the IP address of the nameserver the name or IP address of your mail ser...

Страница 73: ...he same form as the IP address An example netmask is 255 255 255 0 This netmask has 8 zero bits in the least significant portion and this means that 28 addresses are a part of the local network Applie...

Страница 74: ...ce with the desired IP address to answer with its MAC address In this way the table entry can be filled in If no device answers then the device is nonexistent or inoperative and the packet cannot be s...

Страница 75: ...net These addresses can be used to perform some Internet tasks such as sending e mail or browsing the Web but it is more difficult to participate in conversations that originate elsewhere on the Inter...

Страница 76: ...usually work by disallowing traffic that did not originate from inside the net work If you want users on the Internet to communicate with your RCM4000 you have several options You can either place th...

Страница 77: ...ou to connect your PC and the RCM4000 module together on the same network This network can be a local private net work preferred for initial experimentation and debugging or a connection via the Inter...

Страница 78: ...o 255 255 255 0 and the nameserver and gateway to 10 10 6 1 If you would like to change the default values for example to use an IP address of 10 1 1 2 for the RCM4000 module and 10 1 1 1 for your PC...

Страница 79: ...work interface card used for the Ethernet interface you intend to use e g TCP IP Xircom Credit Card Network Adapter and click on the Properties button Depending on which version of Windows your PC is...

Страница 80: ...e transfer of data The ping routine will ping the module four times and write a summary message on the screen describing the operation 6 6 Running Additional Sample Programs With Direct Connect The fo...

Страница 81: ...ith Dynamic C Check the Rabbit Semiconductor Z World Technical Bulletin Board at www rabbit com support bb Use the Technical Support e mail form at www rabbit com support If the sample programs ran fi...

Страница 82: ...76 RabbitCore RCM4000...

Страница 83: ...User s Manual 77 APPENDIX A RCM4000 SPECIFICATIONS Appendix A provides the specifications for the RCM4000 and describes the conformal coating...

Страница 84: ...dia 3 2 R34 C8 C7 C9 C12 C14 L6 L7 C15 C11 L5 L4 R20 J2 C41 R35 DS1 DS2 R37 R36 ACT LINK C72 Y3 C71 U17 C66 R46 U18 R47 C53 C54 C52 C51 C50 C49 C47 C48 U7 C42 C43 U6 C34 C35 Y1 U5 R25 C33 R24 C20 Q1...

Страница 85: ...s incorporated into an assembly that includes other printed circuit boards An exclusion zone of 0 08 2 mm is recom mended below the RCM4000 when the RCM4000 is plugged into another assembly Figure A 2...

Страница 86: ...ode reset in Additional Outputs Status reset out analog VREF Status reset out Analog Inputs 8 channels single ended or 4 channels differential Programmable gain 1 2 4 5 8 10 16 and 20 V V A D Converte...

Страница 87: ...t Capture 2 channel input capture can be used to time input signals from various port pins Quadrature Decoder 2 channel quadrature decoder accepts inputs from external incremental encoder modules Powe...

Страница 88: ...Characteristics Input Capacitance Input Impedance Common Mode Differential Mode 4 9 7 pF 6 M 7 M Static Accuracy Resolution Single Ended Mode Differential Mode Integral Linearity Differential Lineari...

Страница 89: ...spacing J1 the programming port is a 2 5 header with a 1 27 mm pin spacing Figure A 3 shows the layout of another board for the RCM4000 to be plugged into These reference design values are relative t...

Страница 90: ...rom TA 40 C to 85 C VDDIO 3 0 V to 3 6 V Table A 3 Rabbit 4000 Absolute Maximum Ratings Symbol Parameter Maximum Rating TA Operating Temperature 40 to 85 C TS Storage Temperature 55 to 125 C VIH Maxim...

Страница 91: ...ces Table A 5 lists the capacitance for the various RCM4000 I O ports Table A 6 lists the external capacitive bus loading for the various RCM4000 output ports Be sure to add the loads for the devices...

Страница 92: ...NOTE IOCSx can be programmed to be active low default or active high Tadr Tadr External I O Read no extra wait states CLK A 15 0 External I O Write no extra wait states CLK A 15 0 IORD valid T1 Tw T1...

Страница 93: ...rum spreader is enabled with the clock doubler every other clock cycle is shortened sometimes lengthened by a maximum amount given in the table above The shortening takes place by shortening the high...

Страница 94: ...dures for surface mounted components A new conformal coating should then be applied to offer continuing protection against the effects of moisture and contaminants NOTE For more information on conform...

Страница 95: ...tions NOTE The jumper connections are made using 0 surface mounted resistors Table A 9 RCM4000 Jumper Configurations Header Description Pins Connected Factory Default JP1 PE6 or SMODE1 Output on J3 1...

Страница 96: ...90 RabbitCore RCM4000...

Страница 97: ...Board and explains the use of the Prototyping Board to demonstrate the RCM4000 and to build prototypes of your own circuits The Prototyping Board has power supply connections and also provides some b...

Страница 98: ...X67 UX45 RX85 GND GND GND 1 R24 R22 R21 R23 CX23 RX77 1 R27 R28 JP25 CX25 RX75 RX73 CX27 DS3 S3 S2 DS2 J3 UX49 UX4 UX47 5 V GND 3 3 V RCM1 U2 RST_OUT IOWR VBAT EXT PA1 PA3 PA5 PA7 PB1 PB3 PB5 PB7 PC1...

Страница 99: ...are con nected to the PB4 and PB5 pins of the RCM4000 module and may be read as inputs by sample applications Two LEDs are connected to the PB2 and PB3 pins of the RCM4000 module and may be driven as...

Страница 100: ...pins to measure the current drawn from the 5 V supply Similarly you may cut the trace below header JP2 on the bottom side of the Prototyping Board and install a 1 2 header strip from the Development K...

Страница 101: ...PB3 PB5 PB7 PC1 PC3 PC5 PC7 PE1 PE3 PE5 PE7 PD1 LN1 PD3 LN3 PD5 LN5 PD7 LN7 VREF GND IORD RST_IN PA0 PA2 PA4 PA6 PB0 PB2 PB4 PB6 PC0 PC2 PC4 PC6 PE0 PE2 PE4 PE6 PD0 LN0 PD2 LN2 PD4 LN4 PD6 LN6 CVT AGN...

Страница 102: ...ply Table B 1 Prototyping Board Specifications Parameter Specification Board Size 3 80 3 80 0 48 97 mm 97 mm 12 mm Operating Temperature 0 C to 70 C Humidity 5 to 95 noncondensing Input Voltage 8 V to...

Страница 103: ...ader is included in the bag of parts RS 232 signals Serial Ports C and D are available on header J4 A header strip at J4 allows you to connect a ribbon cable and a ribbon cable to DB9 connector is inc...

Страница 104: ...around the prototyping area Table B 2 Use of Rabbit 4000 Signals on the Prototyping Board Pin Pin Name Prototyping Board Use 1 3 3 V 3 3 V power supply 2 GND 3 RST_OUT Reset output from reset generat...

Страница 105: ...current you will have to cut the trace on the bottom side of the Prototyping Board corresponding to the power supply or power supplies whose current draw you will be measuring Header loca tions JP1 an...

Страница 106: ...uts The A D converter chip can make either single ended or differential measurements depending on the value of the opmode parameter in the software function call Adjacent A D converter inputs are pair...

Страница 107: ...the software drivers to work with single ended negative voltages but the differential mode described below may be used to measure negative voltages Differential measurements require two channels As t...

Страница 108: ...e used in the application For example if you will be performing floating differential measurements or differential mea surements using a common analog ground then calibrate the A D converter in the co...

Страница 109: ...al Ports E and F can be used only with the RCM3400 Prototyping Board Serial Ports E and F may be used as serial ports or the corresponding pins at header loca tion J2 may be used as parallel ports Tab...

Страница 110: ...on trolOn function call from RS232 LIB where X is the serial port C or D The locations of the flow control lines are specified using a set of five macros SERX_RTS_PORT Data register for the parallel p...

Страница 111: ...pers or 0 surface mount resistors Table B 6 RCM3400 Prototyping Board Jumper Configurations Header Description Pins Connected Factory Default JP1 5 V Current Measurement 1 2 Via trace or jumper Connec...

Страница 112: ...er filter to RCM4000 1 2 Connected JP14 PB3 LED DS3 1 2 Connected PB3 to LED DS3 n c PB3 available on header J2 JP15 LN2 buffer filter to RCM4000 1 2 Connected JP16 PB4 Switch S2 1 2 Connected PB4 to...

Страница 113: ...JP13 JP15 JP17 and JP19 JP22 are made using 10 k surface mounted resistors JP23 LN4_IN LN6_IN 1 2 Tied to analog ground 2 3 Tied to VREF JP24 LN0_IN LN3_IN 1 2 Tied to analog ground 2 3 Tied to VREF...

Страница 114: ...108 RabbitCore RCM4000...

Страница 115: ...rcuits The RCM4000 does not have a battery but there is provision for a customer supplied bat tery to back up the data SRAM and keep the internal Rabbit 4000 real time clock running Header J2 shown in...

Страница 116: ...y components not on the RCM4000 and on the storage capacity of the battery The RCM4000 does not drain the battery while it is powered up normally C 1 2 Reset Generator The RCM4000 uses a reset generat...

Страница 117: ...ces can still conspire to result in damaging or dan gerous system failures Our products cannot be made perfect or near perfect without causing them to cost so much as to preclude any practical use thu...

Страница 118: ...112 RabbitCore RCM4000...

Страница 119: ...MODE0 29 32 SMODE1 29 32 software 43 dimensions Prototyping Board 95 RCM4000 78 Dynamic C 5 7 12 41 add on modules 7 61 installation 7 battery backed SRAM 43 COM port 12 libraries RCM40xx LIB 45 prote...

Страница 120: ...ess to RCM4000 analog inputs 93 adding components 99 dimensions 95 expansion area 93 features 92 93 jumper configurations 105 jumper locations 105 mounting RCM4000 9 pinout 97 power supply 96 prototyp...

Страница 121: ...anical and environmental 80 exclusion zone 79 header footprint 83 Prototyping Board 96 Rabbit 4000 DC characteris tics 84 Rabbit 4000 timing dia gram 86 relative pin 1 locations 83 spectrum spreader 8...

Страница 122: ...116 RabbitCore RCM4000...

Страница 123: ...0128 Programming Cable Schematic www rabbit com documentation schemat 090 0128 pdf The schematics included with the printed manual were the latest revisions available at the time the manual was last...

Страница 124: ......

Отзывы: