background image

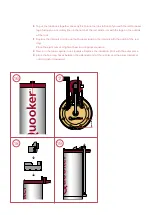
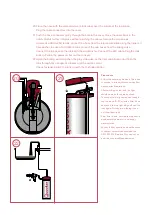
12   Type A internals: remove the transparent hose from the metal nozzle at the top. Clean scale 

from the inside of the nozzle, use the allen key to remove any blockages. Push the hose back 
onto the nozzle all the way. 

-  Type B internals: move to step 13.
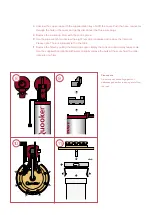
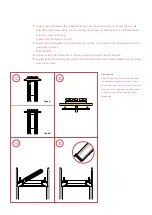
13   Remove the white gasket (G). Ensure that the surface of the plate is dry and clean and put the 

new gasket in place. 

-  Refit the filter. 
14  Ensure that the rim of the tank is clean by using the scraper and Scotchbrite. 
15   Dry the entire rim including the seams and bolts with paper towel, while holding the tank upside 

down at an angle.

12

14

13

15

G

Type A

Type B

Please note
Step 12 is only necessary if the flow from 
the tap was reduced. First check if you 
have a tank with type A or type B internals. 
Take care not to damage the  transparent 
or braided hose while removing scale 
blockages.

Содержание PRO3-VAQ E

Страница 1: ...Descaling the tank This guide shows how to descale PRO3 VAQ and PRO3 VAQ E tanks The descaling of COMBI and COMBI E tanks is similar and is also explained...

Страница 2: ...ide Go to www quooker co uk collection if you are not sure 2 By checking the serial number on your tank In case the serial number starts with 3 letters VCF or CCW for example you have an E tank Use th...

Страница 3: ...will flow out of it 5 Unplug the tank and disconnect the LED cable from the back of the tank 6 Disconnect the flexible hose between the tap and the tank by turning the nut anti clockwise use spanners...

Страница 4: ...h to unscrew the eight nuts anti clockwise and remove the internals Please note There is still water left in the tank 11 Remove the filter by pulling the metal clips apart Empty the tank and discard a...

Страница 5: ...in the nozzle all the way Type B internals move to step 13 13 Remove the white gasket G Ensure that the surface of the plate is dry and clean and put the new gasket in place Refit the filter 14 Ensure...

Страница 6: ...ide of the tank 17 Replace the internals and line up the Quooker logo on the internals with the notch of the red ring Place the eight nuts and tighten them in a diagonal sequence 18 Now turn the tank...

Страница 7: ...ing water tap then the grey stop valve on the inlet combination and flush the tank through for a couple of minutes until the water is clear Check for leaks Switch the tank on with the Q shaped button...

Страница 8: ...will flow out of it 5 Unplug the tank and disconnect the LED cable from the back of the tank 6 Disconnect the flexible hose between the tap and the tank by turning the nut anti clockwise use spanners...

Страница 9: ...s and remove the internals 11 Remove the filter by pulling the metal clips apart Empty the tank and discard loose scale from it Please note There is still water left in the tank Use the supplied Scotc...

Страница 10: ...dry and clean and put the new gasket in place Refit the filter 14 Ensure that the rim of the tank is clean by using the scraper and Scotchbrite 15 Dry the entire rim including the seams and bolts wit...

Страница 11: ...D cable Plug the tank back in Switch the power on but not the tank yet 18 Open the tap then open the stop valve on the inlet combination and flush the tank through Switch the tank on with the Q shaped...

Страница 12: ...UK 30 392 03 V06 Quooker UK Ltd Beaumont Buildings Great Ducie Street Manchester M3 1PQ UK 44 0 207 923 3355 info quooker co uk www quooker co uk...

Отзывы: