background image

5

1-888-QUIETCOOL

5. 

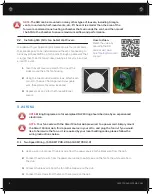
Cap the yellow wire from the Hub.

6. 

Ground the green wire from the fan and 
the green wire from the power cord to the 
ground screw in the Hub. 

7. 

Set the dip switch positions inside the 
Hub as shown in the Figure B. 

8. 

Power-on the Hub. The Power LED 
indicator will be lit.

9. 

Press the Test button to make sure the 
fan works. The Test LED indicator will 
blink three times every two seconds 
indicating 2-speed and the fan will be on 
high. Press the Test button again and the 
fan will switch to low speed and the Test 
LED indicator will blink once every two 
seconds. Press the Test button again and the fan should shut off and the LED will be off.

10. 

If the fan doesn’t operate as described in step 9, please check the dip switch postion/wiring. 

3.2  Three Speed Wiring - (AFG SMT ES-3.0)


1. 

Using a wire nut, connect the black wire from the power cord and the black wire from the fan to the black wire 
from the Hub.

2. 

Connect the white wire from the power cord and the white wire on the fan to the white wire from the Hub.

3. 

Connect the red wire from the fan to the red wire on the Hub

4. 

Connect the yellow wire from the fan to the yellow wire on the Hub

5. 

Connect the blue wire from the fan to  
the blue wire on the Hub

6. 

Ground the green wire from the fan and 
the green wire from the power cord to 
the ground screw in the Hub.

7. 

Set the dip switch positions inside the 
Hub as shown in Figure C.

8. 

Power-on the Hub. The Power LED 
indicator will be lit.

9. 

Press the Test button to make sure the 
fan works. The Test LED indicator will 
blink three times every two seconds 
indicating 3-speed and the fan will be on 
high. Press the Test button again and the 
fan will switch to medium speed and the 
LED will blink twice every two seconds. 
Press the Test button again and the fan 
will switch to low speed and the LED will blink once every two seconds. Press the Test button again and the fan 
should shut off and the LED will be off.

10. 

If the fan doesn’t operate as described in step 9, please check the dip switch postion/wiring.


Power
Cord

Attach green ground wires to ground screw

All White Common Wires Together

POWER           TIMER

PAIR

 TEST

Set dip switches: 

1 - OFF

2 - ON

3 - OFF

Attic Fan

ON

1 2 3

Power
Cord

Attach green ground wires to ground screw

All White Common Wires Together

POWER           TIMER

PAIR

 TEST

Set dip switches: 

1 - OFF

2 - ON

3 - OFF

Attic Fan

ON

1 2 3

Figure B

Figure C

Attach green ground wires to ground screw

POWER           TIMER

PAIR

 TEST

Set dip switches: 

1 - OFF

2 - OFF

3 - ON

Power
Cord

All White Common Wires Together

Attic Fan

ON

1 2 3

Attach green ground wires to ground screw

POWER           TIMER

PAIR

 TEST

Set dip switches: 

1 - OFF

2 - OFF

3 - ON

Power
Cord

All White Common Wires Together

Attic Fan

ON

1 2 3

Содержание AFG Series

Страница 1: ...TCOOL DIFFERENCE ADVANCED WHOLE HOUSE FANS THE NATURAL CHOICE FOR ENERGY SAVINGS OWNER S GUIDE SMART ATTIC FAN GABLE DO NOT THROW AWAY SERIAL NUMBER FOR FAN IS LOCATED ON BACK COVER OF OWNER S GUIDE R...

Страница 2: ...personnel should service the QuietCool system The user should not attempt to service the product 7 Building Codes Always follow Local Building Codes when installing appliances CONTENTS 1 SYSTEM OVERV...

Страница 3: ...ontrol all the settings of your Smart Attic Fan right from your couch With the QuietCool Smart Control App you can see your current attic temperature modify the temperatures for the multiple speeds of...

Страница 4: ...y or effectively as it could with 1 750 attic venting But don t worry the system will still operate if there is not enough venting Insufficient venting is a very simple problem to fix Roofing contract...

Страница 5: ...sible for all applications Wide Mount The AFG can be mounted on a wide louver but additional mounting steps must be taken in order for the fan to work properly As shown in Figure 2 1B two additional b...

Страница 6: ...o the wood framing around your gable vent See picture for screw locations 3 Repeat step 1 and 2 for the three additional covers 3 WIRING NOTE Wiring Diagrams are for examples ONLY Wiring should be don...

Страница 7: ...n wire from the fan and the green wire from the power cord to the ground screw in the Hub 7 Set the dip switch positions inside the Hub as shown in Figure C 8 Power on the Hub The Power LED indicator...

Страница 8: ...ink three times every 2 seconds on HIGH blink once every 2 seconds on LOW Three Speed Fan blink three times every 2 seconds on HIGH blink twice every 2 seconds on MED blink once every 2 seconds on LOW...

Страница 9: ...an to turn off For example if it is set at 90 the fan will turn off if the humidity in the attic is 90 or higher Turn Fan On This is the humidity percentage that will cause the fan to turn on For exam...

Страница 10: ...erage household obstructions Why are all my lights blinking on the hub and nothing is working If you re experiencing blinking lights on all LED indicators on the hub then it is an indication that your...

Страница 11: ...hase C This warranty does not cover any of the following 1 Accidental or consequential damage resulting from the operation of our equipment or any malfunction thereof 2 Cost of service calls to diagno...

Страница 12: ...ANS QuietCool is Proudly Designed and Built in California 43352 Business Park Drive Temecula CA 92590 PH 951 325 6340 QUIETCOOLSYSTEMS COM Fan Serial Number Information Retain for your records Serial...

Отзывы: