


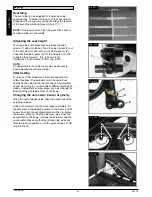


Wheel alignment
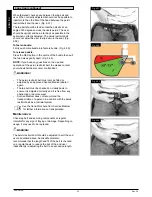
Adjusting the wheel alignment
NOTE:
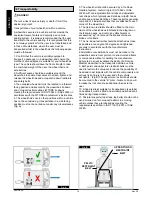
To achieve the very best movement, the rear wheels
must be adjusted to their optimum position. This means
correctly adjusting the wheel alignment. To do this, measure
[the distance between] both wheels front and rear to ensure
that they are parallel to one another. The difference between
both measurements should not exceed 5 mm. The parallel
setting can be adjusted by loosening the screws (1) and
rotating the axle adapter (2). When finished, make sure that all
screws have been properly tightened, (Fig. 6.32). See the page
on torque.
WARNING!
Be careful, there is a risk of tipping when adjusting the centre
of gravity of the seat!
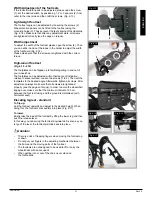
Adjusting the rear wheelbase width
The rear wheelbase is defined as the distance between the
upper side of the rear wheels and the backrest tubes and is
factory set (1.25 cm). This must be increased if more space is
to be created between the tyres and the optional height-
adjustable armrests.
NOTE:
When adjusting the rear wheelbase, set first one wheel
and then the other. When adjusting the rear wheelbase, move
the quick-release adapter (3) in a telescopic manner into the
axle bracket (2) or out of the camber tube. Loosen the screw
(1) on the rear axle bracket. Move the axle adapter in or out,
until the desired wheelbase is achieved. Tighten the screws to
7 Nm. Repeat the procedure on the right side of the wheelchair
and set the same gap on the left side (Fig. 6.32/6.33).
Please contact your approved repair service or authorized
dealer to check this adjustment
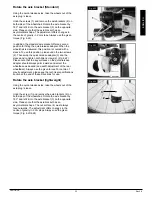
In General: Adjust or correct the eccentric bushing when the
folding performance or the rolling performance gets worse over
time (Fig. 6.34).
1.) Unscrew the both screws (1) on the left hand side and on
the right hand side as well
2.) Adjust respectively correct the eccentric bushing (2) with an
open-end wrench (size 26mm)
3.) Turn the eccentric bushing with the open-end wrench
60dree to the inside or to the outside. The position mark
(no. 3) helps you to find the right position.
4.) Tighten both screws (1) on each side of the chair
Fig. 30
Fig. 6.32
1
2
Fig. 6.33
1
2
3
Frame adjustment
Fig. 6.34
1
3
2
26
ENGLISH
Rev.3.0
XENON SA


