


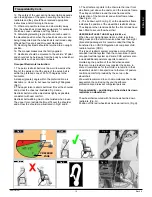


6.0 Quick Release Wheels
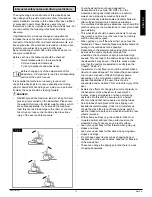
Quick-release axles on rear wheel
The rear wheels are equipped with quick-release axles.
The wheels can thus be installed or removed without
using tools. To remove a wheel, simply depress the quick-
release button on the axle and pull the wheel off the axle.
(Fig. 5.1).
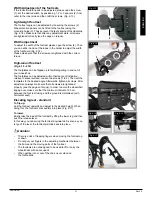
Quick release for quads/tetraplegics
Please flip up the release lever (1). The take out the quick
release axles and/or the wheels.
When the wheels/quick release axles have been put on
the chair again, please flip the release lever down.
Please do always ensure that the release mechanism is
closed and fully locked before starting to use the wheel
chair (Fig. 5.2).
CAUTION!
Hold the quick-release button on the axle depressed
when inserting the axle into the frame to mount the
rear wheels. Release the button to lock the axle in
place. The quick-release button should snap back to
its original position.
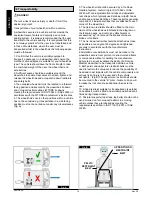
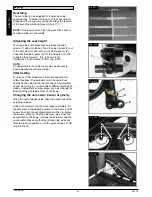
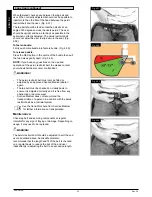
Step Tubes
Step tubes are used by attendants to push a wheelchair
over an obstacle. Simply step on the tube to push a
wheel chair, for example, over a kerb or step, (Fig. 6.1).
Wheel locks
CAUTION!
Braking power can be affected by incorrect fitting and
adjustment of the wheel locks, as well as tyre pressure
which is too low.
Wheel locks
Your wheelchair is equipped with two wheel locks. They
are applied directly against the tyres. To engage, press
both wheel-lock levers forward against the stops. To
release the wheel, pull the levers back to their original
positions.
Braking power will decrease with:
•
Worn tyre tread
•
Tyre pressure that is too low
•
Wet tyres
•
Improperly adjusted wheel locks.
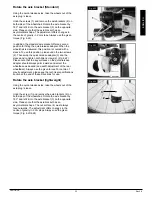
The wheel locks have not been designed to be used as
brakes for a moving wheelchair. The wheel locks should
therefore never be used to brake a moving wheelchair.
Always use the handrims for braking. Make sure that the
interval between the tyres and wheel locks complies with
given specifications. To readjust, loosen the screw and set
the appropriate gap. Then re-tighten the screw
(Fig. 6.2 and 6.3).
3.0 mm
Fig. 6.3
Fig. 6.2
Fig. 6.1
Fig. 5.1
7.0 Options
CAUTION!
After each adjustment of the rear wheels, check the wheel
lock gap and re-adjust if necessary.
Fig. 5.2
1
18
ENGLISH
Rev.3.0
XENON SA


